概要
はじめまして。初投稿です。
今回は組み込み Linux 初心者向けに、Arm® ターゲットの Linux 環境で使用されるデバイスツリーという仕組みを触ってみます。簡単な例という事で、CPU コアの数と RAM サイズの変更を試してみます。
※2020年12月14日 「回避策 - その2」を追記しました
もくじ
検証環境
-
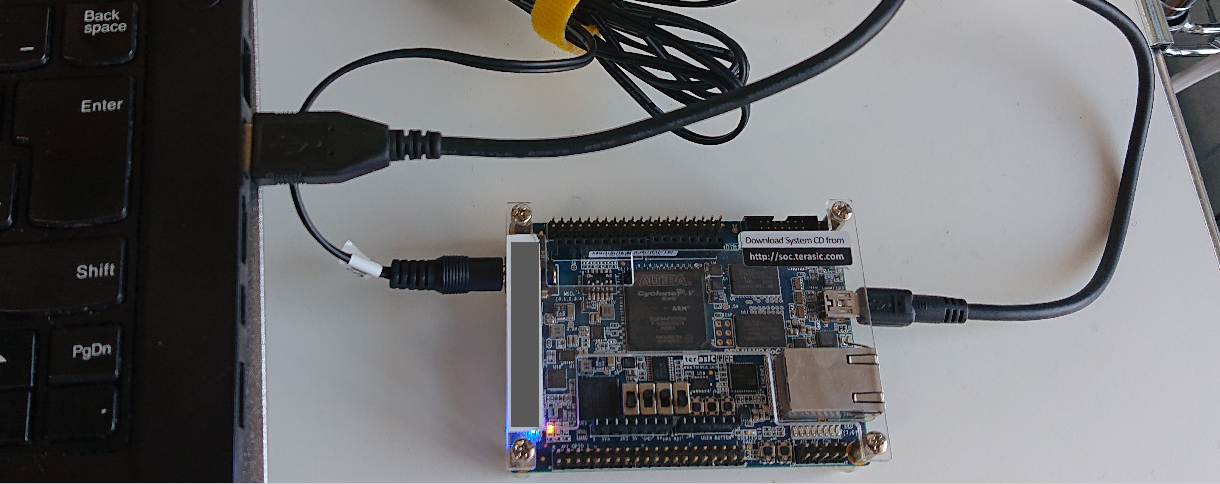
使用したボード:
Terasic 社の DE0-Nano-SoC Kit/Atlas-SoC Kit を使用しました。
(インテル® Cyclone® V SoC [Arm® Cortex®-A9 Dual], DDR 1GB 搭載)
-
ターゲットの Linux 環境:
以前に作成していた SD カードをそのまま使用。Kernel バージョンは 5.4.23-lts です。
(バージョン 4.x 以降の Kernel であれば同じ内容で対応できる筈です。) -
作業用パソコン環境:
Windows® 10 (64bit) バージョン 1803 の環境を使用しました。
Linux ログ確認用のターミナルと、デバイスツリーコンパイラー(dtc)が使えれば詳細は不問です。こちらでは Teraterm と SoC Embedded Development Suite (v20.1 Standard Edition) をインストールして対応しました。(Linux 系の開発作業は Linux OS で行うのが一般的ですが、今回は簡易編集という事で Windows を使用)
Linux 起動時のログ(CPUコア数、RAMサイズの確認)
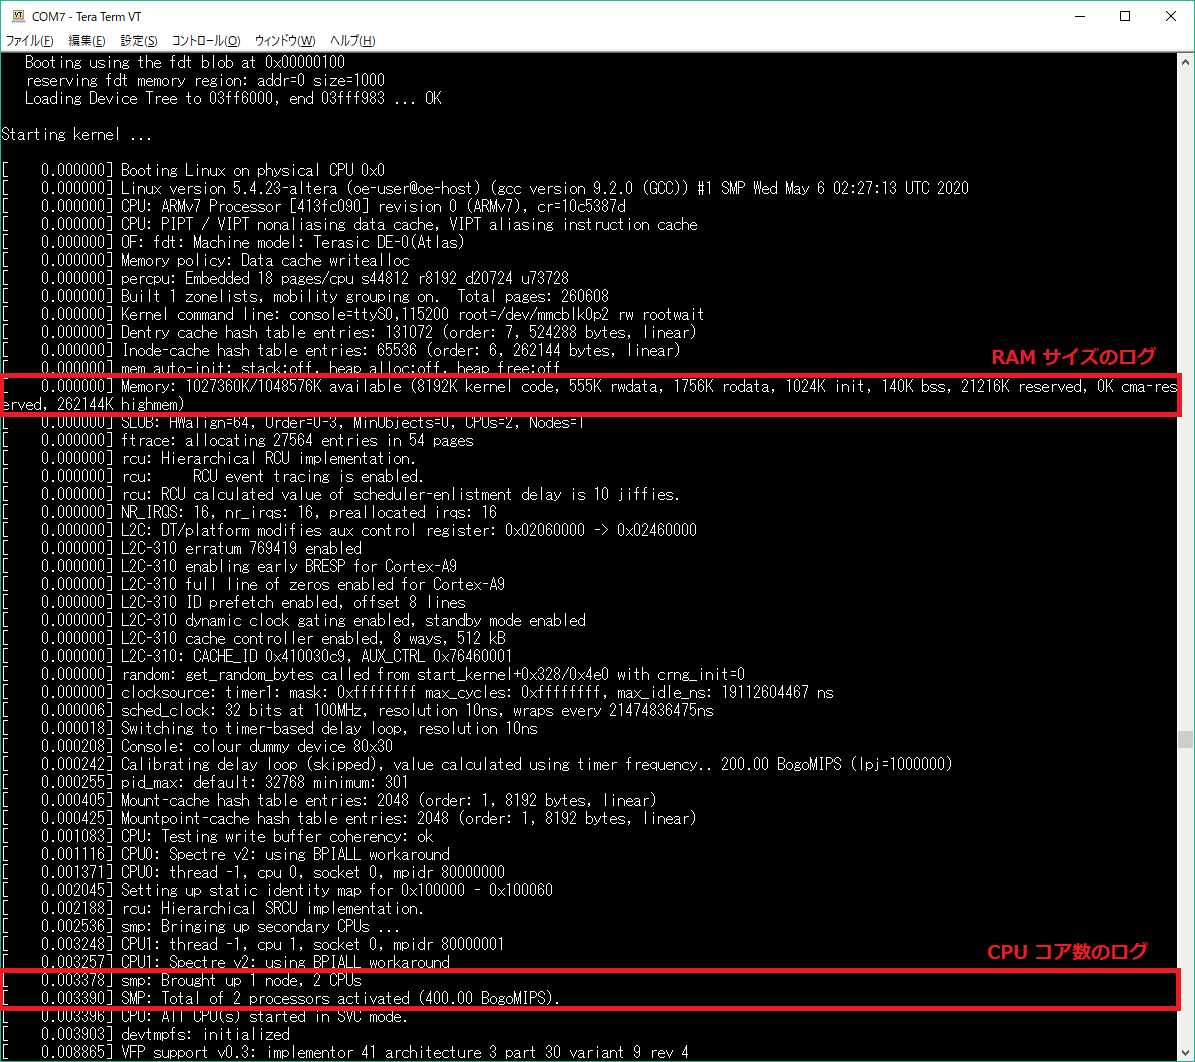
以下、Linux 起動開始直後のログです。表示される内容から CPU コア数と RAM サイズが確認できます。デバイスツリー編集前の環境では、ボードスペックと同じ RAM サイズ=1GB (1048576K available)、CPU コア数=2 (Total of 2 processors activated) が表示されています。
デバイスツリーの簡単な編集方法(dtc)
デバイスツリーは、拡張子 .dtb (デバイスツリーブロブ(バイナリー)) で SD カードの FAT パーティションに格納されています。今回は簡易編集という事でデバイスツリーコンパイラ(dtc)を使用して以下の手順で作業します。
-
デバイスツリーブロブ(.dtb)をソース(.dts)に変換
$ dtc -I dtb -O dts -o soc_system.dts soc_system.dtb -
デバイスツリーソースをテキスト編集
テキストエディターで記述を変更して保存します。 -
デバイスツリーソース(.dts)をブロブ(.dtb)に再変換
$ dtc -I dts -O dtb -o soc_system.dtb soc_system.dts
インテルの SoC FPGA 開発ツール(SoC EDS)に付属の Shell 環境であれば標準で dtc が使用できます。SD カードをパソコンのスロットへ装填後、Shell 上で FAT を認識しているディレクトリに移動した上で dtc コマンドを実行して対応しました。
ここからが本題:デバイスツリーの変更を試す
CPU コア数の変更
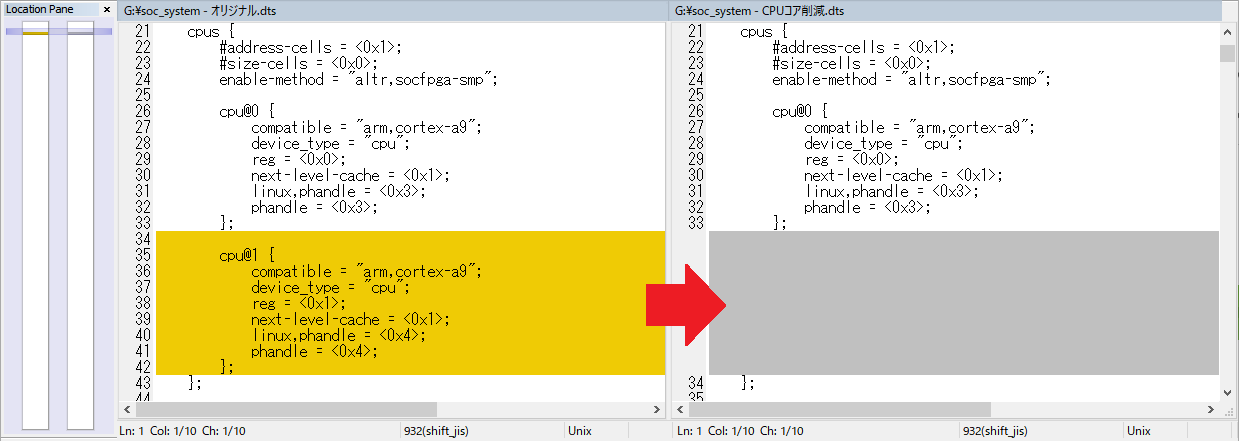
デバイスツリーに cpus {...} という記述があり、この中に 2 コア分の定義が記述されています。試しに以下のように 1 コア減らしてみましょう。
結果
[    0.001083] CPU: Testing write buffer coherency: ok
[    0.001116] CPU0: Spectre v2: using BPIALL workaround
[    0.001371] CPU0: thread -1, cpu 0, socket 0, mpidr 80000000
[    0.002045] Setting up static identity map for 0x100000 - 0x100060
[    0.002188] rcu: Hierarchical SRCU implementation.
[    0.002536] smp: Bringing up secondary CPUs ...
[    0.003248] CPU1: thread -1, cpu 1, socket 0, mpidr 80000001
[    0.003257] CPU1: Spectre v2: using BPIALL workaround
[    0.003378] smp: Brought up 1 node, 2 CPUs
[    0.003390] SMP: Total of 2 processors activated (400.00 BogoMIPS).
[    0.003396] CPU: All CPU(s) started in SVC mode.
[    0.001059] CPU: Testing write buffer coherency: ok
[    0.001091] CPU0: Spectre v2: using BPIALL workaround
[    0.001336] CPU0: thread -1, cpu 0, socket 0, mpidr 80000000
[    0.001867] Setting up static identity map for 0x100000 - 0x100060
[    0.002005] rcu: Hierarchical SRCU implementation.
[    0.002292] smp: Bringing up secondary CPUs ...
[    0.002303] smp: Brought up 1 node, 1 CPU
[    0.002312] SMP: Total of 1 processors activated (200.00 BogoMIPS).
[    0.002319] CPU: All CPU(s) started in SVC mode.
起動ログより、CPU コア数が 1 個になったことが確認できます。
RAM サイズの変更
デバイスツリーの中から device_type = "memory"; を含む記述を探します。この中に reg = <ベースアドレス, サイズ>; の指定がされているので、サイズ 1GB(0x40000000) を半分の 512MB(0x20000000) に削減してみましょう。

結果
[ 0.000000] Memory: 1027360K/1048576K available (8192K kernel code, 555K rwdata, 1756K rodata, 1024K init, 140K bss, 21216K reserved, 0K cma-reserved, 262144K highmem)
[ 0.000000] Memory: 1027360K/1048576K available (8192K kernel code, 555K rwdata, 1756K rodata, 1024K init, 140K bss, 21216K reserved, 0K cma-reserved, 262144K highmem)
なぜかサイズが変ってくれませんでした。。カーネルのコンフィギュレーション設定で変更できるかもしれませんが、標準の状態では搭載メモリサイズを識別してサイズを決定しているようです。
回避策:U-Boot でメモリサイズ指定
Linux には、デバイスツリーでの指定以外に、ブートローダー(U-Boot)から引数パラメータを受け取る仕組みが備わっています。このパラメータは bootargs という名前で管理されていて、指定内容は以下のように Linux の起動ログにも表示されています。
[ 0.000000] Kernel command line: console=ttyS0,115200 root=/dev/mmcblk0p2 rw rootwait
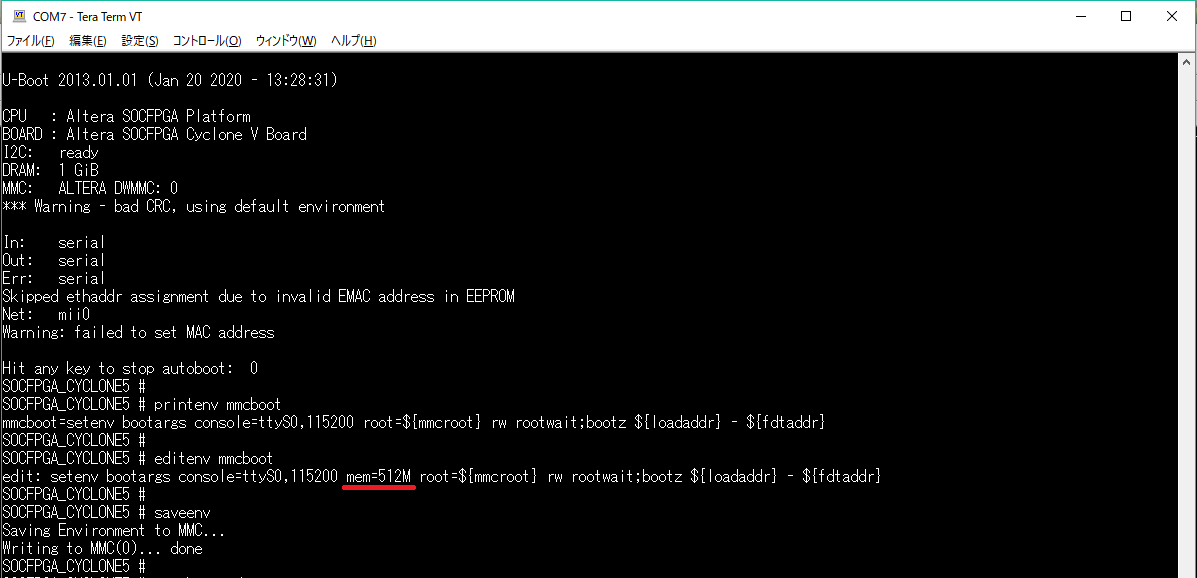
bootargs は U-Boot プロンプト(カウントダウン中に Enter 入力して移行)から編集できます。
使用した環境では、bootargs は mmcboot という環境変数に記述されていたので、以下のように mem=512M を追加します。(editenv コマンドで編集、saveenv コマンドで保存)
結果、以下のようにサイズを減らすことができました。(524288K available)
Kernel command line にmem=512Mの指定が追加されたことも確認できます。
[    0.000000] Kernel command line: console=ttyS0,115200 mem=512M root=/dev/mmcblk0p2 rw rootwait
[    0.000000] Dentry cache hash table entries: 65536 (order: 6, 262144 bytes, linear)
[    0.000000] Inode-cache hash table entries: 32768 (order: 5, 131072 bytes, linear)
[    0.000000] mem auto-init: stack:off, heap alloc:off, heap free:off
[    0.000000] Memory: 507624K/524288K available (8192K kernel code, 555K rwdata, 1756K rodata, 1024K init, 140K bss, 16664K reserved, 0K cma-reserved, 0K highmem)
回避策 - その2:別のデバイスツリーパラメータを使用
デバイスツリーで RAM サイズを指定したい場合、reg ではなく reglinux,usable-memory = <ベースアドレス, サイズ>;を指定することで対応可能という事が判りました。
以下のようにreglinux,usable-memoryを記述します。例では 768MB を指定しています。

試す際には、ひとつ前の回避策で追加した bootargs の mem=512M の指定を削除することをお忘れなく。
結果、以下のようにサイズを減らすことができました。(786432K available)
[    0.000000] Kernel command line: console=ttyS0,115200 root=/dev/mmcblk0p2 rw rootwait
[    0.000000] Dentry cache hash table entries: 131072 (order: 7, 524288 bytes, linear)
[    0.000000] Inode-cache hash table entries: 65536 (order: 6, 262144 bytes, linear)
[    0.000000] mem auto-init: stack:off, heap alloc:off, heap free:off
[    0.000000] Memory: 767264K/786432K available (8192K kernel code, 555K rwdata, 1756K rodata, 1024K init, 140K bss, 19168K reserved, 0K cma-reserved, 0K highmem)
まとめ
実は後から気が付いたのですが、CPU コア数についても bootargs で指定することができるようになっていました。maxcpus=1を追加することでコア数を 1 個に減らすことが可能です。
という事は、今回の内容はデバイスツリーの編集は行わずとも対応できた。。
という事になります。
結果的にデバイスツリーと bootargs の両方を紹介することが出来たので良しとしたいと思います。ぜひ参考にしてみてください。