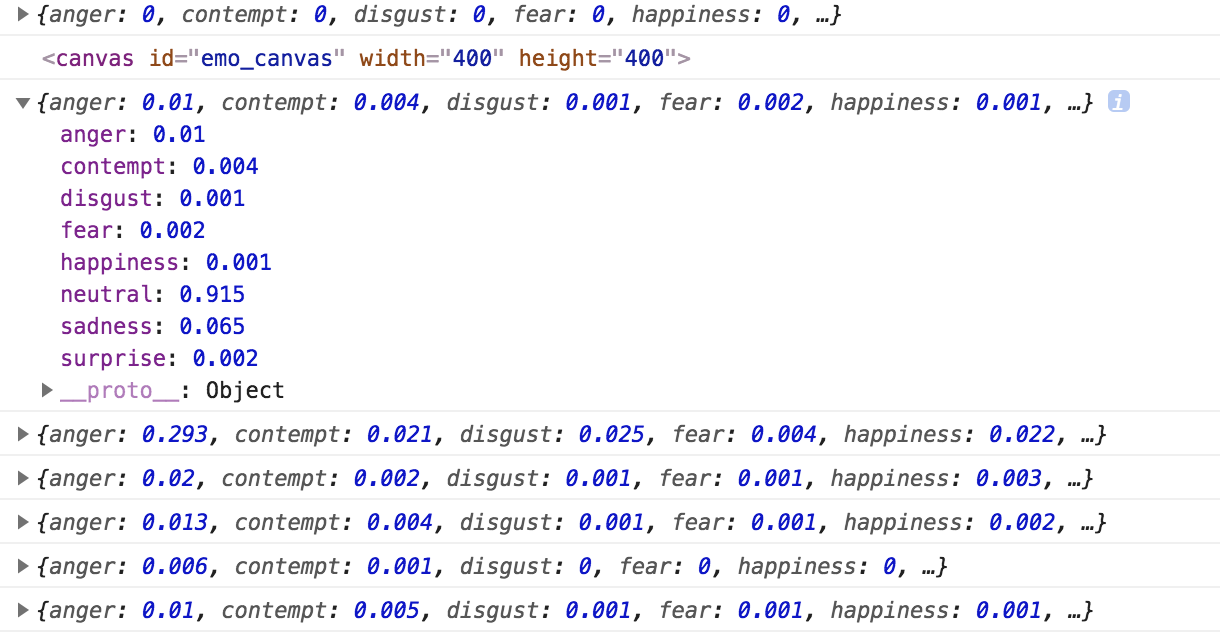
Microsoft AzureのFace APIを利用して感情情報を取得します。
今回はオープンソースのJavaScriptフレームワークであるVue.jsで実装してみます。
Face APIとは?
Microsoft Azureの顔認識APIです。
年齢、感情、性別などの特徴を抽出することができます。
感情については、怒り、軽蔑、嫌悪感、恐怖、喜び、中立、哀しみ、驚きの
8種類を判定することができます。
詳細は以下のページに記載されています。
https://azure.microsoft.com/ja-jp/services/cognitive-services/face/
今回実施したこと
1.準備 (Vue.jsのプロジェクト環境構築)
2.カメラを起動し、リアルタイムの映像をvideoタグ内に表示する
3.感情分析する
準備
vue-cliを使って、Vue.jsのプロジェクト環境を構築します。
こちらについては、以下のページの「プロジェクトを作成する」まで
進めて見てください。
Vue.js を vue-cli を使ってシンプルにはじめてみる
カメラを起動し、リアルタイムの映像をvideoタグに表示する
次に、PCのフロントカメラを起動し、リアルタイムの映像をvideoタグに表示します。
videoタグに表示された映像は、定期的に静止画としてcanvasに表示します。
(具体的な処理は「感情分析する」の項目を参照してください)
<template id="main">
  <div id="app">
    <canvas ref="canvas" id="emo_canvas" width="400" height="400"></canvas>
    <div>
      <video ref="video" id="video" width="400" height="400" playsinline muted autoplay></video>
    </div>
  </div>
</template>
mounted() {
  //PCのフロントカメラを起動し、リアルタイムの映像をvideoタグに表示する
    this.video = this.$refs.video
    if (navigator.mediaDevices && navigator.mediaDevices.getUserMedia) {
      navigator.mediaDevices.getUserMedia({audio: false, video: true})
      .then(stream => {
        this.video.srcObject = stream
        this.video.play()
      })
    }

    console.log(this.$refs.canvas)
    // console.log(this.$refs.canvas)

    this.canvas = this.$refs.canvas
感情分析する
以下のサイトで会員登録し、APIキーを取得します。
その後、canvasに静止画を表示し、画像データをbase64に
変換した上で(makeblobメソッドの処理を参照してください)、
AxiosでFace APIに画像データを送信します。
this.testTimer = setInterval(() => {
      // console.log(this.$refs.canvas)
      let context = this.canvas.getContext("2d").drawImage(this.video, 0, 0, 400, 240)
    //撮った画像をcaptures配列に格納する
      this.captures.push(this.canvas.toDataURL("image/png"))
      let subscriptionKey = "取得したキーをここに入力する";
      let uriBase = "https://westcentralus.api.cognitive.microsoft.com/face/v1.0/detect";
      let params = {
        "returnFaceId": "true",
        "returnFaceLandmarks": "false",
        "returnFaceAttributes":
          "emotion"
      };
      //配列最後に追加された画像のフォーマットを変換し、imgURL変数に代入する
      const imgURL = this.makeblob(this.captures[this.captures.length - 1])
      //imgURLの画像をFaceAPIに送信
      Axios.post(
        uriBase + "?returnFaceId=true&returnFaceLandmarks=false&returnFaceAttributes=age,emotion",
        imgURL,
        {
          headers: {
            "Content-Type": "application/octet-stream",
            "Ocp-Apim-Subscription-Key": subscriptionKey,
          }
        },
      )
      .then(response => {
        console.log(response.data[0].faceAttributes.emotion)

      })
      .catch(error => {
        // console.log(error.response)
      });
    }, 5000);
Axiosで画像をPostするために、画像データをbase64に変換します。
methods: {
    makeblob: function (dataURL) {
      let BASE64_MARKER = ';base64,';
      if (dataURL.indexOf(BASE64_MARKER) == -1) {
        let parts = dataURL.split(',');
        let contentType = parts[0].split(':')[1];
        let raw = decodeURIComponent(parts[1]);
        return new Blob([raw], {type: contentType});
      }
      let parts = dataURL.split(BASE64_MARKER);
      let contentType = parts[0].split(':')[1];
      let raw = window.atob(parts[1]);
      let rawLength = raw.length;
      let uInt8Array = new Uint8Array(rawLength);
      for (let i = 0; i < rawLength; ++i) {
        uInt8Array[i] = raw.charCodeAt(i);
      }
      return new Blob([uInt8Array], {type: contentType})
    }
  }
axiosを利用するため、以下のコマンドでnpm installします。
npm install --save-dev vue-axios axios
コード全体
今回コーディングしたコード全体は以下の通りです。
<template id="main">
  <div id="app">
    <canvas ref="canvas" id="emo_canvas" width="400" height="400"></canvas>
    <div>
      <video ref="video" id="video" width="400" height="400" playsinline muted autoplay></video>
    </div>
  </div>
</template>

<script>
import Vue from 'vue';
import Axios from 'axios';
import VueAxios from 'vue-axios'

Vue.use(VueAxios, Axios)

export default ({
  template: '#main',
  data() {
    return {
      video: {},
      canvas: {},
      captures: [],
      testTimer: '',
    };
  },
  mounted() {
  //カメラを起動し、映像をvideoタグ内に表示
    this.video = this.$refs.video
    if (navigator.mediaDevices && navigator.mediaDevices.getUserMedia) {
      navigator.mediaDevices.getUserMedia({audio: false, video: true})
      .then(stream => {
        this.video.srcObject = stream
        this.video.play()
      })
    }

    console.log(this.$refs.canvas)
    // console.log(this.$refs.canvas)

    this.canvas = this.$refs.canvas
    this.testTimer = setInterval(() => {
      // console.log(this.$refs.canvas)
      let context = this.canvas.getContext("2d").drawImage(this.video, 0, 0, 400, 240)
      this.captures.push(this.canvas.toDataURL("image/png")) //撮った画像をcaptures配列に格納する
      let subscriptionKey = "取得したキーをここに入力する";
      let uriBase = "https://westcentralus.api.cognitive.microsoft.com/face/v1.0/detect";
      let params = {
        "returnFaceId": "true",
        "returnFaceLandmarks": "false",
        "returnFaceAttributes":
          "emotion"
      };
      //配列最後に追加された画像のフォーマットを変換し、imgURL変数に代入する
      const imgURL = this.makeblob(this.captures[this.captures.length - 1])
      //imgURLの画像をFaceAPIに送信
      Axios.post(
        uriBase + "?returnFaceId=true&returnFaceLandmarks=false&returnFaceAttributes=age,emotion",
        imgURL,
        {
          headers: {
            "Content-Type": "application/octet-stream",
            "Ocp-Apim-Subscription-Key": subscriptionKey,
          }
        },
      )
      .then(response => {
        console.log(response.data[0].faceAttributes.emotion)

      })
      .catch(error => {
        // console.log(error.response)
      });
    }, 5000);
  },
  methods: {
    makeblob: function (dataURL) {
      let BASE64_MARKER = ';base64,';
      if (dataURL.indexOf(BASE64_MARKER) == -1) {
        let parts = dataURL.split(',');
        let contentType = parts[0].split(':')[1];
        let raw = decodeURIComponent(parts[1]);
        return new Blob([raw], {type: contentType});
      }
      let parts = dataURL.split(BASE64_MARKER);
      let contentType = parts[0].split(':')[1];
      let raw = window.atob(parts[1]);
      let rawLength = raw.length;
      let uInt8Array = new Uint8Array(rawLength);
      for (let i = 0; i < rawLength; ++i) {
        uInt8Array[i] = raw.charCodeAt(i);
      }
      return new Blob([uInt8Array], {type: contentType})
    }
  }
});
参考にさせて頂いたサイト
FaceAPIを使った感情分析
Vue.js を vue-cli を使ってシンプルにはじめてみる
Vue.jsでもjQueryと同じような ajax postを実装したい
