この記事は、Stripe Apps を25日間紹介し続ける Advent Calendar 2022 8日目の記事です。

「Stripe Dashboardを拡張する」ためのアプリを作るには、Stripeのデータを取得・更新・削除する必要があります。
今回は、Stripe AppsのReactアプリ内で、Stripe Node.js SDKを利用したStripe API呼び出しを行う方法を紹介します。
Stripe Appsアプリは、アプリ内でStripe APIを呼び出せる
StripeアプリでStripeのAPIを呼び出す方法
今回は、アプリ内からStripe APIを利用して決済履歴を取得するサンプルを構築します。
Stripe CLIでアプリにAPI呼び出しの権限を設定する
まずはじめに、アプリがどのAPI操作を利用するかの「権限設定」を行います。
アプリケーションのディレクトリ内にて、Stripe CLIでstripe apps grant permissionを実行しましょう。
Step1: 権限を設定したいリソースを選択する
どのリソースへのアクセスかを選択する画面が表示されます。
$ stripe apps grant permission
Use the arrow keys to navigate: ↓ ↑ → ←
? Select a resource to grant access to:
  ▸ Account link
    Apply Pay Domain
    Application Fee
    Balance
↓   Balance transaction source
矢印キーの下を押してスクロールして、Payment intentを選択しましょう。
▸ Payment intent
Step2: 権限の種類を選択する
「読み込みだけ」か「書き込み(作成・更新・削除)もするか」を聞かれます。
? Select access type:
  ▸ read
    write
今回は読み込みだけなので、readを選びます。
Step3: アクセスを要求する理由を入力する
続いて次のメッセージが表示されます。
✗ Enter a purpose for the grant: █
これは、「そのリソースへのアクセス権限を要求する理由」を入力するエリアです。
アプリの設定画面やマーケットプレイスにて、ユーザーが「このアプリはStripeアカウントのどんなリソースに、どういう目的でアクセスしてくるか」を確認できるようになります。
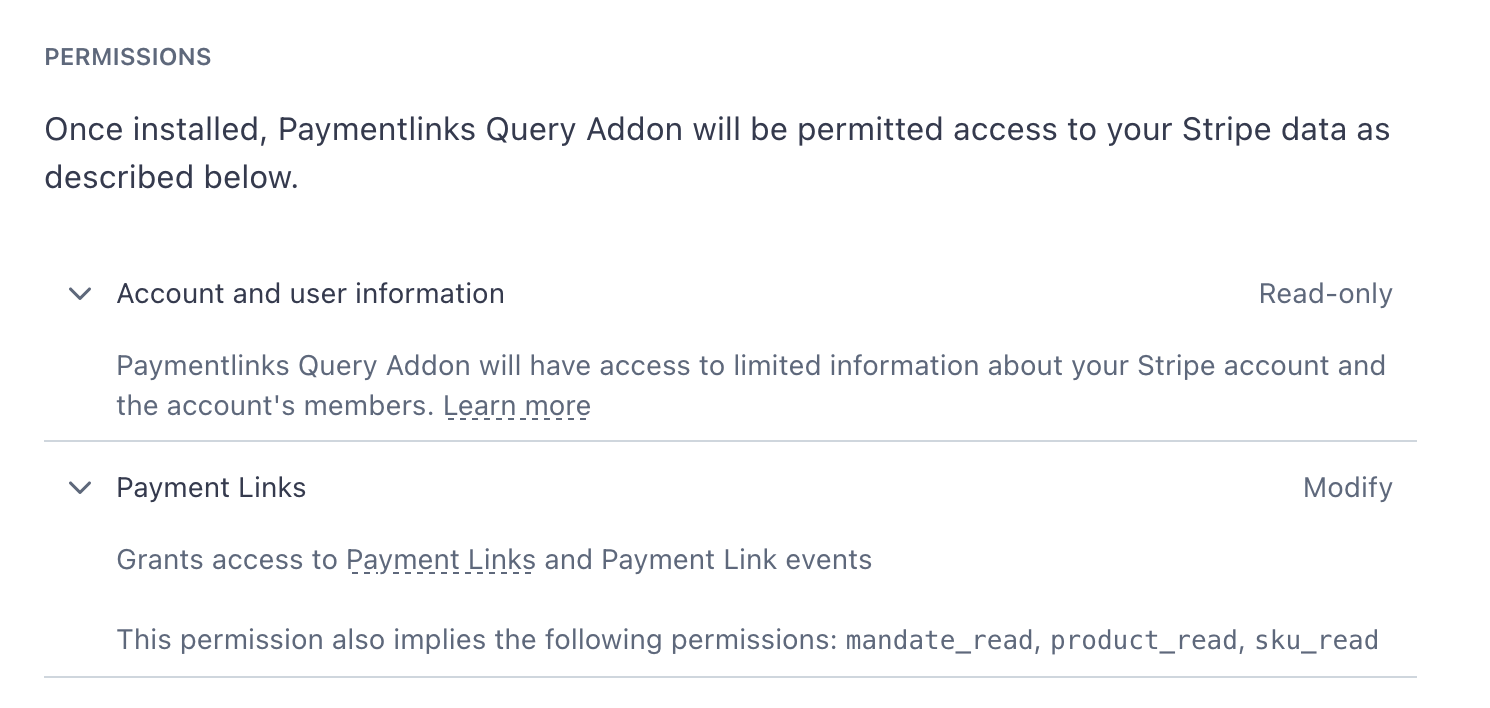
Lists the payment intent data to analyze the business.など、シンプルな説明文を入れましょう。
あとから変更できますので、ローカルで試す範囲であれば、dummyやTBDなどで一旦進めることも可能です。
ただし公開時には修正する必要がありますので、TODOリストに「stripe-app.jsonのpermissions.purposeを更新する」のようにタスクを入れておくことをお勧めします。
セットアップが終わると、stripe-app.jsonのpermissionsに入力したデータが反映されます。
{
  "id": "com.example.first-stripe-app",
  "version": "0.0.1",
  "name": "First Stripe App",
  "icon": "",
-  "permissions": [],
+  "permissions": [
+    {
+      "permission": "payment_intent_read",
+      "purpose": "tbd"
+    }
+  ],
...
stripe apps startを実行中の場合、アプリの再読み込みが必要
stripe apps startを実行したままstripe apps grantコマンドを実行した場合、stripe apps startを実行中のターミナルに以下のメッセージが表示されます。
[14:48:51] compiled successfully
[12:17:16] WARNING stripe-app.json
To reflect recent changes from stripe-app.json, click "Continue" on https://dashboard.stripe.com/apps/enable-preview?cliaccount=acct_123456abcde
[12:17:16] compiled successfully
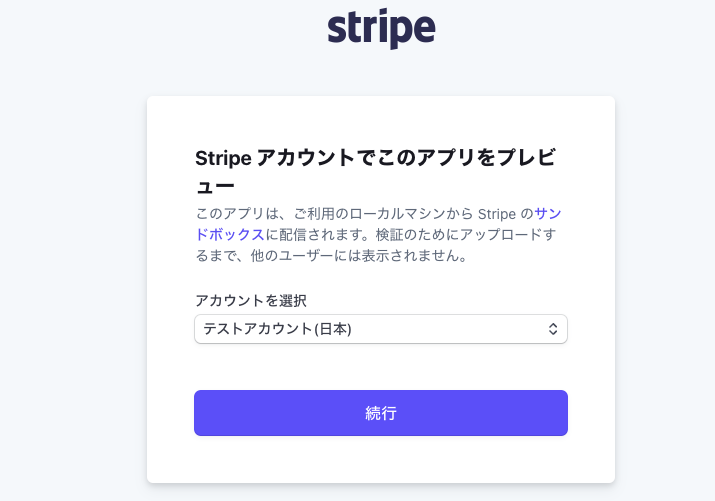
変更した権限設定でアプリを実行するには、このURLにアクセスしてプレビューを再度有効化する必要があります。
@stripe/ui-extension-sdkで、Stripe Node.js SDKのクライアントをセットアップする
権限の設定が終わりましたので、Stripe APIを呼び出すためのSDKを準備します。
stripe apps createで作成したアプリには、デフォルトでNode.js SDKが追加されています。
  "dependencies": {
    "@stripe/ui-extension-sdk": "^8.5.0",
    "stripe": "^11.1.0"
  }
Stripe SDKのクライアントは次のコードでセットアップできます。
import { createHttpClient, STRIPE_API_KEY } from '@stripe/ui-extension-sdk/http_client'
import Stripe from 'stripe'

// Initiate communication with the stripe client.
const stripe = new Stripe(STRIPE_API_KEY, {
  httpClient: createHttpClient(),
  apiVersion: '2022-11-15',
})
apiVersionがSDKのバージョンによって変わることがあります。
TypeScriptで型エラーが発生した場合は、エラー文または型定義が指示するバージョンに変更しましょう。
APIキーを環境変数などで設定する必要はありません。
アプリが実行されるサンドボックス側で自動的に設定されます。
useEffectとuseStateを利用して、API呼び出しとレスポンスの取得を行う
クライアントの準備ができましたので、Reactのコンテキストに従ってAPIを呼び出しましょう。
const PaymentIntentsViewer: FC = () => {
  const [paymentIntents, setPaymentIntents] = useState<Stripe.PaymentIntent[]>([])
  useEffect(() => {
    stripe.paymentIntents.list()
      .then(response => {
        setPaymentIntents(response.data)
      })
      .catch(error => {
        console.log(error)
      })
  }, [])
  return (
    <Box>
      {JSON.stringify(paymentIntents, null, 2)}
    </Box>
  )
}
作成したPaymentIntentsViewerコンポーネントを、src/views/App.tsxで読み込ませます。
const App = ({ userContext, environment }: ExtensionContextValue) => {
  return (
    <ContextView
      title="Hello world"
      brandColor="#F6F8FA" // replace this with your brand color
      brandIcon={BrandIcon} // replace this with your brand icon
      externalLink={{
        label: "View docs",
        href: "https://stripe.com/docs/stripe-apps"
      }}
    >
+      <PaymentIntentsViewer />
    </ContextView>
  );
};
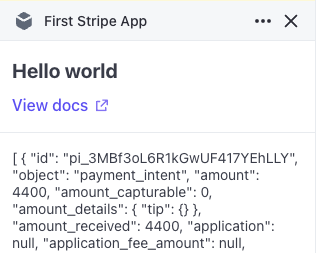
アプリを再読み込みすると、アカウントのPayment IntentデータがJSONで出力されます。
List系コンポーネントで、取得したデータを表示する
データの取得ができましたので、見た目を整えましょう。
今回は、Listコンポーネントを活用します。
PaymentIntentsViewerを次のように書き換えましょう。
-import { Box } from "@stripe/ui-extension-sdk/ui";
+import { List, ListItem } from "@stripe/ui-extension-sdk/ui";

// 中略

  return (
+    <List>
-    <Box>
+      {paymentIntents.map(intent => {
+        const value = `${intent.amount.toLocaleString()} ${intent.currency.toLocaleUpperCase()}`
+        const createdAt = new Date(intent.created * 1000).toLocaleString('ja-JP')
+        return (
+          <ListItem
+            key={intent.id}
+            title={intent.id}
+            secondaryTitle={createdAt}
+            value={value}
+          />
+        )
+      })}
-      {JSON.stringify(paymentIntents, null, 2)}
-    </Box>
+    </List>
  )
保存してアプリを再読み込みすると、JSONデータがリスト形式の表示に変わります。

[Advanced] 表示中のページのID情報などを取得する方法
「現在表示中の顧客・サブスクリプションデータを取得したい」など、顧客やサブスクリプションなどのIDが必要なケースも存在します。
この場合は、コンポーネントから渡されるenvironmentプロパティを利用しましょう。
environment.objectContextの中身を見てみます。
const App = ({ environment }: ExtensionContextValue) => {
+  console.log(environment.objectContext)
顧客の詳細ページでは、次のようなデータが取得できます。
{
  "id": "cus_MuOQ7rso8N3wF6",
  "object": "customer"
}
environment.objectContext.objectでIDの種類を見ることができます。
そしてenvironment.objectContext.idでIDを取得し、Stripe APIの引数に渡すことができます。
次のサンプルコードでは、「顧客IDが取得できた場合に、その顧客に関連するPayment Intentを取得する」処理を行います。
const App = ({ environment }: ExtensionContextValue) => {
  useEffect(() => {
    if (!environment.objectContext) return
    if (environment.objectContext.object !== 'customer') return
    const customerId = environment.objectContext.id
    stripe.paymentIntents.list({
      customer: customerId
    })
      .then(response => {
        console.log(response.data)
      })
      .catch(error => {
        console.log(error)
      })
  }, [environment.objectContext])
...
ドキュメント
Stripe Appsひとりアドベントカレンダー 2022
今年ベータリリースされたばかりのStripe Appsは、まだ日本語の情報が多くありません。
そこでQiita Advent Calendar 2022にて、毎日Stripe Appsについての情報を投稿します。
ノーコードで利用する方法や、開発するためのTipsなども紹介予定ですので、ぜひ購読をお願いします。