Markdocは、Stripeのドキュメントサイトで利用している、マークダウンのオーサリングツールです。
この記事では、JavaScriptと@markwodn/markdocライブラリを利用して、Markdownで書かれたコンテンツをサイトに表示させる方法を紹介します。
セットアップ
Markdocライブラリは、npm installして利用します。
今回はコードのビルドに、Viteを利用します。
フレームワークにはvanillaを選びましょう。
variantでTypeScriptも選べますが、今回は使用しません。
$ npm init vite
✔ Project name: … vite-markdoc
✔ Select a framework: › vanilla
✔ Select a variant: › vanilla

Scaffolding project in /Users/examples/vite-markdoc...

Done. Now run:
セットアップ後は、ディレクトリに移動して、ライブラリのインストールを行います。
$ cd vite-markdoc
$ npm install
ベタ書きのMarkdownを表示する
main.jsを開くと、以下のようなコードが書かれています。
import './style.css'
document.querySelector('#app').innerHTML = `
  <h1>Hello Vite!</h1>
  <a href="https://vitejs.dev/guide/features.html" target="_blank">Documentation</a>
`
このコードを、Markdocを利用してMarkdown記法で書けるように変更しましょう。
ライブラリインストール
まずは、ライブラリをインストールしましょう。
$ npm install @markdoc/markdoc
Markdown記法でコンテンツを書き換える
デフォルトのコンテンツとほぼ同じ内容を、Markdownで書き直し、Markdocで表示させましょう。
import Markdoc from '@markdoc/markdoc';

const source = `# Hello Vite!
[Documentation](https://vitejs.dev/guide/features.html)
`;

const ast = Markdoc.parse(source);
const content = Markdoc.transform(ast);

document.querySelector('#app').innerHTML = Markdoc.renderers.html(content);
Markdocでは、MarkdownをAST(Abstract Syntax Tree)にパースした後、レンダリング可能な形に変換します。
その後、Markdoc.renderersを利用して描画できる形に出力します。
独自の関数を実装する
Markdocでは、Markdown内に関数を追加することができます。
Markdoc.transformの第二引数に、Functionsを追加しましょう。
const content = Markdoc.transform(ast, {
  functions: {
    uppercase: {
      transform: (parameters) => {
        const string = parameters[0];
        return typeof string === 'string' ? string.toUpperCase() : string;
      }
    }
  }
});
これでuppercase関数が登録できました。
あとはMarkdownの中で{% 関数名("引数") %}のように書いて利用しましょう。
大文字にする: {% uppercase("uppercase") %}
実行結果
独自のタグを実装する
関数だけでなく、通常のHTMLタグやWebComponentを利用して、独自のタグも追加できます。
今回はMDNに公開されている単語数を数えるWebComponentを利用します。
import './style.css'
import Markdoc from '@markdoc/markdoc';

const source = `# Hello Vite!
[Documentation](https://vitejs.dev/guide/features.html)

+{% wordCount/ %}
`;

+class WordCount extends HTMLParagraphElement {
+  constructor() {
+    // Always call super first in constructor
+    super();
+
+    // count words in element's parent element
+    const wcParent = this.parentNode;
+
+    function countWords(node){
+      const text = node.innerText || node.textContent;
+      return text.trim().split(/\s+/g).filter(a => a.trim().length > 0).length;
+    }
+
+    const count = `Words: ${countWords(wcParent)}`;
+
+    // Create a shadow root
+    const shadow = this.attachShadow({mode: 'open'});
+
+    // Create text node and add word count to it
+    const text = document.createElement('span');
+    text.textContent = count;
+
+    // Append it to the shadow root
+    shadow.appendChild(text);
+
+    // Update count when element content changes
+    setInterval(function() {
+      const count = `Words: ${countWords(wcParent)}`;
+      text.textContent = count;
+    }, 200);
+  }
+}
+customElements.define('word-count', WordCount, { extends: 'p' });

const ast = Markdoc.parse(source);
const content = Markdoc.transform(ast, {
+  tags: {
+    wordCount: {
+      render: 'p is="word-count"',
+    }
+  }
});

document.querySelector('#app').innerHTML = Markdoc.renderers.html(content);
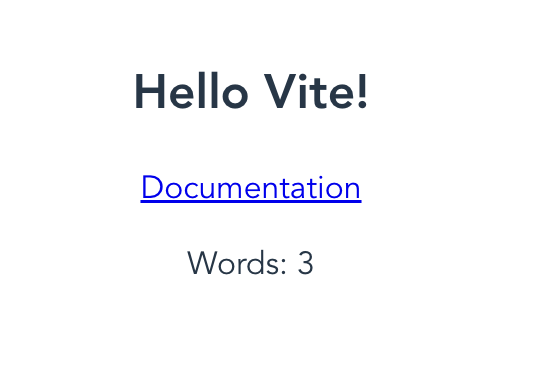
単語数が表示されていれば、実装成功です。
IF文や変数を設定する
条件に応じて表示を変更することもできます。
transformのvariablesに変数を渡すと、{% 変数名 %}のようにしてその値が取得できます。
また、{% if 条件 %}と{% /if %}で囲うことで、表示内容の制御も可能です。
import Markdoc from '@markdoc/markdoc';

const source = `# Hello Vite!
[Documentation](https://vitejs.dev/guide/features.html)

{% if $flags.my_feature_flag %}
Username: {% $user.name %}
{% /if %}
`;


const ast = Markdoc.parse(source);
const content = Markdoc.transform(ast, {
  variables: {
    flags: {
      my_feature_flag: true
    },
    user: {
      name: 'Dr. Mark'
    }
  }
});

document.querySelector('#app').innerHTML = Markdoc.renderers.html(content);
今回はベタ書きですが、Expressなどのサーバーから取得した情報やlocalStorage、Cognito/Firebaseなどの情報を利用することで、ベータユーザーのみ見れるコンテンツなどの制御ができるようになります。
Documents & Examples

