この記事は、Angular Advent Calendar 2022 18日目の記事です。
AngularでWebサービスやアプリを開発する場合、Stripeの組み込みに使える便利なライブラリ「ngx-stripe」が利用できます。
この記事では、Angularプロジェクトにngx-stripeで決済フォームを組み込む方法を紹介します。
Angularバージョンについて
- "@angular/core": "^15.0.0"
- "ngx-stripe": "^14.1.0"
- "@stripe/stripe-js": "^1.44.1"
Angularアプリのセットアップ
まずはアプリをセットアップします。
$ npm i -g @angular/cli
$ ng new ng-stripe-demo
はじめてngコマンドを実行する場合、オートコンプリートを設定するかどうかの質問がでます。
? Would you like to enable autocompletion? This will set up your terminal so pressing TAB while typing Angular CLI commands will show possible options
and autocomplete arguments. (Enabling autocompletion will modify configuration files in your home directory.) (Y/n)
共有マシンや、今後Angularを利用する予定がない場合以外は、yでセットアップするとよさそうです。
今回はシンプルなデモにするため、ルーティングやCSSのメタ言語は省きます。
? Would you like to add Angular routing? No
? Which stylesheet format would you like to use? CSS
セットアップが終われば、以下のようなメッセージが表示されます。
✔ Packages installed successfully.
    Successfully initialized git.
プロジェクトディレクトリに移動し、開発サーバーを起動しましょう。
$ ng serve
Build at: 2022-11-30T08:43:42.491Z - Hash: 04ce66ad26425dbf - Time: 5930ms

** Angular Live Development Server is listening on localhost:4200, open your browser on http://localhost:4200/ **


✔ Compiled successfully.
表示されたURL(http://localhost:4200/ )にアクセスして、デモ画面が出ることを確認します。
ngx-stripeでStripeの決済フォームを組み込む
ここからはngx-stripeを利用して、決済フォームを組み込みます。
ライブラリのインストールとセットアップ
ドキュメントに従って、ライブラリをインストールしましょう。
$ npm install ngx-stripe @stripe/stripe-js
ngx-stripeのバージョン14.1.0以前は、Angular v15でのインストール時にエラーが発生することがあります。
GitHubのIssueによると、「内部の変更が必要なためにリリースに時間がかかっている」とコメントされています。
Related: https://github.com/richnologies/ngx-stripe/issues/187
今の所、npm install ngx-stripe --forceでインストールが可能ですので、もしうまくいかない場合はこちらをおためしくだs
インストールしたngx-stripeをNgModuleで読み込みましょう。
src/app/app.module.tsを次のように変更します。
import { NgModule } from '@angular/core';
import { BrowserModule } from '@angular/platform-browser';
+import { NgxStripeModule } from 'ngx-stripe';

import { AppComponent } from './app.component';

@NgModule({
  declarations: [
    AppComponent
  ],
  imports: [
    BrowserModule,
+    NgxStripeModule.forRoot('pk_test_から始まるStripeの公開可能APIキー')
  ],
  providers: [],
  bootstrap: [AppComponent]
})
export class AppModule { }
APIを呼び出して、Payment Intentを取得する
Stripe.jsのカード要素を表示するには、事前にPayment IntentまたはSetup Intent(カード情報などの保存のみする場合)を作成します。
StripeドキュメントのクイックスタートなどでAPIを用意しましょう。
取得したPayment Intentで、決済フォームを表示する
クイックスタートなどで用意したAPIを呼び出して、決済フォームを表示させましょう。
HttpClientModuleを利用しますので、先にsrc/app/app.module.tsで設定します。
import { NgModule } from '@angular/core';
import { BrowserModule } from '@angular/platform-browser';
+import { HttpClientModule } from '@angular/common/http';
import { NgxStripeModule } from 'ngx-stripe';

import { AppComponent } from './app.component';

@NgModule({
  declarations: [
    AppComponent
  ],
  imports: [
    BrowserModule,
+    HttpClientModule,
    NgxStripeModule.forRoot('pk_test_から始まるStripeの公開可能APIキー')
  ],
  providers: [],
  bootstrap: [AppComponent]
})
export class AppModule { }
src/app/app.component.tsを次のように変更します。
-import { Component } from '@angular/core';
+import { Component, OnInit } from '@angular/core';
+import { HttpClient } from '@angular/common/http';
+import { Observable } from 'rxjs';

type PaymentIntentAPIResponse = {
  clientSecret: string;
}

@Component({
  selector: 'app-root',
  templateUrl: './app.component.html',
  styleUrls: ['./app.component.css']
})
export class AppComponent implements OnInit {

  clientSecret: string = '';

  constructor(
    private readonly http: HttpClient,
  ) {}

  ngOnInit() {
    this.createPaymentIntent()
      .subscribe(pi => {
        this.clientSecret = pi.clientSecret
      })
  }

  private createPaymentIntent(): Observable<PaymentIntentAPIResponse> {
    return this.http.post<PaymentIntentAPIResponse>(
      `http://localhost:3000/create-payment-intent`,
      {}
    );
  }
}
続いて、src/app/app.component.htmlを次のコードで上書きします。
<form>
  <ng-container *ngIf="clientSecret">
    <ngx-stripe-payment [clientSecret]="clientSecret">
    </ngx-stripe-payment>
    <button>支払う</button>
  </ng-container>
</form>
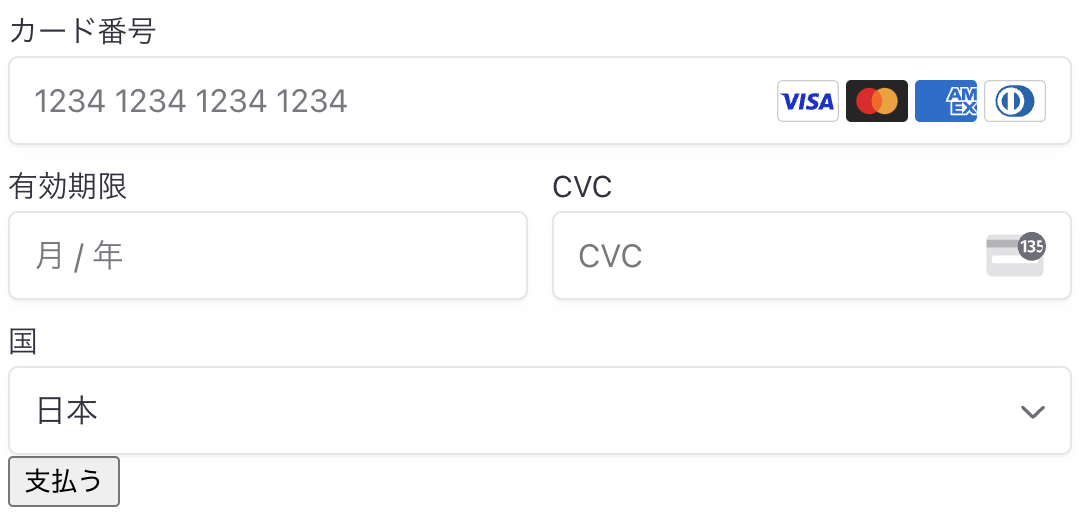
両方ファイルを保存すると、アプリの画面が決済フォームに変わります。
フォームのSubmit処理を実装しよう
最後に、カード情報を入力した後のSubmit処理を追加します。
FormsModuleを利用しますので、先にsrc/app/app.module.tsで設定します。
import { NgModule } from '@angular/core';
import { BrowserModule } from '@angular/platform-browser';
+import { FormsModule } from '@angular/forms';
import { HttpClientModule } from '@angular/common/http';
import { NgxStripeModule } from 'ngx-stripe';

import { AppComponent } from './app.component';

@NgModule({
  declarations: [
    AppComponent
  ],
  imports: [
    BrowserModule,
+    FormsModule,
    HttpClientModule,
    NgxStripeModule.forRoot('pk_test_から始まるStripeの公開可能APIキー')
  ],
  providers: [],
  bootstrap: [AppComponent]
})
export class AppModule { }
formに設定する関数をsrc/app/app.component.tsに設定しましょう。
-import { Component, OnInit } from '@angular/core';
+import { Component, OnInit, ViewChild } from '@angular/core';
import { HttpClient } from '@angular/common/http';
+import { StripePaymentElementComponent, StripeService } from 'ngx-stripe';
import { Observable } from 'rxjs';

type PaymentIntentAPIResponse = {
  clientSecret: string
}

@Component({
  selector: 'app-root',
  templateUrl: './app.component.html',
  styleUrls: ['./app.component.css']
})
export class AppComponent implements OnInit {
+  @ViewChild(StripePaymentElementComponent) paymentElement?: StripePaymentElementComponent

  clientSecret: string = '';

  constructor(
+    private readonly stripeService: StripeService,
    private readonly http: HttpClient,
  ) {}

  ngOnInit() {
    this.createPaymentIntent()
      .subscribe(pi => {
        this.clientSecret = pi.clientSecret
      });
  }

  private createPaymentIntent(): Observable<PaymentIntentAPIResponse> {
    return this.http.post<PaymentIntentAPIResponse>(
      `http://localhost:3000/create-payment-intent`,
      {}
    );
  }

+  pay() {
+    if (!this.paymentElement) return;
+    this.stripeService.confirmPayment({
+      elements: this.paymentElement.elements,
+      redirect: 'if_required',
+    }).subscribe(result => {
+      console.log('Result', result);
+      if (result.error) {
+        alert( 'Failed' );
+      } else {
+        if (result.paymentIntent?.status === 'succeeded') {
+          alert( 'success' );
+        }
+      }
+    });
+  }
}
ViewChildを利用して、ngx-stripeが提供するPayment Elementコンポーネントにアクセスできるようにしています。
その後、 ngx-stripeが提供するStripeServiceからStripe.jsのメソッドconfirmPaymentを実行しています。
このpayメソッドを、formのsubmitイベントに紐づけましょう。
-<form>
+<form (ngSubmit)="pay()">
  <ng-container *ngIf="clientSecret">
    <ngx-stripe-payment [clientSecret]="clientSecret">
    </ngx-stripe-payment>
    <button type="submit">支払う</button>
  </ng-container>
</form>
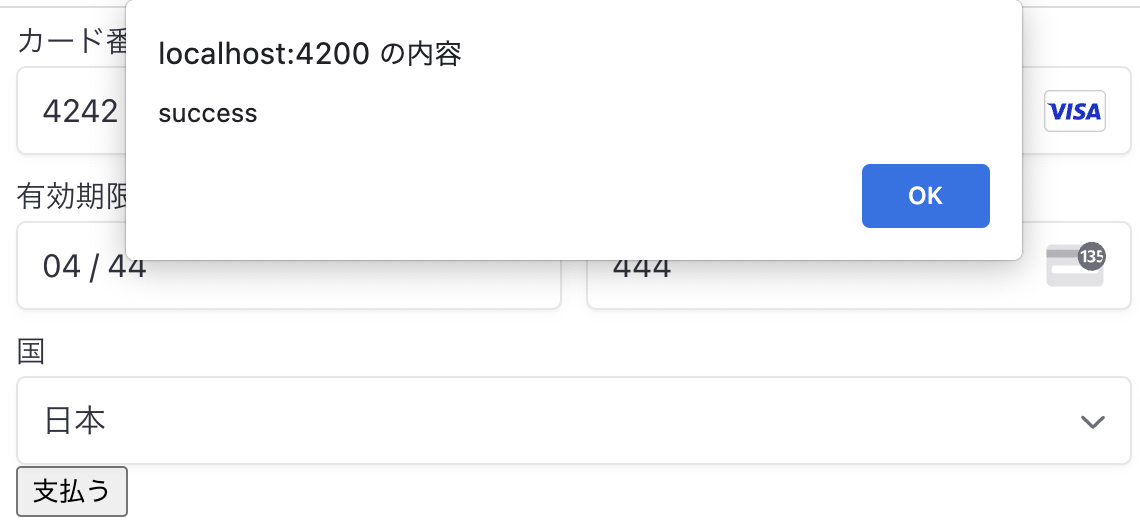
Stripeが用意している「テストカード番号」を利用して、決済をテストしましょう。
Successが表示されれば、実装完了です。
[Optional] サブスクリプション申し込みフォームを作りたい場合
サブスクリプションの申し込みフォームも、今回の実装が活かせます。
Payment Intentを作成していた処理部分を次のようなコードに変更しましょう。
    const subscription = await stripe.subscriptions.create({
        customer: customer.id,
        items: [{
            price_data: {
                unit_amount: 1000,
                currency: 'jpy',
                recurring: {
                    interval: 'month',
                },
                product: product.id
            }
        }],
        payment_behavior: 'default_incomplete',
        expand: ['latest_invoice.payment_intent'],
        payment_settings: {
            save_default_payment_method: 'on_subscription',
        },
    })

    return {
        clientSecret: ((subscription.latest_invoice as Stripe.Invoice).payment_intent as Stripe.PaymentIntent).client_secret
    }
Stripeのサブスクリプションでも、初回決済分のPayment Intentが内部的に生成されます。
ですので、作成されたPayment IntentのclientSecretを取得してフロントエンドに返すことで、Angular側でフォームの実装を変えることなくサブスクリプション申し込みを処理できます。
なお、実際の組み込みでは、特定商取引法などの要件を満たす必要があります。
消費者庁のPDFなどを参考に、フォーム以外の組み込みも併せて行いましょう。