この記事は、「LINE de 決済勉強会!LINE API×Stripeエキスパート秘伝のノウハウを共有!」にて紹介した、注文履歴を表示するbotの実装Tips記事です。
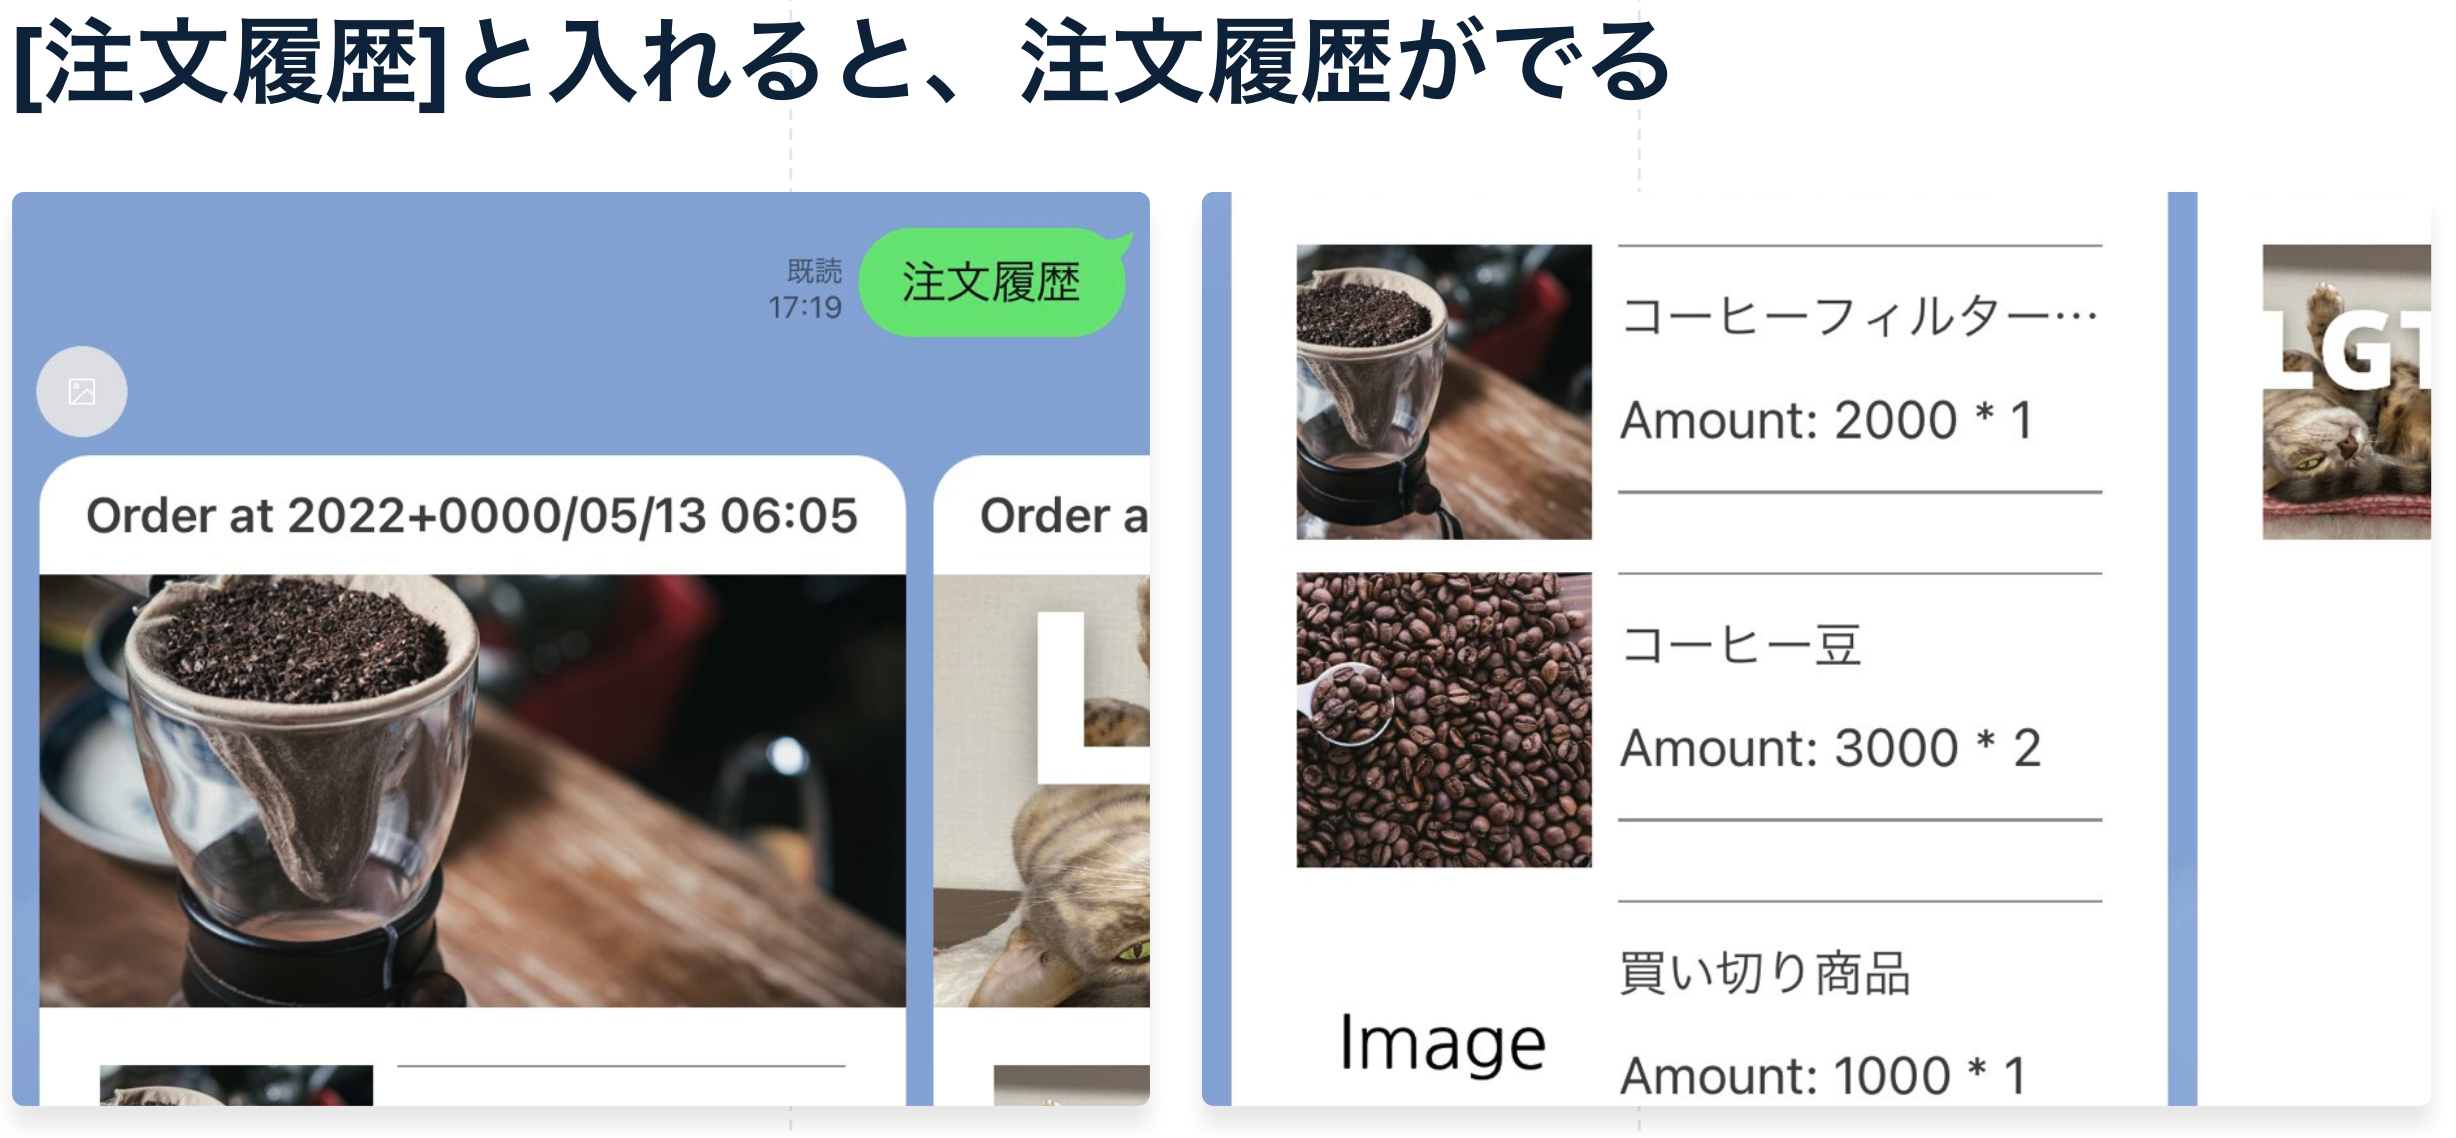
完成イメージ
セッション資料
Step1: 注文完了時に、StripeのCustomerにLINEのUser IDを設定する
StripeのWebhookを利用して、注文完了時にCustomerのmetadataにLINEのuser idを登録します。
    const data = event.data.object
    if (['checkout.session.completed', 'checkout.session.async_payment_succeeded'].includes(event.type)) {
        const userId = data.metadata.user_id
        if (userId) {
            // put user id to customer
            const customer = await stripe.customers.retrieve(data.customer)
            if (!customer.deleted && !customer.metadata.userId) {
                await stripe.customers.update(customer.id, {
                    metadata: {
                        userId
                    }
                })
            }
        }
    }
Step2: LINE bot用のWebhook APIを用意する
LINE botには、ユーザーがメッセージを送信したタイミングなどで呼び出すwebhook APIを用意します。
セットアップ方法などは、記事作成時に参考にした記事を参考にしてください。
Next.jsの場合、APIはおおよそ以下のようなコードになります。
import { Client, middleware as lineMiddleware } from '@line/bot-sdk'

export const config = {
  api: {
    bodyParser: false,
  },
}

export const client = new Client({
  channelAccessToken: process.env.LINE_CHANNEL_ACCESS_TOKEN || '',
  channelSecret: process.env.LINE_CHANNEL_SECRET || '',
})
export const middleware = lineMiddleware({
  channelAccessToken: process.env.LINE_CHANNEL_ACCESS_TOKEN,
  channelSecret: process.env.LINE_CHANNEL_SECRET || '',
})
const runMiddleware = async (req, res, fn) => {
  return new Promise((resolve, reject) => {
    fn(req, res, (result) =>
      result instanceof Error
        ? reject(result)
        : resolve(result)
    )
  })
}

export default async function handler(req, res) {
  try {
    if (req.method?.toLocaleLowerCase() === 'post') {
      await runMiddleware(req, res, middleware)
      await Promise.all(req.body.events.map(async event => {
          if (event.mode !== 'active') return
          if (event.type === 'follow') {
            return
          }
          if (event.type === 'message') {
            if (event.message.type !== 'text') return
            if (!/注文履歴/.test(event.message.text)) return
            const userId = event.source.userId
            // ここで処理

          }
      }))
    }
    res.status(200).end()
    return
  } catch (e) {
    res.status(500).json(e as any)
  }
}
User IDを利用して、注文履歴を検索する
Webhookでは、event.source.userIdからLINEのUser IDが取得できます。
このデータを利用して、Customerや支払い履歴を取得します。
StripeのCustomerデータを取得する
先ほどmetadataに登録したユーザーIDで顧客データを取得します。
const {data} = await stripe.customers.search({
  query: `metadata['userId']:'${userId}'`
})
const customer = data[0]
Payment Linksを使っている場合などでは、複数の顧客が取得できるケースもあることにご注意ください。
今回の記事では、シンプルにするため、1件だけ取得しています。
Stripeの支払い履歴(Payment Intents)を検索する
Search APIを利用して、指定した月の決済履歴を検索しましょう。
日付の範囲指定には、dayjsを利用しています。
    const targetMonth = dayjs().subtract(0, 'month')
    const {data: intents} = await stripe.paymentIntents.search({
      query: [
        `created>${targetMonth.startOf('month').unix()}`,
        'AND',
        `created<${targetMonth.endOf('month').unix()}`,
        'AND',
        `customer:"${customerId}"`,
        'AND',
        `status:"succeeded"`,
        'AND',
        'currency:"JPY"',
      ].join(' '),
      limit: 100,
    })
Searchで1度に取得できるデータは、最大100件です。そのため、件数が多い場合には再帰呼び出しが必要です。
Checkoutでの注文内容を取得する
Checkoutでの注文の場合、注文された商品データの取得ができます。
Payment Intentsの取得結果をループさせて、対応するCheckout Sessionのデータを取得しましょう。
  const sessionHistories = await Promise.all(intents.map(async intent => {
    const {data: [session]} = await stripe.checkout.sessions.list({
      payment_intent: intent.id
    })
    if (!session) return null;
    const {data: lineItems} = await stripe.checkout.sessions.listLineItems(session.id)
    return {
      id: session.id,
      amount_total: session.amount_total,
      total_details: session.total_details,
      payment_status: session.payment_status,
      lineItems,
    }
  }))
商品データを取得する
LINEのレスポンスで、商品画像などを出したい場合は、Product APIも呼び出しましょう。
先ほどの作成したsessionHistoriesを渡して、注文されたことのあるProduct IDを収集・整理し、その後にデータ取得を行います。
/**
 * 注文履歴に含まれている商品データをStripeから取得
 */
const listOrderedProducts = async (sessionHistories) => {
  /**
   * 注文履歴からProductのidを取得
   */
  const orderedProductIds = histories.reduce((prev, current) => {
    const customerOrderedProductIds = current.sessionHistories.map(history => {
      return history.lineItems.map(item => {
        const product = item.price.product
        if (!product) return null;
        return typeof product === 'string' ? product : product.id
      })
    })
    const next = Array.from(new Set([...prev, ...customerOrderedProductIds.flat()]))
    return next.filter((id) => !!id)
  }, [])

  /**
   * 商品データを取得
   */
  const orderedProducts = await Promise.all(orderedProductIds.map(async id => stripe.products.retrieve(id)))
  return orderedProducts
}
ユーザーへの返答を作成する
最後にレスポンスを作成します。
ここでは、これまでのデータを利用して、Flex MessageのJSONを作成しています。
const sendOrderHistory = async (sessionHistories, lineUserId, products, replyToken) => {

  const carouselColumns = sessionHistories.map((history) => {
    if (!history?.lineItems) return;

    /**
     * カルーセルのメッセージを作成
     */
    const carouselItem: FlexBubble = {
      type: 'bubble',
      header: {
        type: 'box',
        layout: 'vertical',
        contents: [{
          type: "text",
          weight: 'bold',
          text:  `Order at ${dayjs.unix(history.created_at).format('YYYYY/MM/DD HH:MM')}`,
        }],
        paddingAll: '10px',
        paddingStart: '15px',
      },
      body: {
        type: 'box',
        layout: 'vertical',
        contents: history.lineItems.map((lineItem): FlexComponent => {
          const product = products.find(product => product.id === lineItem.price?.product)
          return {
            type: 'box',
            layout: 'horizontal',
            contents: [{
              type: 'box',
              layout: 'vertical',
              contents: [{
                type: "image",
                url: product?.images[0] || "https://i.ibb.co/4dTjScT/Image.png",
                size: 'lg',
                aspectMode: 'cover',
                aspectRatio: '1:1',
              }],
              width: '90px',
              height: '90px',
            }, {
              type: 'box',
              layout: 'vertical',
              contents: [{
                type: 'separator',
                color: '#909090'
              }, {
                type: 'text',
                text: lineItem.description || `Item: ${lineItem.id}`
              }, {
                type: 'text',
                text: `Amount: ${lineItem.amount_total} * ${lineItem.quantity}`
              }, {
                type: 'separator',
                color: '#909090'
              }],
              height: '100px',
              margin: 'md',
              spacing: 'lg'
            }]
          }
        })
      }
    }

    /**
     * Heroに表示する画像URLがあれば、追加する
     **/
    let thumbnailImageUrl: string | null = null;
    for (const lineItem of history.lineItems) {
      const productId = lineItem.price?.product
      if (!productId) continue;
      const product = products.find(({id}) => id === productId)
      if (!product) continue;
      if (product.images.length < 1) continue;
      thumbnailImageUrl = product.images[0]
      break;
    }
    if (thumbnailImageUrl) {
      carouselItem.hero = {
        type: 'image',
        url: thumbnailImageUrl,
        size: 'full',
        aspectMode: 'cover',
        aspectRatio: '2:1',
      }
    }
    return carouselItem
  }).filter((item) => !!item)
  const flexMessageTemplate = {
    type: 'flex',
    altText: "Order history",
    contents: {
      type: 'carousel',
      contents: carouselColumns,
    }
  }

  // bot-sdkで送信
  const client = new Client(config);
  await client.replyMessage(replyToken, flexMessageTemplate)
}
実装が完了すると、以下のように注文履歴が表示されるBotができます。
イベントURL
[PR] Stripe開発者向け情報をQiitaにて配信中!
- [Stripe Updates]:開発者向けStripeアップデート紹介・解説
- ユースケース別のStripe製品や実装サンプルの紹介
- Stripeと外部サービス・OSSとの連携方法やTipsの紹介
- 初心者向けのチュートリアル(予定)
など、Stripeを利用してオンラインビジネスを始める方法について週に2〜3本ペースで更新中です。