この記事は、Hono Advent Calendar 2024 3日目の記事です。
この記事では、Honoを使ってStripeのSDKを利用したAPI開発を行う際に、知っておくと便利なAPIや実装方法を紹介します。
はじめに
StripeでDeveloper Relation ( DevRel )として活動している岡本と申します。Qiitaの記事を作成する際のサンプルコード開発や、Cloudflare WorkerでのサンプルアプリなどでHonoを利用しています。
Hono側でStripeを使った開発に関する相談・Issueが立った際、作者の @yusukebe さんからメンションいただくこともあり、Issueへの回答やDocument記事作成などにもわずかながら参加しています。
この記事では、これらのやり取りやデモアプリ開発などを通した経験を元に、Honoの活用Tipsを紹介します。
Stripe SDKのセットアップは、envとmiddlewareを活用しよう
HonoはCloudflare Workersでも利用するフレームワークです。そのため、環境変数の取得方法が、通常のNode.jsアプリケーションと異なります。Cloudflare / Vercel / AWS Lambdaなど、複数のランタイムでアプリケーションを動作させるためには、env()を利用してAPIキーを取得しましょう。
import { env } from "hono/adapter"
import { Hono } from 'hono'

const app = new Hono()

app.get('/', (context) => {
  const { STRIPE_SECRET_KEY } = env(context)
  const stripe = new Stripe(STRIPE_SECRET_KEY, {
    maxNetworkRetries: 3,
    timeout: 30 * 1000,
  })
  return c.render(<h1>Hello!</h1>)
})

export default app
middlewareでStripe SDKの初期化を1箇所にまとめる
もし複数のAPIでStripe SDKを利用したい場合、それぞれのAPIでnew Stripe()していると、APIバージョンの変更やmaxNetworkRetriesなどの設定変更の抜け漏れの発生する恐れがあります。
例えば下のサンプルコードでは、2つのAPIで利用しているStripe APIのバージョンが異なります。このため、2つ目のAPIで設定されているバージョンではサポートされていないパラメータを送信してしまうことによる、意図しないエラーの発生リスクが存在しています。
app.get('/maintained-api', (context) => {
  const { STRIPE_SECRET_KEY } = env(context)
  const stripe = new Stripe(STRIPE_SECRET_KEY, {
    maxNetworkRetries: 3,
    timeout: 30 * 1000,
    apiVersion: '2024-11-20.acacia'
  })
  return c.render(<h1>Hello!</h1>)
})


app.get('/unmaintained-api', (context) => {
  const { STRIPE_SECRET_KEY } = env(context)
  const stripe = new Stripe(STRIPE_SECRET_KEY, {
    maxNetworkRetries: 3,
    timeout: 30 * 1000,
    apiVersion: '2024-04-10'
  })
  return c.render(<h1>Hello!</h1>)
})
この問題を解消するために、Honoのmiddleware機能を利用します。middlewareを利用することで、Stripe SDKの初期化を1箇所で行うことができます。
import { env } from "hono/adapter"
import { Hono } from 'hono'
import Stripe from 'stripe'

const app = new Hono()

app.use(async (context, next) => {
    const { STRIPE_SECRET_KEY } = env(context)
    const stripe = new Stripe(STRIPE_SECRET_KEY, {
        maxNetworkRetries: 3,
        timeout: 30 * 1000,
        apiVersion: '2024-11-20.acacia'
    })
    context.set("stripe", stripe)
    await next()
})

export default app
このmiddlewareを追加することで、それぞれのAPIはContextから取得するだけでStripe SDKが利用できるようになります。
app.get('/checkout', async context => {
  const stripe = context.get('stripe')

  const session = await stripe.checkout.sessions.create({
    // ... 省略 ...
  })
  return context.redirect(session.url, 303)
})
TypeScriptの型定義は、Variablesを利用する
TypeScriptを利用している場合、次のような型定義設定を行うことで、context.get()した際にもStripe SDKが持つ型定義を利用できます。
const app = new Hono<{
  Variables: {
    stripe: Stripe
  };
  Bindings: {
    STRIPE_SECRET_API_KEY: string;
  };
}>()
特定のパスでのみ、Stripe SDKを利用する方法
Stripe SDKの初期化は1箇所にまとめつつも、利用する予定のないAPIでは除外することもできます。この場合はmiddlewareを登録するパスを絞るようにしましょう。また、context.reqにある情報を使って、「POSTリクエストでのみ利用する」のような設定を行うこともできます。ただしこの場合は、context.get('stripe')がundefinedになる可能性が生まれることへの注意が必要です。下のサンプルでは、「Stripe上の顧客情報や商品上を取得するGET API」を後から追加しようとすると、Stripeクラスがundefinedになるため、エラーが発生します。
-app.use('*', async (context, next) => {
+app.use('/stripe/*', async (context, next) => {
+  if (context.req.method === 'POST') {
    // Load the Stripe API key from context.
    const { STRIPE_API_KEY: stripeKey } = env(context);

    // Instantiate the Stripe client object
    const stripe = new Stripe(stripeKey, {
      maxNetworkRetries: 3,
      timeout: 30 * 1000,
    });

    // Set the Stripe client to the Variable context object
    context.set("stripe", stripe);
+  }

  await next();
});
Factoryを使うこともできる
もう1つの方法として、Routeを作成するFactoryを用意することもできます。この場合は、createFactory().createApp()経由で作成したRouteでのみStripe SDKが利用できます。
import { env } from "hono/adapter";
import { createFactory } from "hono/factory";
import Stripe from "stripe";

export type Env = {
    STRIPE_PUBLISHABLE_KEY: string;
    STRIPE_SECRET_KEY: string;
}

export const stripeAppFactory = createFactory<{
    Bindings: Env;
    Variables: {
        stripe: Stripe
    }
}>({
    initApp: app => {
        app.use(async (context, next) => {
            const { STRIPE_SECRET_KEY } = env(context)
            const stripe = new Stripe(STRIPE_SECRET_KEY, {
                maxNetworkRetries: 3,
                timeout: 30 * 1000,
            })
            context.set("stripe", stripe)
            await next()
        })
    }
})

const app = stripeAppFactory.createApp()
app.get('/', (c) => {
  const stripe = c.get('stripe')
  const session = await stripe.checkout.sessions.create({ ... })
  return c.redirect(session.url, 303)
})
Factoryにもmiddlewareやhandlerが追加できますので、Railsライクな書き方も可能です。
stripeAppFactory.createHandlers(async c => {
  const stripe = c.get('stripe')
  const session = await stripe.checkout.sessions.create({ ... })
  return context.redirect(session.url, 303)
})

stripeAppFactory.createMiddleware(async (c, next) => {
  const stripe = c.get('stripe')
  ...
  await next()
})
Viteでエラーが出ることもあります。
% npm run dev
15:02:17 [vite] Error when evaluating SSR module src/index.tsx: failed to import "/src/libs/factory/stripe.ts"
|- ReferenceError: require is not defined
    at eval (/Users/stripe/sandbox/hono/cwp-stripe-ec/node_modules/qs/lib/index.js:5:17)
    at instantiateModule (file:///Users/stripe/sandbox/hono/cwp-stripe-ec/node_modules/vite/dist/node/chunks/dep-cNe07EU9.js:55058:15)

15:02:17 [vite] Internal server error: require is not defined
この場合は、vite.config.tsのssrを次のように変更しましょう。
import build from '@hono/vite-cloudflare-pages'
import devServer from '@hono/vite-dev-server'
import adapter from '@hono/vite-dev-server/cloudflare'
import { defineConfig } from 'vite'

export default defineConfig({
  plugins: [
    build(),
    devServer({
      adapter,
      entry: 'src/index.tsx'
    })
  ],
+  ssr: {
+    external: ['qs']
+  }
})
Honoを使ったアプリで、決済フォームも提供する方法
HonoはHTMLをレスポンスにするための仕組みも用意されています。この仕組みを利用して、決済フォームの実装も行うことができます。
まずはStripe.jsをscriptタグで読み込みましょう。これによって、ブラウザ上で実行するJavaScriptにて、Stripe.js SDKを実行できます。
app.get('/', (c) => {
  const { STRIPE_PUBLISHABLE_KEY } = env(c)
  return c.html(
    html`
    <script src="https://js.stripe.com/v3" async></script>
    <script>
      window.addEventListener('load', () => {
        const stripe = new window.Stripe("${STRIPE_PUBLISHABLE_KEY}")
      })
    </script>
    `
  )
})
続いて決済処理を行うためのPayment Intents APIを利用します。サーバー側の処理として実行し、ページが読み込みされるたびにPayment Intentsを作成します。
-app.get('/', (c) => {
+app.get('/', async (c) => {
+  const stripe = c.get('stripe')
+  const paymentIntent = await stripe.paymentIntents.create({
+    amount: 1000,
+    currency: 'jpy',
+    metadata: {
+      orderId: Math.floor(Math.random() * 10000)
+    }
+  })
  const { STRIPE_PUBLISHABLE_KEY } = env(c)
  return c.html(
    html`
    <script src="https://js.stripe.com/v3" async></script>
    <script>
      window.addEventListener('load', () => {
        const stripe = new window.Stripe("${STRIPE_PUBLISHABLE_KEY}")
      })
    </script>
    `
  )
})
Cloudflareなど、一部サービスではキャッシュによってPayment Intentが毎回作成されないこともあります。キャッシュを活用したい場合は、別途Payment Intentを作成するPOST APIを用意し、ページ読み込み時にブラウザ側でfetchさせましょう。
作成したPayment Intentのclient_secretを利用することで、Stripe.js SDKを使って決済フォームをマウントできます。
app.get('/', async (c) => {
  const stripe = c.get('stripe')
  const paymentIntent = await stripe.paymentIntents.create({
    amount: 1000,
    currency: 'jpy'
  })
  const { STRIPE_PUBLISHABLE_KEY } = env(c)
  return c.html(
    html`
+    <form id="payment-form">
+        <div id="payment-element"></div>
+        <div id="address-element"></div>
+        <div id="result"></div>
+        <button type="submit">Order</button>
+    </form>
    <script src="https://js.stripe.com/v3" async></script>
    <script>
      window.addEventListener('load', () => {
        const stripe = new window.Stripe("${STRIPE_PUBLISHABLE_KEY}")

+        const options = {
+          clientSecret: "${paymentIntent.client_secret}",
+          appearance: {
+            theme: 'stripe'
+          }
+        }
+        const elements = stripe.elements(options)
+        const paymentElement = elements.create('payment')
+        paymentElement.mount('#payment-element')
+        const addressElement = elements.create('address', {
+          mode: 'billing',
+          appearance: {
+            theme: 'stripe'
+          },
+        })
+        addressElement.mount('#address-element')
      })
    </script>
    `
  )
})
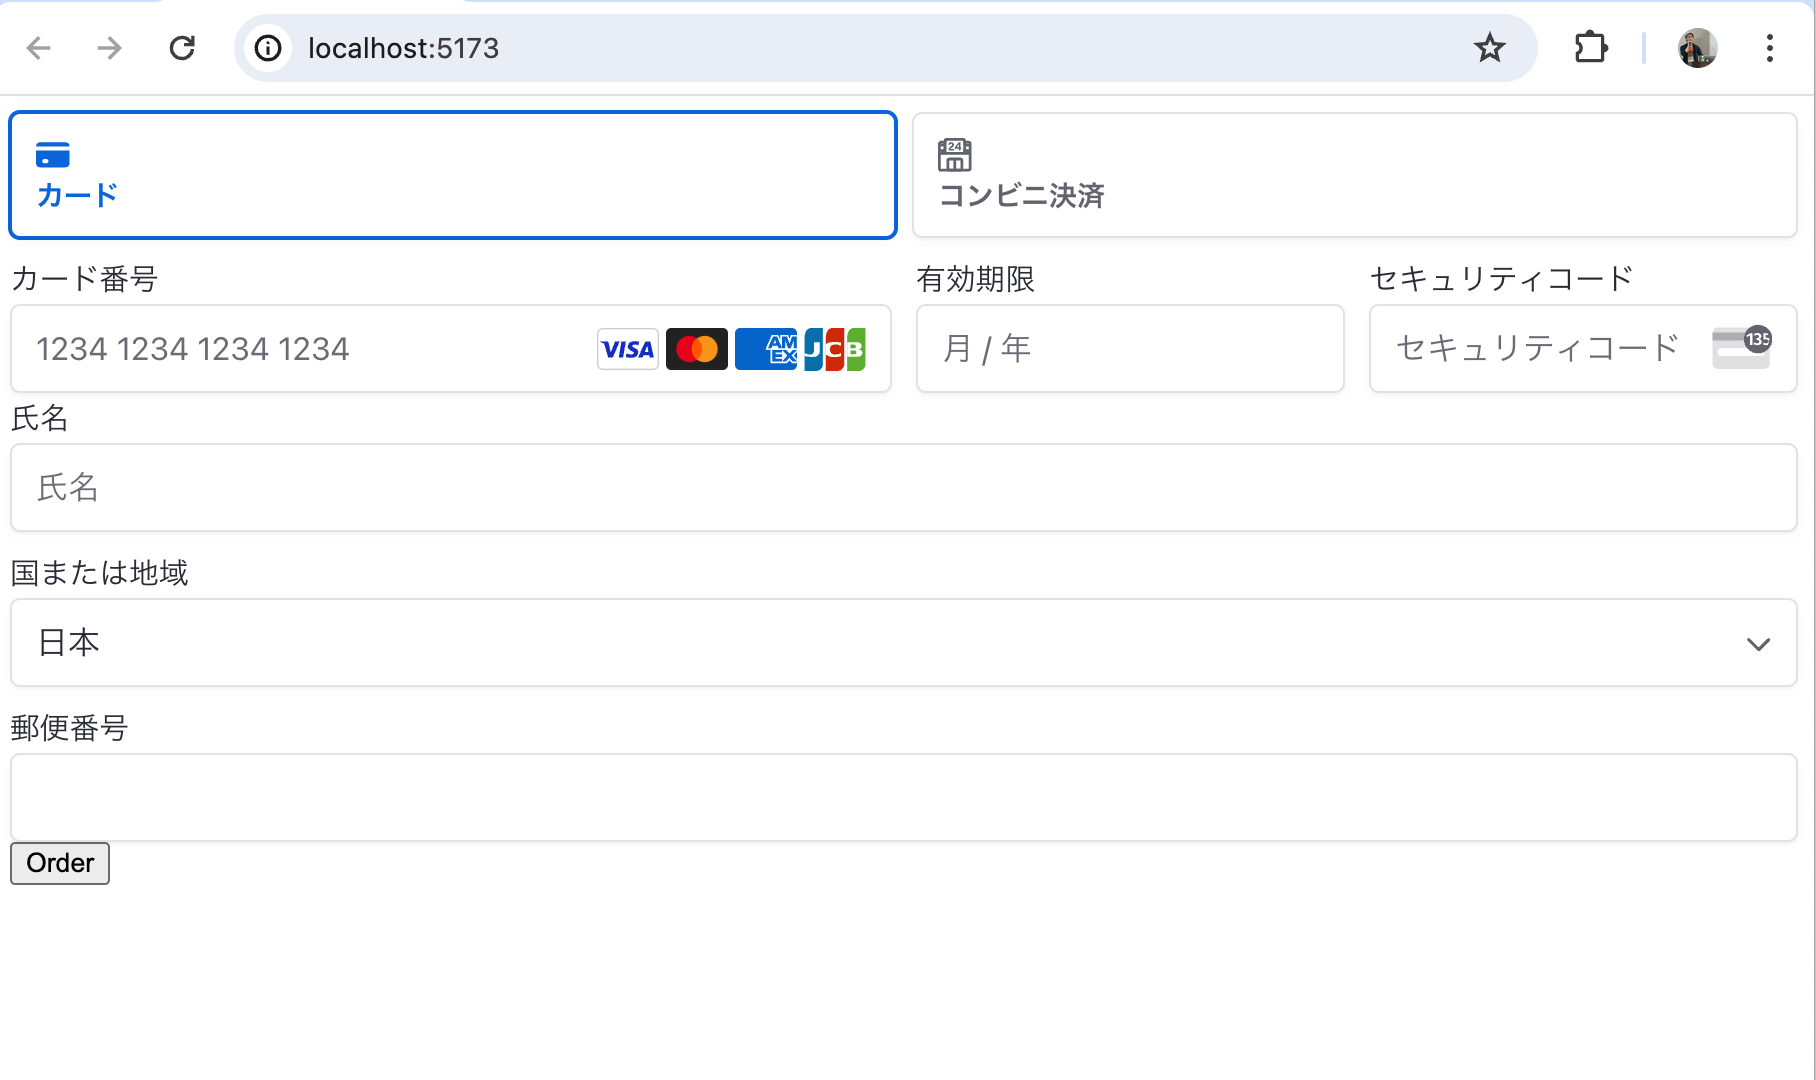
ここまで実装が完了した状態で、開発サーバーにアクセスすると、決済フォームが表示されます。
あとはFormのsubmitイベントをaddEventListenerなどで設定することで、決済を完了させる処理を実行できます。
    <script>
      window.addEventListener('load', () => {
        const stripe = new window.Stripe("${STRIPE_PUBLISHABLE_KEY}")
        /**
         * Render the payment form
         */
        const options = {
          clientSecret: "${paymentIntent.client_secret}",
          appearance: {
            theme: 'stripe'
          }
        }
        const elements = stripe.elements(options)
        const paymentElement = elements.create('payment')
        paymentElement.mount('#payment-element')
        const addressElement = elements.create('address', {
          mode: 'billing',
          appearance: {
            theme: 'stripe'
          },
        })
        addressElement.mount('#address-element')

+        document.getElementById('payment-form').addEventListener('submit', async e => {
+          e.preventDefault()
+          const result = await stripe.confirmPayment({
+            elements,
+            confirmParams: {
+              return_url: 'http://localhost:5173'
+            }
+          })
+        })
      })
    </script>
注文完了後のページの実装にもHonoやStripe.jsを利用できます。決済完了後のリダイレクトで渡されるクエリ文字列(payment_intent)を使って、決済内容を取得し、それを表示することで決済の結果などをユーザーへ見せることができます。
app.get('/thanks', async (c) => {
    const stripe = c.get('stripe')
    const { payment_intent: paymentIntentId } = c.req.query()
    if (!paymentIntentId) {
        return c.redirect('/')
    }
    const paymentIntent = await stripe.paymentIntents.retrieve(paymentIntentId, {
        expand: ['latest_charge']
    })
    const receiptUrl = (paymentIntent.latest_charge as Stripe.Charge).receipt_url
    return c.html(
      html`
      <main>
        <h2>注文 #${paymentIntent.metadata.orderId}</h2>
        <p>ご注文ありがとうございます。発送時にメールでお知らせいたします。</p>
        <p>合計金額: ${paymentIntent.amount.toLocaleString()} ${paymentIntent.currency.toUpperCase()}</p>
        ${receiptUrl ? html`<p>領収書: <a href="${receiptUrl}">ダウンロード</a></p>` : null}
      </main>
      `
    )
})
Tailwindなどでみためを調整すると、このような決済完了ページを表示できます。
まとめ
本記事では、Honoフレームワークを使用してStripe決済を実装する方法について詳しく解説しました。StripeのようなAPIキーを利用するサービスのSDKを利用する際に、安全にAPIキーを取得する方法やクラスの作成方法・そして決済フローの実装などを進める方法を紹介しています。
Honoを効率的に実装する方法を深く理解することで、クラウドサービス・ランタイムに依存しないアプリケーション開発を進めることが可能となります。また、RemixなどのUIフレームワークと併用できるアダプターを使うことで、決済UIを実装する方法についても、本記事で紹介した以上の効率化が期待できます。
この記事をきっかけに、ビジネスの成長度合いやシステム要件に合わせて環境を変更・カスタマイズしやすいアプリケーション開発の手法をめざせるようになると幸いです。
関連ドキュメント

