この記事は、Stripe Apps を25日間紹介し続ける Advent Calendar 2022 9日目の記事です。

ここまでの記事で、「UIコンポーネントの配置方法」「フォーム入力などのイベントのハンドル方法」「Stripe APIの呼び出し方法」を紹介しました。
今回は、この3つを組み合わせて、アプリに顧客情報を更新するフォームを構築してみましょう。
Stripe Appsアプリで、フォームを開発する方法
簡単なサンプルとして、「テストケースに応じた、テスト用クレジットカードを登録する」アプリを作りましょう。
ドキュメントに紹介されている、テスト用のクレジットカード番号を利用して、「特定のテストケースのためのカード情報」をワンクリックで設定できるようにします。
テスト用カード番号を利用するため、本番環境ではご利用いただけません。
Step1: 利用するStripe APIの権限を設定する
まずは利用するAPIの権限を設定しましょう。
ここでは、顧客情報の読み込み・更新と決済方法の追加を行います。
そのため、Stripe CLIでそれぞれの権限を設定しましょう。
$ stripe apps grant permission customer_write "for demo application"
$ stripe apps grant permission payment_method_write  "for demo application"
それぞれの権限名は、ドキュメントからご確認ください。
Step2: フォームのUIを実装する
続いてテストケースに対応したカード情報を入力するフォームを作りましょう。
src/views/App.tsxに以下のコードを追加します。
import { Box, ContextView, FormFieldGroup, Radio } from "@stripe/ui-extension-sdk/ui"
import type { ExtensionContextValue } from "@stripe/ui-extension-sdk/context"
import BrandIcon from "./brand_icon.svg"
import { FC } from 'react'

type TestCard = {
  label: string;
  cardNumber: string;
}

/**
 * @see https://stripe.com/docs/testing
 **/
const testCardTypes: Array<TestCard> = [{
  label: "VISA",
  cardNumber: "4242424242424242"
}, {
  label: "disputes",
  cardNumber: "4000000000002685"
}, {
  label: "Declied card",
  cardNumber: "4000000000000341"
}]

const TestCardForm:FC<{ customerId?: string }> = ({ customerId }) => {
  if (!customerId) return null
  return (
    <Box css={{
      gap: 'medium',
      stack: 'y',
    }}>
      <FormFieldGroup
        legend="Testing card type"
        layout="column"
      >
        {testCardTypes.map(card => (
          <Radio
            key={card.cardNumber}
            name="cardType"
            label={card.label}
            onChange={(e) => {
              console.log(e.target.checked)
            }}
          />
        ))}
      </FormFieldGroup>
      <Box
        css={{
          alignSelfX: 'end'
        }}
      >
        <Button
          type="primary"
          onPress={(e) => {
            console.log(e)
          }}
        >
          Save
        </Button>
      </Box>
    </Box>
  )
}

const App = ({ environment }: ExtensionContextValue) => {
  return (
    <ContextView
      title="Test card register"
      brandColor="#F6F8FA" // replace this with your brand color
      brandIcon={BrandIcon} // replace this with your brand icon
    >
      <TestCardForm customerId={environment.objectContext?.id} />
    </ContextView>
  );
};

export default App;
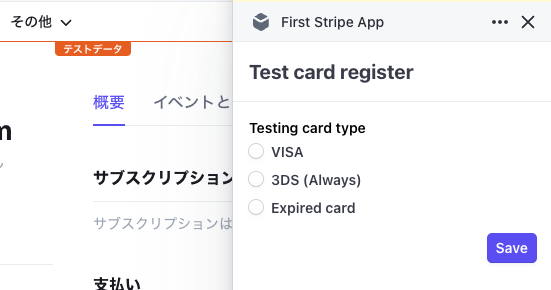
保存すると、testCardTypesで定義したカードの種類を選ぶ画面が表示されます。
Step3: useStateで、フォームに入力された情報をハンドルする
画面が用意できましたので、選択したテスト用カードを保存する仕組みを作りましょう。
まずuseStateを利用して、選択中のカード情報をstateに保存します。
-import { FC } from 'react'
+import { FC, useState } from 'react'

...


const TestCardForm:FC<{ customerId?: string }> = ({ customerId }) => {
+  const [testCard, setTestCard] = useState<TestCard | null>(null)
  if (!customerId) return null
  return (
    <Box css={{
      gap: 'medium',
      stack: 'y',
    }}>
      <FormFieldGroup
        legend="Testing card type"
        layout="column"
      >
        {testCardTypes.map(card => (
          <Radio
            key={card.cardNumber}
            name="cardType"
            label={card.label}
            onChange={(e) => {
-              console.log(e.target.checked)
+              setTestCard(card)
            }}
          />
        ))}
      </FormFieldGroup>
+      <Box>{JSON.stringify(testCard, null, 2)}</Box>

...
デバッグのため、useStateにセットされた値を見るための要素を追加しています。
次の画像のように、選択したカード情報が表示されていればOKdesu.

Step4: Buttonのイベントハンドラを使って、カード情報を保存する
選択したカードを、顧客の決済手段として登録する処理を作りましょう。
formのonSubmitに相当するイベントが2022/12時点ではないため、ButtonのonPressイベントで発火します。
import { FC, useState} from 'react'
+import { showToast } from '@stripe/ui-extension-sdk/utils';
+import { createHttpClient, STRIPE_API_KEY } from '@stripe/ui-extension-sdk/http_client'
+import Stripe from 'stripe'
+const stripe = new Stripe(STRIPE_API_KEY, {
+  httpClient: createHttpClient(),
+  apiVersion: '2022-11-15',
+})

...


-      <Box>{JSON.stringify(testCard, null, 2)}</Box>
      <Box
        css={{
          alignSelfX: 'end'
        }}
      >
        <Button
          type="primary"
-          onPress={(e) => {
+          onPress={async (e) => {
-            console.log(e)
+            if (!testCard) return
+            const today = new Date()
+            const paymentMethod = await stripe.paymentMethods.create({
+              type: 'card',
+              card: {
+                number: testCard?.cardNumber,
+                exp_month: today.getMonth() + 1,
+                exp_year: today.getFullYear() + 1,
+                cvc: '123',
+              }
+            })
+            await stripe.paymentMethods.attach(paymentMethod.id, {
+              customer: customerId
+            })
+            await showToast("Saved the test card", {
+              type: "success"
+            })
          }}
        >
          Save
        </Button>
      </Box>
    </Box>
  )
}
ユーザーがカード情報を入力する際は、本来SetupIntentとStripe ElementsかCheckoutを利用します。
https://stripe.com/docs/payments/setup-intents?locale=ja-JP
ですが今回は3DSの認証や有効期限のバリデーションなどは不要ですので、Payment Method APIで直接登録しています。
Saveボタンをクリックして、画面下に成功メッセージが表示されれば成功です。

Step5: ダッシュボードの顧客情報を更新する
Stripe SDKを利用して、顧客情報などの更新ができました。
しかしよく見ると、ダッシュボード側の顧客情報が更新されていません。
アプリ側の変更をダッシュボードにも反映させるために、数行コードを追加しましょう。
-import { showToast } from '@stripe/ui-extension-sdk/utils';
+import { useRefreshDashboardData, showToast } from '@stripe/ui-extension-sdk/utils';


...


const TestCardForm:FC<{ customerId?: string }> = ({ customerId }) => {
  const [testCard, setTestCard] = useState<TestCard | null>(null)
+  const refreshDashboardData = useRefreshDashboardData()


...

            await stripe.paymentMethods.attach(paymentMethod.id, {
              customer: customerId
            })
+            await refreshDashboardData()
            await showToast("Saved the test card", {
              type: "success"
            })
これで保存成功後に、ダッシュボードが再読み込みされます。
おわりに
このように、Stripe Appsのアプリを作ることで、Stripe上の様々なデータにアクセスしたり、情報を更新できます。
請求業務や顧客サポートなどで、複数のページを行ったり来たりして行う作業がある場合、今回のサンプルを応用して、カスタムワークフローを構築できます。
Stripe Appsひとりアドベントカレンダー 2022
今年ベータリリースされたばかりのStripe Appsは、まだ日本語の情報が多くありません。
そこでQiita Advent Calendar 2022にて、毎日Stripe Appsについての情報を投稿します。
ノーコードで利用する方法や、開発するためのTipsなども紹介予定ですので、ぜひ購読をお願いします。