この記事は、Stripe Apps を25日間紹介し続ける Advent Calendar 2022 7日目の記事です。
アプリを開発する中で、「フォームへの情報入力」や「ボタンクリック」など、さまざまなユーザー操作を処理する必要があります。
この記事では、@stripe/ui-extension-sdkを使って、ボタンクリックなどのイベントを処理する方法を紹介します。
コンポーネントごとの、onXXXプロパティで関数を設定する
クリックや入力などの操作を受け付けるコンポーネントには、onPressやonChangeなどのイベント処理用プロパティが用意されています。
例えばボタン要素の場合、onPressでクリック時に実行したい処理を記述できます。
import { Button } from '@stripe/ui-extension-sdk/ui'
import { FC } from 'react'

const ExampleButton: FC = () => {
  return (
    <Button
      onPress={(e) => {
        console.log(e)
      }}
    >
      Click it!
    </Button>
  )
}
このボタンをクリックすると、ブラウザのコンソールにイベントの中身が表示されます。
そのほかのコンポーネントについては、ドキュメントにてご確認ください。
Tips: TypeScriptで、ハンドラー関数を型安全に作る方法
onPressなどのイベントハンドラの型定義は、React.ComponentPropsを利用して取得できます。
先ほどのButtonコンポーネントの場合次のように書き換えることができます。
import { Button } from '@stripe/ui-extension-sdk/ui'
import { FC } from 'react'

+ type ButtonProps = React.ComponentProps<typeof Button>
const ExampleButton: FC = () => {
  const handleOnPress: ButtonProps['onPress'] = (e) => {
    console.log(e)
  }
  return (
    <Button
-      onPress={(e) => {
-        console.log(e)
-      }}
+      onPress={handleOnPress}
    >
      Click it!
    </Button>
  )
}
この書き方を覚えると、カスタムHookの作成などがやりやすくなりますので、ぜひお試しください。
フォームを実装する際の注意点
通常、入力フォームを実装する際は、formタグのsubmitイベントで送信処理を行います。
ですがStripe Appsの場合、フォームについてもButtonのonPressで処理する必要があります。
import { Box, ContextView, Button, Switch, FormFieldGroup, TextField } from "@stripe/ui-extension-sdk/ui";
import { FC } from 'react'

const FormExample: FC = () => {
  const handleSubmit: ButtonProps['onPress'] = (e) => {
    console.log(e)
  }
  return (
    <Box css={{
      gap: 'medium',
      stack: 'y',
    }}>
      <FormFieldGroup legend="Full name" description="Enter your full name">
        <TextField label="First name" placeholder="First name" hiddenElements={['label']} />
        <TextField label="Last name" placeholder="Last name" hiddenElements={['label']} />
      </FormFieldGroup>
      <FormFieldGroup legend="Spiffy settings" layout="column">
        <Switch label="Enable transmogrifier" description="Scientific progress goes 'boink'" />
        <Switch label="Set zorcher on 'shake and bake'" description="Note: blasters may be useless against slime" />
      </FormFieldGroup>
      <Box
        css={{
          alignSelfX: 'end'
        }}
      >
        <Button
          type="primary"
          onPress={handleSubmit}
        >
          Save
        </Button>
      </Box>
    </Box>
  )
}
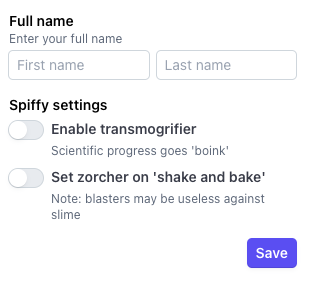
このコードは、次のような見た目になります。
入力値のハンドルをする場合は、TextFieldなどの要素のonChangeとuseStateを組み合わせます。
import { Box, FormFieldGroup, TextField } from "@stripe/ui-extension-sdk/ui";
import { FC, useState } from 'react'

const Greeding: FC = () => {
  const [firstName, setFirstName] = useState('')
  const [lastName, setLastName] = useState('')
  return (
    <Box css={{
      gap: 'medium',
      stack: 'y',
    }}>
      <FormFieldGroup legend="Full name" description="Enter your full name">
        <TextField
          label="First name"
          placeholder="First name"
          hiddenElements={['label']}
          onChange={(e) => setFirstName(e.target.value)}
        />
        <TextField
          label="Last name"
          placeholder="Last name"
          hiddenElements={['label']}
          onChange={(e) => setLastName(e.target.value)}
        />
      </FormFieldGroup>
...
valueプロパティがなく、useStateなどで入力値の制御ができない点にご注意ください。
初期パラメータを設定したい場合は、defaultValueを利用しましょう。
        <TextField
          label="Last name"
          placeholder="Last name"
+          defaultValue="Due"
          hiddenElements={['label']}
          onChange={(e) => setLastName(e.target.value)}
        />
Stripe Appsひとりアドベントカレンダー 2022
今年ベータリリースされたばかりのStripe Appsは、まだ日本語の情報が多くありません。
そこでQiita Advent Calendar 2022にて、毎日Stripe Appsについての情報を投稿します。
ノーコードで利用する方法や、開発するためのTipsなども紹介予定ですので、ぜひ購読をお願いします。


