Stripe Checkoutを利用することで、クレジットカードの登録画面を簡単に用意することができます。
この記事では、Next.js上にStripe CheckoutとStripe SDKを利用して簡単なカード情報管理画面の構築方法を紹介します。
前準備
Next.jsでのアプリ起動は、create-next-appを利用します。
% npx create-next-app
今回はStripeのシークレットAPIキーを利用します。
Next.jsの場合、.envファイルで環境変数にセットできますので、事前にセットしておきましょう。
.env.local
STRIPE_SECRET_KEY="sk_test_xxxx
また、実装で利用するライブラリを追加でインストールしましょう。
% npm install stripe
また、複数のファイルからStripeクラスを利用しますので、以下のファイルを事前に用意します。
libs/stripe.js
import Stripe from 'stripe'

export const stripe = new Stripe(process.env.STRIPE_SECRET_KEY, {
  apiVersion: '2020-08-27'
})
1: Stripe Checkoutを利用したカード登録画面を用意する
まずはカード情報の登録ができるようにしましょう。
ここでは、APIを1つ用意します。
pages/api/checkout_session.js
// Next.js API route support: https://nextjs.org/docs/api-routes/introduction
import type { NextApiRequest, NextApiResponse } from 'next'
import { stripe } from '../../libs/stripe'

export default async function handler(req, res) {
  if (req.method.toLocaleLowerCase() !== 'post') {
    return res.status(405).end()
  }

  const customer = await stripe.customers.create()
  const checkoutSession = await stripe.checkout.sessions.create({
    mode: 'setup',
    success_url: 'http://localhost:3000',
    cancel_url: 'http://localhost:3000',
    payment_method_types: ["card"],
    customer: customer.id,
    customer_update: {
      name: 'auto'
    }
  })
  return res.status(200).json({
      session_id: checkoutSession.id,
      checkout_url: checkoutSession.url,
      customer_id: customer.id,
  })
}
続けて作成したAPIを利用して、Stripe Checkoutのカード登録ページへのリンクをReact上に構築しましょう。
pages/index.jsx
import { useRouter } from 'next/router';

export const CheckoutPage = () => {
  const { push } = useRouter()
  return (
      <button
        onClick={async () =>{
          const response = await fetch('/api/checkout_session', {
            method:'post'
          }).then(data => data.json())
          if (response.customer_id) {
            window.localStorage.setItem('customer_id', response.customer_id)
          }
          push(response.checkout_url)
        }}
      >カードを登録する</button>
  )
}

export default CheckoutPage
ここでは、ボタンクリック時に先ほど作成したAPIを呼び出ししています。
その後、レスポンスに含まれるcustomer_idとcheckout_urlを利用して処理を進めます。
customer_idを利用して、登録済みカード情報の取得などを行います。本来firebaseやCognito / Auth0などのユーザーメタデータに保存する必要がありますが、今回は便宜上localStorageに一時保存しています。
また、Next.jsのリダイレクト機能を利用して、Stripe Checkoutページへのリダイレクトも実行します。
npm run devなどでアプリを起動すると、以下のようにボタンが表示されます。
ボタンをクリックすると、Stripe Checkoutのカード登録ページにリダイレクトされます。
カード情報の保存に成功すると、元のページにリダイレクトされます。
2: Stripe SDKを利用して、登録したカード情報を一覧表示する
続いて登録したカード情報を確認できる機能を実装しましょう。
カード情報を取得するAPIを追加しましょう。
pages/api/cards/[customer_id].js
import { stripe } from '../../../libs/stripe'

export default async function handler(
  req,
  res
) {
  if (req.method.toLocaleLowerCase() !== 'get') {
    return res.status(405).end()
  }
  const customerId = typeof req.query.customer_id === 'string' ? req.query.customer_id : req.query.customer_id[0]
  const customer = await stripe.customers.retrieve(customerId)
  const paymentMethods = await stripe.paymentMethods.list({
      customer: customer.id,
      type: 'card'
  })
  return res.status(200).json(paymentMethods.data)
}
stripe.paymentMethods.listの引数でtype='card'を指定することで、登録されたカード情報のみを取得しています。
件数が多い場合などは、limit: 100などを設定して対応できますが、101件目以降については再帰処理が必要になりますのでご注意ください。
APIが用意できれば、あとはReactで取得・表示するだけです。
pages/index.jsx
新しくカード一覧を表示するListCardsコンポーネントを用意します。
const ListCards = () => {
  const [cards, setCards] = useState([])
  useEffect(()=>{
    const customerId = window.localStorage.getItem('customer_id')
    if (!customerId) return
    fetch(`/api/cards/${customerId}`)
      .then(data => data.json())
      .then(response => setCards(response))
  },[setCards])

  return (
    <ul>
      {cards.map(pm => (
        <li key={pm.id}>
          {`${pm.card.brand} - **** ${pm.card.last4} (${pm.card.exp_month}/${pm.card.exp_year})`}
        </li>
      ))}
    </ul>
  )
}
あとは作成したコンポーネントを読み込みさせればOKです。
  return (
+    <div>
+    <ListCards />
      <button
        onClick={async () =>{
...
+     </div>
  )
}
簡易的な機能ですが、カード情報が表示されるようになりました。
3: 複数のカードを登録できるようにする
ここまででカードの登録と表示ができるようになりました。
しかしこのままでは、2枚目以降のカードを登録しようとすると、カード一覧に追加されない問題が発生します。
これはCheckoutのセッションを作成する際に毎回Customerを新規作成していることが原因です。
そこでここでは、「Checkoutセッション作成時のリクエストに、Customer IDが含まれている場合は作成を省略する」機能を追加しましょう。
まず、「IDがないときは作成、あるときは取得を行う」関数を作成します。
pages/api/checkout_session.js
/**
 * Customerデータが存在しない場合、新しく作成する。
 * @param customerId {string}
 * @returns
 */
const getOrCreateStripeCustomer = async (customerId?: string) => {
    if (customerId) {
        try {
            const customer = await stripe.customers.retrieve(customerId)
            return customer
        } catch (e) {
            if (!(e instanceof Stripe.StripeAPIError)) {
                throw e
            }
            if (e.code !== 'resource_missing') {
                throw e
            }
        }
    }
    const newCustomer = await stripe.customers.create()
    return newCustomer
}
リクエストに含まれるCustomer IDが何かしらの理由で存在しなくなっている場合、Stripe SDKがThrowするエラーを拾って新規に作成する処理を含めています。
あとは元のCustomer作成処理部分をこの関数で置き換えましょう。
-  const customer = await stripe.customers.create()
+  const customer = await getOrCreateStripeCustomer(req.body.customer_id)
これでAPIリクエストのBodyにcustomer_idが含まれており、そのCustomerデータが存在している場合は、Customer作成処理をスキップするようになります。
最後にReactからの呼び出しでBodyデータを送信するようにしましょう。
          const response = await fetch('/api/checkout_session', {
            method:'post',
+            headers: {
+              "Content-Type": 'application/json'
+            },
+            body: JSON.stringify({
+              customer_id: window.localStorage.getItem('customer_id')
+            })
          }).then(data => data.json())
実際の動作を確認してみましょう。
すでに一度カード情報の登録を行なっているブラウザであれば、2回目からは以下の画像のように、メールアドレスが入力された状態の画面に遷移します。
また、登録完了後のページでも、2枚目以降のカード情報が表示されるようになります。
4: 登録した支払い方法で購入を行う
登録したカードを利用して、決済を行なってみましょう。
支払いについても、Stripe Checkoutが利用できますので、Checkoutのセッション作成APIに少し手を加えます。
pages/api/checkout_session.js
...

export default async function handler(
  req,
  res
) {
    console.log(req.body.customer_id)
  if (req.method.toLocaleLowerCase() !== 'post') {
    return res.status(405).end()
  }
  const customer = await getOrCreateStripeCustomer(req.body.customer_id)

  if (req.body.price_id) {
      const session = await stripe.checkout.sessions.create({
          mode: "payment",
          success_url: `${req.headers.origin}`,
          cancel_url: `${req.headers.origin}`,
          payment_method_types: ["card"],
          customer: customer.id,
          line_items:[{
              price: req.body.price_id,
              quantity: 1
          }]
      })
      return res.status(200).json({
          session_id: session.id,
          checkout_url: session.url,
          customer_id: customer.id,
      })
  }

  const checkoutSession = await stripe.checkout.sessions.create({
    mode: 'setup',
    success_url: `${req.headers.origin}`,
    cancel_url: `${req.headers.origin}`,
    payment_method_types: ["card"],
    customer: customer.id,
    customer_update: {
      name: 'auto'
    }
  })
  return res.status(200).json({
      session_id: checkoutSession.id,
      checkout_url: checkoutSession.url,
      customer_id: customer.id,
  })

}
リクエストBodyにprice_idが存在する場合、カード登録mode='setup'ではなく支払いmode='payment'モードでCheckoutセッションを作成します。
React側でボタンを追加すれば、準備完了です。
      <button
        onClick={async () =>{
          const response = await fetch('/api/checkout_session', {
            method:'post',
            headers: {
              "Content-Type": 'application/json'
            },
            body: JSON.stringify({
              customer_id: window.localStorage.getItem('customer_id'),
              price_id: 'price_xxxxxx'
            })
          }).then(data => data.json())
          if (response.customer_id) {
            window.localStorage.setItem('customer_id', response.customer_id)
          }
          push(response.checkout_url)
        }}
      >商品を購入する</button>
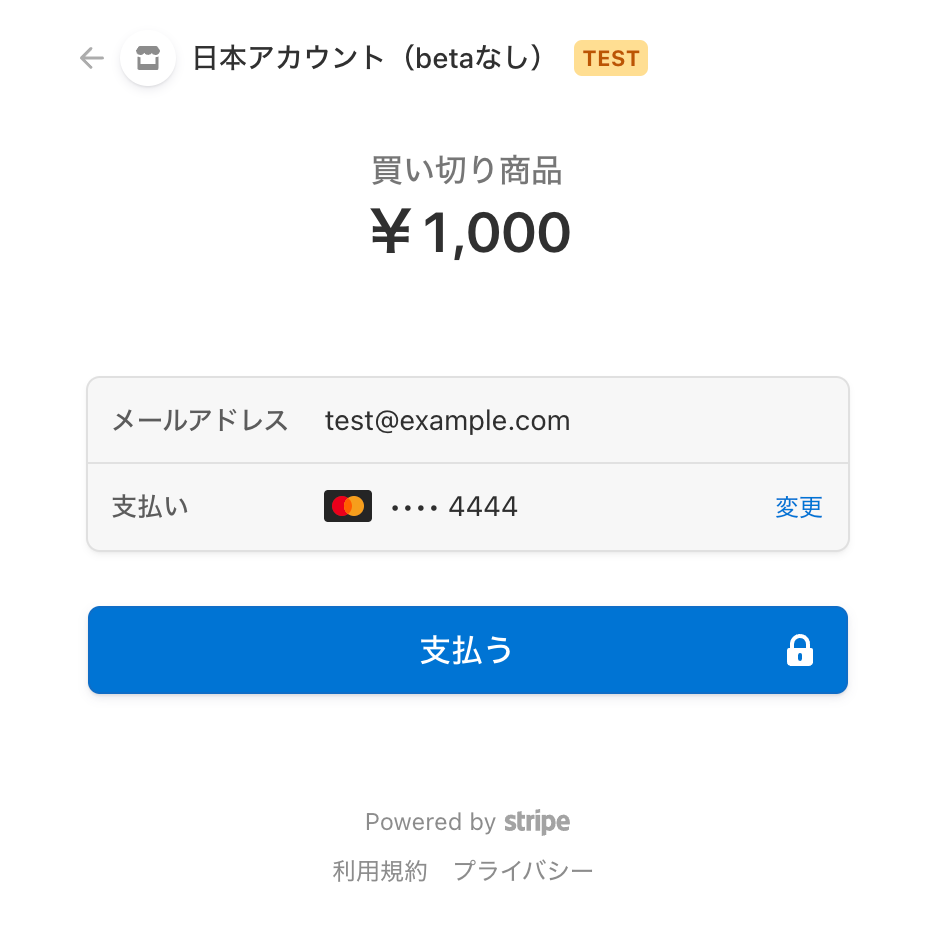
追加した「商品を購入する」ボタンをクリックすると、登録済みのカードを利用して決済する画面が表示されます。
「変更」をクリックすることで、別のカードを利用することもできます。
おわりに
Stripe Checkoutを利用することで、決済だけでなくカード情報の登録画面の提供も可能です。
SaaSやECサイトなどで、事前にカード情報を登録させるUXを提供したい場合には、ぜひmode='setup'でのStripe Checkoutをお試しください。
[PR] Stripe開発者向け情報をQiitaにて配信中!
2021年12月よりQiitaにて、Stripe開発者のためのブログ記事更新を開始しました。
- [Stripe Updates]:開発者向けStripeアップデート紹介・解説
- ユースケース別のStripe製品や実装サンプルの紹介
- Stripeと外部サービス・OSSとの連携方法やTipsの紹介
- 初心者向けのチュートリアル(予定)
など、Stripeを利用してオンラインビジネスを始める方法について随時更新してまいります。


