2024/09/15時点で検証結果に疑義が生じたので再検証します。
再検証の結果も追記しますのでしばらくお待ちください。
2024/09/15検証の結果、Windows OSのネイティブftp機能、ftp.exeはPassiveモードに対応していませんでした!
検証結果が誤っておりました。
申し訳ございません。
子どもも夏休みに入り、絵日記を書いています。
小学1年生の子どもは絵日記が何かわからず、本記事を書きながらまずは日記が何かを説明しました。
日記に絵が付いているのが絵日記で、日記の文章で表現できない部分を絵で捕捉する、と説明したのですがイマイチ理解していないっぽい(恐らく私の説明が下手、かつ日記を宿題で書く意味がわからない)ので、書きかけの本記事を見せながら「パパも絵日記書いてるんやで。技術者の絵日記やで。」と説明しました。絵がスクリーンショット、私はこのスクショを証跡という意味で使っているので微妙に絵日記とは異なりますが、このQiitaという技術者の絵日記は非常に楽しいこと、インターネット上に公開していることから、いろんな方からフィードバック(意見)を貰えて、様々な観点が増えるため自身のスキルアップ(興味のあることを深堀する、より詳しくなることと、子どもには説明しました)非常に有用であると説明したところ、子どもなりに絵日記を書く意味を掴んで納得して書いてくれています。
本記事を書くきっかけ
この4月に転職し、何回目かのQiita記事です。
今までの職場もそうでしたが、新しい職場も技術力のある方や優秀な方が多く、とても楽しい日々を過ごしています。
そんなある日に私のところへ来たこんな問い合わせが本記事を書くきっかけになりました。
「AWS上のWindows Server 2022 DCのEC2から、オンプレミスのLinuxのFTPサーバにFTP接続できません。」
正直「へー、そうなんですね。」って感じでした。
用途も構成も全然わかっていないのですが、たまたまAWS上にEC2を立てたんで私に相談が来たようです。
私がエンジニアになって比較的すぐにGumblarというWebページを改ざんする攻撃が猛威を振るったことがありました。
Gumblarの感染経路として一般的だったのがFTPのWell-Known Portだったので、FTPについてはあまりいい印象はありませんでした。
過去に2度ほどネットワークの案件とGoogle Cloudの案件で少しだけFTPを触っており、その時は
「よくわかんないけど古いファイル転送プロトコルで、Active ModeとPassive Modeがあるのね。」
くらいの認識でした。
正直全然よくわかってなかったので改めて調べてみてわかったことをまとめてみます。
Web検索で出てくる情報、「Windows OSのネイティブFTP機能、ftp.exeはPassiveモードが使えない」
この情報、「Windows OSのネイティブFTP機能、ftp.exeはPassiveモードが使えない」にぶち当たり、過去の2回の案件を振り返ってみて
「あれ?ホンマに?」
って感じでした。
ネットワークの案件の時はRTX1200を使っていたのでパケットフィルタリング機能を用いましたし、FTPはPassiveモードでした。
ただサーバもクライアントもOSが不明だったのでこのftp.exeはPassiveモードが使えないに合致するかどうか確証がありませんでした。
しかし2回目の案件、Google CloudのGCE上にFTPサーバ(Linux、確かCent OS)を構築し、FTPクライアント(確かWindows Client OSとMacが対象)を構築したとき、Passiveモードだったとは思うのですが特にエラーは起きなかった認識です。
ただこの2回目の時もftp.exeはPassiveモードが使えないという情報は確認しており、その時も疑問を持ったことはなんとなく記憶しています。
ただ、私の記憶なので怪しいです。
数々の先達たちがWeb上に残しているftp.exeはPassiveモードが使えないという情報が仮に誤りであれば指摘されずに残っているのもおかしな話ですし、ftp.exeがバージョンアップしていつからかpassiveモードが使えるようになった、ということであれば合点がいくのですが、こういった情報も少なくとも私は見つけられませんでした。
ftp.exeの仕様を調べてみる
Microsoftさんの公式サイトで調べてみましたが、Activeモード、Passiveモードに関する記述を見つけることはできませんでした。
どなたか見つけることができたのであれば大変お手数ですが是非教えてください。
公式情報を探してみても該当の情報が見つからないので検証してみた
はい。
検証するしかないですね。
いったんWindows Server 2022のftp.exeで試してみます。
余力があればバージョンアップでPassiveモードが使えるようになったことを想定し、過去のOSバージョンまで遡ってみます。(自宅の検証環境でWindows 2000 Serverまで遡れます)
FTPのActiveモード、Passiveモードに対する理解(検証環境の構成図)
はい。
では構成図です。
Activeモード
まずはActiveモードから

はい。
めっちゃ簡単な構成図ですね。
構成図と言って良いのでしょうか?
IPアドレスとか書けよ、って感じですよね。
書いてなかったんでIPアドレスはリストにします。
| FTPクライアント | FTPサーバ |
|---|---|
| 172.16.0.82 | 172.16.0.81 |
はい。
簡単ですね。
Passiveモード
はい。
次にPassiveモードです。

はい。
こちらも簡単ですね。
IPアドレスはActiveモードと同じです。
その他条件
FTPサーバのアプリケーションはvsftpを使い、FTPサーバのOSはAlmalinuxです。
Google Cloudの案件の時は確かCent OSだったのですが、現在Cent OSはご存じの通りサポート切れのため複数ある後継OSのうちの一つ、Almalinuxを選定しました。
ActiveモードとPassiveモードの違い
本件で大事な部分ですね。
違いについては前述の構成図内で矢印の向きを用いて記載していますが、それぞれ詳細に説明していきます。
まずはActiveモードとPassiveモードの共通点、制御通信からみてきましょう。
FTPの制御通信
Activeモード、Passiveモードともに、FTPクライアントからFTPサーバ宛にFTPの制御通信をTCP21番ポートに通信します。
この通信でFTPサーバの設定に依りますが、今回は認証ありに設定していますので認証を行います。
Activeモードのデータ通信
ここからはActiveモードとPassiveモードの違いです。
構成図の上から2本目の矢印の向きに注目してもらいたいのですが、ActiveモードはFTPサーバのTCP20番ポートからFTPクライアントの任意のTCPポート宛に通信します。
Passiveモードのデータ通信
続いてPassiveモードですが、構成図の上から2本目の矢印です。
ご覧の通りPassiveモードはFTPクライアントの任意のポートから、FTPサーバが制御通信内で通知してきたFTPサーバの任意のポート宛に通信します。
ActiveモードとPassiveモードのデータ通信の違いをまとめる
はい。
大事な部分なのでまとめます。
| FTPデータ通信 | Source Resource(IP Address) | Destination Resource(IP Address) |
|---|---|---|
| Activeモード | FTPサーバ(172.16.0.81) | FTPクライアント(172.16.0.82) |
| Passiveモード | FTPクライアント(172.16.0.82) | FTPサーバ(172.16.0.81) |
大事な部分なのでまとめますとか言っておいて良い表現が見つからなかったのですが、ようは通信元(Source)と通信先(Destination)がActiveモードとPaasiveモードで互い違いになっています。
当然ポートもActiveモードはFTPサーバの通信元がTCP20番(設定に依って変更は可能)、Paasiveモードはサーバが都度制御通信で提示してくる任意のポートである違いもありますが、そもそも通信元(Source)と通信先(Destination)が逆なんですよね。
これはネットワーク的には看過できない大きな違いです。
どこを検証するのか?
タイトルの通りだとftp.exeがPassiveモードで通信するかどうかなのでこの点だけ検証すれば良いのですが、まずは念のためActiveモードもちゃんと通信するのかも確認しておきましょう。
ftp.exeはActiveモードで接続できるのか?
ということでftp.exeがActiveモードもちゃんと通信するのかも確認します。
検証前の確認
まずはFTPサーバ関連の設定項目です。
FTPサーバの確認
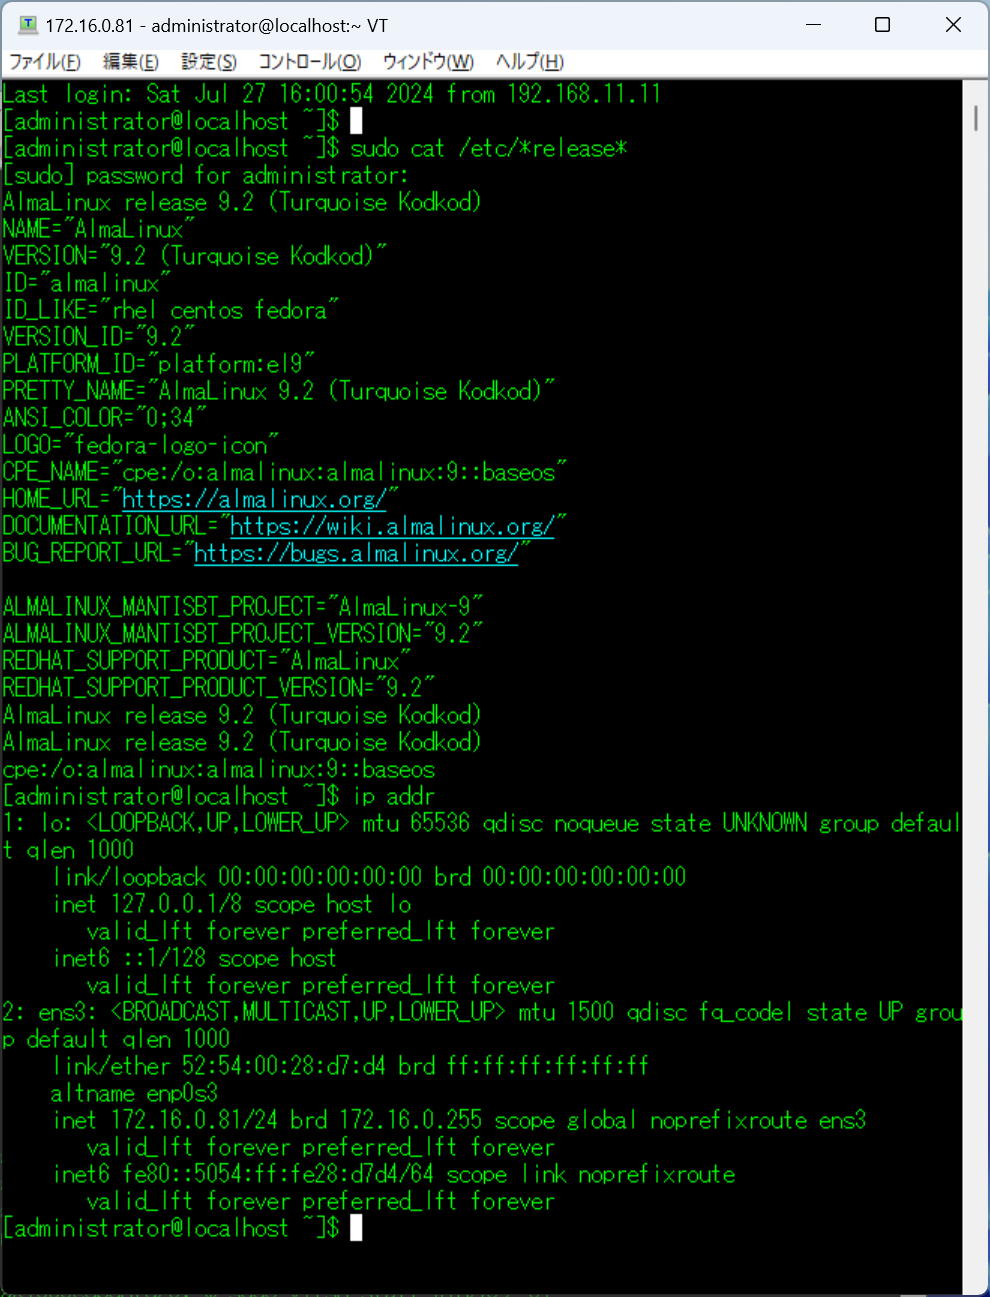
はい。
見ての通りAlimalinux9.2、IPアドレスは172.16.0.81です。
FTPのアプリケーションはvsftpなので、そのConfigファイルも確認します。
sudo cat /etc/vsftpd/vsftpd.confを実行し、結果は以下の通りです。
# Example config file /etc/vsftpd/vsftpd.conf
#
# The default compiled in settings are fairly paranoid. This sample file
# loosens things up a bit, to make the ftp daemon more usable.
# Please see vsftpd.conf.5 for all compiled in defaults.
#
# READ THIS: This example file is NOT an exhaustive list of vsftpd options.
# Please read the vsftpd.conf.5 manual page to get a full idea of vsftpd's
# capabilities.
#
# Allow anonymous FTP? (Beware - allowed by default if you comment this out).
anonymous_enable=NO
#
# Uncomment this to allow local users to log in.
local_enable=YES
#
# Uncomment this to enable any form of FTP write command.
write_enable=YES
#
# Default umask for local users is 077. You may wish to change this to 022,
# if your users expect that (022 is used by most other ftpd's)
local_umask=022
#
# Uncomment this to allow the anonymous FTP user to upload files. This only
# has an effect if the above global write enable is activated. Also, you will
# obviously need to create a directory writable by the FTP user.
# When SELinux is enforcing check for SE bool allow_ftpd_anon_write, allow_ftpd_full_access
#anon_upload_enable=YES
#
# Uncomment this if you want the anonymous FTP user to be able to create
# new directories.
#anon_mkdir_write_enable=YES
#
# Activate directory messages - messages given to remote users when they
# go into a certain directory.
dirmessage_enable=YES
#
# Activate logging of uploads/downloads.
xferlog_enable=YES
#
# Make sure PORT transfer connections originate from port 20 (ftp-data).
connect_from_port_20=YES
#
# If you want, you can arrange for uploaded anonymous files to be owned by
# a different user. Note! Using "root" for uploaded files is not
# recommended!
#chown_uploads=YES
#chown_username=whoever
#
# You may override where the log file goes if you like. The default is shown
# below.
#xferlog_file=/var/log/xferlog
#
# If you want, you can have your log file in standard ftpd xferlog format.
# Note that the default log file location is /var/log/xferlog in this case.
xferlog_std_format=YES
#
# You may change the default value for timing out an idle session.
#idle_session_timeout=600
#
# You may change the default value for timing out a data connection.
#data_connection_timeout=120
#
# It is recommended that you define on your system a unique user which the
# ftp server can use as a totally isolated and unprivileged user.
#nopriv_user=ftpsecure
#
# Enable this and the server will recognise asynchronous ABOR requests. Not
# recommended for security (the code is non-trivial). Not enabling it,
# however, may confuse older FTP clients.
#async_abor_enable=YES
#
# By default the server will pretend to allow ASCII mode but in fact ignore
# the request. Turn on the below options to have the server actually do ASCII
# mangling on files when in ASCII mode. The vsftpd.conf(5) man page explains
# the behaviour when these options are disabled.
# Beware that on some FTP servers, ASCII support allows a denial of service
# attack (DoS) via the command "SIZE /big/file" in ASCII mode. vsftpd
# predicted this attack and has always been safe, reporting the size of the
# raw file.
# ASCII mangling is a horrible feature of the protocol.
#ascii_upload_enable=YES
#ascii_download_enable=YES
#
# You may fully customise the login banner string:
#ftpd_banner=Welcome to blah FTP service.
#
# You may specify a file of disallowed anonymous e-mail addresses. Apparently
# useful for combatting certain DoS attacks.
#deny_email_enable=YES
# (default follows)
#banned_email_file=/etc/vsftpd/banned_emails
#
# You may specify an explicit list of local users to chroot() to their home
# directory. If chroot_local_user is YES, then this list becomes a list of
# users to NOT chroot().
# (Warning! chroot'ing can be very dangerous. If using chroot, make sure that
# the user does not have write access to the top level directory within the
# chroot)
#chroot_local_user=YES
#chroot_list_enable=YES
chroot_local_user=YES
chroot_list_enable=YES
# (default follows)
#chroot_list_file=/etc/vsftpd/chroot_list
chroot_list_file=/etc/vsftpd/chroot_list
#
# You may activate the "-R" option to the builtin ls. This is disabled by
# default to avoid remote users being able to cause excessive I/O on large
# sites. However, some broken FTP clients such as "ncftp" and "mirror" assume
# the presence of the "-R" option, so there is a strong case for enabling it.
#ls_recurse_enable=YES
ls_recurse_enable=YES
#
# When "listen" directive is enabled, vsftpd runs in standalone mode and
# listens on IPv4 sockets. This directive cannot be used in conjunction
# with the listen_ipv6 directive.
listen=NO
#
# This directive enables listening on IPv6 sockets. By default, listening
# on the IPv6 "any" address (::) will accept connections from both IPv6
# and IPv4 clients. It is not necessary to listen on *both* IPv4 and IPv6
# sockets. If you want that (perhaps because you want to listen on specific
# addresses) then you must run two copies of vsftpd with two configuration
# files.
# Make sure, that one of the listen options is commented !!
listen_ipv6=YES

pam_service_name=vsftpd
userlist_enable=YES
use_localtime=YES
allow_writeable_chroot=YES
ftp_data_port=20
pasv_enable=NO
port_enable=YES
やいのやいのデフォルトから弄っているところはありますが、最後の3行、ftp_data_portとpasv_enableとport_enableとがActiveモードでの動作を指定するオプションです。
情報のソースは
https://docs.redhat.com/ja/documentation/red_hat_enterprise_linux/6/html/deployment_guide/s4-ftp-vsftpd-conf-opt-net
こちらです。
FTPクライアントの確認
こちらは簡単ですね。
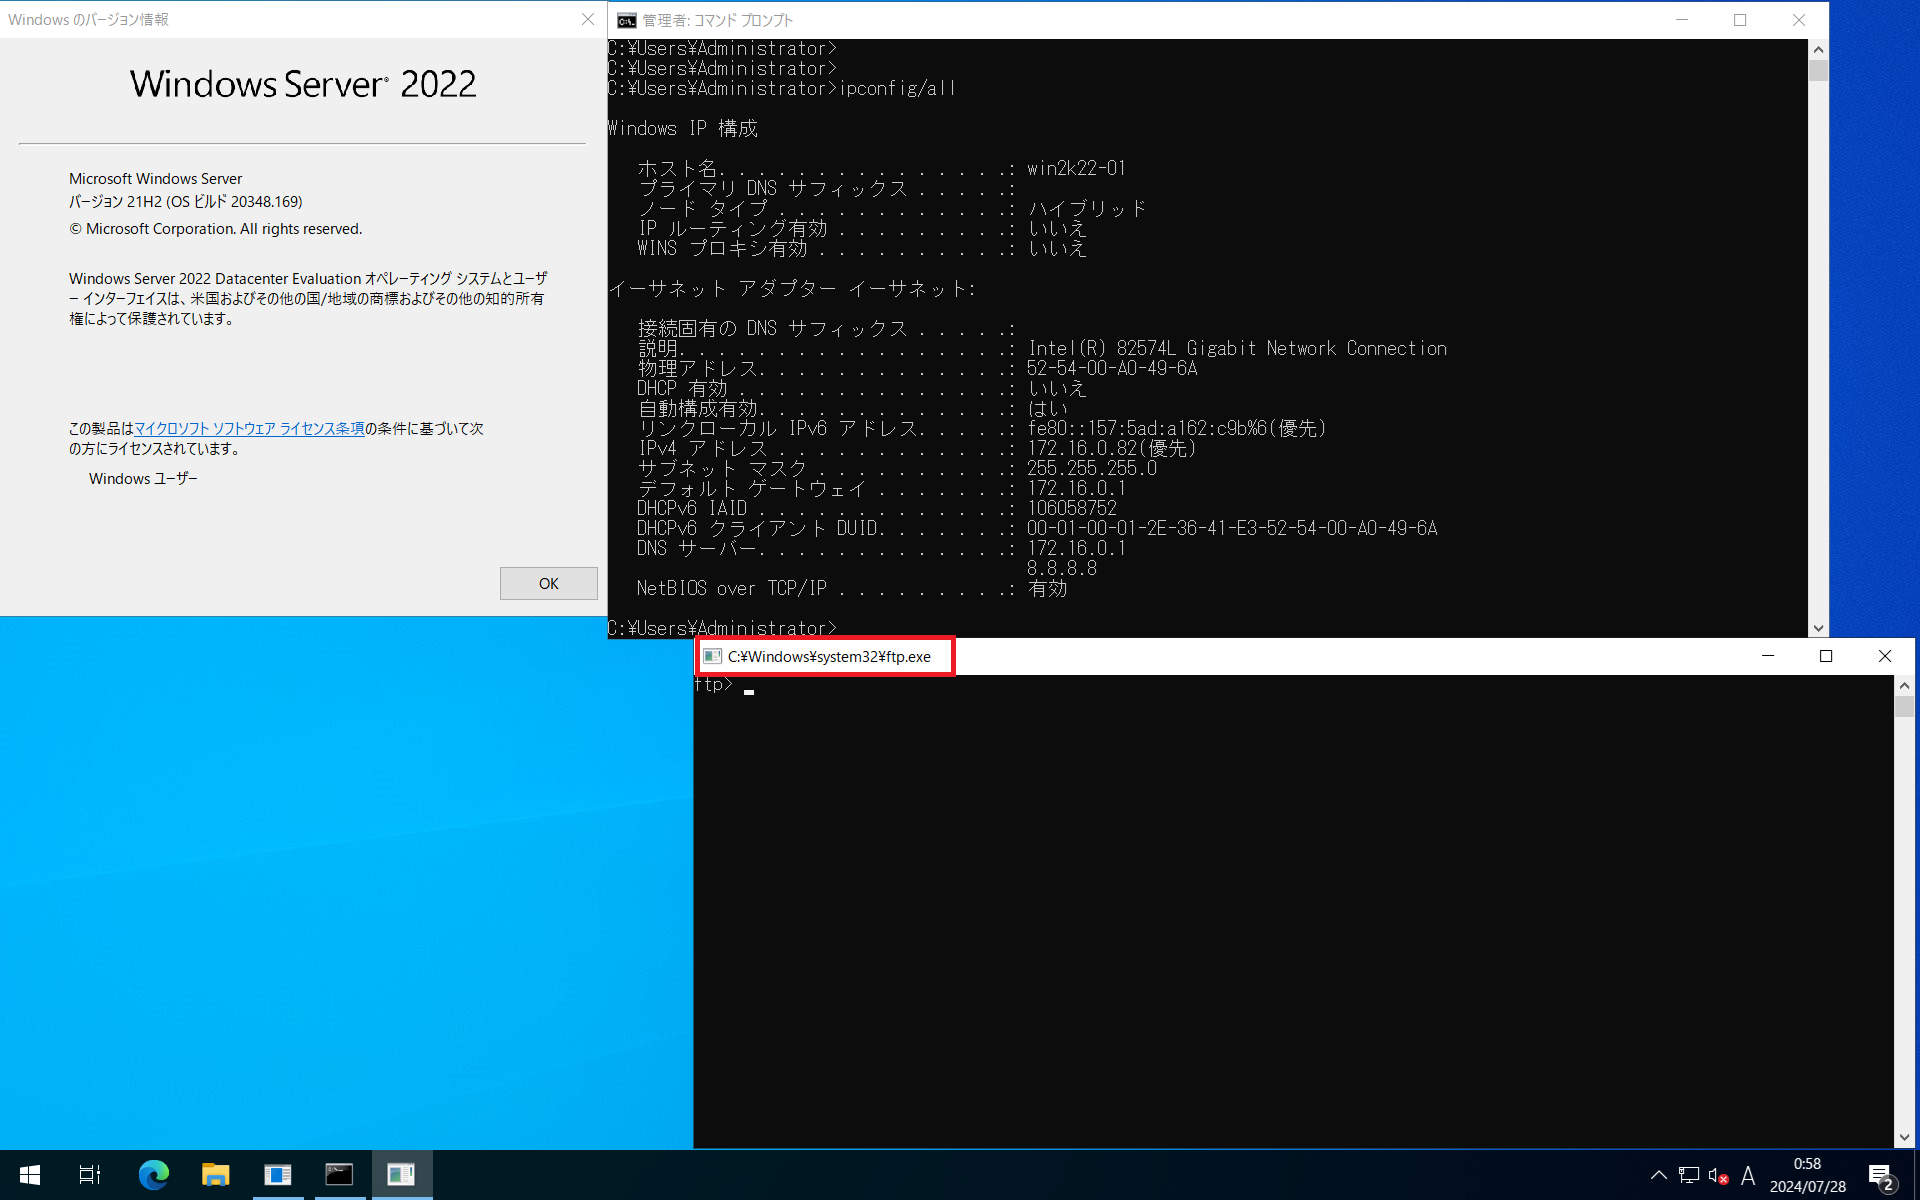
はい。
いつもの仮想マシンです。
このWindows Server 2022で、ファイル名を指定して実行からftp.exeを指定し、ftp.exeを起動します。
図の赤枠内ですね。
【検証】ftp.exeはActiveモードで接続できるのか?
はい。
早速コマンドを実行していきましょう。
FTPクライアント(Windows Server 2022)の管理者権限で開いたコマンドプロンプトで以下のコマンドを実行します。
netsh trace start capture=yes
そしてftp.exeの画面で以下のコマンドを実行します。
open 172.16.0.81
認証を求められるのでユーザーの部分でFTPユーザー名を、パスワードの項目でパスワードを入力し、認証を突破します。
ここまでがActiveモードとPassiveモードの共通シーケンス、制御通信のFTPクライアントの任意のTCPポートを通信元としFTPサーバのTCP20番ポートを通信先とする制御通信です。
認証後、lsコマンドを実行します。
これがActiveモードのデータ通信、即ちFTPサーバの任意のTCPポートを通信元とし、FTPクライアントのTCP20番ポートを通信先とするデータ通信です。

lsコマンド実行後、管理者権限のコマンドプロンプト画面で以下のコマンドを実行します。
netsh trace stop
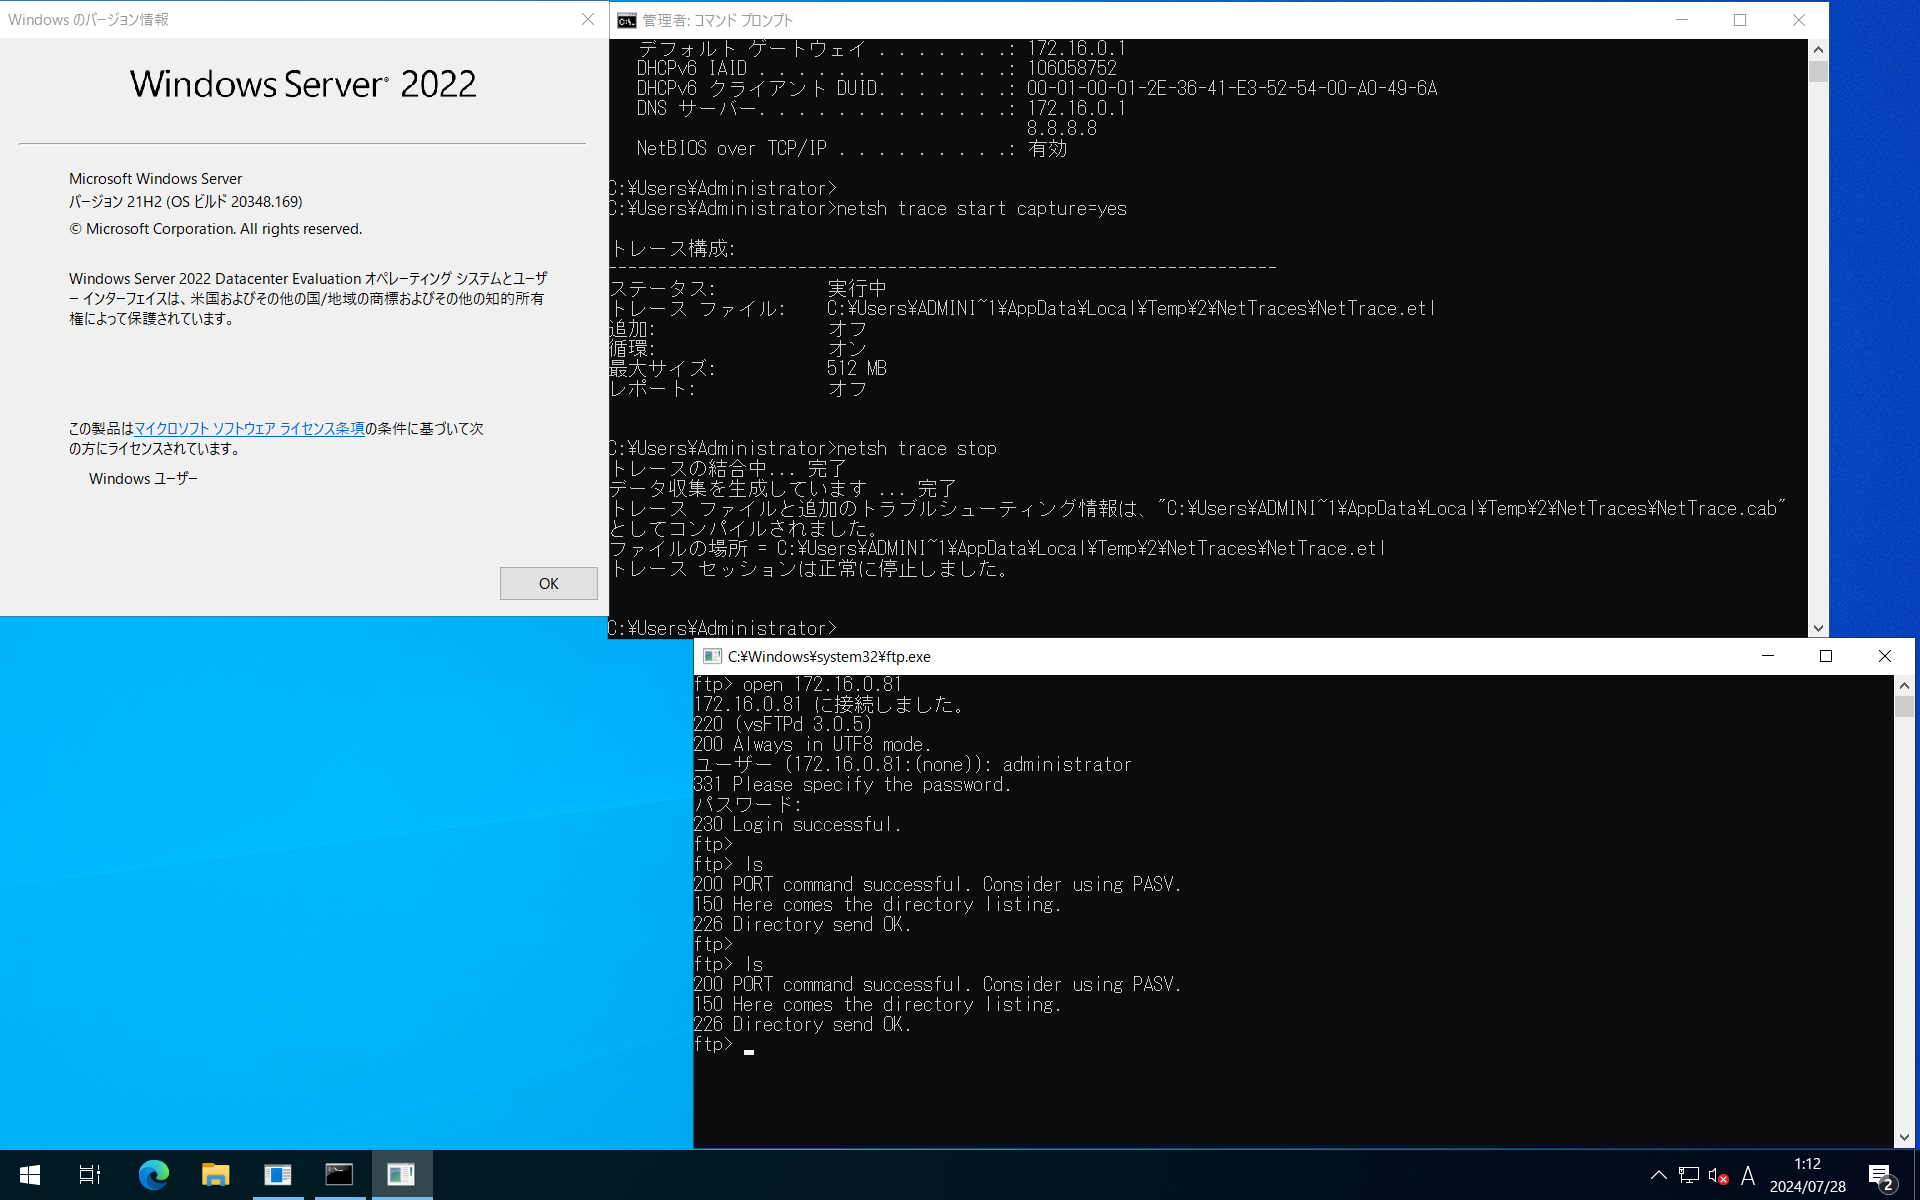
画面にすると1枚に収まり切りましたね。
では実際のパケットキャプチャを見てみましょう。
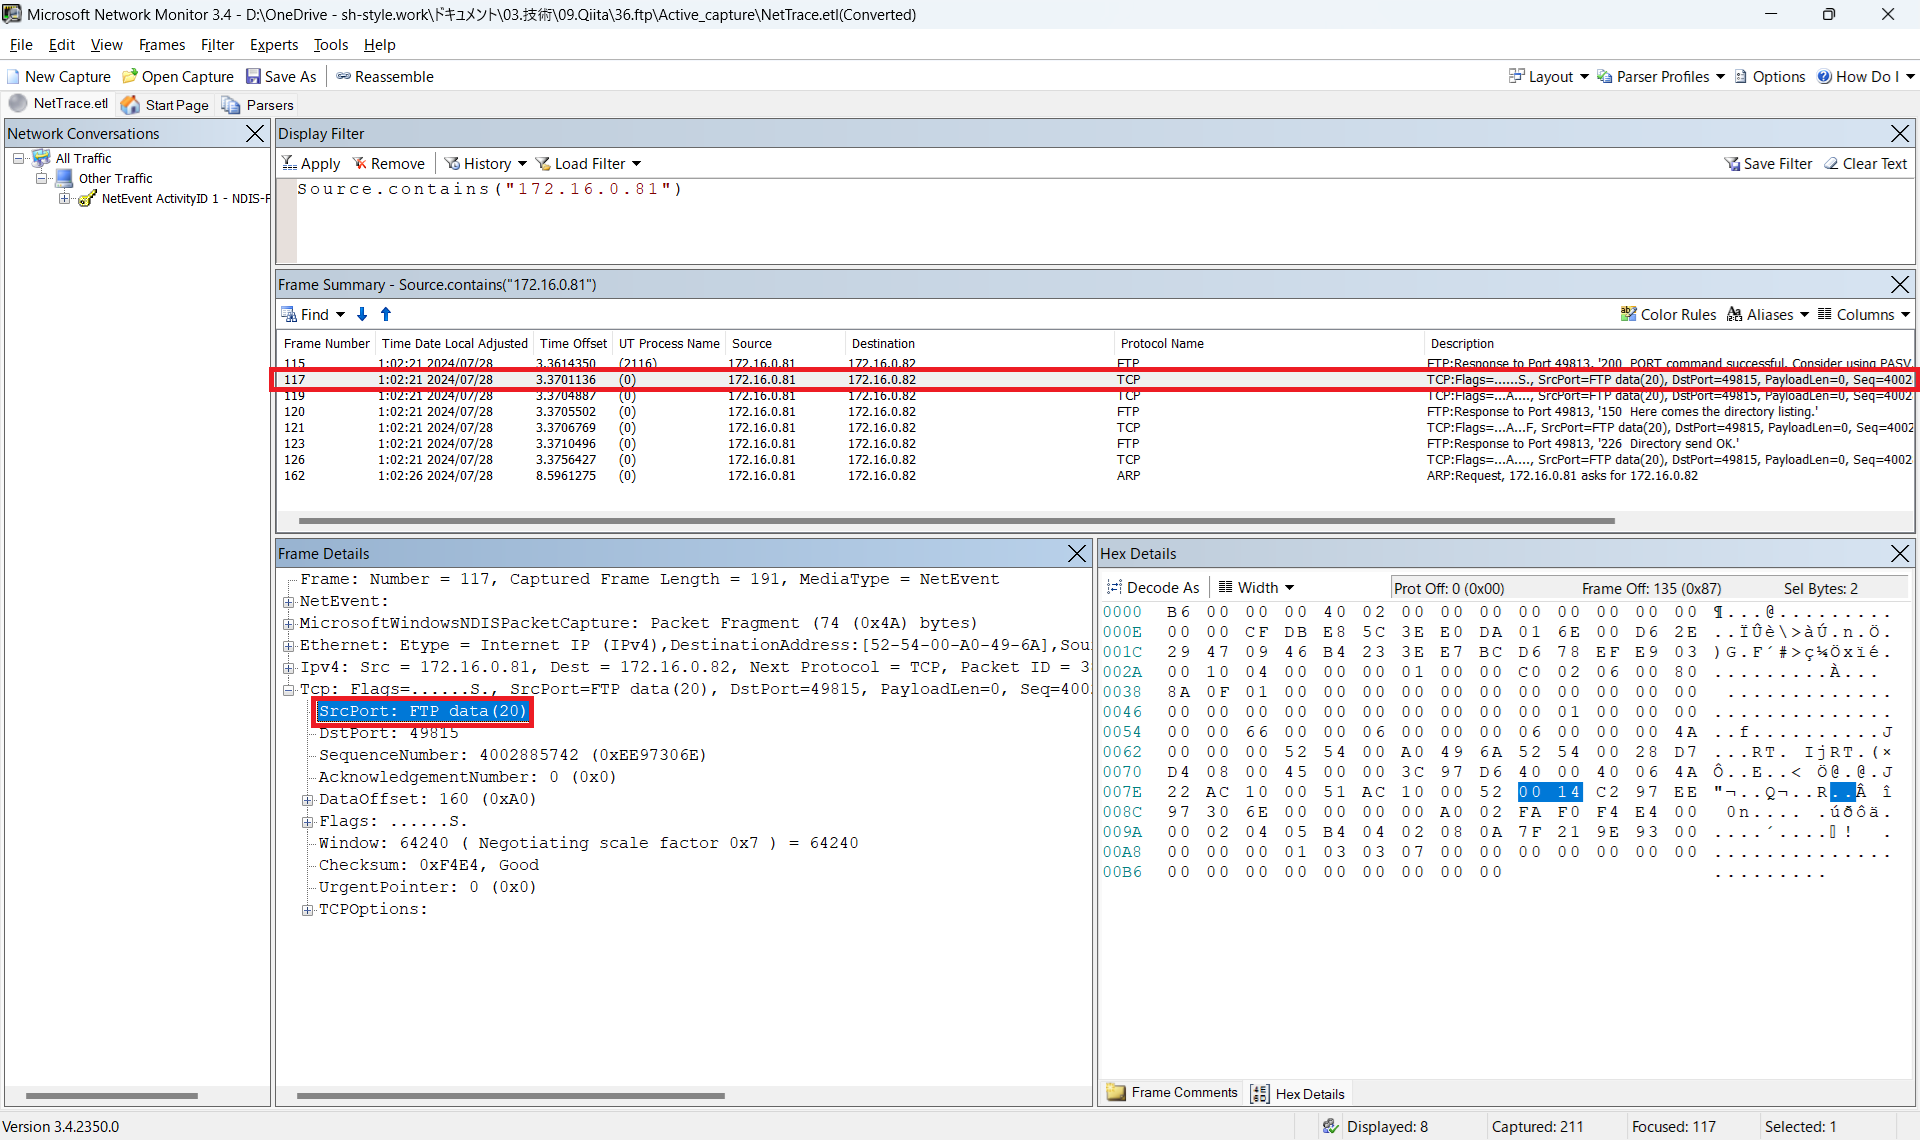
はい。
赤枠内の通り、FTPサーバ(172.16.0.81)のTCP20番ポートを通信元とする通信が行われています。
想定通りですね。
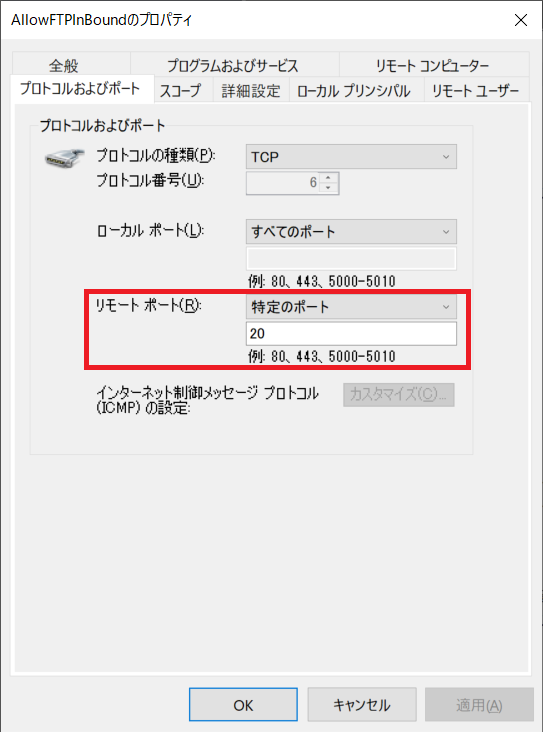
因みにWindows Defender Firewallは次のように開けています。
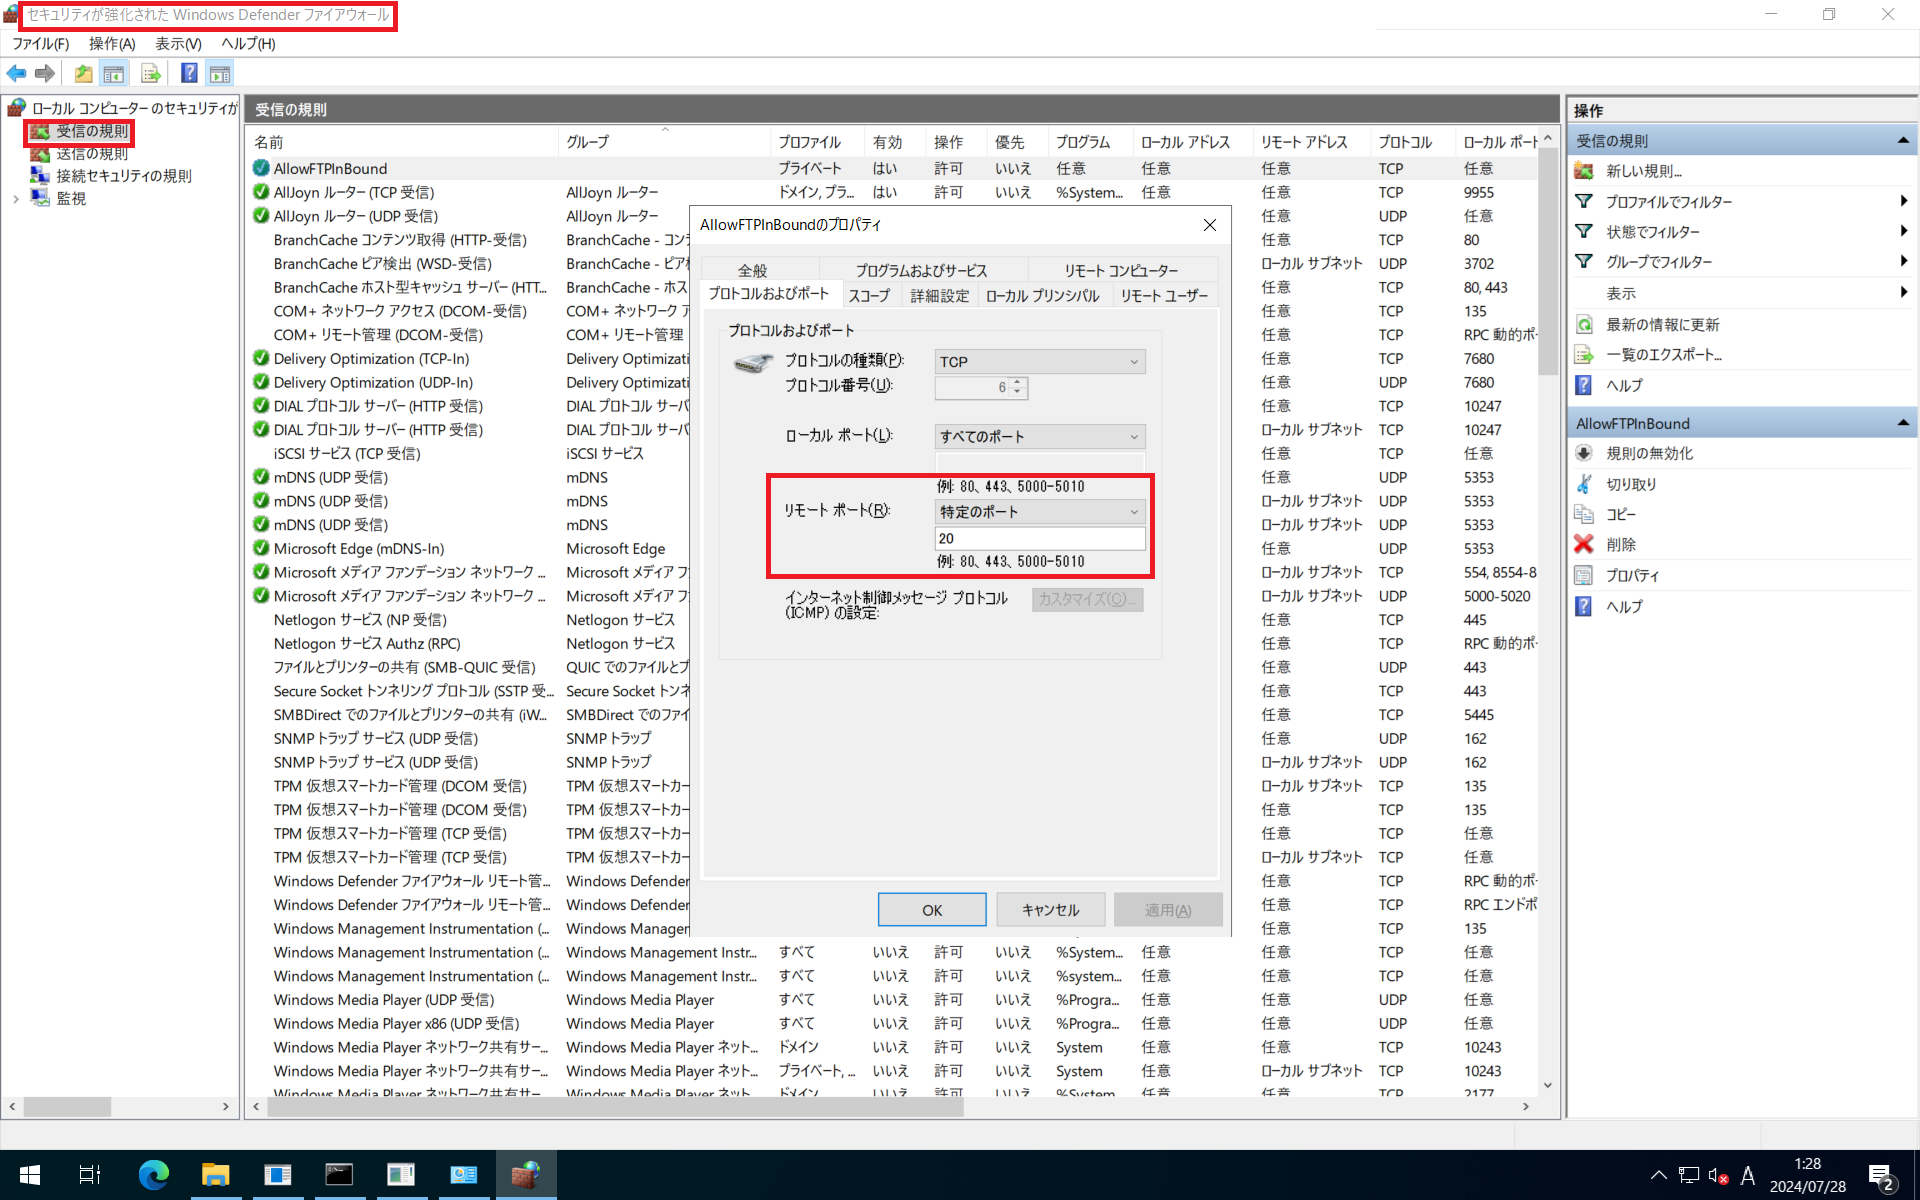
リモート ポートを開ける、というのがポイントですね。
はい。
Activeモードは以上です。
ftp.exeはPassiveモードで接続できるのか?
ということで本記事の本題、ftp.exeがPassiveモードでもちゃんと通信するのかも確認します。
検証前の確認
まずはFTPサーバ関連の設定項目です。
FTPサーバの確認
sudo cat /etc/vsftpd/vsftpd.confの設定変更します。
# Example config file /etc/vsftpd/vsftpd.conf
#
# The default compiled in settings are fairly paranoid. This sample file
# loosens things up a bit, to make the ftp daemon more usable.
# Please see vsftpd.conf.5 for all compiled in defaults.
#
# READ THIS: This example file is NOT an exhaustive list of vsftpd options.
# Please read the vsftpd.conf.5 manual page to get a full idea of vsftpd's
# capabilities.
#
# Allow anonymous FTP? (Beware - allowed by default if you comment this out).
anonymous_enable=NO
#
# Uncomment this to allow local users to log in.
local_enable=YES
#
# Uncomment this to enable any form of FTP write command.
write_enable=YES
#
# Default umask for local users is 077. You may wish to change this to 022,
# if your users expect that (022 is used by most other ftpd's)
local_umask=022
#
# Uncomment this to allow the anonymous FTP user to upload files. This only
# has an effect if the above global write enable is activated. Also, you will
# obviously need to create a directory writable by the FTP user.
# When SELinux is enforcing check for SE bool allow_ftpd_anon_write, allow_ftpd_full_access
#anon_upload_enable=YES
#
# Uncomment this if you want the anonymous FTP user to be able to create
# new directories.
#anon_mkdir_write_enable=YES
#
# Activate directory messages - messages given to remote users when they
# go into a certain directory.
dirmessage_enable=YES
#
# Activate logging of uploads/downloads.
xferlog_enable=YES
#
# Make sure PORT transfer connections originate from port 20 (ftp-data).
#connect_from_port_20=YES
#
# If you want, you can arrange for uploaded anonymous files to be owned by
# a different user. Note! Using "root" for uploaded files is not
# recommended!
#chown_uploads=YES
#chown_username=whoever
#
# You may override where the log file goes if you like. The default is shown
# below.
#xferlog_file=/var/log/xferlog
#
# If you want, you can have your log file in standard ftpd xferlog format.
# Note that the default log file location is /var/log/xferlog in this case.
xferlog_std_format=YES
#
# You may change the default value for timing out an idle session.
#idle_session_timeout=600
#
# You may change the default value for timing out a data connection.
#data_connection_timeout=120
#
# It is recommended that you define on your system a unique user which the
# ftp server can use as a totally isolated and unprivileged user.
#nopriv_user=ftpsecure
#
# Enable this and the server will recognise asynchronous ABOR requests. Not
# recommended for security (the code is non-trivial). Not enabling it,
# however, may confuse older FTP clients.
#async_abor_enable=YES
#
# By default the server will pretend to allow ASCII mode but in fact ignore
# the request. Turn on the below options to have the server actually do ASCII
# mangling on files when in ASCII mode. The vsftpd.conf(5) man page explains
# the behaviour when these options are disabled.
# Beware that on some FTP servers, ASCII support allows a denial of service
# attack (DoS) via the command "SIZE /big/file" in ASCII mode. vsftpd
# predicted this attack and has always been safe, reporting the size of the
# raw file.
# ASCII mangling is a horrible feature of the protocol.
#ascii_upload_enable=YES
#ascii_download_enable=YES
#
# You may fully customise the login banner string:
#ftpd_banner=Welcome to blah FTP service.
#
# You may specify a file of disallowed anonymous e-mail addresses. Apparently
# useful for combatting certain DoS attacks.
#deny_email_enable=YES
# (default follows)
#banned_email_file=/etc/vsftpd/banned_emails
#
# You may specify an explicit list of local users to chroot() to their home
# directory. If chroot_local_user is YES, then this list becomes a list of
# users to NOT chroot().
# (Warning! chroot'ing can be very dangerous. If using chroot, make sure that
# the user does not have write access to the top level directory within the
# chroot)
#chroot_local_user=YES
#chroot_list_enable=YES
chroot_local_user=YES
chroot_list_enable=YES
# (default follows)
#chroot_list_file=/etc/vsftpd/chroot_list
chroot_list_file=/etc/vsftpd/chroot_list
#
# You may activate the "-R" option to the builtin ls. This is disabled by
# default to avoid remote users being able to cause excessive I/O on large
# sites. However, some broken FTP clients such as "ncftp" and "mirror" assume
# the presence of the "-R" option, so there is a strong case for enabling it.
#ls_recurse_enable=YES
ls_recurse_enable=YES
#
# When "listen" directive is enabled, vsftpd runs in standalone mode and
# listens on IPv4 sockets. This directive cannot be used in conjunction
# with the listen_ipv6 directive.
listen=NO
#
# This directive enables listening on IPv6 sockets. By default, listening
# on the IPv6 "any" address (::) will accept connections from both IPv6
# and IPv4 clients. It is not necessary to listen on *both* IPv4 and IPv6
# sockets. If you want that (perhaps because you want to listen on specific
# addresses) then you must run two copies of vsftpd with two configuration
# files.
# Make sure, that one of the listen options is commented !!
listen_ipv6=YES

pam_service_name=vsftpd
userlist_enable=YES
use_localtime=YES
allow_writeable_chroot=YES
#ftp_data_port=20
pasv_enable=YES
#port_enable=YES
大事なのは下3行、ftp_data_port=20をコメントアウトし、pasv_enableをYESからNOに変更し、port_enable=YESをコメントアウトしました。
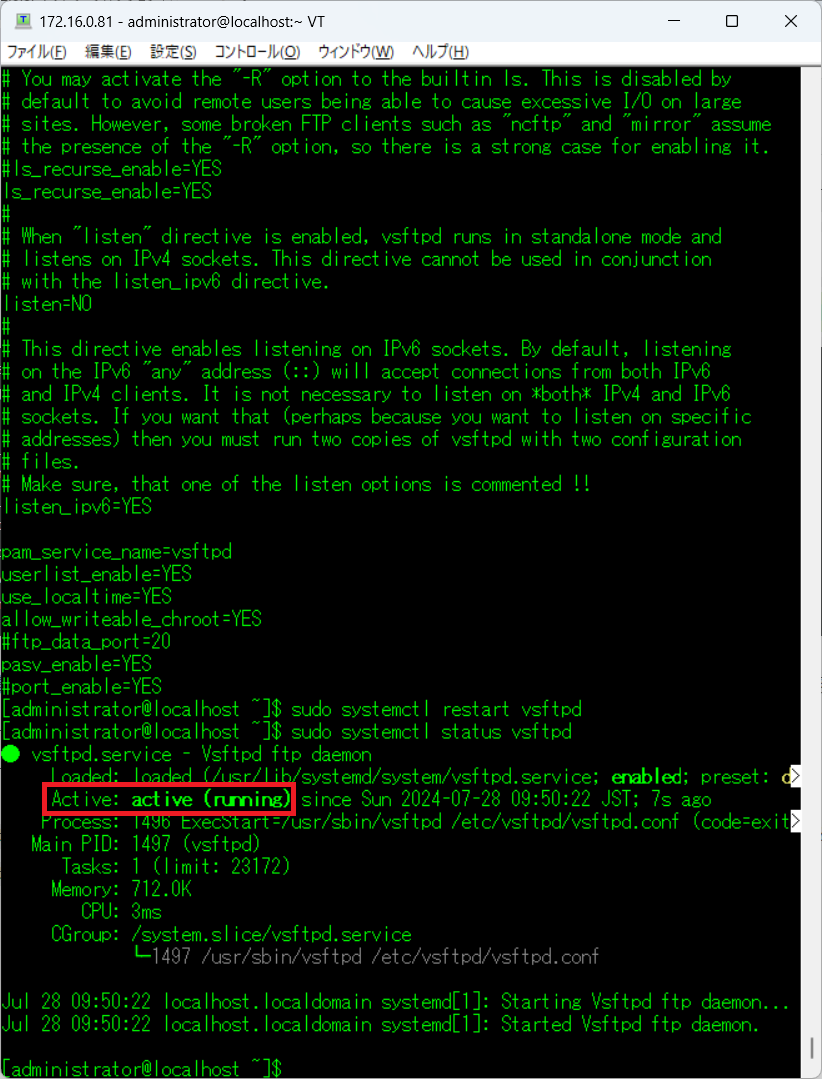
そしてsudo systemctl restart vsfpdコマンドを実行してvsftpdのサービスを再起動します。
sudo systemctl restart vsfpdを実行してエラーが出なければ問題ないのですが、念のためsudo systemctl status vsfpdを実行します。
以下の赤枠ようにActive:Active (Running)と出ていれば問題ありません。
FTPクライアントの確認
赤枠の通りWindows Defender FirewallがActiveモードのままだとPassiveモードでは接続できないので設定変更します。
この設定値を
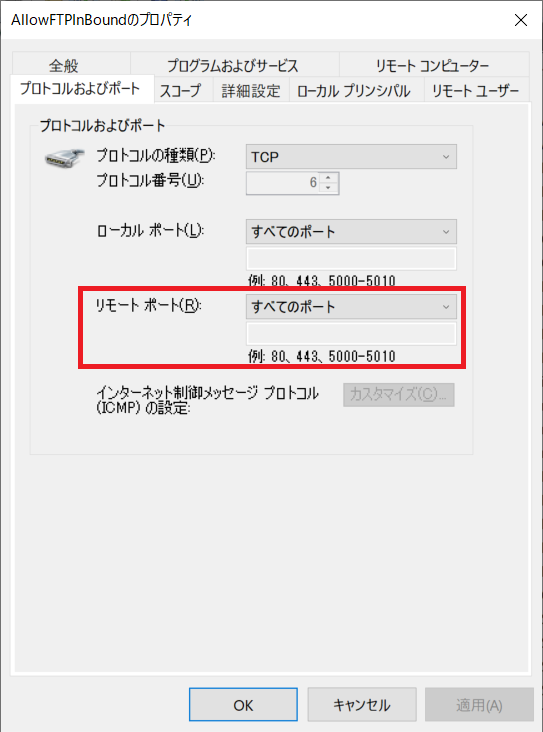
このように変更します。
Passiveモードではデータ通信の通信元になるポート(リモート ポート)は任意なので、Activeモードの時のTCP20番ポートから任意(すべてのポート)に変更します。
【検証】ftp.exeはPassiveモードで接続できるのか?
FTP接続し認証を突破、lsコマンドを実行します。
赤枠のように無事lsコマンドは実行できました。
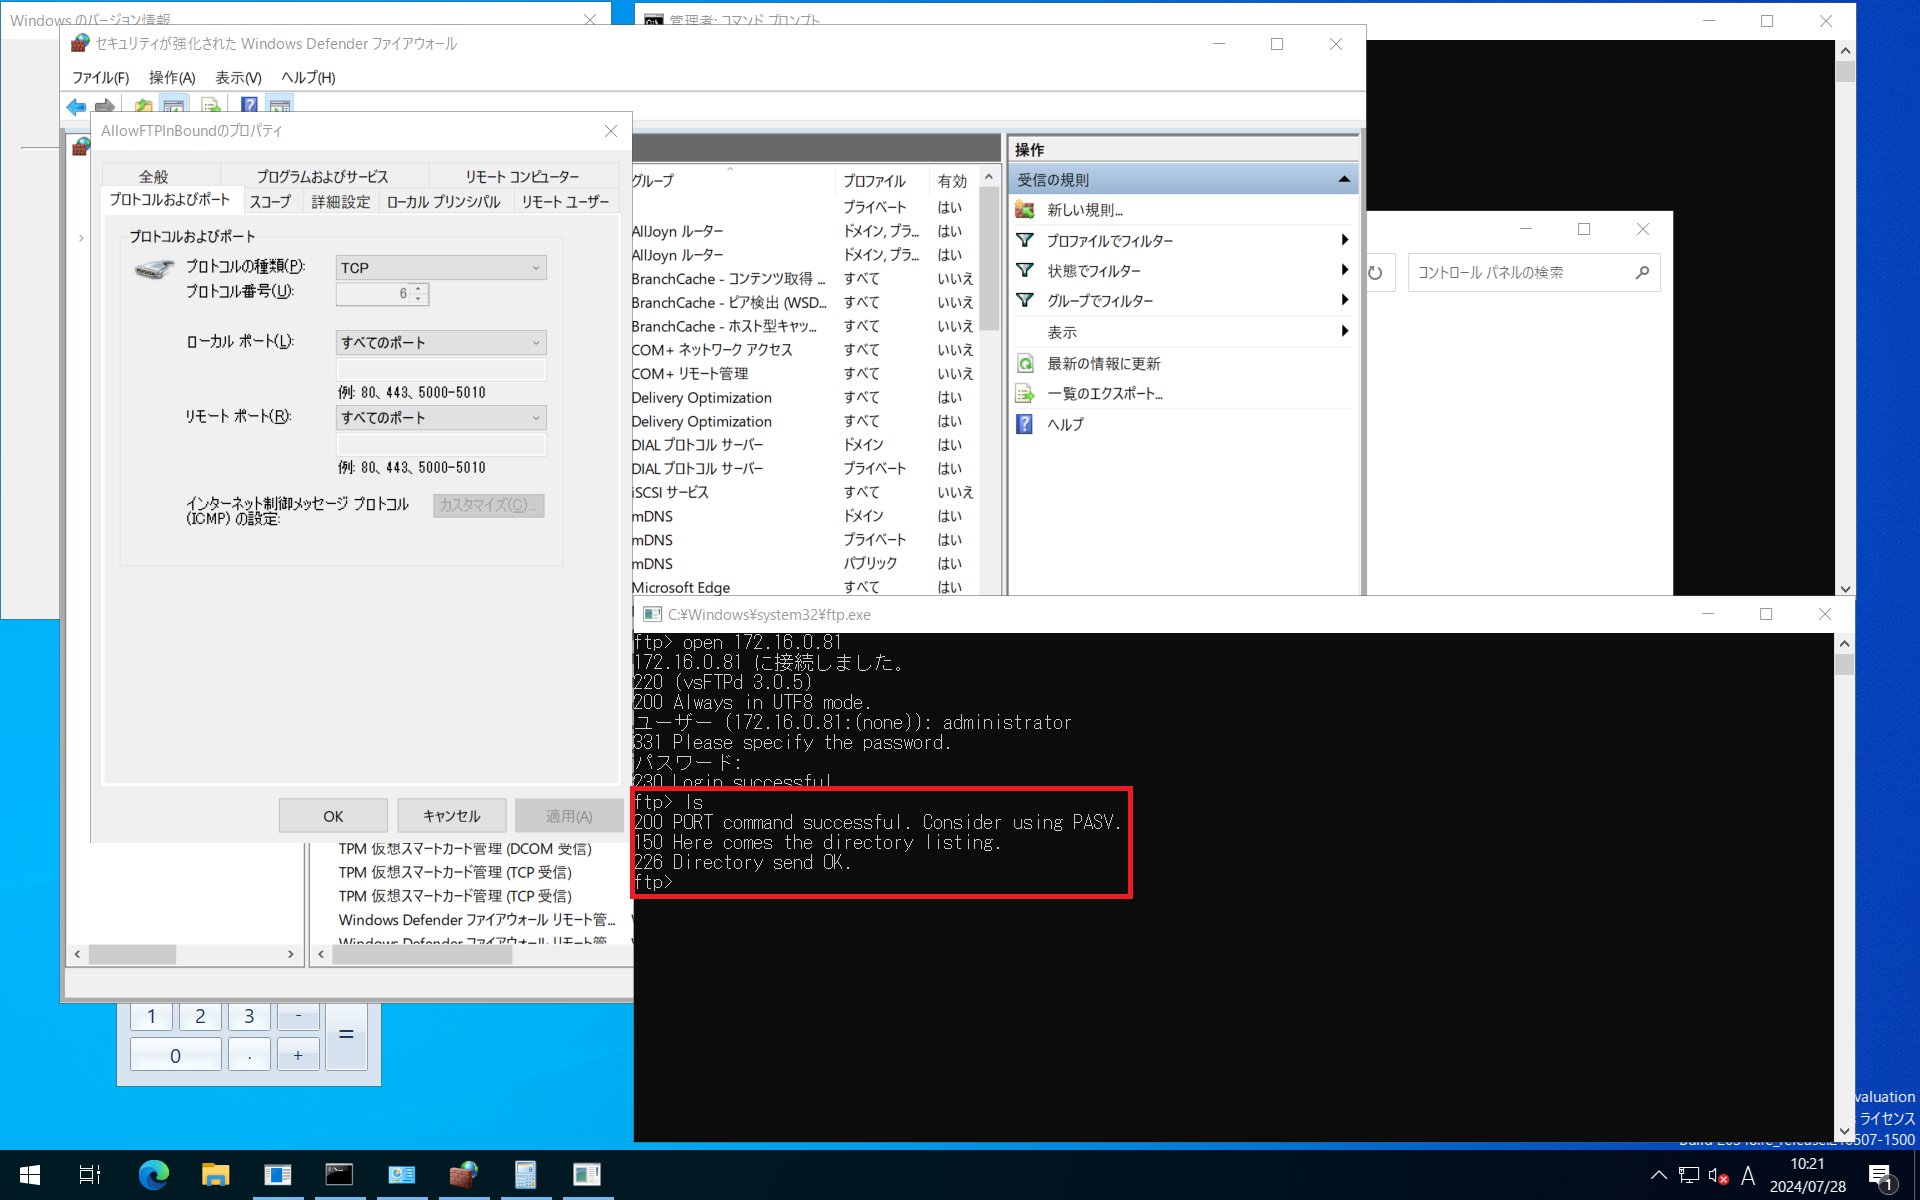
でもこれだと何が何だかわかりませんし、Activeモードでつながっている可能性も否定しきれません。
当然パケットキャプチャは撮るのですが、まずはWindows Defender FirewallをActiveモードの設定値に戻してみて確認してみたいと思います。
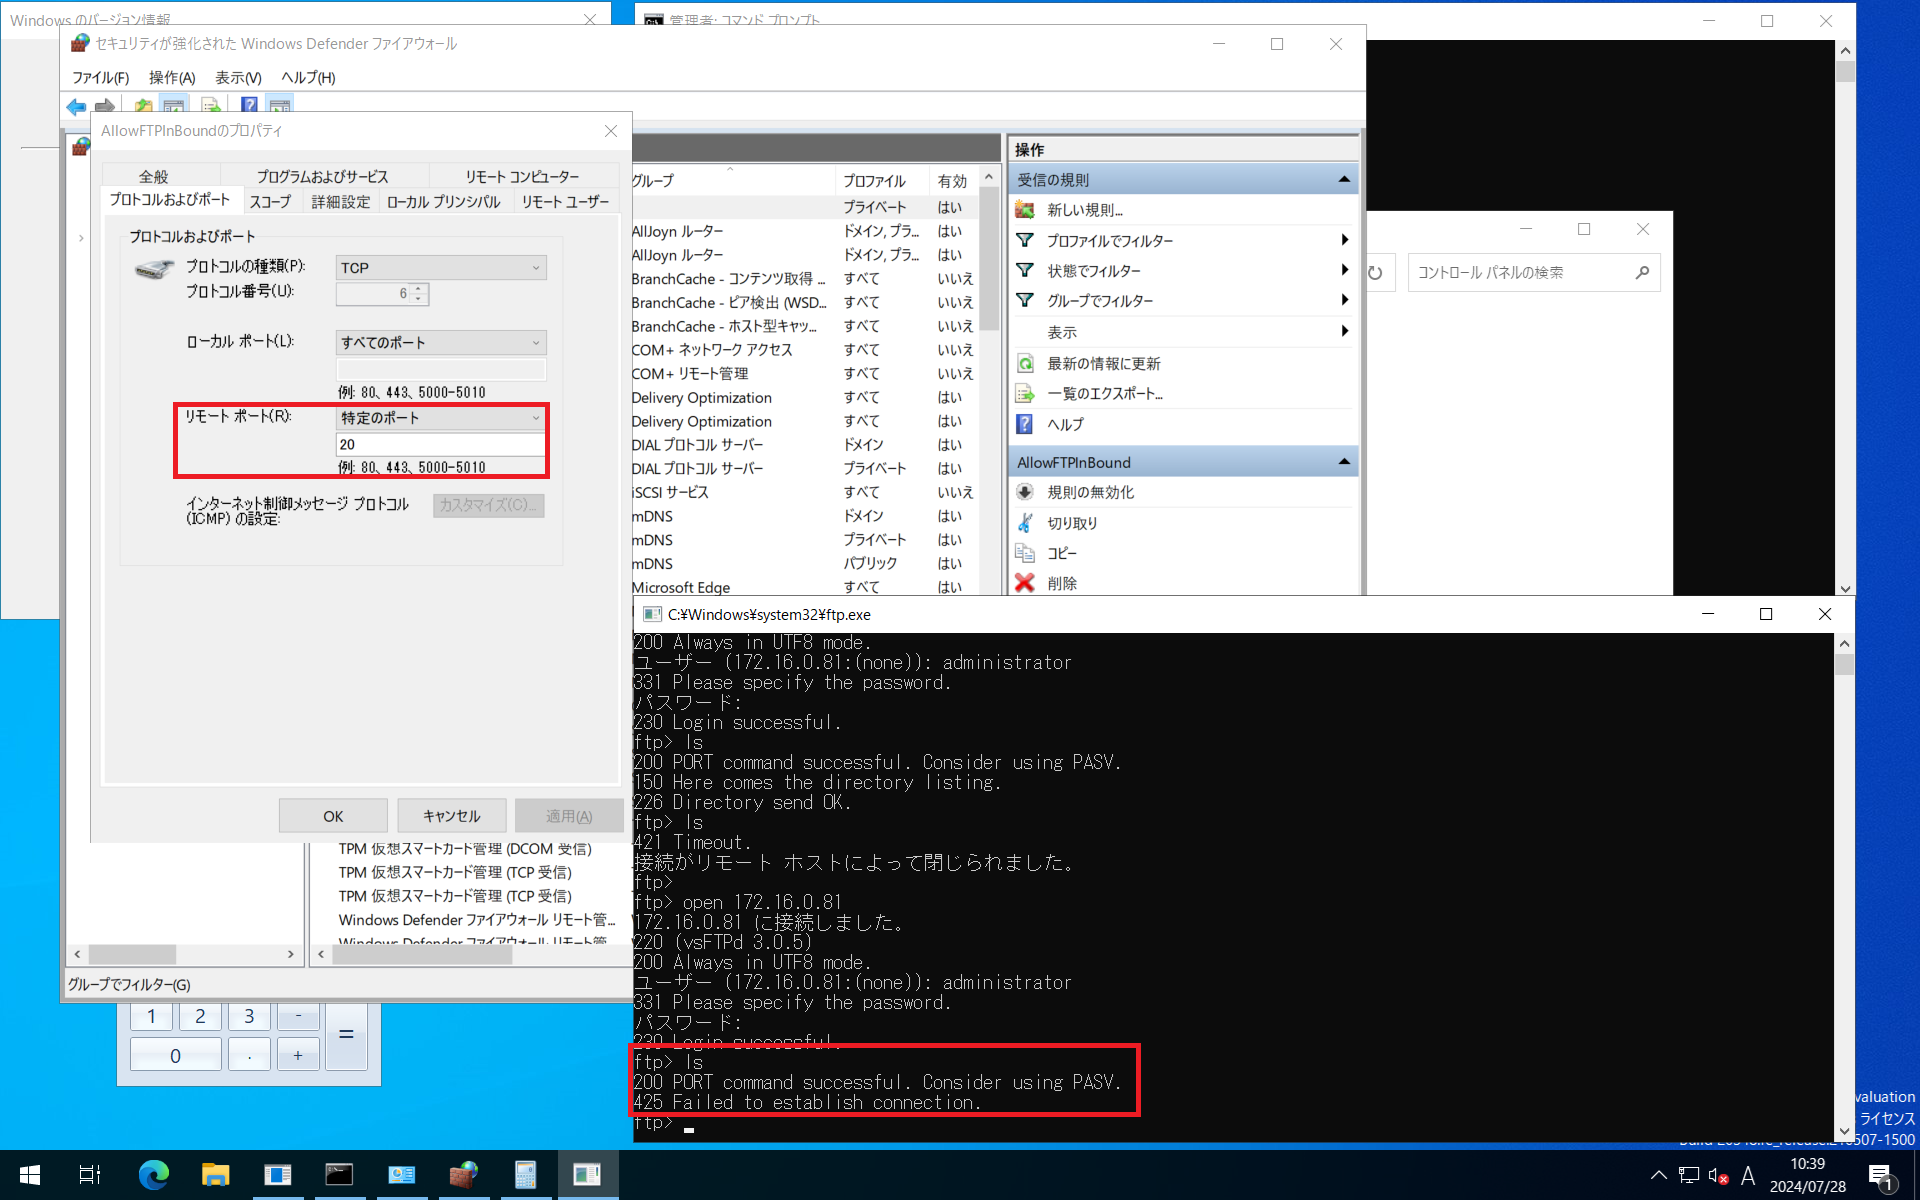
はい。
設定を戻してみたところ、無事コケましたね。
これだけではftp.exeがPassiveモードで動作している証跡としては不十分です。
ではftp.exeをデバッグモードで動かしてみて、ftp.exeの挙動を細かく見ていきます。
【追加検証】ftp.exeをデバッグモードで動かしてみる
Windows Defender Firewallの設定を元に戻し、debugとたたきます。

ftp.exeのデバッグモードがオンになりました。
続いてlsと実行します。
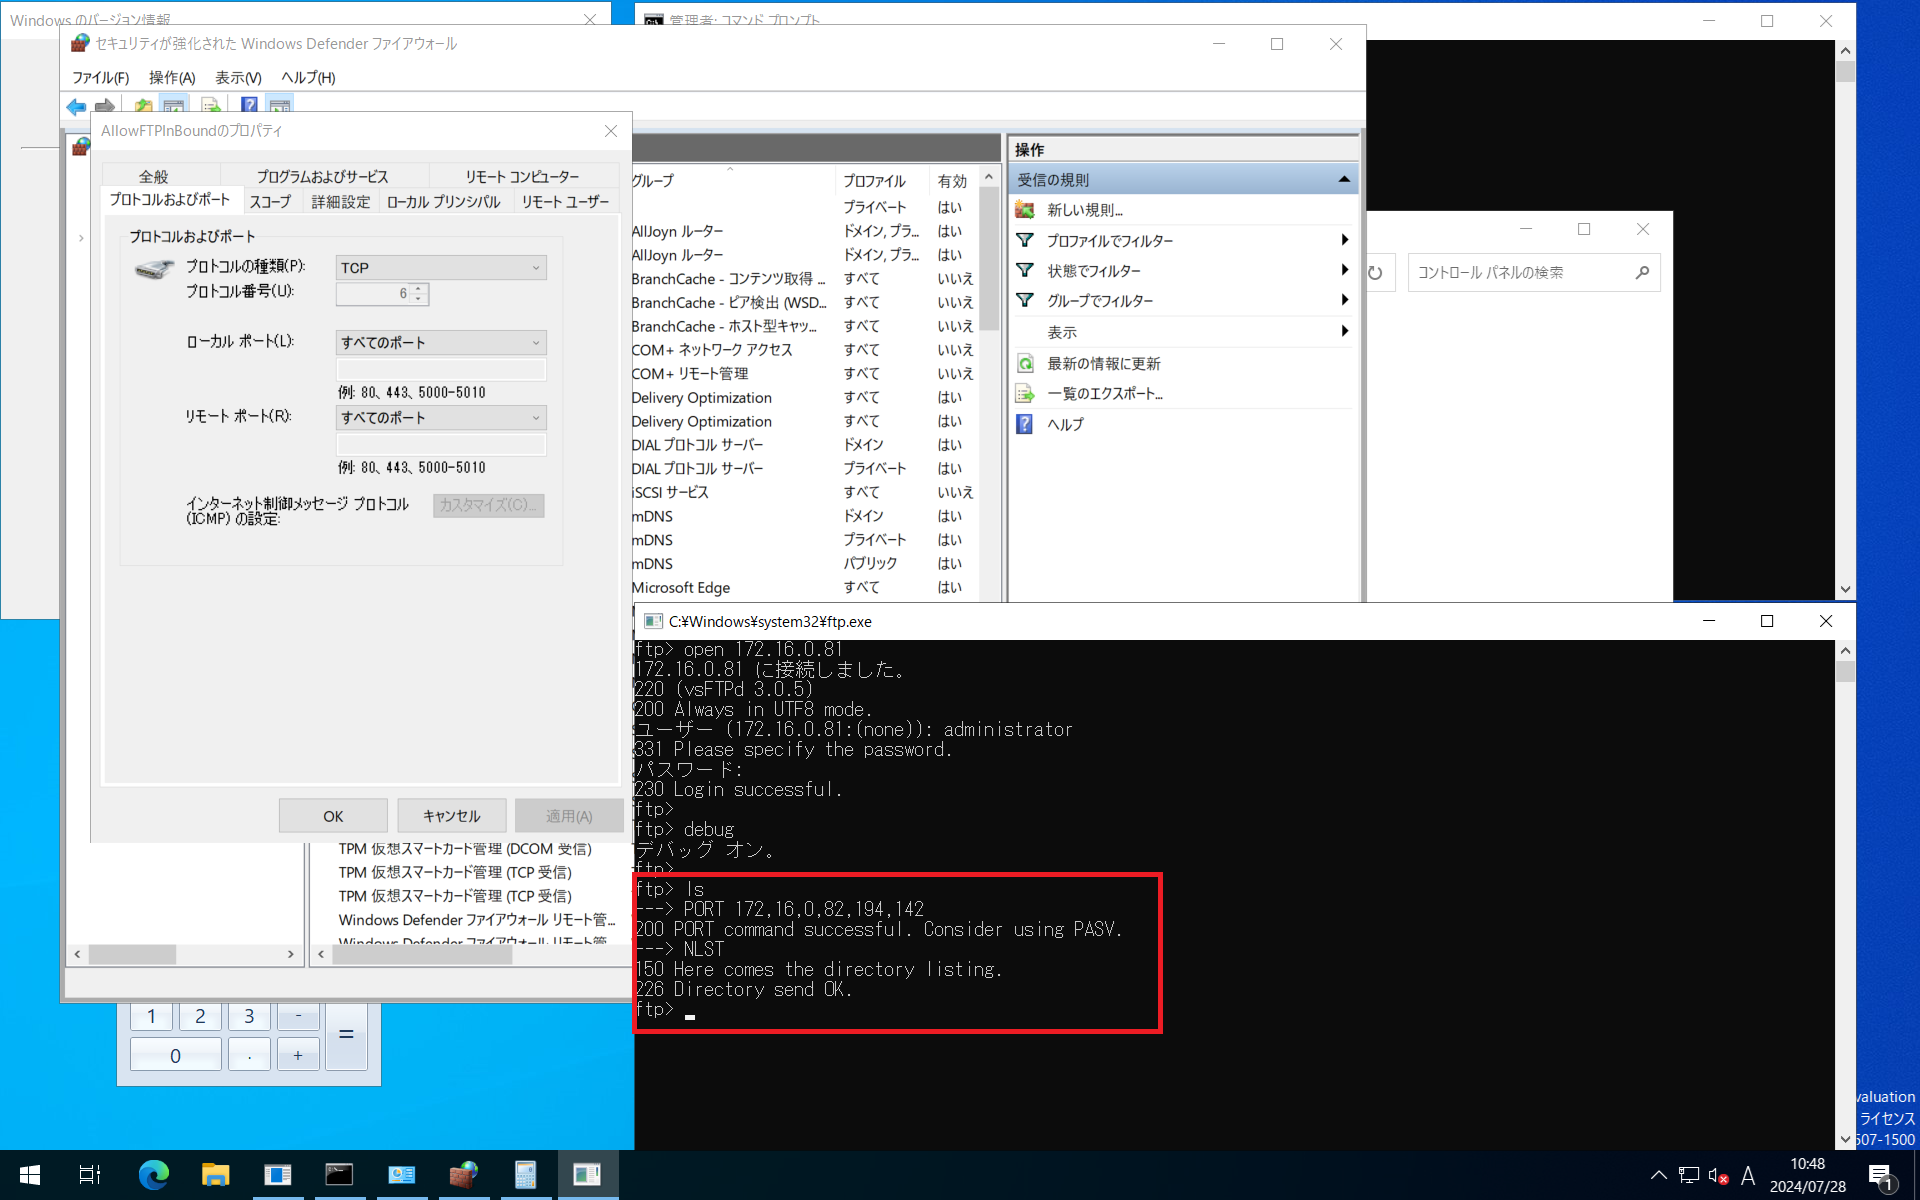
はい。
無事に実行できました。
ここで大事なポイントがあります。
先ほどと同じ図ですが、大事な部分を拡大します。
ここです。
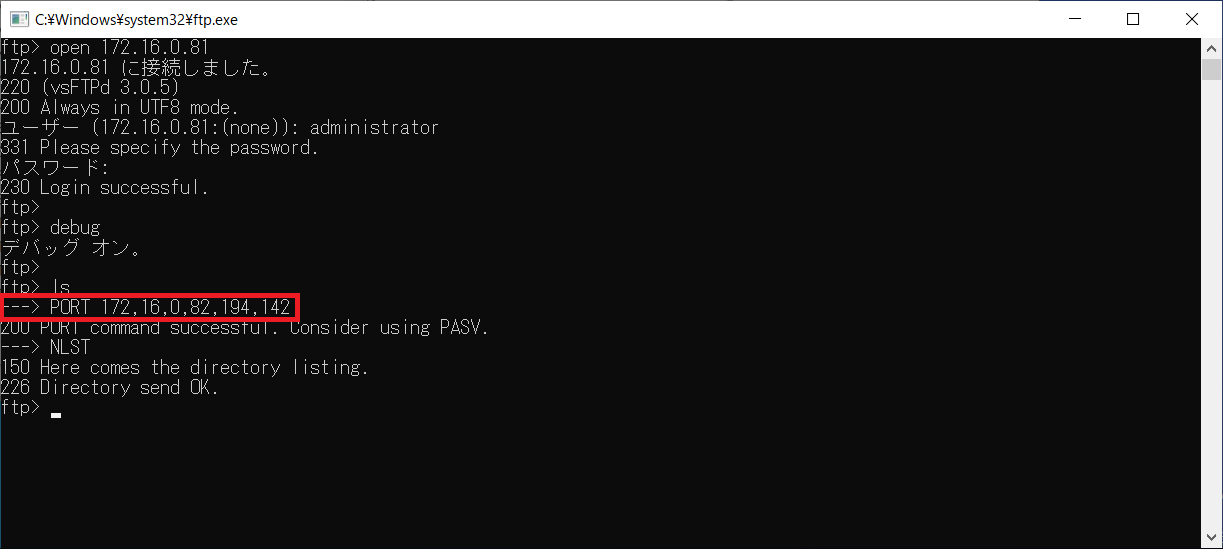
この赤枠内にある172,16,0,82,194,142という部分です。
ここですが、カンマで区切られた数字が並んでいます。
カンマで区切られた上位4つは172.16.0.82という、FTPクライアントのIPアドレスです。
ではカンマで区切られた5番目、6番目は何でしょうか?
これ実は、5番目の数字×256+6番目の数字でクライアントのポート番号を指定しています。
これも確認するためにわざとローカルポートをTCP1番ポートだけ許可してみました。
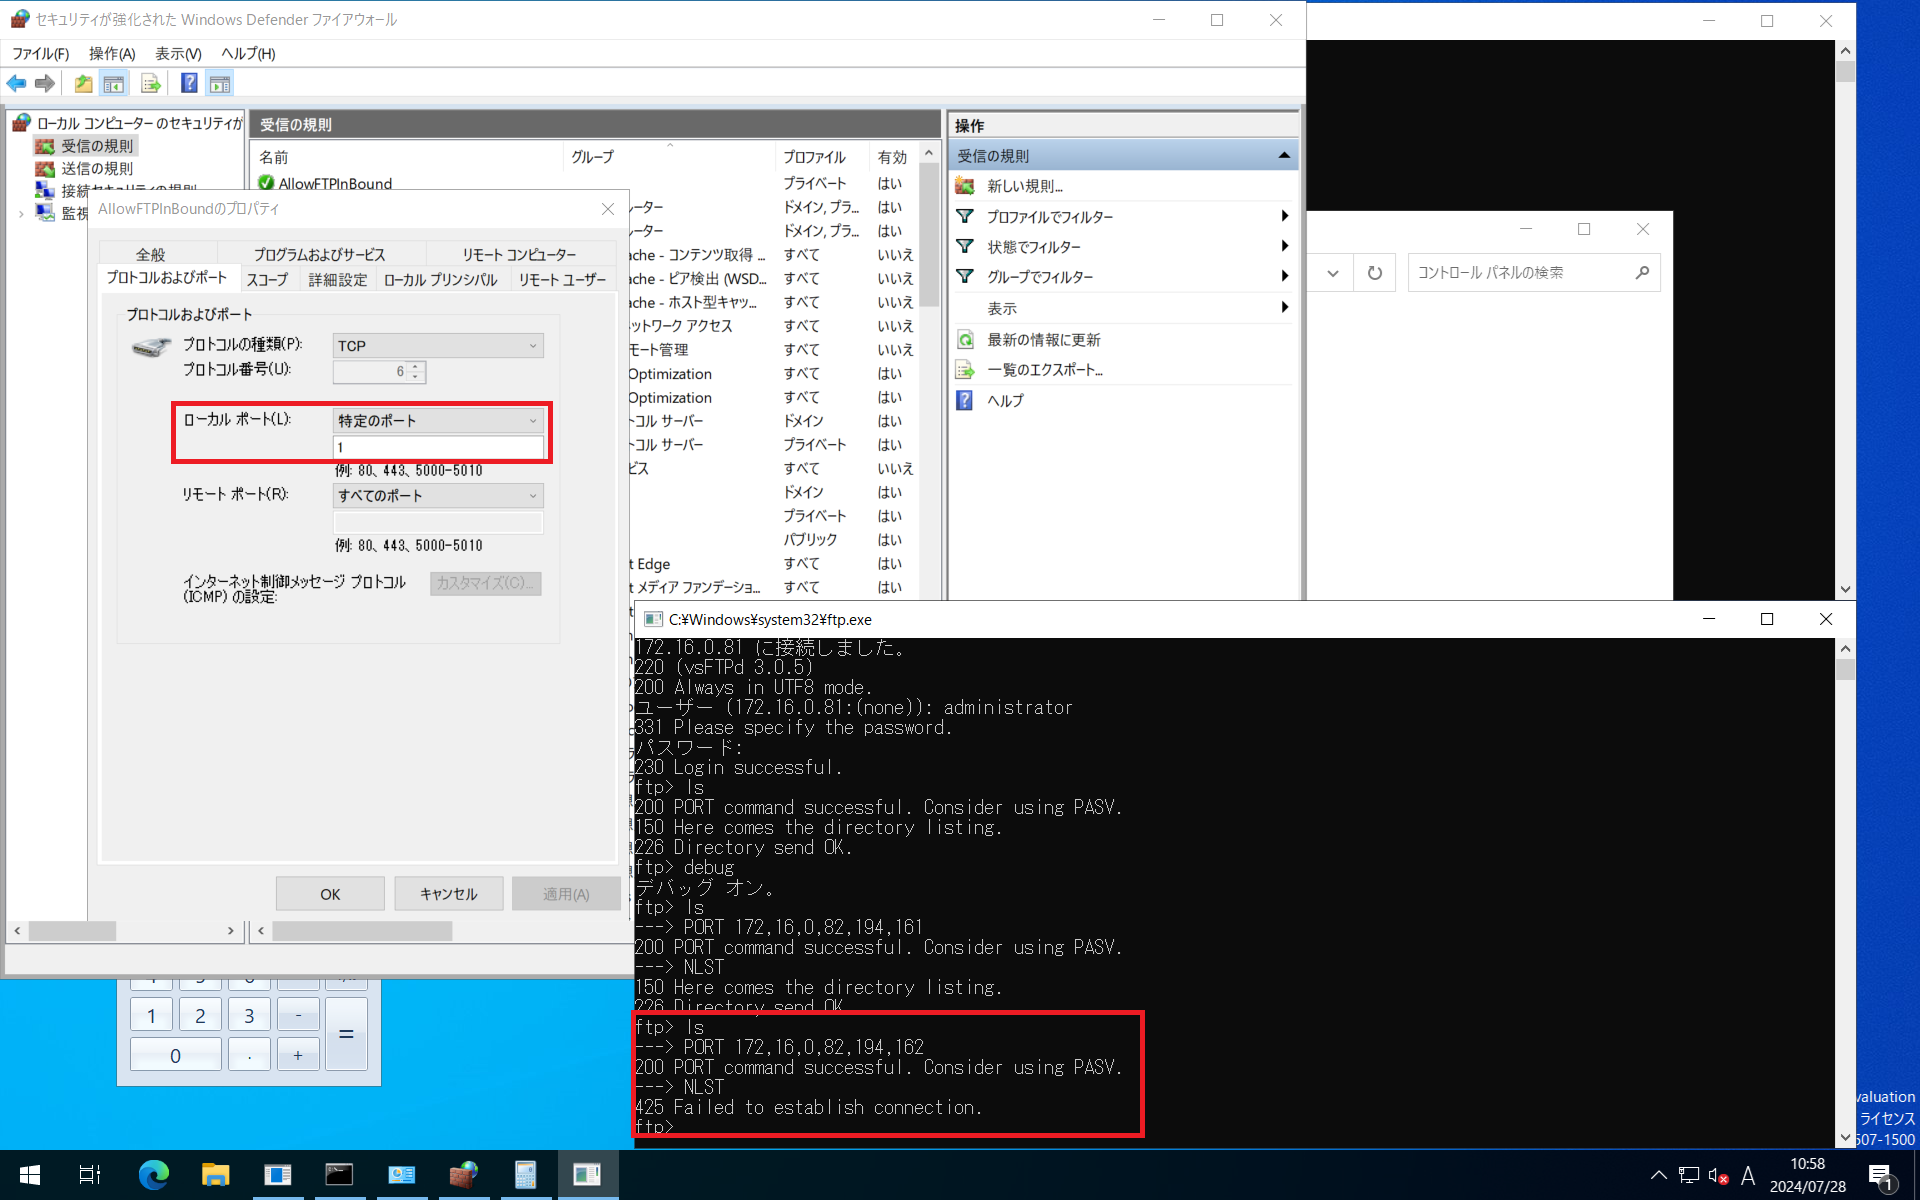
無事コケていますね。
ではこのローカルポートを、lsコマンドを叩いた後に出てくるカンマ区切りのうち5番目と6番目の値から算出して手動で許可し、通信が確立するか確認してみましょう。
実行結果です。
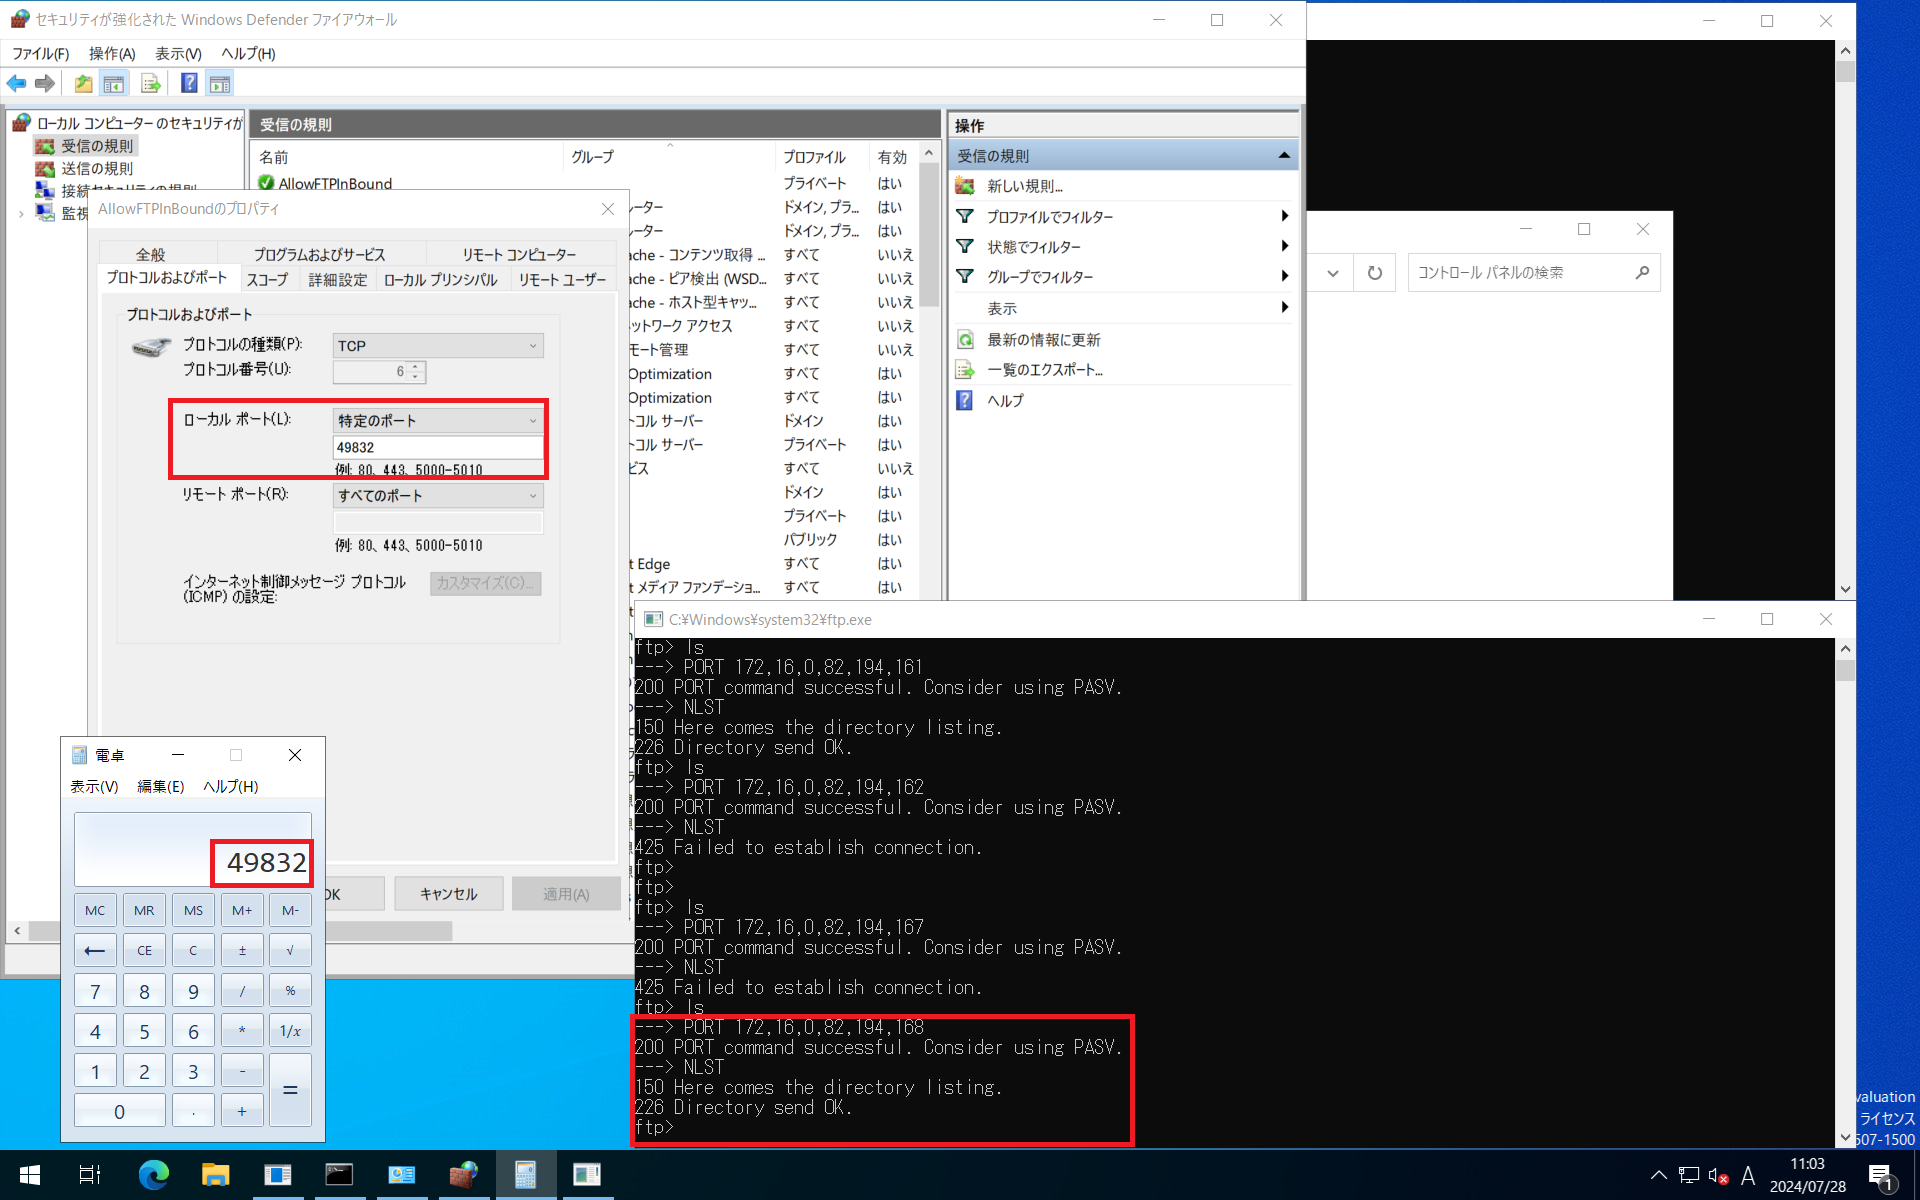
ftp.exeではポートが172,16,0,82,194,168と出てきました。
上位4つは無視して5番目と6番目の数字から194×256+168=49832となります。
これをWindows Defender Firewallのローカルポートで許可すると無事lsコマンドは通りました。
はい。
これでWindows OSのネイティブftp.exeがPassiveモードをサポートしている可能性が高まってきました。
【検証】パケットキャプチャを撮ってftp.exeがPassiveモードで通信しているか確認する
はい。
伝家の宝刀、パケットキャプチャです。
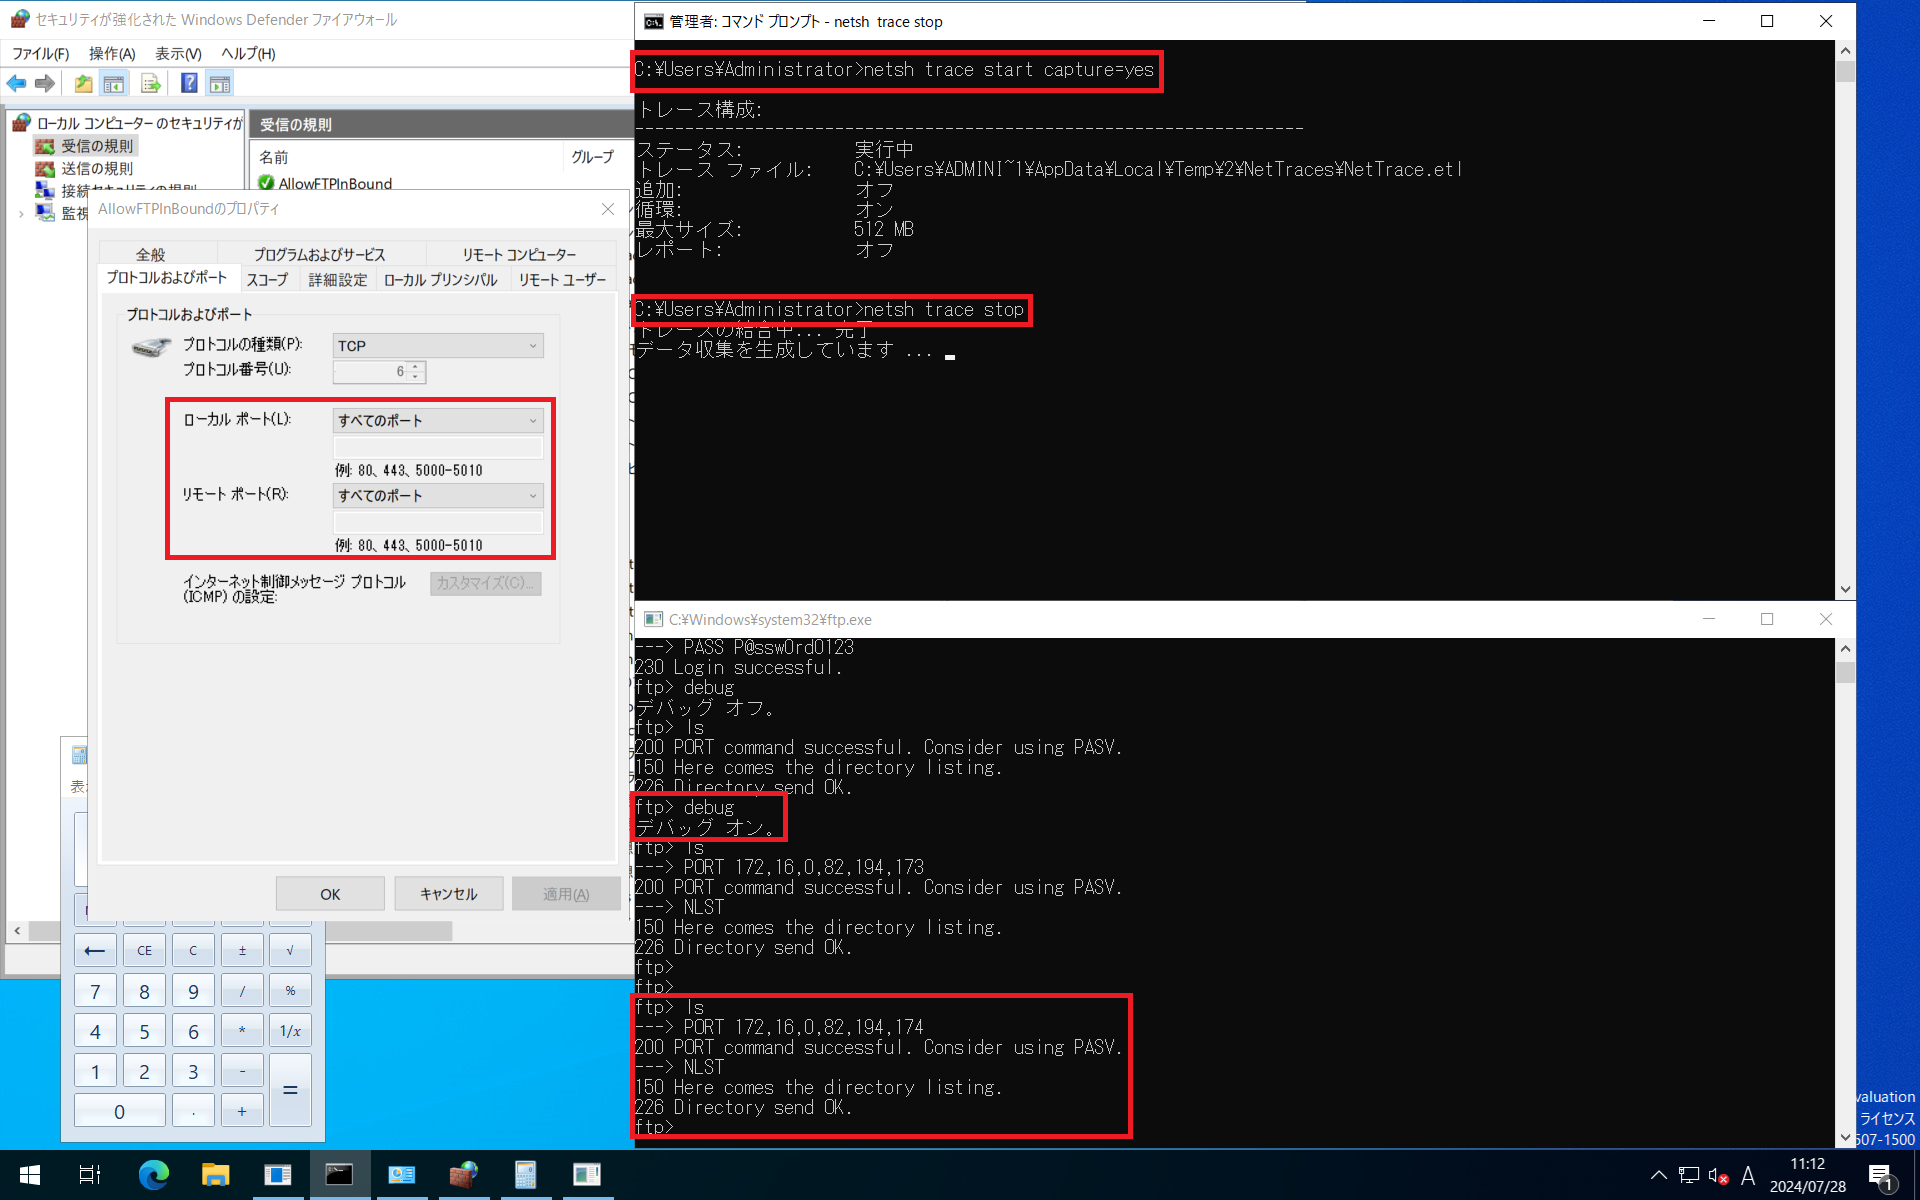
はい。
この画像のようにftp.exeをデバッグモードで動かしました。
この場合だと194×256+174=49838なので、TCP49838番ポートを通信元とする通信を行うというパケットがあれば良いですね。
パケットキャプチャも取得しましたので確認しましょう。
確認観点はデバッグモードで出てきたポートを通信元のTCPポートとし、制御系通信でFTPサーバから受け取った任意のポート宛に通信しているかどうか、で良いですね。
ではパケットキャプチャです。
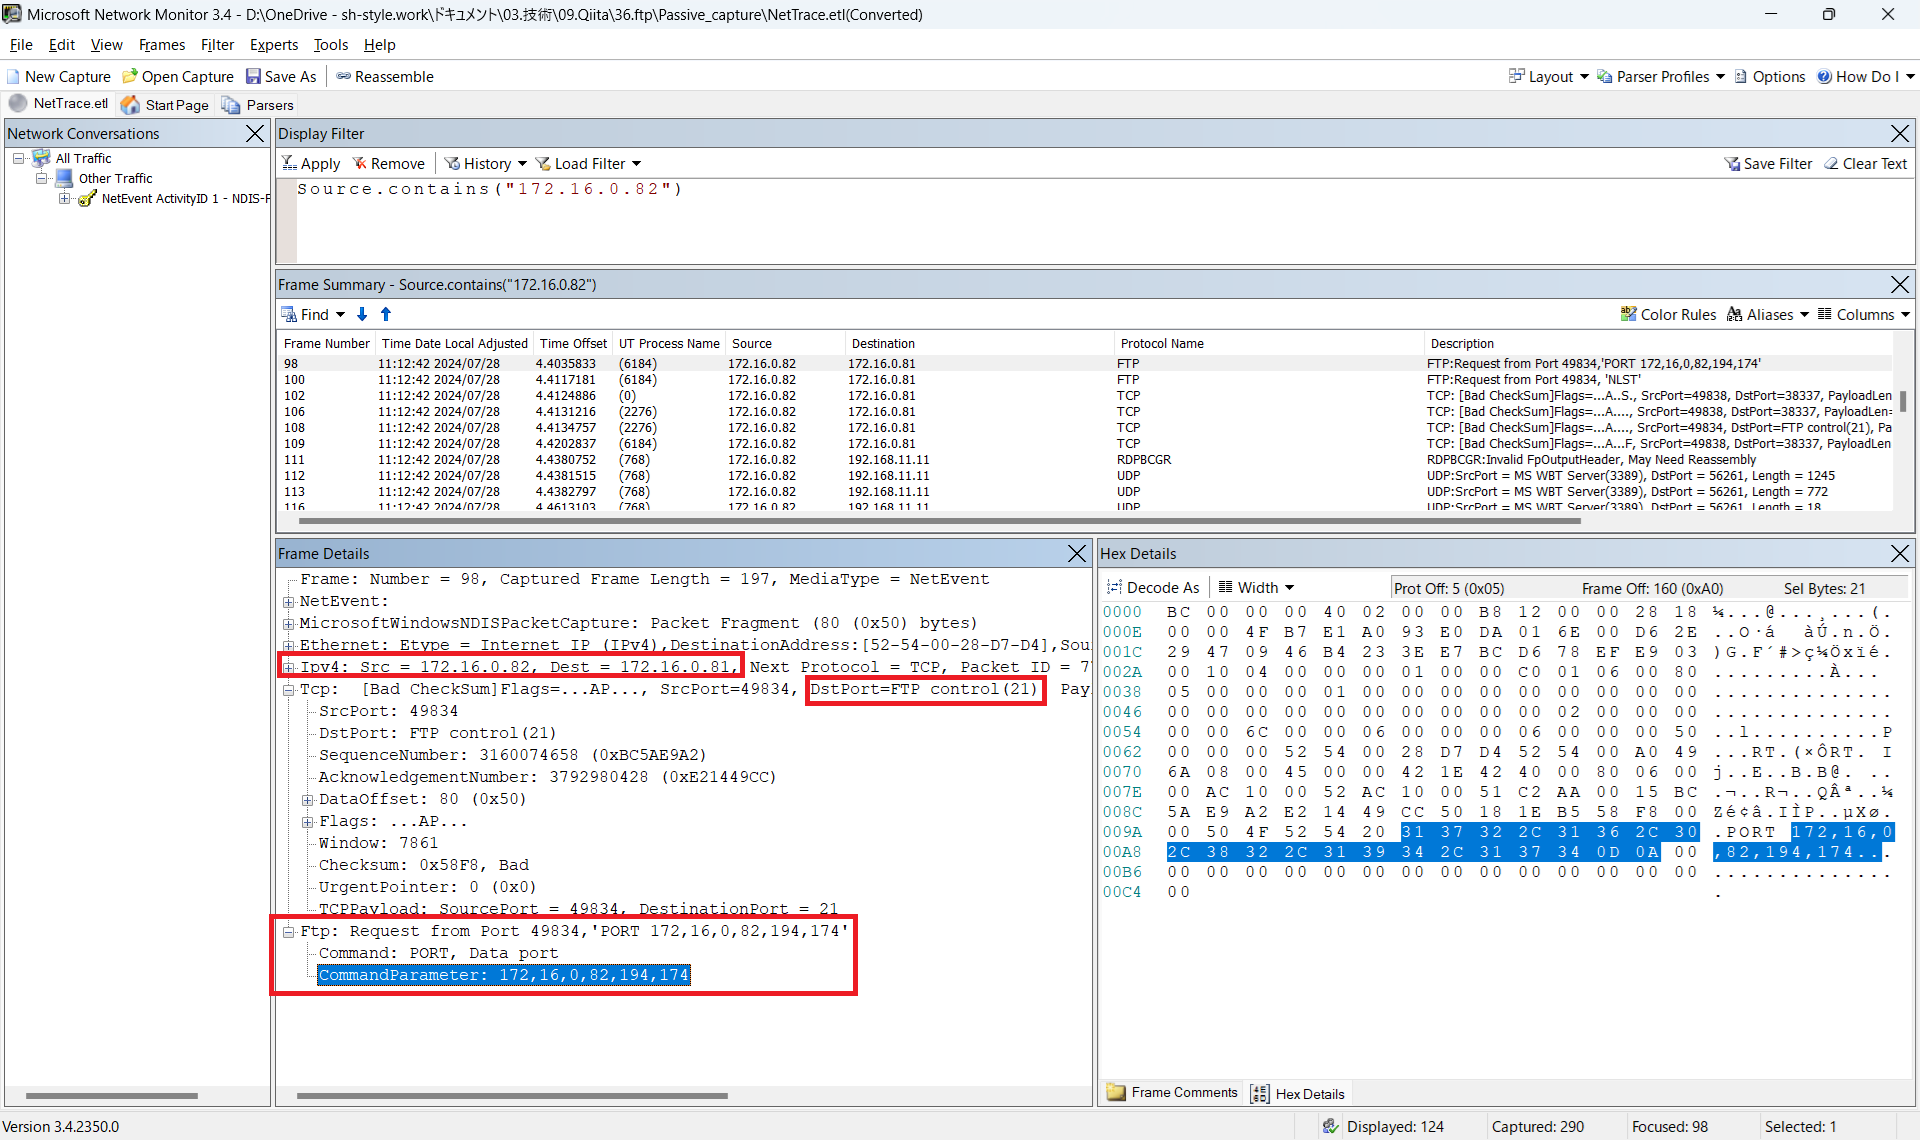
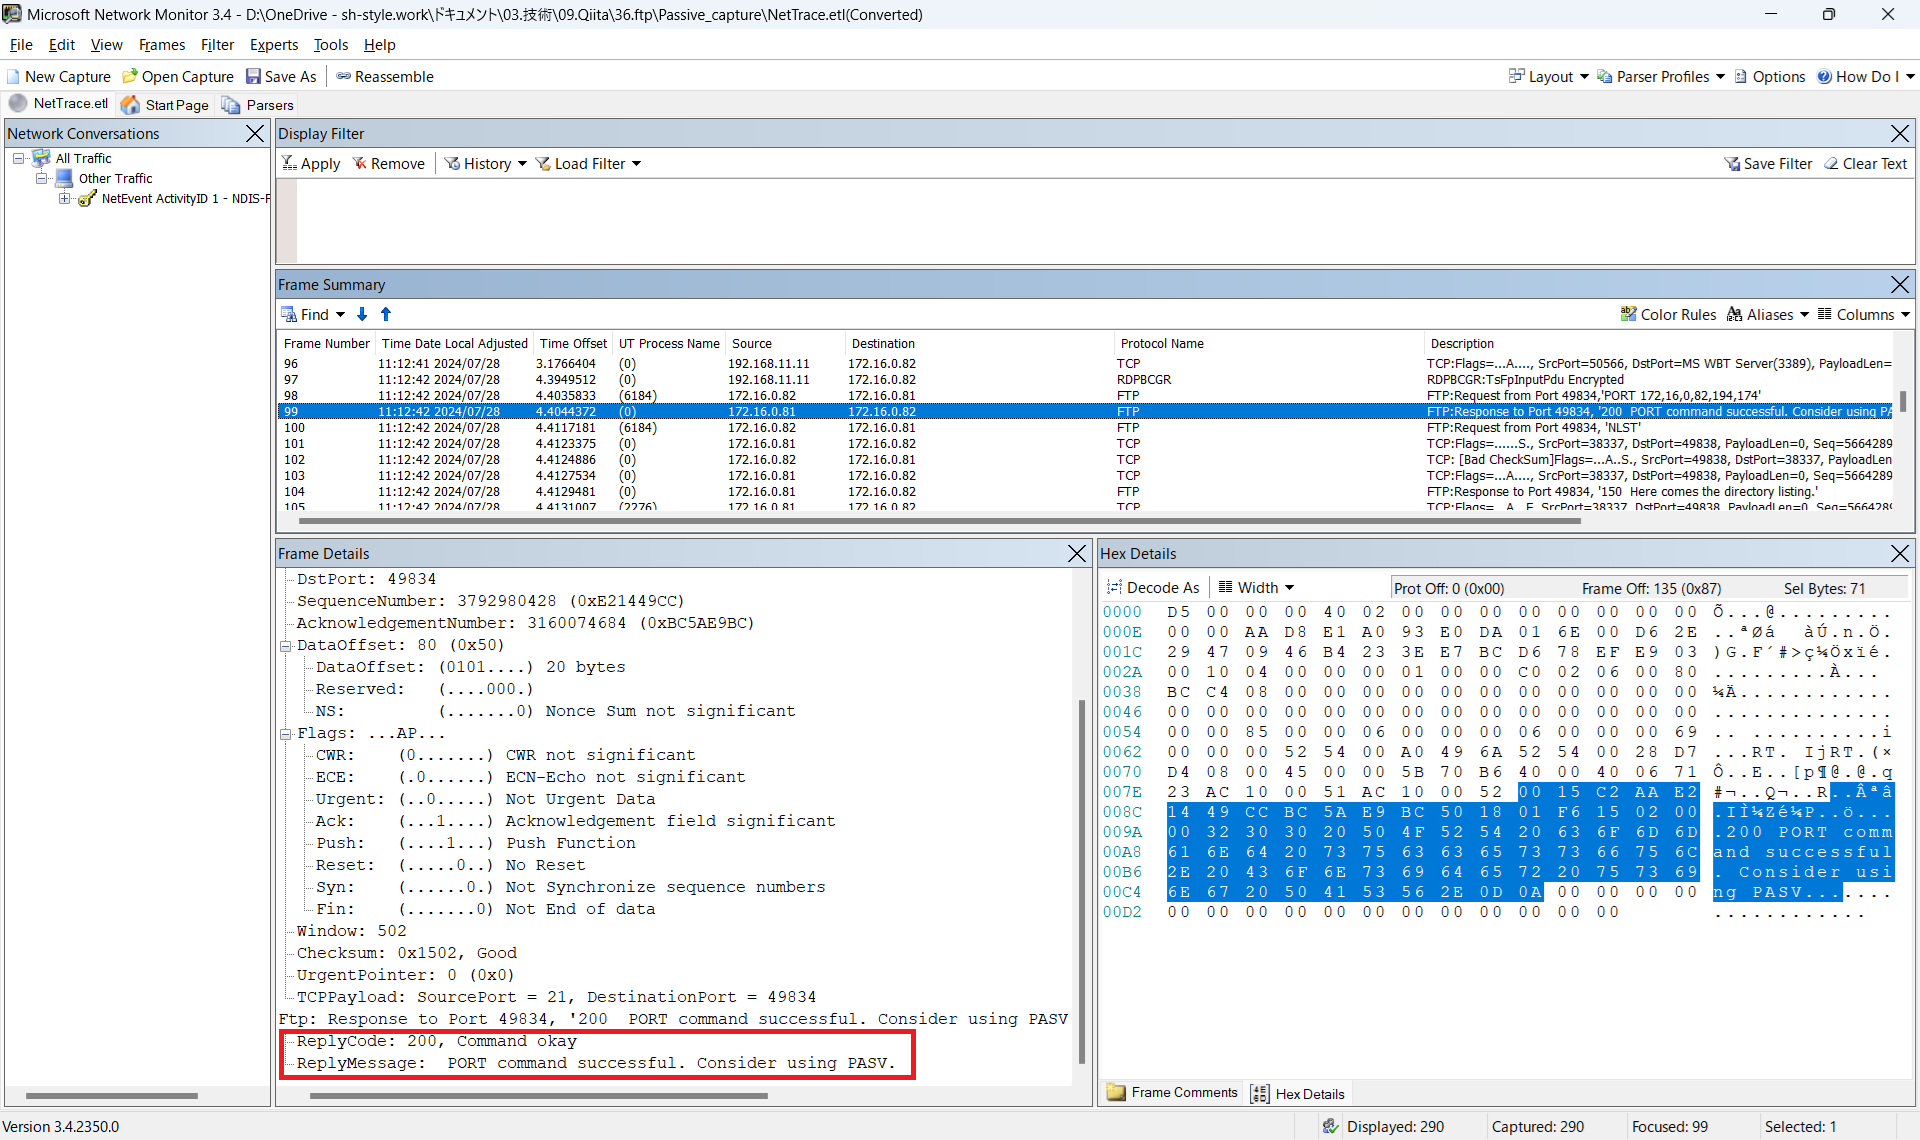
ご覧の通りシーケンス番号98のパケットで、FTPクライアント(172.16.0.82)を通信元とし、FTPサーバ(172.16.0.81)を通信先とするFTP制御通信(TCP21番ポート)の通信が実行され、そのパケットの中にCommandParameter: 172,16,0,82,194,174という記載があります。
これがWindows OSネイティブのftp.exeがPassiveモードで通信を行えるという証跡になります。
が、続いて後続のパケットも見ていきましょう。
シーケンス番号99のパケットでは、シーケンス番号98で行われたFTPクライアントからFTPサーバへの通信を受け入れています。
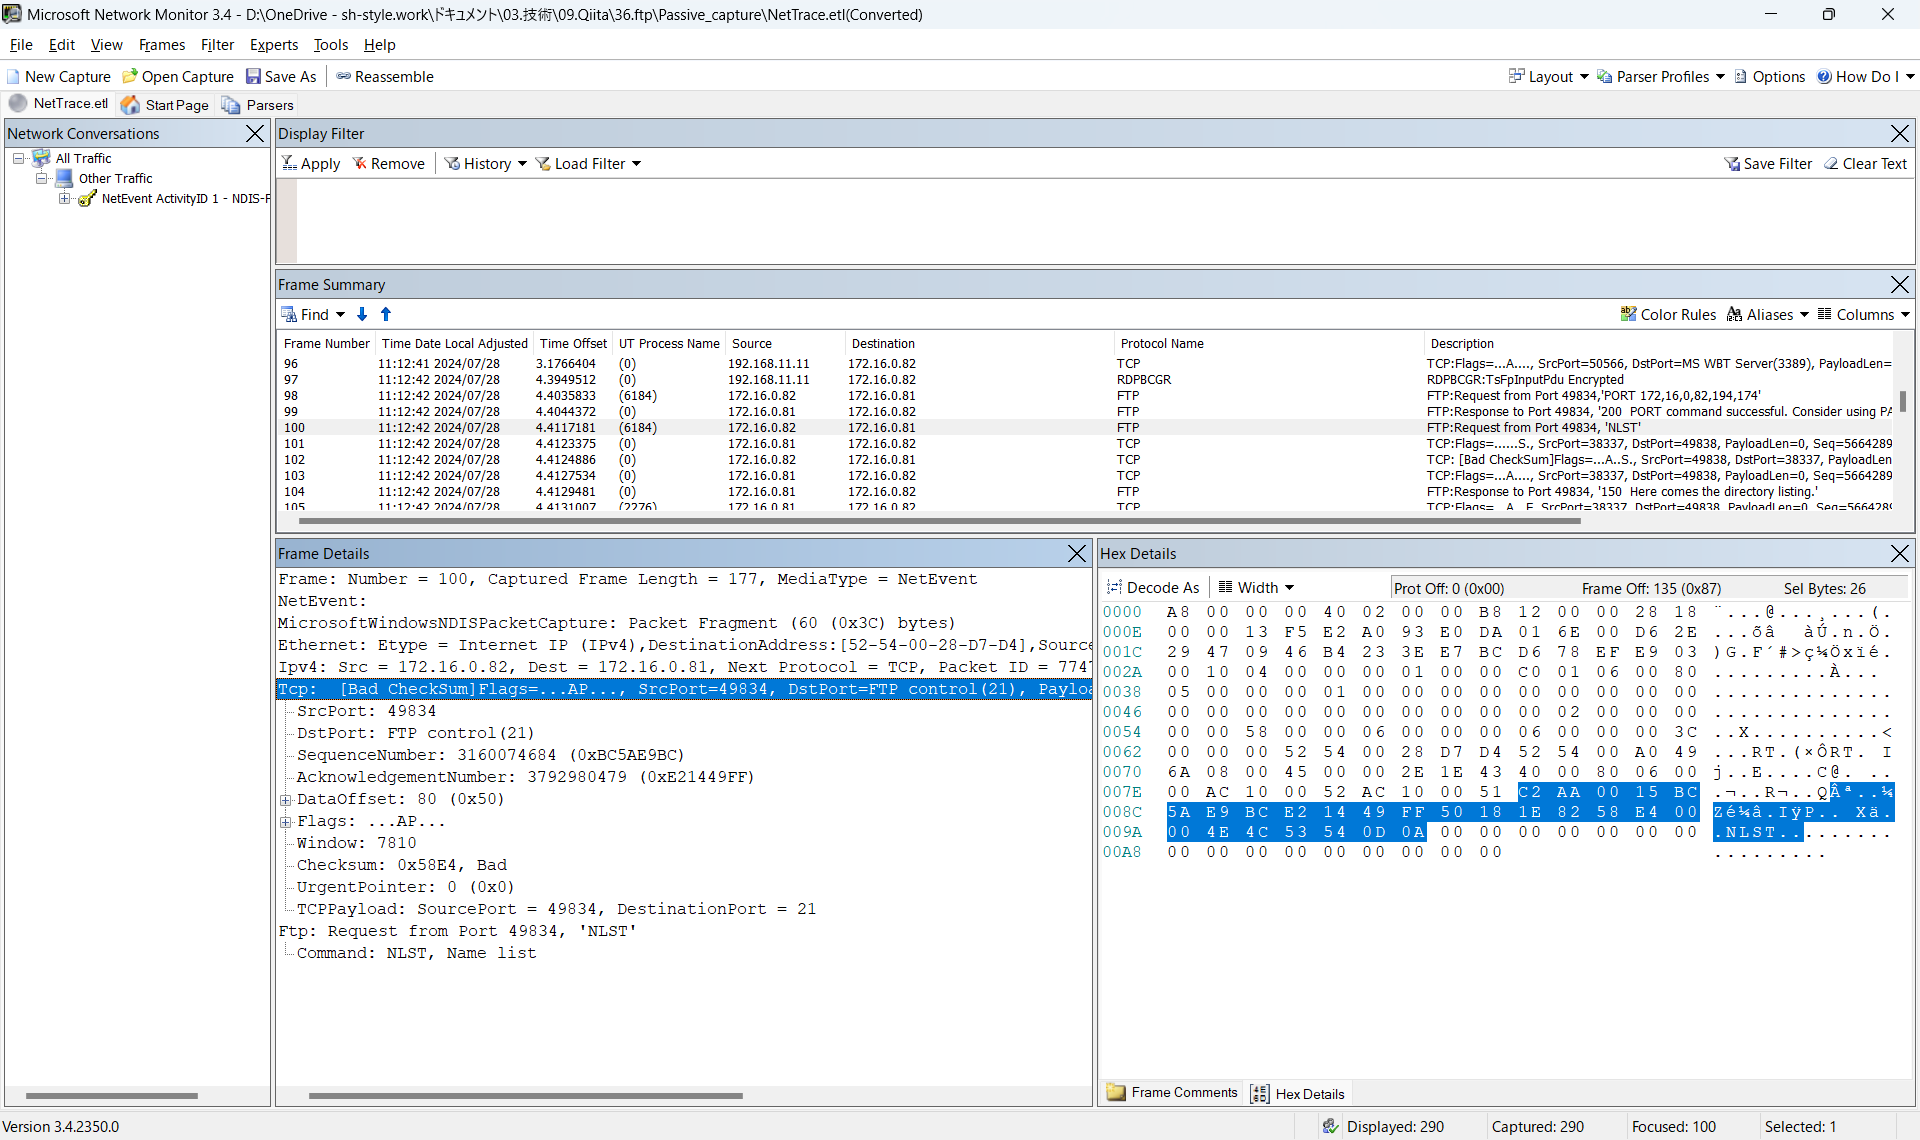
シーケンス番号100のパケットでは、FTPクライアント側で実行されたlsコマンドをNLSTとして受け取っています。
ここまでがTCP21番ポートのFTP制御通信でのやりとりです。
制御通信の中でFTPサーバから接続ポートの指定があるかと思っていましたが、違いましたね。
シーケンス番号101のパケットでは、FTPサーバを通信元としFTPクライアントを通信先とした、FTPクライアントからシーケンス番号99のパケットで提示のあったCommandParameter: 172,16,0,82,194,174から算出されたTCP49838番ポートを通信先ポートとして指定し、TCP38337番ポートを通信元ポートとした通信が行われました。
制御通信ではなく、データ通信が行われる直前のこの通信(TCPのSyncパケット)でFTPサーバはFTPクライアントに自身の接続先ポートとなるポート番号の指定を行っていたのですね。
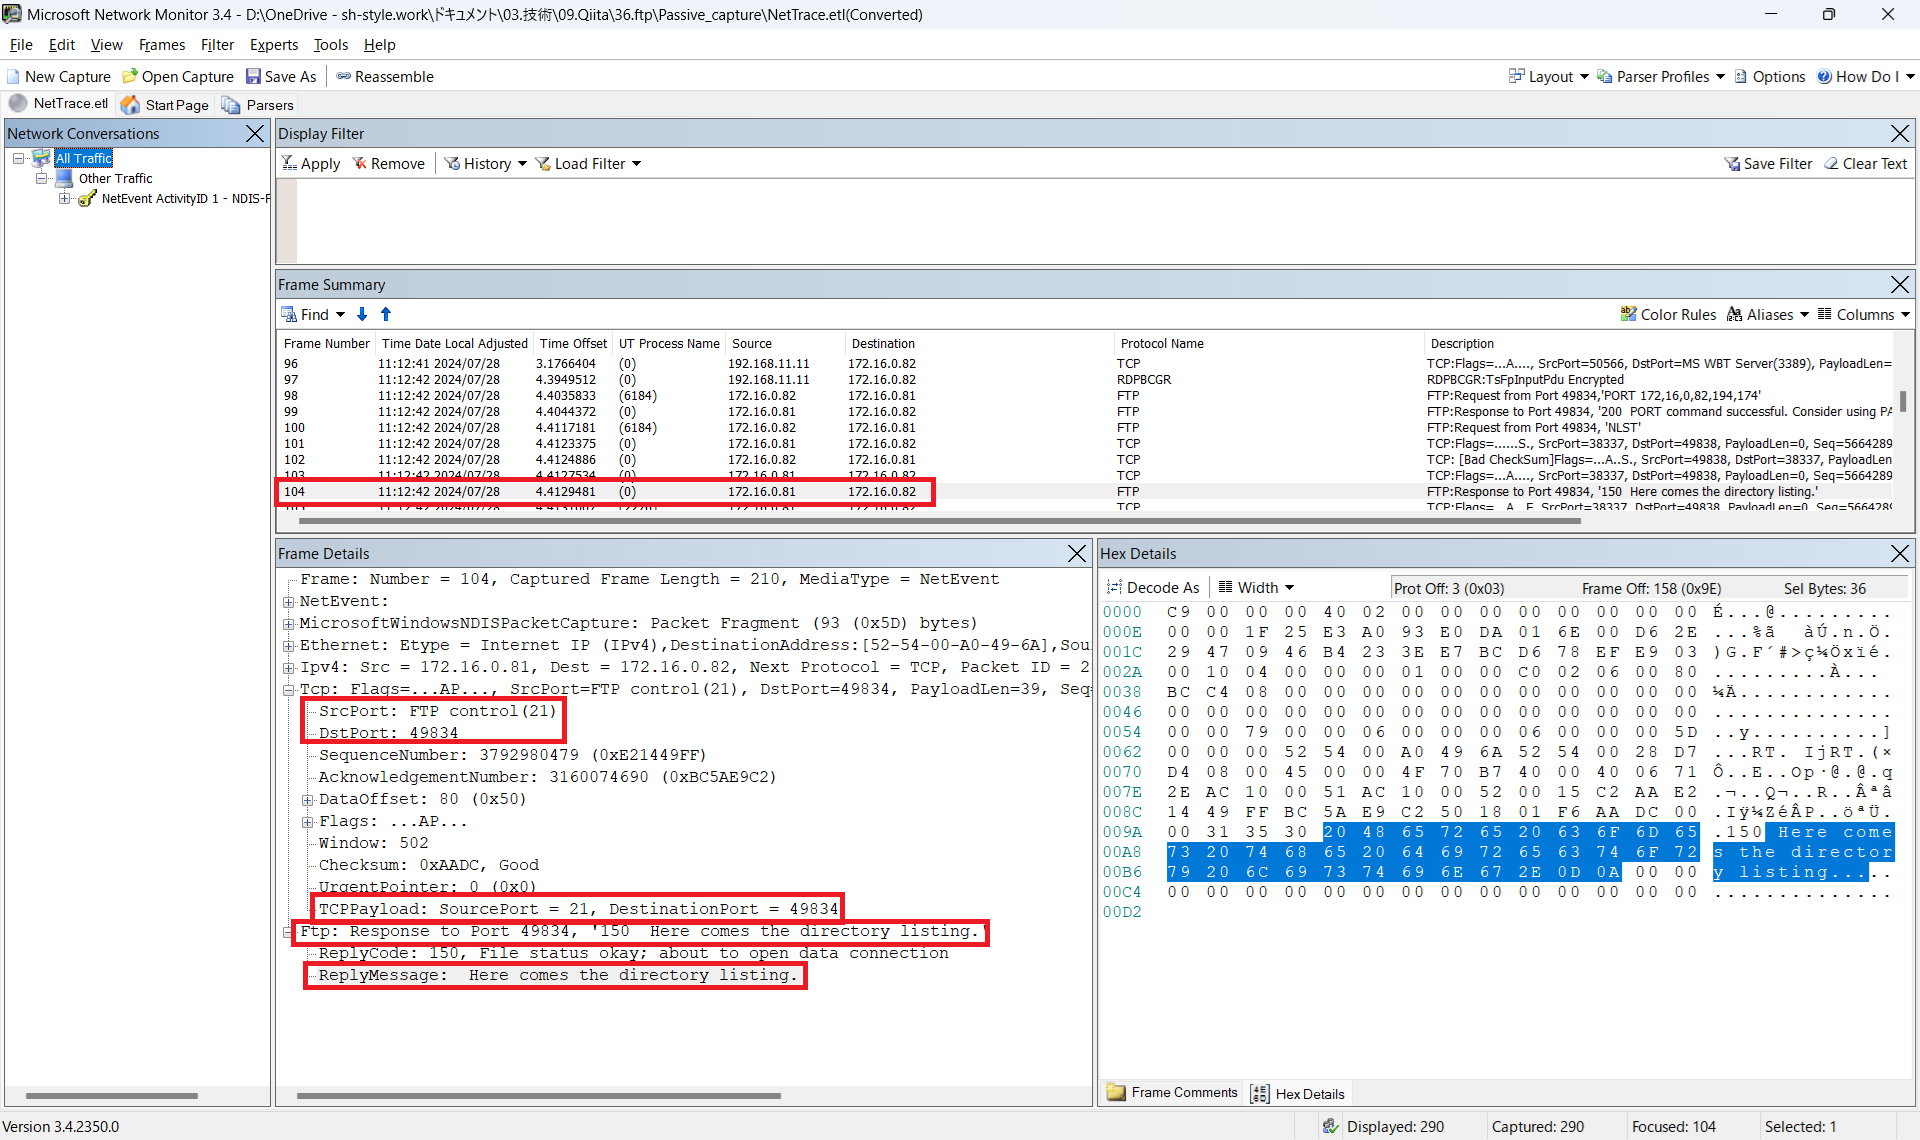
その後シーケンス番号102、103とTCPの通信(Syn Ack、Ack)が行われ、シーケンス番号104でlsコマンドが実行結果がFTPの制御通信で返されます。
結論
はい。
以上のことから、Windows OSのネイティブftp機能、ftp.exeがPassiveモードで接続できます!
少なくともWindows Server 2022 Datacenter Editionではできます!
記事を見直していて、Windows Firewallの部分で疑義が出てきましたので引き続き検証します。
サーバ側をPassiveモードのみにしているのでActiveモードで接続できない認識だったのですが、Windows Firewallの方向を見ているとどうも違うような気がしますので、再度検証を行います。
2024/09/15追記
はい。
検証しました。
パケットキャプチャ取ったり色々設定変えたりしましたが、結局一番単純なWindows FirewallのInBoundをAny Any Denyにしました。
Passiveモードで動作しているとするとOutBoundがAny Any Permitであれば動作するはずですが、Windows FirewallのInBound方向でそれまでの検証でftp.exeをPermitにして、このポリシーを有効にしていたので通信ができていました。
当然これを無効化、もしくは削除するとftpのデータ通信が途絶えました。
結論、Windows OSのネイティブftp機能、ftp.exeはPassiveモードに対応していません!
Windows Server 2022で対応していないので、恐らくこれより古いWindows OSでも対応していないでしょう。
2024/09/15追記終わり
子どもも絵日記が1日分完成したようなので、私も本記事を終わります。
Windows 2000 Serverまでは遡れるので、気が向いたら試してみます。
本日はここまで。