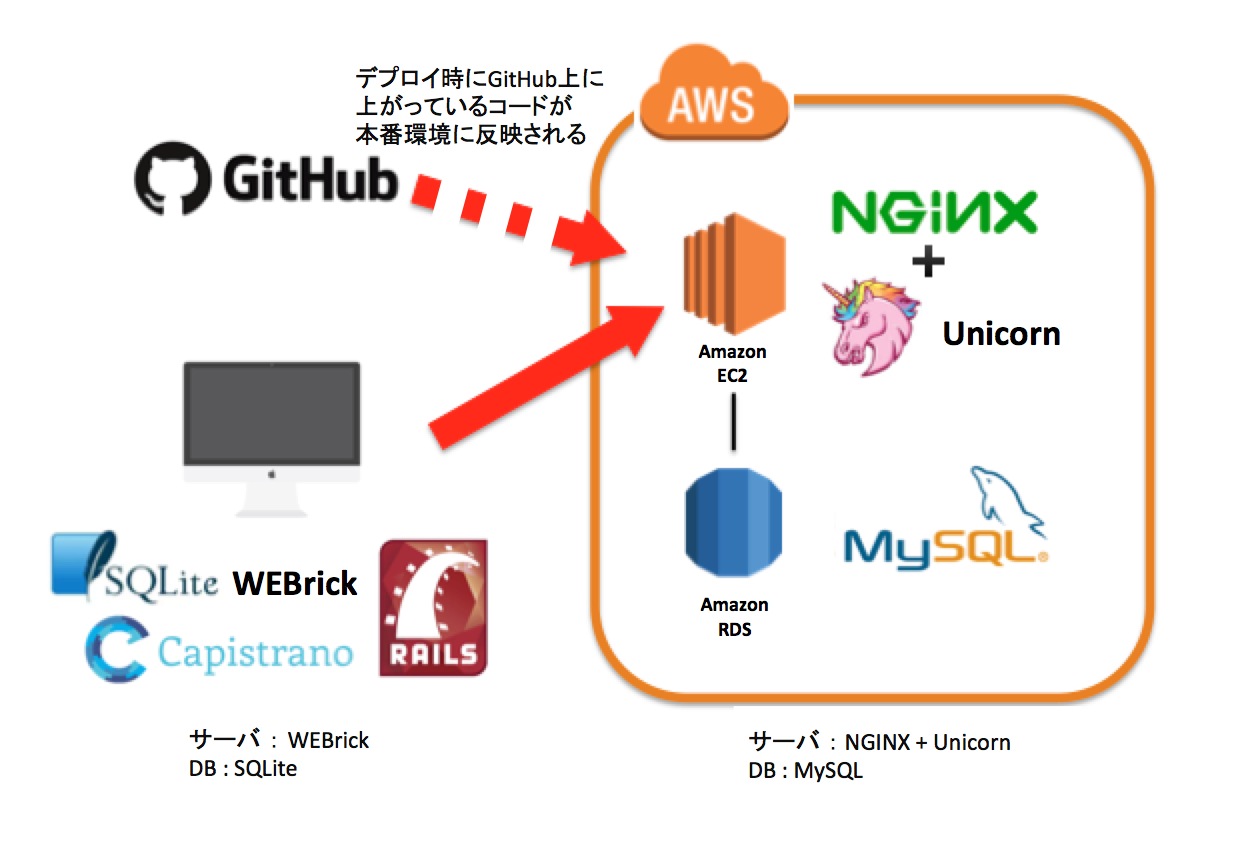
AWSにrailsアプリをEC2にデプロイしたので備忘録として残します。
長いので<前編><後編>の2回に分けて実施致します。
【前提】
・今回はscaffoldで作成した簡単なアプリ(userの名前と年齢を登録するアプリ)をデプロイすることをゴールに進めていきます。
・デプロイのディレクトリは /var/www/qiitaAppです。
・shared/config 配下のdatabase.yml と secrets.yml は手動で作成します。
・ローカルへのRubyやRailsのインストールとEC2、RDSのセットアップ(VPCやセキュリティグループ等々の設定)、GitHubのアカウント登録に関しての説明は致しません。
・hostの設定、各環境毎の設定は実施しません。
Rubyのインストール
Ruby on Railsのインストールと設定
[AWSの設定] (http://qiita.com/hibriiiiidge/items/aebcd4184c7ab4c83bdf)
【バージョン】
| software | version |
|---|---|
| Ruby | 2.3.3 |
| Rails | 4.2.7 |
| Nginx | 1.10.2 |
| Unicorn | 5.3.0 |
| MySql | 5.6 |
| Capistrano | 3.8.1 |
| capistrano3-unicorn | 0.2.1 |
今回は、デプロイ時にUnicornの再起動もさせるべくcapistrano3-unicornというgemを使用します。
(自身でtaskとして設定する事も可能です。)
GitHubの設定
1)New Repositoryの生成
Repository name → qiitaApp
Public
Create repository
2)ローカルからSSH接続ができるように[SSH keys]を追加する
今回は説明は省略します。
(EC2からもGitHub接続が必要なのでそちらは下記に記載します。)
GitHub 初心者による GitHub 入門(1)
EC2(AmazonLinux)の設定
- git,rbenvのインストール
[myname@ip-10-0-1-86 ~]$ sudo yum -y install git
[myname@ip-10-0-1-86 ~]$ git clone https://github.com/sstephenson/rbenv.git ~/.rbenv #rbenvインストール
[myname@ip-10-0-1-86 ~]$ git clone https://github.com/sstephenson/ruby-build.git ~/.rbenv/plugins/ruby-build #ruby-buildインストール
[myname@ip-10-0-1-86 ~]$ sudo vi .bash_profile #.bash_profileの編集

=ファイルの編集画面=

export PATH
export PATH="$HOME/.rbenv/bin:$PATH" ← 追加
eval "$(rbenv init -)" ← 追加

=================

[myname@ip-10-0-1-86 ~]$ source ~/.bash_profile #環境変数の反映
[myname@ip-10-0-1-86 ~]$ rbenv -v #バージョン確認
rbenv 1.1.0-2-g4f8925a
- Ruby2.3.3のインストール
[myname@ip-10-0-1-86 ~]$ sudo yum install -y gcc
[myname@ip-10-0-1-86 ~]$ sudo yum install -y openssl-devel readline-devel zlib-devel
[myname@ip-10-0-1-86 ~]$ rbenv install 2.3.3
- Nginxのインストール・設定
[myname@ip-10-0-1-86 ~]$ sudo yum install nginx
[myname@ip-10-0-1-86 ~]$ cd /etc/nginx/conf.d/
[myname@ip-10-0-1-86 conf.d]$ sudo touch local.conf
[myname@ip-10-0-1-86 conf.d]$ sudo vi local.conf

==================== local.conf ===================================

upstream unicorn {
  server unix:/tmp/unicorn.sock;
}

server {
  listen 80;
  server_name YOUR_IP_ADDRESS;

  access_log /var/log/nginx/sample_access.log;
  error_log /var/log/nginx/sample_error.log;

  location / {
    proxy_set_header X-Real-IP $remote_addr;
    proxy_set_header X-Forwarded-For $proxy_add_x_forwarded_for;
    proxy_set_header Host $http_host;
    proxy_pass http://unicorn;
  }
}

=================================================================
- デプロイするディレクトリと権限の変更
[myname@ip-10-0-1-86 conf.d]$ cd /var/
[myname@ip-10-0-1-86 var]$ sudo mkdir www
[myname@ip-10-0-1-86 var]$ sudo chmod 777 www
[myname@ip-10-0-1-86 var]$ cd www
[myname@ip-10-0-1-86 www]$ mkdir qiitaApp
[myname@ip-10-0-1-86 www]$ cd qiitaApp
[myname@ip-10-0-1-86 qiitaApp]$ rbenv local 2.3.3
- GitHubへの接続 SSHkey
[myname@ip-10-0-1-86 qiitaApp]$ cd
[myname@ip-10-0-1-86 ~]$ ssh-keygen -t rsa
$ cat .ssh/id_rsa.pub
ssh-rsa abcdefghijklmnopqrstuvwxyz1234567890 ec2-user@ip-10-0-1-86
[ssh-rsa]から[ec2-user@ip-10-0-1-86]までをコピーしてGitHubのSSH keysにNewKeyとして追加する
- その他必要なソフトウェアのインストール・設定
- bundler
[myname@ip-10-0-1-86 ~]$ rbenv exec gem install bundler
[myname@ip-10-0-1-86 ~]$ rbenv rehash
- Node.js
[myname@ip-10-0-1-86 ~]$ sudo yum install nodejs --enablerepo=epel
- sqlite
[myname@ip-10-0-1-86 ~]$ sudo yum install sqlite-devel
- mysql
[myname@ip-10-0-1-86 ~]$ sudo yum install mysql-devel
ローカルの設定
- railsアプリの生成とgemのインストール
$ rails new qiitaApp
$ cd qiitaApp/
$ git init
$ vi Gemfile

============ Gemfile ===============

gem 'unicorn' #コメントアウトを解除する
gem 'mysql2'
group :development do
  gem 'capistrano'
  gem 'capistrano-rails'
  gem 'capistrano-bundler'
  gem 'capistrano-rbenv'
  gem 'capistrano3-unicorn'
end

===================================

$ bundle install
$ rails g scaffold user name:string age:integer
$ rake db:migrate
- Capistranoの設定に必要なファイルの生成
$ bundle exec cap install STAGES=production #自動で下記のディレクトリとファイルを生成
mkdir -p config/deploy
create config/deploy.rb
create config/deploy/production.rb
mkdir -p lib/capistrano/tasks
create Capfile
Capified
3) Capfileの設定
$ vi Capfile #下記を追加
require 'capistrano/rbenv'
require 'capistrano/bundler'
require 'capistrano/rails/assets'
require 'capistrano/rails/migrations'
require 'capistrano3/unicorn'
4) config/deploy.rbの設定
$ vi config/deploy.rb

lock "3.8.1"

set :application, "qiitaApp"
set :repo_url, "git@github.com:YOUR_GITHUB_ACCOUNT/qiitaApp.git"

set :rbenv_type, :user
set :rbenv_ruby, '2.3.3'
set :rbenv_prefix, "RBENV_ROOT=#{fetch(:rbenv_path)} RBENV_VERSION=#{fetch(:rbenv_ruby)} #{fetch(:rbenv_path)}/bin/rbenv exec"
set :rbenv_map_bins, %w{rake gem bundle ruby rails}
set :rbenv_roles, :all

set :log_level, :warn

# Default value for :linked_files is []
set :linked_files, fetch(:linked_files, []).push('config/database.yml', 'config/secrets.yml')

# Default value for linked_dirs is []
set :linked_dirs, fetch(:linked_dirs, []).push('log', 'tmp/pids', 'tmp/cache', 'tmp/sockets', 'vendor/bundle', 'public/system')

# Default value for keep_releases is 5
set :keep_releases, 3

set :unicorn_pid, "#{shared_path}/tmp/pids/unicorn.pid"

set :unicorn_config_path, -> { File.join(current_path, "config", "unicorn.rb") }

namespace :deploy do
  after :restart, :clear_cache do
    on roles(:web), in: :groups, limit: 3, wait: 10 do
      # Here we can do anything such as:
      # within release_path do
      #   execute :rake, 'cache:clear'
      # end
    end
  end
end

after 'deploy:publishing', 'deploy:restart'
namespace :deploy do
  task :restart do
    invoke 'unicorn:restart'
  end
end
- config/deploy/production.rbの設定
set :branch, 'master'

server 'EC2-IP-ADDRESS', user: 'ec2-user', roles: %w{app db web} ※

set :ssh_options, {
    keys: %w(~/.ssh/YOUR_EC2_KEY.pem),
    forward_agent: true,
    auth_methods: %w(publickey)
  }
※今回はEC2-userでログインする設定で進めていきます。
本来はデプロイユーザを設定して、そのユーザのみがデプロイ可能にすべきだと思います。
- Unicornの設定
手動で config 配下に unicorn.rb を生成
$ cd config
$ touch unicorn.rb
$ vi unicorn.rb

========================== unicorn ==============================

APP_PATH   = "#{File.dirname(__FILE__)}/.." unless defined?(APP_PATH)
RAILS_ROOT = "#{File.dirname(__FILE__)}/.." unless defined?(RAILS_ROOT)
RAILS_ENV  = ENV['RAILS_ENV'] || 'development'

worker_processes 3

listen "/tmp/unicorn.sock"
pid "tmp/pids/unicorn.pid"

preload_app true

timeout 60
working_directory APP_PATH

# log
stderr_path "#{RAILS_ROOT}/log/unicorn_error.log"
stdout_path "#{RAILS_ROOT}/log/unicorn_access.log"

if GC.respond_to?(:copy_on_write_friendly=)
  GC.copy_on_write_friendly = true
end

before_exec do |server|
  ENV['BUNDLE_GEMFILE'] = APP_PATH + "/Gemfile"
end

before_fork do |server, worker|
  defined?(ActiveRecord::Base) and ActiveRecord::Base.connection.disconnect!

  old_pid = "#{ server.config[:pid] }.oldbin"
  unless old_pid == server.pid
    begin
      Process.kill :QUIT, File.read(old_pid).to_i
    rescue Errno::ENOENT, Errno::ESRCH

    end
  end
end

after_fork do |server, worker|
  defined?(ActiveRecord::Base) and ActiveRecord::Base.establish_connection
end

=================================================================
ここまでで各種設定に関しては終了です。
・shared/config 配下のdatabase.yml と secrets.yml は手動で作成します。
が残っていますが、こちらは後編で実施します。
最後にGitHubにここまでのコードをあげておきます。
$ git add .
$ git commit -m "first commint(任意)"
$ git remote add origin git@github.com:YOUR_GITHUB_ACCOUNT/qiitaApp.git
$ ssh-add ~/.ssh/id_rsa_github
$ git push origin master
前編は以上です。
後編ではデプロイチェック、デプロイ、ログ確認を実施します。
