AWSに以下の環境を構築するまでの流れを実施したので、備忘録として残しておこうと思います。
開発環境
RedHatEnterpriseLinux 7.3
postfix 2.10.1
Dovecot 2.2.10
Thunderbird 45.8.0
webサーバのドメイン : example.com
webサーバのIP : X.X.X.X
メールサーバのドメイン : mail.example.com
メールサーバのIP : Y.Y.Y.Y
※webサーバとメールサーバを分けたサーバ設計です。
実施事項
◎構築前の確認/下準備
◎インストール
◎Let's Encryptの設定
◎postfixの設定
◎Dovecotの設定
◎Thunderbirdの設定
構築前の確認/下準備
1.Route53にてDNSの設定を確認
| Name | Type | Value |
|---|---|---|
| example.com | MX | 10 mail.example.com. |
| mail.example.com | A | Y.Y.Y.Y |
dig mail.example.com mx等で設定通りの値が返ってくるか確認
[ec2-user@ip-10-0-200-67 ~]$ dig mail.example.com mx
~略~
;; AUTHORITY SECTION:
example.com.	60	IN	SOA	ns-ZZZZ.awsdns-ZZZZ.com. awsdns-hostmaster.amazon.com. 1 7200 900 1209600 86400
2.ポートの設定を開放・確認
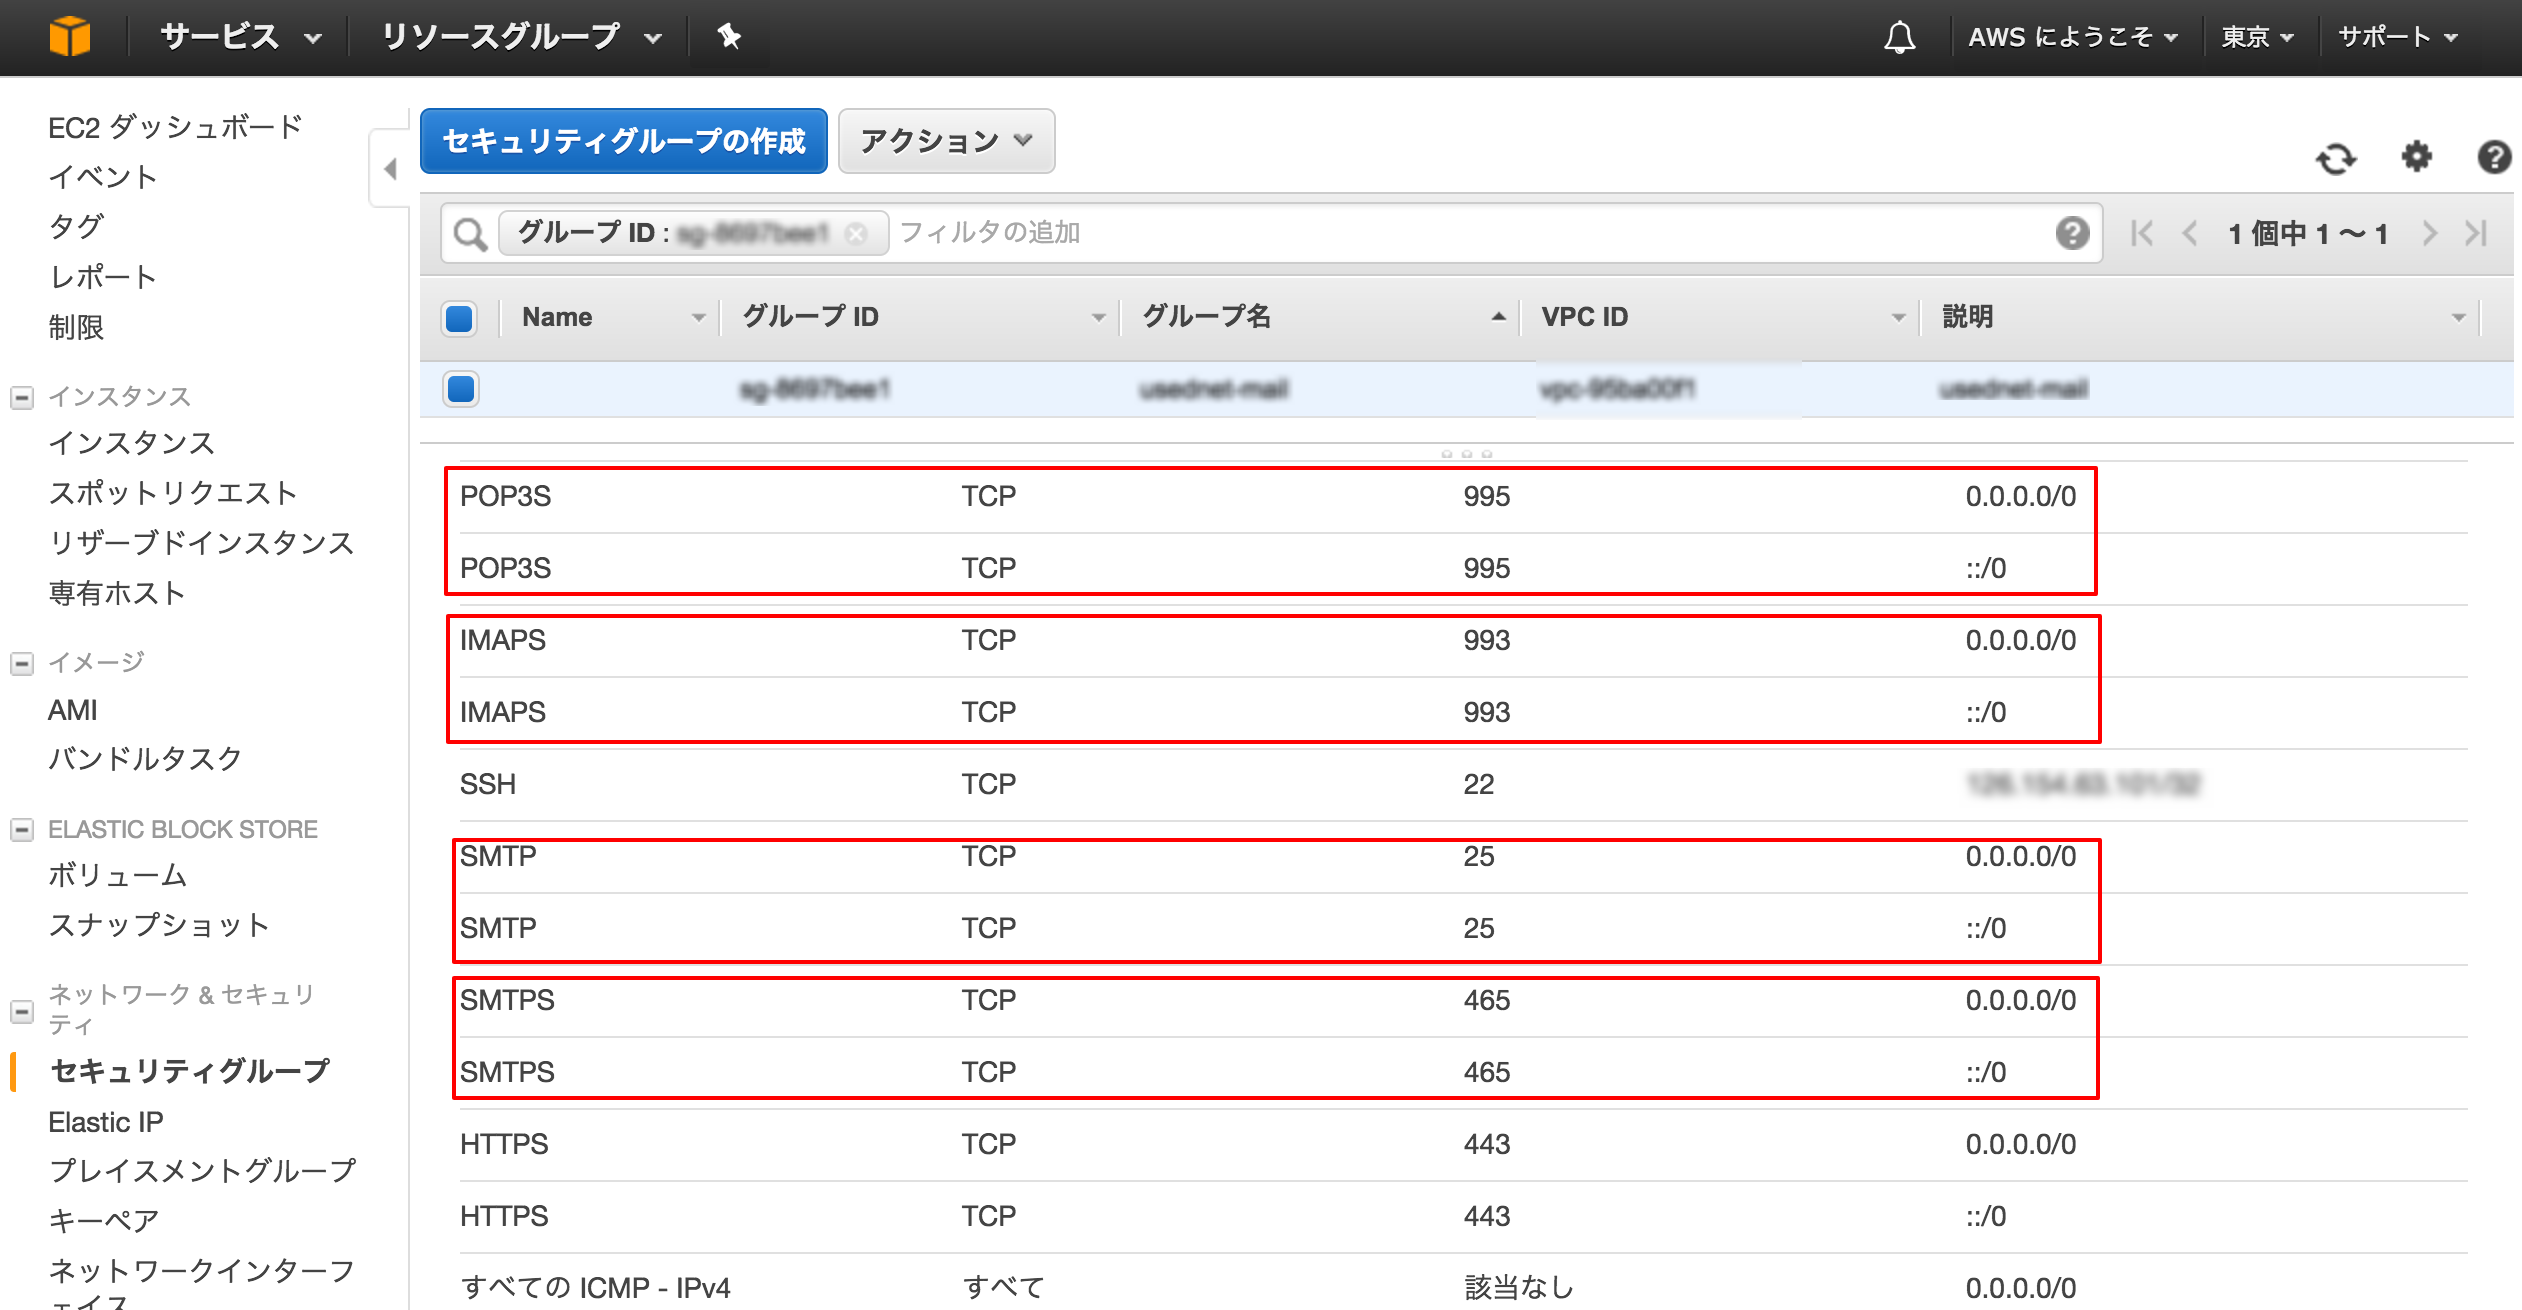
メールの送受信で使用する下記のポートが、(1)EC2のセキュリティグループ(2)サーバでそれぞれ開放されているか確認
・SMPT(25) ・SMTPS(465) ・IMAPS(993) ・POP3S(995)
(1)EC2のセキュリティグループでの確認
(2)サーバでの開放・確認
[ec2-user@ip-10-0-200-67 ~]$ sudo su -
[root@ip-10-0-200-67 ~]# yum install firewalld   //firewalldのインストール
[root@ip-10-0-200-67 ~]# systemctl start firewalld.service   //firewalldのサービスを起動
[root@ip-10-0-200-67 ~]# firewall-cmd --add-port=25/tcp --permanent
success
[root@ip-10-0-200-67 ~]# firewall-cmd --add-port=465/tcp --permanent
success
[root@ip-10-0-200-67 ~]# firewall-cmd --add-port=993/tcp --permanent
success
[root@ip-10-0-200-67 ~]# firewall-cmd --add-port=995/tcp --permanent
success
[root@ip-10-0-200-67 ~]# firewall-cmd --reload
[root@ip-10-0-200-67 ~]# firewall-cmd --list-ports   //開放されているポート一覧の確認
465/tcp 80/tcp 443/tcp 995/tcp 25/tcp 993/tcp
インストール
[root@ip-10-0-200-67 ~]# yum -y groupinstall base
[root@ip-10-0-200-67 ~]# yum -y groupinstall development
[root@ip-10-0-200-67 ~]# yum -y groupinstall network-tools
[root@ip-10-0-200-67 ~]# yum -y install dovecot
postfixはデフォルトでインストールされています。
Let's Encryptの設定
Let's Encrypt のクライアントソフトをインストール
[root@ip-10-0-200-67 ~]# cd /usr/local/
[root@ip-10-0-200-67 ~]# git clone https://github.com/letsencrypt/letsencrypt
[root@ip-10-0-200-67 ~]# cd letsencrypt/
[root@ip-10-0-200-67 ~]# ./letsencrypt-auto --help
Let's Encrypt クライアントの待ち受けポートの開放
[root@ip-10-0-200-67 ~]# firewall-cmd --add-port=80/tcp --permanent
[root@ip-10-0-200-67 ~]# firewall-cmd --add-port=443/tcp --permanent
[root@ip-10-0-200-67 ~]# firewall-cmd --reload
Let's Encrypt のSSL/TLS証明書を取得
今回はメールサーバを独立させたサーバ設計なのでstandaloneとなります。
apache,Nginx等のwebサーバと同じサーバでメールサーバを設定する場合は、バーチャルホストの設定等が必要になります。(今回は省略)
[root@ip-10-0-200-67 ~]# ./letsencrypt-auto certonly --standalone \
> -d mail.example.com \
> -m myname@example.com \ ←任意のメールアドレスで良い
> --agree-tos
Let's EncryptのSSL/TLS証明書は90日間で有効期限が切れるので、毎月1日の朝5時にcronで証明書の自動更新とpostfix・Devocotのリロードを実施します。
[root@ip-10-0-200-67 ~]# crontab -e
========== crontabのファイル =============
00 05 01 * * /usr/local/letsencrypt/letsencrypt-auto certonly --standalone -d mail.example.com --renew-by-default && /bin/systemctl reload postfix && /bin/systemctl reload dovecot
==========================================
postfixの設定
Postfixの設定ファイルを編集
[root@ip-10-0-200-67 ~]# cp -ip /etc/postfix/main.cf /etc/postfix/main.cf.org  //元のファイルをバックアップ
[root@ip-10-0-200-67 ~]# vi /etc/postfix/main.cf

========== main.cfのファイル =============
# このメールサーバのホスト名(FQDN)を指定
# myhostname = host.domain.tld
 ↓
myhostname = mail.example.com

# このメールサーバのドメイン名を指定
# mydomain = domain.tld
 ↓
mydomain = example.com

# メールアドレスを「ユーザ名@ドメイン名」の形式にする
# myorigin = $mydomain
 ↓
myorigin = $mydomain

# 全てのホストからメールを受信する
inet_interfaces = localhost
 ↓
inet_interfaces = all

# mydomain = で指定したドメイン宛のメールを受信する
mydestination = $myhostname, localhost.$mydomain, localhost
 ↓
mydestination = $myhostname, localhost.$mydomain, localhost, $mydomain

# 存在しないメールアドレス(ユーザ)宛のメールの受信を拒否する
# local_recipient_maps = proxy:unix:passwd.byname $alias_maps
 ↓
local_recipient_maps = proxy:unix:passwd.byname $alias_maps

# 中継を許可する宛先ドメインを指定
# relay_domains = $mydestination
 ↓
relay_domains = $mydestination

# 転送サーバを使わない
# relayhost = [an.ip.add.ress]
 ↓
relayhost =

# メールの格納フォーマットの指定
# home_mailbox = Maildir/
 ↓
home_mailbox = Maildir/

# 不要な情報を公開しない
# smtpd_banner = $myhostname ESMTP $mail_name
 ↓
smtpd_banner = $myhostname ESMTP


---(下記を最終行に追加)---------------------------
# VRFYコマンドの使用を禁止する
disable_vrfy_command = yes

# MailBoxの最大サイズの指定
# メールボックスがMaildir形式のためこの設定は無視されますが「message_size_limit」との兼ね合いのため設定しておきます
mailbox_size_limit = 204800000

# 受信メールサイズの制限「mailbox_size_limit」より少ない値を設定してください
message_size_limit = 5120000

# 接続元の制限(スパムメール対策)
smtpd_client_restrictions =
    check_client_access hash:/etc/postfix/access
    reject_rbl_client zen.spamhaus.org
    reject_rbl_client all.rbl.jp
    reject_non_fqdn_sender
    reject_unknown_sender_domain

# エンベロープアドレス(MAIL FROM)による制限(スパムメール対策)
smtpd_sender_restrictions =
	reject_rhsbl_sender zen.spamhaus.org
	reject_unknown_sender_domain


########## SMTP-Auth関連 ##########
# SASL認証を有効化
smtpd_sasl_auth_enable = yes

# Dovecot SASL ライブラリを指定
smtpd_sasl_type = dovecot

# Dovecot SASL ライブラリの認証ソケットファイル /var/spool/postfix/ からの相対パスで記述
smtpd_sasl_path = private/auth

# 古いバージョンの AUTH コマンド (RFC 2554) を実装した SMTP クライアントとの相互運用性を有効にする
broken_sasl_auth_clients = yes


########## TLS/SSL関連 ##########
# TLSを有効化
smtpd_use_tls = yes

# 宛先のメールサーバがTLSに対応していれば、通信を暗号化する
smtp_tls_security_level = may

# サーバ証明書と秘密鍵を指定
smtpd_tls_cert_file = /etc/letsencrypt/live/mail.example.com/fullchain.pem
smtpd_tls_key_file = /etc/letsencrypt/live/mail.example.com/privkey.pem

# TLSログレベルの設定
# 0:出力しない 1:TLSハンドシェイクと証明書情報 2:TLSネゴシエーションの全て
smtpd_tls_loglevel = 1

# 暗号に関する情報を "Received:" メッセージヘッダに含める
smtpd_tls_received_header = yes

# 接続キャッシュファイルの指定
smtpd_tls_session_cache_database = btree:/var/lib/postfix/smtpd_scache

# キャッシュの保持時間の指定
smtpd_tls_session_cache_timeout = 3600s

# 認証を通過したものはリレーを許可する(permit_sasl_authenticated)
smtpd_recipient_restrictions =
    permit_mynetworks
    permit_sasl_authenticated
    reject_unauth_destination
==========================================
smtps(SMTP-Auth over SSL)を有効化
[root@ip-10-0-200-67 ~]# vi /etc/postfix/master.cf

========== master.cfのファイル =============
# smtps     inet  n       -       n       -       -       smtpd
#  -o syslog_name=postfix/smtps
#  -o smtpd_tls_wrappermode=yes
#  -o smtpd_sasl_auth_enable=yes
#  -o smtpd_reject_unlisted_recipient=no
#  -o smtpd_client_restrictions=$mua_client_restrictions
#  -o smtpd_helo_restrictions=$mua_helo_restrictions
#  -o smtpd_sender_restrictions=$mua_sender_restrictions
#  -o smtpd_recipient_restrictions=permit_sasl_authenticated,reject
#  -o milter_macro_daemon_name=ORIGINATING
 ↓
smtps     inet  n       -       n       -       -       smtpd
#  -o syslog_name=postfix/smtps
  -o smtpd_tls_wrappermode=yes
  -o smtpd_sasl_auth_enable=yes
#  -o smtpd_reject_unlisted_recipient=no
#  -o smtpd_client_restrictions=$mua_client_restrictions
#  -o smtpd_helo_restrictions=$mua_helo_restrictions
#  -o smtpd_sender_restrictions=$mua_sender_restrictions
  -o smtpd_recipient_restrictions=permit_sasl_authenticated,reject
#  -o milter_macro_daemon_name=ORIGINATING
============================================

[root@ip-10-0-200-67 ~]# postfix check   //設定の間違いをチェック
[root@ip-10-0-200-67 ~]# systemctl start postfix
[root@ip-10-0-200-67 ~]# systemctl enable postfix //自動起動の設定
Dovecotの設定
受信プロトコルの設定
[root@ip-10-0-200-67 ~]# vi /etc/dovecot/dovecot.conf

========== dovecot.confのファイル =============
# protocols = imap pop3 lmtp
 ↓
protocols = imap pop3
===============================================
ポートの設定
[root@ip-10-0-200-67 ~]# vi /etc/dovecot/conf.d/10-master.conf

========== 10-master.confのファイル =============
service imap-login {
  inet_listener imap {
    #port = 143
	 ↓
    port = 0
  }
  inet_listener imaps {
    #port = 993
    #ssl = yes
	 ↓
    port = 993
    ssl = yes
  }
}

service pop3-login {
  inet_listener pop3 {
    #port = 110
	 ↓
    port = 0
  }
  inet_listener pop3s {
    #port = 995
    #ssl = yes
	 ↓
    port = 995
    ssl = yes
  }
}

〜 略 〜

service auth {
  # Postfix smtp-auth
  #unix_listener /var/spool/postfix/private/auth {
  #  mode = 0666
  #}
 ↓
  unix_listener /var/spool/postfix/private/auth {
    mode = 0660
    user = postfix
    group = postfix
  }
}
=================================================
認証方式の設定
[root@ip-10-0-200-67 ~]# vi /etc/dovecot/conf.d/10-auth.conf

========== 10-auth.confのファイル =============
# disable_plaintext_auth = yes
 ↓
disable_plaintext_auth = no

auth_mechanisms = plain
 ↓
auth_mechanisms = plain login
===============================================
SSL/TLSの有効化とサーバ証明書と秘密鍵を指定
[root@ip-10-0-200-67 ~]# vi /etc/dovecot/conf.d/10-ssl.conf

========== 10-ssl.confのファイル =============
ssl = required
 ↓
ssl = yes

# ssl_cert = </etc/pki/dovecot/certs/dovecot.pem
# ssl_key = </etc/pki/dovecot/private/dovecot.pem
 ↓
ssl_cert = </etc/letsencrypt/live/mail.example.com/fullchain.pem
ssl_key = </etc/letsencrypt/live/mail.example.com/privkey.pem
==============================================
メールボックスの場所を設定
[root@ip-10-0-200-67 ~]# vi /etc/dovecot/conf.d/10-mail.conf

========== 10-mail.confのファイル =============
# mail_location =
 ↓
mail_location = maildir:~/Maildir
==============================================
[root@ip-10-0-200-67 ~]# systemctl start dovecot   //dovecotの起動
[root@ip-10-0-200-67 ~]# systemctl enable dovecot   //自動起動の設定
ログの設定
【postfixのログの設定】
[root@ip-10-0-200-67 ~]# mkdir /var/log/mail
[root@ip-10-0-200-67 ~]# vi /etc/rsyslog.conf

========== rsyslog.confのファイル =============
mail.*                  -/var/log/maillog
         ↓
mail.*                  -/var/log/mail/maillog
==============================================

[root@ip-10-0-200-67 ~]# systemctl restart rsyslog   //syslogの再起動
[root@ip-10-0-200-67 ~]# rm -f /var/log/maillog*    //不要なログの削除
[root@ip-10-0-200-67 ~]# vi /etc/logrotate.d/syslog

========== syslogファイル =============
/var/log/cron
/var/log/maillog
/var/log/messages
/var/log/secure
/var/log/spooler
   ↓ /var/log/maillogを削除
/var/log/cron
/var/log/messages
/var/log/secure
/var/log/spooler
=======================================

[root@ip-10-0-200-67 ~]# vi /etc/logrotate.d/maillog   //ログローテーション設定

========== maillogファイル =============
/var/log/mail/maillog {
    daily
    missingok
    dateext
    rotate 60
    sharedscripts
    postrotate
        /bin/kill -HUP `cat /var/run/syslogd.pid 2> /dev/null` 2> /dev/null || true
    endscript
}
=======================================
postfixログ設定の確認
[root@ip-10-0-200-67 ~]# logrotate -dv /etc/logrotate.d/maillog
Allocating hash table for state file, size 15360 B

Handling 1 logs

rotating pattern: /var/log/mail/maillog  after 1 days (60 rotations)
empty log files are rotated, old logs are removed
considering log /var/log/mail/maillog
  log does not need rotating (log has been already rotated)not running postrotate script, since no logs were rotated
【Dovecotのログの設定】
Dovecotログの出力先を変更
[root@ip-10-0-200-67 ~]# mkdir /var/log/dovecot
[root@ip-10-0-200-67 ~]# vi /etc/dovecot/conf.d/10-logging.conf

========== 10-logging.confのファイル =============
# log_path = syslog
 ↓
log_path = /var/log/dovecot/dovecot.log
==================================================
ログローテーション設定
[root@ip-10-0-200-67 ~]# vi /etc/logrotate.d/dovecot

========== dovecotファイル =============
/var/log/dovecot/dovecot.log {
    daily
    missingok
    dateext
    rotate 60
    sharedscripts
    postrotate
        /bin/kill -USR1 `cat /var/run/dovecot/master.pid 2>/dev/null` 2> /dev/null || true
    endscript
}
========================================
Dovecotログ設定の確認
[root@ip-10-0-200-67 ~]# logrotate -dv /etc/logrotate.d/dovecot
reading config file /etc/logrotate.d/dovecot
Allocating hash table for state file, size 15360 B

Handling 1 logs

rotating pattern: /var/log/dovecot/dovecot.log  after 1 days (60 rotations)
empty log files are rotated, old logs are removed
considering log /var/log/dovecot/dovecot.log
  log does not need rotating (log has been already rotated)not running postrotate script, since no logs were rotated
新規ユーザ作成時にMaildirを自動生成するようにします。
[root@ip-10-0-200-67 ~]# mkdir -p /etc/skel/Maildir/{new,cur,tmp}
[root@ip-10-0-200-67 ~]# chmod -R 700 /etc/skel/Maildir/
全ての設定が完了したら、postfixとDovecotを再起動します。
(私はここが抜けていて、1日ハマってしまいました。)
[root@ip-10-0-200-67 ~]# systemctl restart  postfix.service
[root@ip-10-0-200-67 ~]# systemctl restart dovecot.service
Thunderbirdの設定
新規ユーザの登録
[root@ip-10-0-200-67 ~]# useradd -s /sbin/nologin qiita_user
[root@ip-10-0-200-67 ~]# passwd qiita_user
Changing password for user qiita_user.
New password: (qiita)
Retype new password: (qiita)
passwd: all authentication tokens updated successfully.
これで、giita_user@example.comのメールアドレスが登録されます。
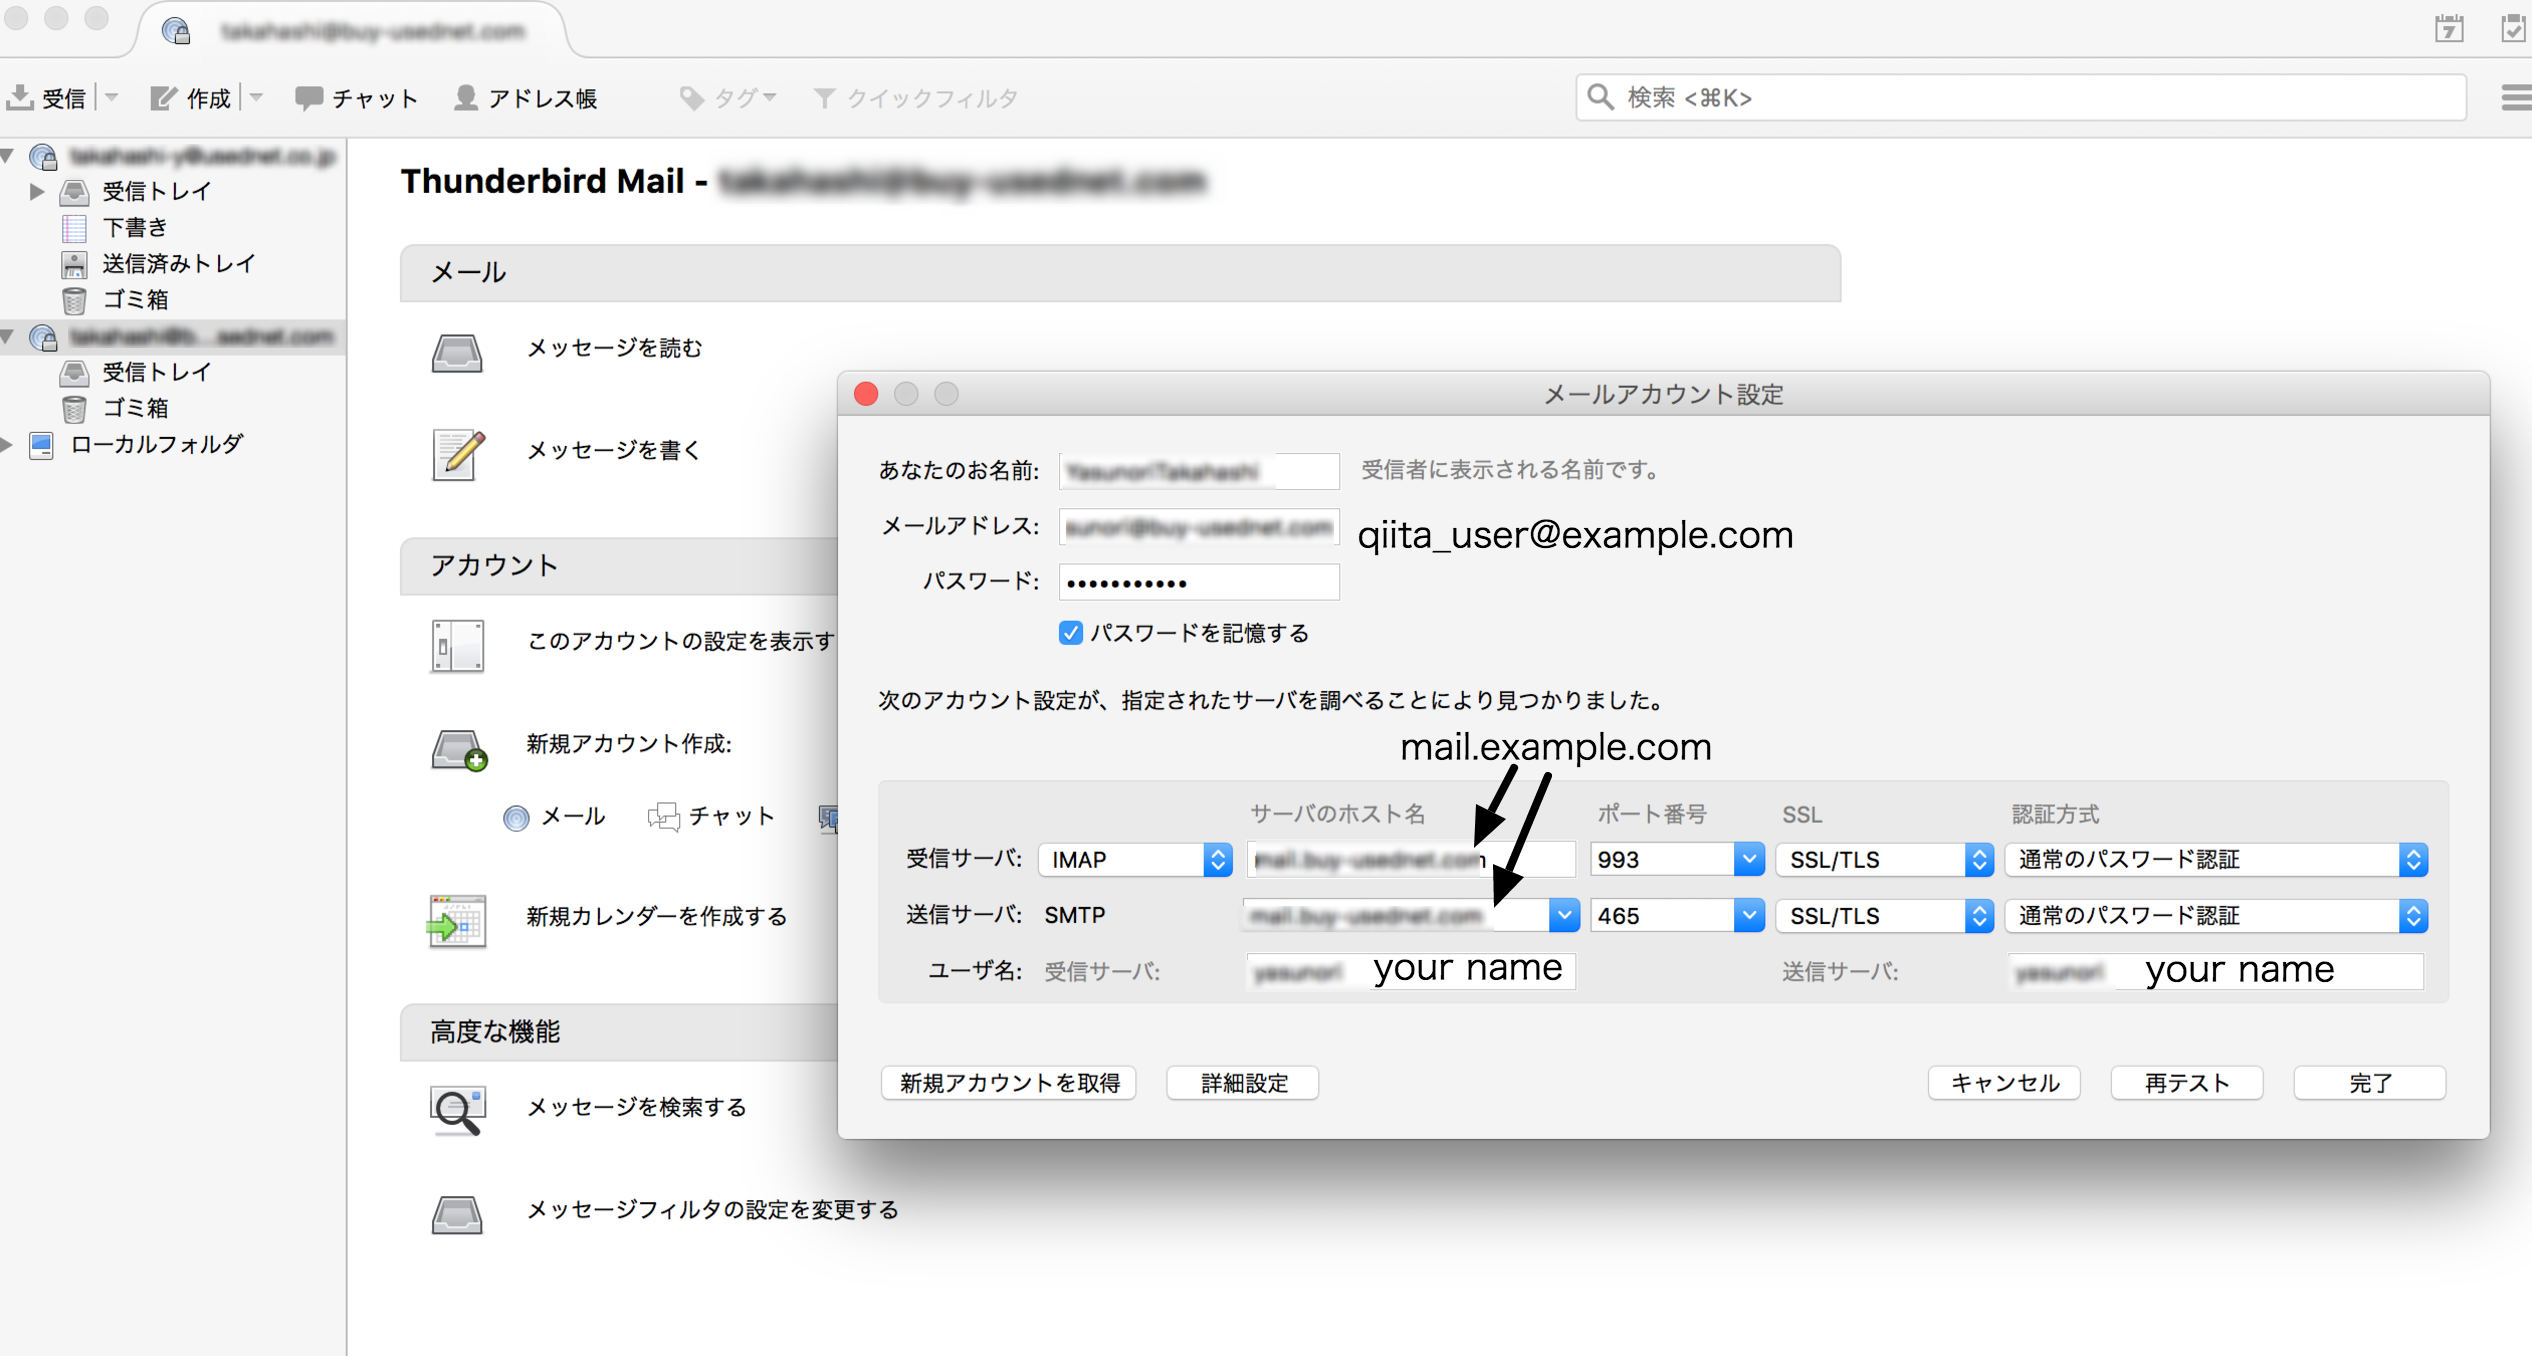
Thunderbirdの設定
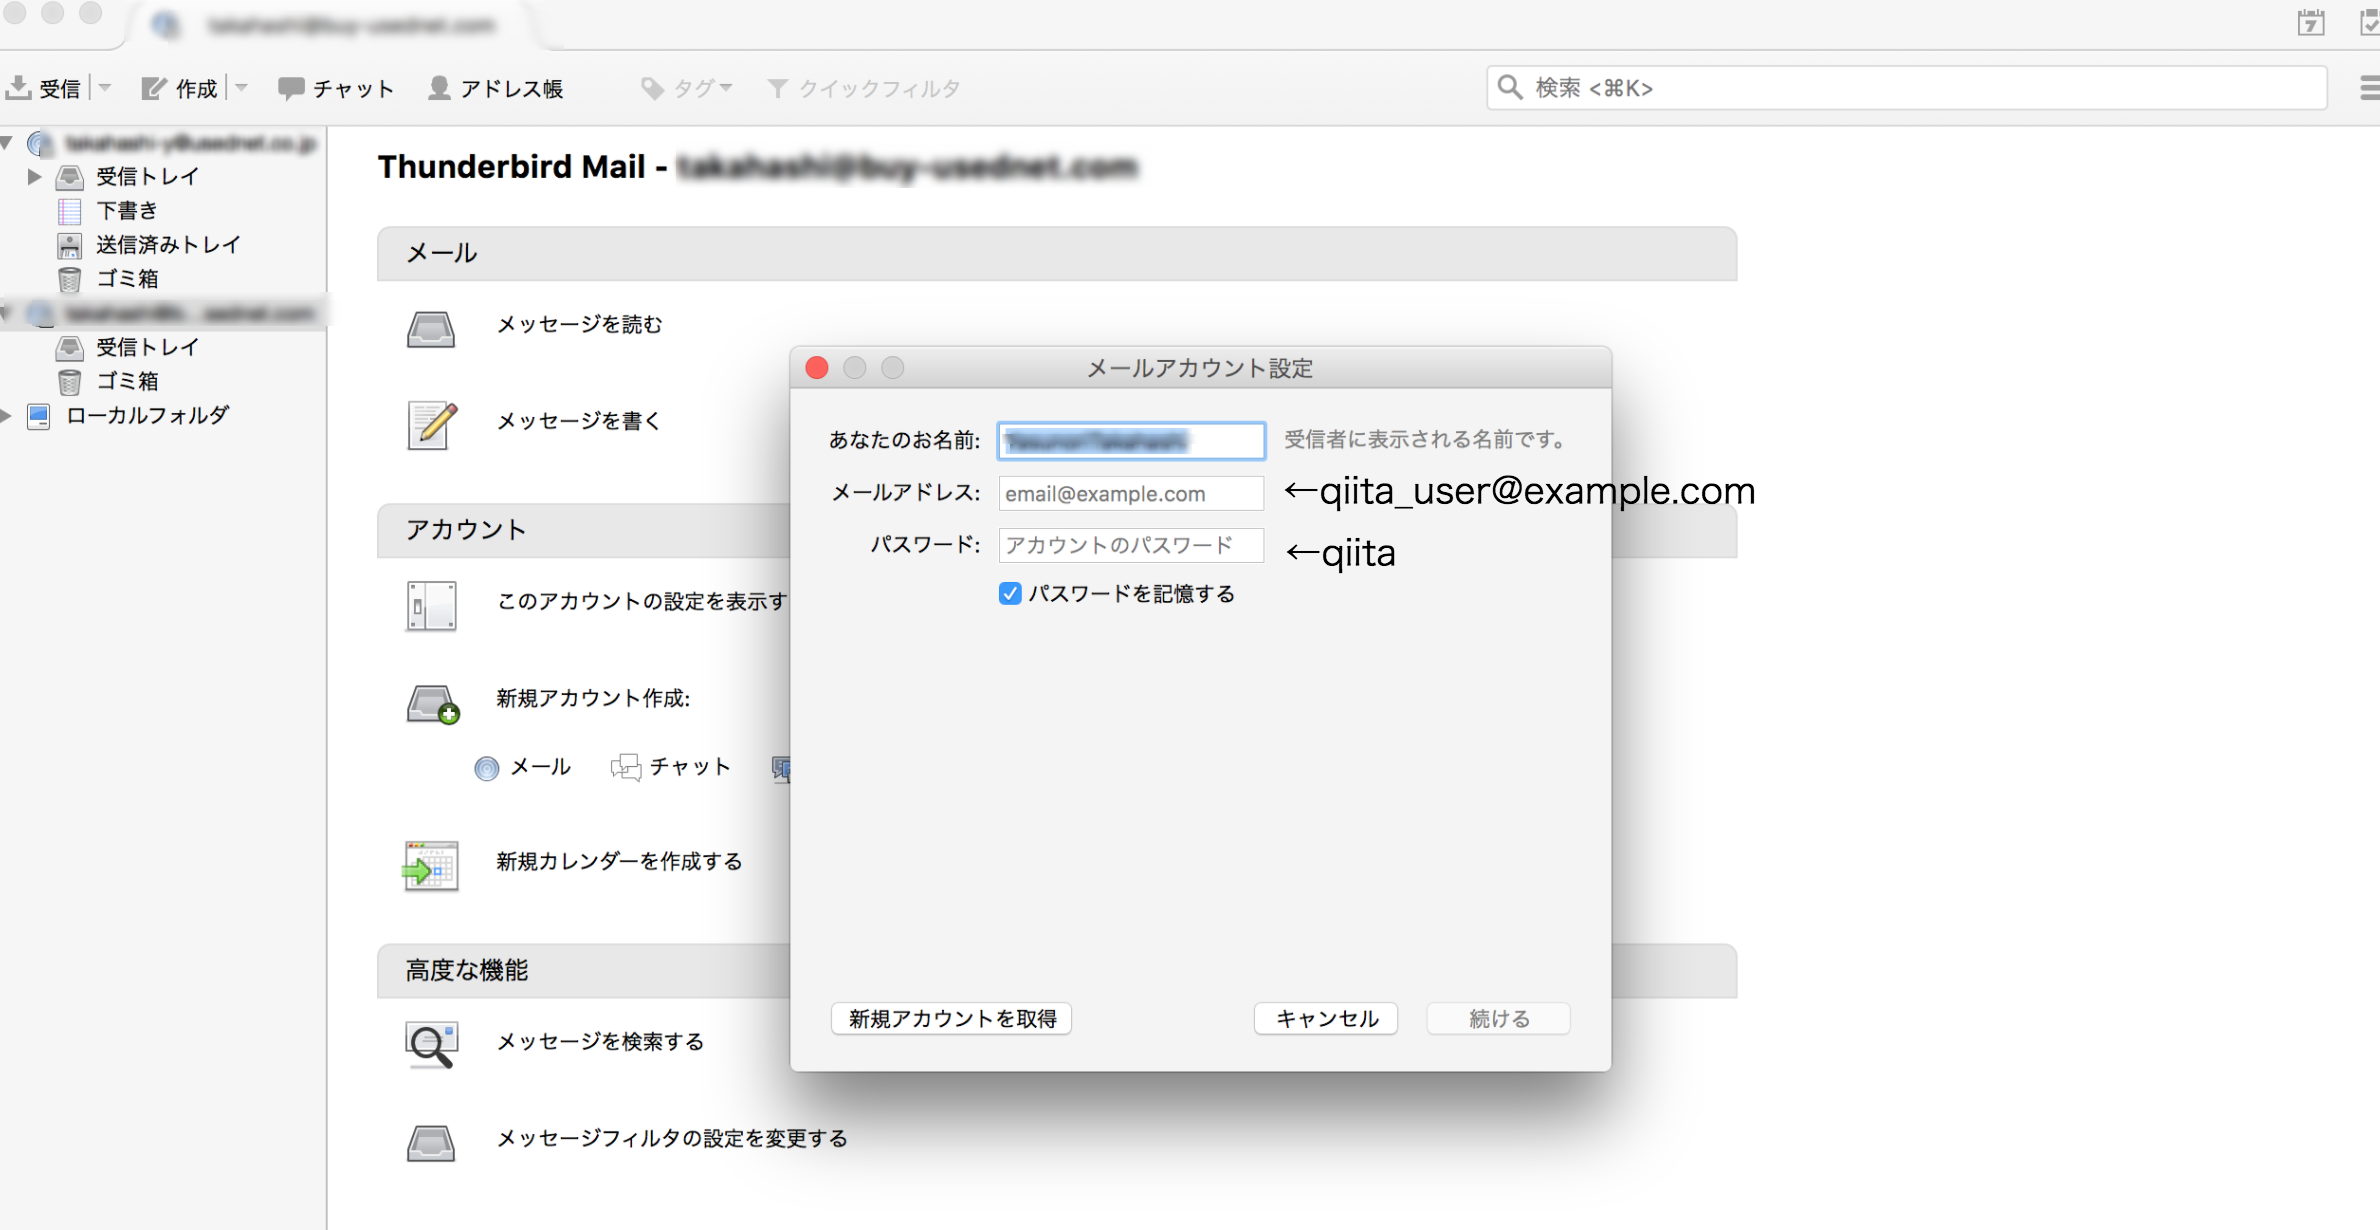
[Thunderbirdはあなたのアカウト設定を見つけられませんでした。]というエラーが出た場合は、手動で設定します。
以上です。
うまくいかない場合は、下記をご確認ください。
1. postfixとDovecotのログ
[root@ip-10-0-200-67 ~]# tail -f /var/log/mail/maillog
[root@ip-10-0-200-67 ~]# tail -f /var/log/dovecot/dovecot.log
2. ポートが開放されているかどうか
telnetコマンドを叩いてみる。
(コマンドが打てない場合は、インストールする必要があります。)
[root@ip-10-0-200-67 ~]# telnet mail.example.com 25
[root@ip-10-0-200-67 ~]# telnet mail.example.com 465
[root@ip-10-0-200-67 ~]# telnet mail.example.com 993
[root@ip-10-0-200-67 ~]# telnet mail.example.com 995
Portチェックテストで確認してみる。
また、メールサーバを構築する上で外部からの不正中継が可能な状態になっていないかの第三者中継チェックをしなければならないようです。
第三者中継チェック RBL.JP
以上です。
大変参考にさせていただきました。
ありがとうございました。
SSLメールサーバ構築メモ Let's Encrypt+Postfix+Dovecot
POPとIMAPの違いと選択
yum の groupinstall でインストールされるパッケージを確認する
Let's Encrypt で手軽に HTTPS サーバを設定する
telnetコマンドでのメールサーバ(SMTP, SMTP-AUTH, POP3)の動作確認
[Posftix]25番ポートに接続しようとして"Connection refused"の対処法