VSCode devcontainer で外部サーバに建てたコンテナで開発する
0. 環境
- CentOS7
- Windows10
- WSL2
- Ubuntu20.04
1. 前提
Docker用サーバはイントラネットに建てます。
が、EC2等のクラウドサービスを利用した構築ともほぼ同じことなので
同じ手順で構築可能と考えます。
2. サーバ準備
ベースOSはCentOS7で建てようと思います。
※クラウドサービスを利用する方はこの章はスキップでOKです。
-
https://www.centos.org/download/
- こちらからCentOS7をDLしてください。
- DL出来たらDVDに焼いて以下参考サイトの通りにインストールします。
- https://centossrv.com/centos7.shtml
3. サーバ初期設定
やること
yum update- ユーザ作成
- ssh設定
- firewall設定
- Dockerインストール
yum update
# yum update -y
これを実行するだけ。
ユーザ作成
vscode の部分は各自好きなユーザ名としてください。
UIDはWSL使用されている方はメインユーザと同じがいいかなと思います(パーミッション問題とかありそうなので)。
- ローカルで鍵を作成
$ ssh-keygen -t rsa -b 4096 -C "vscode"- デフォルトだとid_rsa, id_rsa.pubが作られます
- ==以下サーバ側の作業==
# useradd -u 1000 vscode-
# passwd vscode- 任意のパスワードを設定してください
# su - vscode$ mkdir ~/.ssh && cd ~/.ssh-
$ vi authorized_keys- id_rsa.pubの内容を貼り付ける
- パーミッション調整
$ chmod 700 ~/.ssh$ chmod 600 ~/.ssh/authorized_keys
ssh設定
以下のように設定変更しました。
$ sudo diff /etc/ssh/sshd_config /etc/ssh/sshd_config.org
17c17
< Port 1022
---
> Port 22
21c21
< Protocol 2
---
>
26,29d25
< SyslogFacility AUTHPRIV
< LogLevel VERBOSE
< AllowUsers vscode
< #DenyUsers ec2-user
42c38
< PermitRootLogin no
---
> #PermitRootLogin yes
47c43
< PubkeyAuthentication yes
---
> #PubkeyAuthentication yes
68,69c64,65
< PermitEmptyPasswords no
< PasswordAuthentication no
---
> #PermitEmptyPasswords no
> PasswordAuthentication yes
102c98
< AllowAgentForwarding yes
---
> #AllowAgentForwarding yes
- Port
- 22から1022に変更しました
- Protocol
- 2のみ許可
- ログを出します
- SyslogFacility AUTHPRIV
- LogLevel VERBOSE
- AllowUsers
- vscode のみログイン許可
- rootログイン禁止
- PermitRootLogin no
- パスワードログイン禁止
- PermitEmptyPasswords no
- PasswordAuthentication no
- フォワーディングあり
- AllowAgentForwarding yes
- これが肝
sudoersも追加しておきます
# cat /etc/sudoers.d/vscode
vscode ALL=(ALL:ALL) ALL
一応vscodeユーザになってsudo 効くか確認しておきます。
以下の感じでsudo使えるようになっていればOKです。
# su - vscode
Last login: ******
$ sudo ls
[sudo] password for vscode:
$
firewall設定
※AWS EC2の場合はセキュリティグループも確認ください。
cp /usr/lib/firewalld/services/ssh.xml /etc/firewalld/services/
/etc/firewalld/ に置いた設定が優先されるようです。
基のファイルをコピーして設定します。
portを1022に変更します。
# cat /etc/firewalld/services/ssh.xml
<?xml version="1.0" encoding="utf-8"?>
<service>
  <short>SSH</short>
  <description>Secure Shell (SSH) is a protocol for logging into and executing commands on remote machines. It provides secure encrypted communications. If you plan on accessing your machine remotely via SSH over a firewalled interface, enable this option. You need the openssh-server package installed for this option to be useful.</description>
  <port protocol="tcp" port="1022"/>
</service>
-
# firewall-cmd --permanent --remove-service=dhcpv6-client- dhcpv6-client は切っておきます
-
# firewall-cmd --permanent --add-icmp-block-inversion- pingも切っておきます。
# firewall-cmd --reload
最終設定は以下のようになります。
# firewall-cmd --list-all
public (active)
  target: default
  icmp-block-inversion: yes
  interfaces: ens33
  sources:
  services: ssh
  ports:
  protocols:
  masquerade: no
  forward-ports:
  source-ports:
  icmp-blocks:
  rich rules:
SELinuxを切っておきます。
# cat /etc/selinux/config

# This file controls the state of SELinux on the system.
# SELINUX= can take one of these three values:
#     enforcing - SELinux security policy is enforced.
#     permissive - SELinux prints warnings instead of enforcing.
#     disabled - No SELinux policy is loaded.
# SELINUX=enforcing
SELINUX=disabled
# SELINUXTYPE= can take one of three values:
#     targeted - Targeted processes are protected,
#     minimum - Modification of targeted policy. Only selected processes are protected.
#     mls - Multi Level Security protection.
SELINUXTYPE=targeted
ここまで来たら再起動します
# reboot
疎通確認
ローカルの ~/.ssh/config に以下を記載します。
Host devcontainer
  Hostname サーバのIPアドレス
  User vscode
  Port 1022
  IdentityFile ~/.ssh/id_rsa
ssh devcontainer でログインできます。
できないときは、サーバ側の/var/log/secure か /var/log/messages を確認して対応してください。
Dockerインストール
サーバ側にDockerをインストールします。
Dockerをsudoなしで実行できるようにします。
dockerは18以降を入れます。
参考: https://docs.docker.jp/engine/installation/linux/docker-ce/centos.html
$ sudo yum install -y yum-utils device-mapper-persistent-data lvm2$ sudo yum-config-manager --add-repo https://download.docker.com/linux/centos/docker-ce.repo$ sudo yum install docker-ce -y$ sudo groupadd docker$ sudo usermod -aG docker vscode$ sudo systemctl enable --now docker$ docker ps
実行できればOKです。
$ docker -H ssh://devcontainer ps
でローカル側で実行できれば疎通はOKです。
※ローカルにDocker CLIのインストールが必要です。
4. ローカル設定
SSH設定
ubuntuの場合は以下をインストールください。
apt install socat
参考: VSCode Remote ContainersでGitにSSH接続でpushする
SSHAgentに先ほどsshに使用した鍵を ssh-add $HOME/.ssh/id_rsa で登録します。
~/.bash_profile に以下を記載すると起動時に自動設定してくれます。
if [ -z "$SSH_AUTH_SOCK" ]; then
   # Check for a currently running instance of the agent
   RUNNING_AGENT="`ps -ax | grep 'ssh-agent -s' | grep -v grep | wc -l | tr -d '[:space:]'`"
   if [ "$RUNNING_AGENT" = "0" ]; then
        # Launch a new instance of the agent
        ssh-agent -s &> $HOME/.ssh/ssh-agent
   fi
   eval `cat $HOME/.ssh/ssh-agent`
fi
ssh-add $HOME/.ssh/id_rsa
. $HOME/.bashrc
Docker Cliインストール
$ sudo apt-get update
$ sudo apt-get install \
    apt-transport-https \
    ca-certificates \
    curl \
    gnupg \
    lsb-release
$ curl -fsSL https://download.docker.com/linux/ubuntu/gpg | sudo gpg --dearmor -o /usr/share/keyrings/docker-archive-keyring.gpg
$ echo \
  "deb [arch=amd64 signed-by=/usr/share/keyrings/docker-archive-keyring.gpg] https://download.docker.com/linux/ubuntu \
  $(lsb_release -cs) stable" | sudo tee /etc/apt/sources.list.d/docker.list > /dev/null
$ sudo apt-get update
$ sudo apt-get install docker-ce-cli
以下の通りリモートサーバのdockerにアクセスできるように設定します。
docker context create remote --docker 'host=ssh://devcontainer'
docker context use remote
docker ps
5. VSCodeを立ち上げる
※コンテナにマウントされるディレクトリは サーバのディレクトリ となるので注意です。
.devcontainer/devcontainer.jsonにサーバ側のコンテナのワークスペースにしたいディレクトリをマウントする設定を追記します。
SSHでサーバにログインし、/home/vscode/testディレクトリを作成しました。
"workspaceMount": "source=/home/vscode/test,target=/workspace/test,type=bind,consistency=cached"
↑
ローカル側の作業ディレクトリと同じディレクトリ構成がサーバ側にあれば設定は不要です。
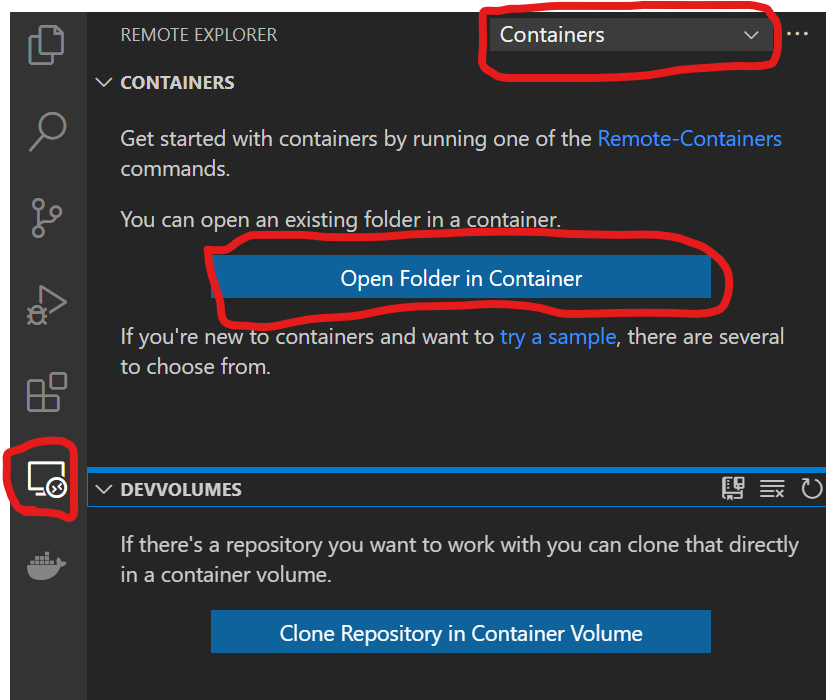
以下の「Open Folder in Container」で起動します。

Dockerコンテナにopenssh-client、gitインストールしておくとコンテナ内でGitが使えるようになります。
以上です。
