はじめに
前回、React チュートリアルの三目並べに Redux を導入するという記事を書きました。
今回は、その続きとして redux-aggregate と redux-observable を導入してみます。
前提
本記事は、React の公式チュートリアルが最後まで終わっていて、そこに Redux が導入されている状態 (即ち前回の記事が最後まで終わっている状態) を想定しています。
このリポジトリを clone しても良いです。
redux-aggregate 導入
The purpose of this library is to make the application core independent by pure language specification.Persistent code does not need to be closely related to Redux concept.I think it is important to extend the life of the code / accompanying test.Redux already has strong type definition by TypeScript,and ecosystems of supported by community.I believe this will be able to hub of them.
redux-aggregate を利用することで、reducer や action に関する記述量を減らすことができます。
また、今回はその恩恵を受けられませんが、TypeScript 環境下であれば action を扱う際に型の恩恵を受けやすくなります。
(ちなみに、Redux 4.0.4 に対応させて型とか追加した fork が opt-tech/redux-aggregate にあったりします。)
redux-aggregate をインストール
まず、redux-aggregate をプロジェクトに追加します。
npm install redux-aggregate
mutation を追加
Mutaions is immutable mutate functions for state. Generate boilerplate starting from this MutationsMap. It be equal to behavior of Reducer. Let provide payload as the second argument if necessary. This is pure function for state.
Mutations・redux-aggregate より引用
インストールが完了したら、mutation を書きます。
import { createAggregate } from "redux-aggregate";
import { calculateWinner } from "./utils";

/*
 * mutations
 */

const gameMT = {
  clickSquare(state, index) {
    const history = state.history.slice(0, state.stepNumber + 1);
    const current = history[history.length - 1];
    const squares = current.squares.slice();
    if (calculateWinner(squares) || squares[index]) {
      return state;
    }
    squares[index] = state.xIsNext ? "X" : "O";
    return {
      history: history.concat([
        {
          squares: squares
        }
      ]),
      stepNumber: history.length,
      xIsNext: !state.xIsNext
    };
  },
  jumpToPast(state, step) {
    return {
      ...state,
      stepNumber: step,
      xIsNext: step % 2 === 0
    };
  }
};

/*
 * aggregates
 */

const gameAggregate = createAggregate(gameMT, "game/");

/*
 * actions
 */

export const gameTypes = gameAggregate.types;
export const gameCreators = gameAggregate.creators;

/*
 * reducers
 */
export const gameReducer = gameAggregate.reducerFactory({
  history: [
    {
      squares: Array(9).fill(null)
    }
  ],
  stepNumber: 0,
  xIsNext: true
});
mutation には reducer に case 文で書いていたロジックをオブジェクトとして書き直しているだけです。
action type や action creator は mutation から生成した aggregate から得られます。
後は、既存の action や reducer を削除して、代わりに gameAggregate から生成したものを使うようにするだけです。
具体的な変更例はここにあります。
これで redux-aggregate が導入できました。
middleware 導入
Redux middleware solves different problems than Express or Koa middleware, but in a conceptually similar way. It provides a third-party extension point between dispatching an action, and the moment it reaches the reducer. People use Redux middleware for logging, crash reporting, talking to an asynchronous API, routing, and more.
Middleware・Redux より引用
(この記事は面白いので、読んだことない人はざっと見てみることをお勧めします。)
上記の記事にもありますが、ロガーを自作するとこんな感じになります。
export const logger = store => next => action => {
  console.log("previous state", store.getState());
  console.log("dispatching", action);
  let result = next(action);
  console.log("next state", store.getState());
  return result;
};
で、それを導入するとこんな感じになります。
import React from "react";
import { render } from "react-dom";
import { createStore, applyMiddleware } from "redux";
import { Provider } from "react-redux";
import { app } from "./reducers";
import { GameContainer } from "./containers";
import { logger } from "./middlewares";
import "./index.css";

const store = createStore(app, applyMiddleware(logger));

render(
  <Provider store={store}>
    <GameContainer />
  </Provider>,
  document.getElementById("root")
);
同様に、redux-observable も導入してみましょう。
redux-observable 導入
RxJS 6-based middleware for Redux. Compose and cancel async actions to create side effects and more.
redux-observable/redux-observable より引用
redux-observable は Redux 向け middleware の一種です。
今回は redux-observable を導入して API コールをさせてみます。
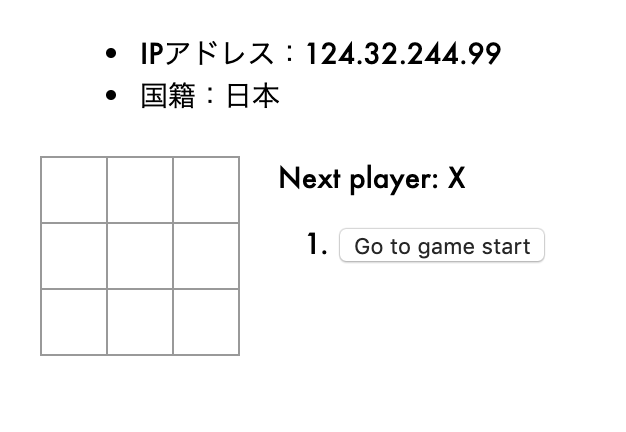
具体的には、下の図のように、三目並べの上部にプレイヤーの IP アドレスと国籍を表示させます。
(なんで IP アドレス?などと突っ込んではいけません。適当な API が見つからなかったんです。)
叩くエンドポイントは以下の 2 つです。
-
https://api.ipify.org/- IP アドレスを取得する API
- レスポンスは text 形式
-
https://www.maxmind.com/geoip/v2.1/city/${ipAddress}?demo=1- IP アドレスから国籍を取得する API
- レスポンスは JSON 形式
React component を追加
まず、IP アドレスと国籍を表示させる Information component を作成します。
function Information(props) {
  return (
    <div className="information">
      <ul>
        <li>IPアドレス:xxx</li>
        <li>国籍:xxx</li>
      </ul>
    </div>
  );
}
.information {
  margin: 20px;
}
Information component は Game component から呼び出しましょう。
export function Game(props) {
  ...

  return (
    <div>
      <Information />
      <div className="game">
        <div className="game-board">
          <BoardContainer />
        </div>
        <div className="game-info">
          <div>{status}</div>
          <ol>{moves}</ol>
        </div>
      </div>
    </div>
  );
}
redux-observable をインストール
以下のコマンドを実行して redux-observable と rxjs を導入しましょう。
npm install redux-observable rxjs
mutation を追加
Information component に対する mutation を追加します。
API から取得する IP アドレスと国籍を Redux の state に保持させることを念頭に置いてください。
作成している action については後述します。
/*
 * mutations
 */

const informationMT = {
  fetchIPAddress(state) {
    return state;
  },
  fetchIPAddressFulfilled(state, ipAddress) {
    return { ...state, ipAddress };
  },
  fetchCountryFulfilled(state, country) {
    return { ...state, country };
  }
};

/*
 * aggregates
 */

const informationAggregate = createAggregate(informationMT, "information/");

/*
 * actions
 */

export const informationTypes = informationAggregate.types;
export const informationCreators = informationAggregate.creators;

/*
 * reducers
 */

export const informationReducer = informationAggregate.reducerFactory({
  ipAddress: undefined,
  country: undefined
});
container component を追加
さて、先ほど定義した action は以下の3種類です。
-
fetchIPAddress- IP アドレスの取得開始を表す action
- payload には何も持たない
-
fetchIPAddressFulfilled- IP アドレスの取得完了を表す action
- API から取得した IP アドレスを payload に持つ
-
fetchCountryFulfilled- 国籍の取得完了を表す action
- API から取得した国籍を payload に持つ
component に発行させる action は fetchIPAddress です。
middleware である redux-observable に fetchIPAddress を購読させて、もしそれが発火されたら API コールを開始させるようにします。
それでは fetchIPAddress を dispatch する関数を Information component に渡しましょう。
ついでに Redux の state から IP アドレスと国籍も渡せるようにしておきましょう。
import { Information } from "./components";
import { informationCreators } from "./mutations";

/*
 * Information component
 */

const mapStateToPropsForInformation = (state, ownProps) => {
  return state.information;
};

const mapDispatchToPropsForInformation = (dispatch, ownProps) => {
  return {
    fetchInformation: () => {
      dispatch(informationCreators.fetchIPAddress());
    }
  };
};

export const InformationContainer = connect(
  mapStateToPropsForInformation,
  mapDispatchToPropsForInformation
)(Information);
IP アドレスと国籍は画面を開いた時に出て欲しいので、 fetchIPAddress action の dispatch は Information component がマウントされたタイミングで行います。
useEffect() についてはこちらを参照してください。
create-react-app の都合上、一部 ESLint を disable するコメントが含まれていますが、あまり気にしないでください。
import React, { useEffect } from "react";

export function Information(props) {
  const { fetchInformation, ipAddress, country } = props;

  useEffect(() => {
    fetchInformation();
    // fetchInformation() は一回だけ実行できれば良い
    // eslint-disable-next-line react-hooks/exhaustive-deps
  }, []);

  return (
    <div className="information">
      <ul>
        <li>IPアドレス:{ipAddress}</li>
        <li>国籍:{country}</li>
      </ul>
    </div>
  );
}
最後に、 Game component 内で Information component を呼んでいた箇所を InformationContainer に書き換えましょう。
epic を追加
An Epic is the core primitive of redux-observable.
It is a function which takes a stream of actions and returns a stream of actions. Actions in, actions out.
先ほど component が dispatcher を呼び出すよう変更しました。
ここで component のマウントから API コールの完了までの流れを説明します。
(1) Information component がマウントされる
(2) Information component が fetchIPAddress action を dispatch する
(3) reducer が state を更新する
これは我々が知っている Redux の挙動です。
しかし、今回はこの dispatch を redux-observable が購読しているため、(3) と同時に別の処理が走ります。
(3') fetchIPAddress action を検知した redux-observable が IP アドレスの取得を開始する
(4) IP アドレスの取得が完了したら、redux-observable はその情報を fetchIPAddressFulfilled action の payload に乗せて dispatch する
(5) reducer が state を更新する
これが redux-observable の仕事です。
今回は更に国籍も取得したいため、(5) と同時に別の処理も走ります。
(5') fetchIPAddressFulfilled action を検知した redux-observable が国籍の取得を開始する
(6) 国籍の取得が完了したら、redux-observable はその情報を fetchCountryFulfilled action の payload に乗せて dispatch する
(7) reducer が state を更新する
これでめでたく IP アドレスと国籍が取得できました。
(本当は API コールに失敗した時の処理も必要ですが、面倒なので割愛します。)
これらの action を検知した際に走らせる処理は、epic と呼ばれる関数の配列に記述します。
epic は配列ですが、ここでは見やすくするため Object.values() を活用しています。
API コールには fetch API を利用しています。
rxjs については・・・こう、良い感じにググってください。
import { filter, mergeMap, map } from "rxjs/operators";
import { informationTypes, informationCreators } from "./mutations";

export const informationEpics = Object.values({
  fetchIPAddress: (action$, state$) => {
    return action$.pipe(
      filter(action => action.type === informationTypes.fetchIPAddress),
      mergeMap(async () => {
        return fetch("https://api.ipify.org/").then(res => res.text());
      }),
      map(response => {
        return informationCreators.fetchIPAddressFulfilled(response);
      })
    );
  },
  fetchCountry: (action$, state$) => {
    return action$.pipe(
      filter(action => {
        return action.type === informationTypes.fetchIPAddressFulfilled;
      }),
      mergeMap(async action => {
        const ipAddress = action.payload;
        return fetch(
          `https://www.maxmind.com/geoip/v2.1/city/${ipAddress}?demo=1`
        ).then(res => res.json());
      }),
      map(response => {
        return informationCreators.fetchCountryFulfilled(
          response.country.names.ja
        );
      })
    );
  }
});
ここで mutation をもう一度確認すると、 fetchIPAddress action に対する reducer は state を変更しないことがわかると思います。
これは、 fetchIPAddress action は API コールの開始を redux-observable に伝えるためだけの action であるからです。
Redux と redux-observable を接続
それでは最後に Redux と redux-observable を接続しましょう。
ちなみに、ここまでの手順はここにもまとめてあります。
import { gameReducer, informationReducer } from "./mutations";
import { logger } from "./middlewares";
import { combineEpics, createEpicMiddleware } from "redux-observable";
import { informationEpics } from "./epics";
import "./index.css";

const epic = combineEpics(...informationEpics);
const reducer = combineReducers({
  game: gameReducer,
  information: informationReducer
});
const epicMiddleware = createEpicMiddleware();
const store = createStore(reducer, applyMiddleware(logger, epicMiddleware));
epicMiddleware.run(epic);
これで三目並べの上部に IP アドレスと国籍を表示できるようになったはずです。
これで諸々の導入が完了しました。
導入の全容を俯瞰したい場合はこのリポジトリを参考にしてください。
蛇足
この記事は元々僕の所属するプロダクトに配属された新卒向けに書いたものであり、プロダクトで使われているコードを出来るだけ再現しようとしたのですが、書いている途中で色々なことを思いました。
- 登場人物が多い
- action type, action creator, reducer, dispatcher, store, state, mutation, aggregate, epic, ...
- redux-aggregate のおかげでコードは短くなったけど、結局 action や reducer のことは知ってないと使えないので考えることはむしろ増えた感がある
- 処理の流れが追いにくい
- middleware の登場で一気にわかりにくくなる
- epic に手をつけたあたりから TypeScript にしておけば良かったと後悔した
- プロダクトコードは勿論 TypeScript ですが、色々悩んだ末にこの記事は JavaScript で書き始めてしまった
- 値を加工するロジックをどこに寄せたら良いかで悩む
- 現在の store, 次に適用する reducer, 今 dispatch された action の全てを middleware は知っているので、reducer がすべき処理のほとんどを肩代わりできてしまう
- API コールは middleware がするとして、API から受け取った値を state に格納する前に加工したい時、middleware と reducer のどちらで加工する?
- その加工に別の state の値が必要な時は?
- そもそも state にはどんな値を持たせる?実は state には API から受け取った値をほぼそのまま保持させて、値の加工は mapStateToProps で行うべき?
こんなに簡単なゲームを作るだけでも、上記のような悩みが湧き上がりました。
その辺は上手いこと誤魔化しつつ記事は書きましたが (あ、書けてないです・・・?) 、実際にプロダクトコードを書く上でもやっぱり同様の悩みを抱えることになります。
似たような感想を抱く人はやっぱりいて、非同期処理に middleware なんて要らんとか、良いから typeless を使うんだとかいう意見があります。
本記事を書くことによってこれらの意見が理解できるようになったので、まあ頑張ってこれを書いた甲斐はあったかな、という感じです。
悩みを解消するには・・・結局どうしたら良いんでしょうね。
Redux を使っている限りはどうにもならないような気もします。
最後に
蛇足に色々書きましたが、Redux は Redux でテスタビリティやメンテナンス性を担保するための仕組みを提供していますし、現実問題として React + Redux はまだまだこれからも使われるものだと思います。
Redux と middleware の導入は中々骨が折れますが、この記事が皆様の開発の一助になれば幸いです。