INTRODUCTION
ok guys so today we are going to make a sample app by using Core ML and Vision API to detect the object. (see below picture)
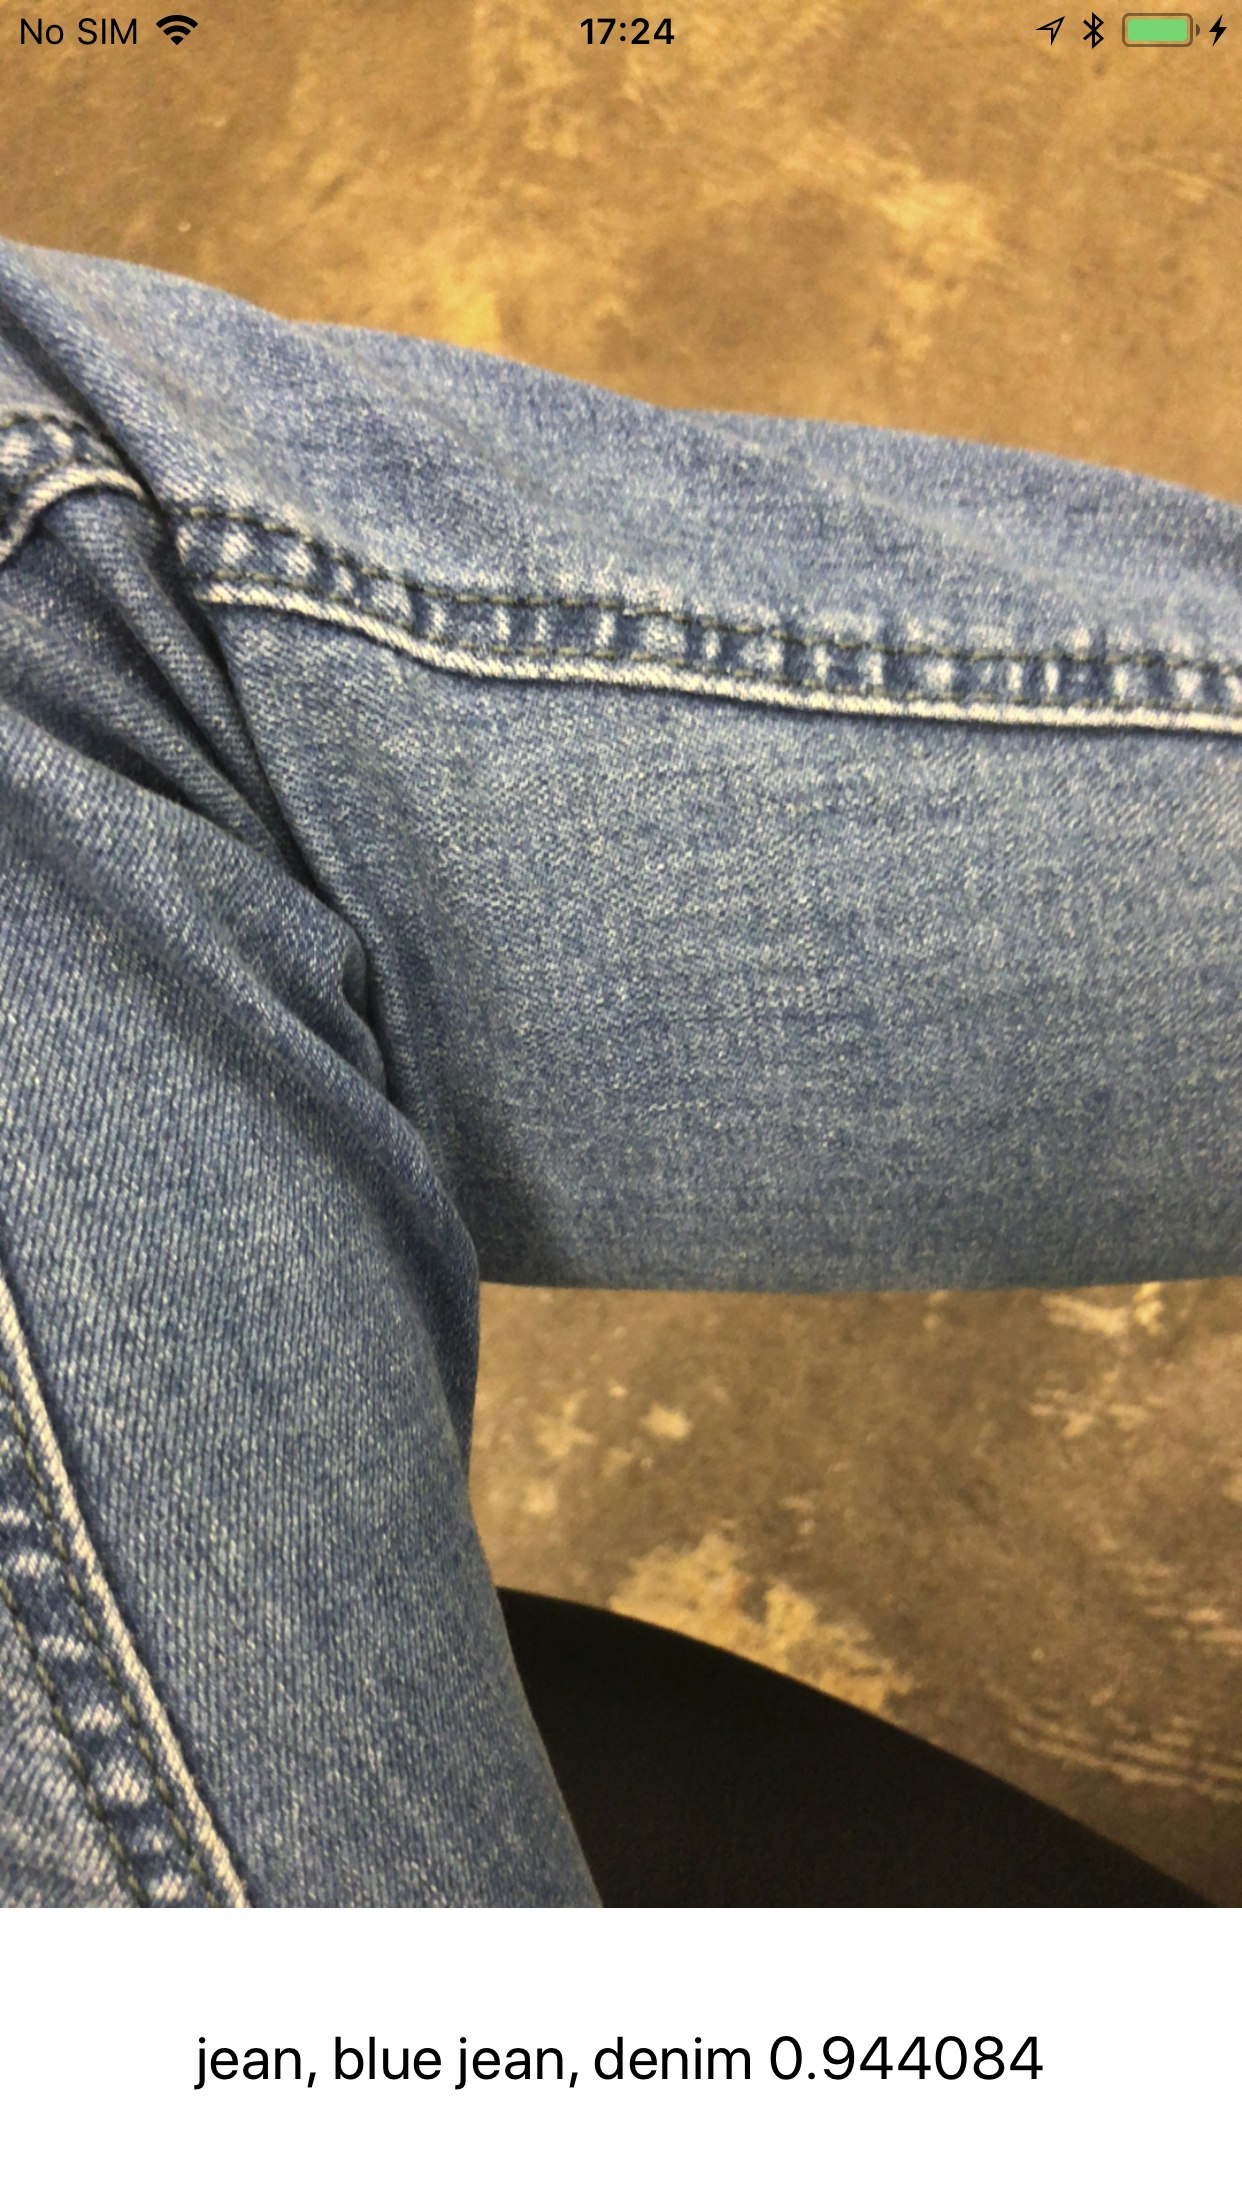
This is a demo app. The Vision can detect the object and classifying the object based on the Core ML model that we provide For example : The above picture it know , That is a jean , blue jean with 94% Accuracy. Ok enough talking let do the work.
GETTING STARTED
1. Create Xcode Project
first , let's us create a Xcode Project. This project I am going to use CocoaPod library. Below is the podfile that we are going to use.
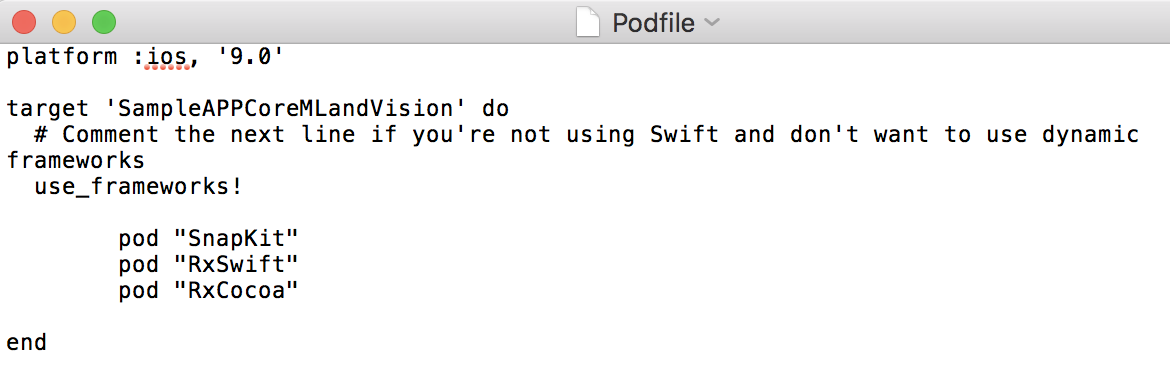
ok then install the podfile. After everything is finished then open the xcode.workplace project.
2. User Interface
let's fire the User Interface First. For Interface Design I don't use storyboard so there will be alot of code and you will see I am using many extension. The reason is I want to make the code clean as much as possible.
ViewController
import UIKit
import AVKit //  AVKit ~ Use The Camera
import SnapKit // SnapKit ~ Setup Layout
import Vision // Machine Learning Library Using To detect object
import RxSwift
import RxCocoa

class ViewController: UIViewController, AVCaptureVideoDataOutputSampleBufferDelegate {

    var dispose : DisposeBag = DisposeBag()
    var captureSession : AVCaptureSession!
    var previewLayer : AVCaptureVideoPreviewLayer!
    var predictLabel : UILabel!

    override func viewDidLoad() {
        super.viewDidLoad()

        // UI Setup
        createComponent()
        addSupview()
        setupLayout()

        // Vision & Core ML
        captureAnalyzeFrame()

    }
}
So first let's import all the library that we are going to use and In viewDidLoad function there are 3 call back method. Those method will handle all the UI.
- createComponent() : use to instantialize UI component and properties.
- addSupview() : handle adding the UI component to ViewController
- setupLayout() : Ask the name say , It will handle the layout of the UI.
createComponent Function
// MARK: - Create UI Component
extension ViewController {
    func createComponent() -> Void {

                        // Setting Up Camera Caption

        // Capture Session
        captureSession = AVCaptureSession()

        // Add Input to Session
        guard let captureDevice = AVCaptureDevice.default(for: .video) else {
            return }
        guard let input = try? AVCaptureDeviceInput(device: captureDevice) else {
            return }
        captureSession.addInput(input)
        captureSession.startRunning()

        // Add Preview Layer To give the Output to the application
        previewLayer = AVCaptureVideoPreviewLayer(session: captureSession)

                        // Setting Up Label Display
        predictLabel = UILabel()
        predictLabel.textAlignment = .center
        predictLabel.backgroundColor = UIColor.white
        predictLabel.textColor = UIColor.black
        predictLabel.font = predictLabel.font.withSize(20)
        predictLabel.numberOfLines = 0
        predictLabel.sizeToFit()

    }
}
There are two part in createComponent function.
- First part, we are setting up the camera by using the AVKit library. First , we create the session after that we giving .video as input to the session. It mean we telling that the app is the ability to access the camera to take the video as input and finally we are adding input to the session.
- Second part, we are just setting up a label to display the result message.
addSupview Function
// MARK: - Add Sup View
extension ViewController{
    func addSupview() -> Void {
        self.view.layer.addSublayer(previewLayer)
        self.view.addSubview(predictLabel)
    }
}
setupLayout Function
// MARK: - Setup UI Layout
extension ViewController {
    func setupLayout() -> Void {
        // Camera Layout
        previewLayer.frame = self.view.frame

        // PredictLabel
        predictLabel.snp.makeConstraints { (make) in
            make.left.equalToSuperview()
            make.bottom.equalToSuperview()
            make.width.equalToSuperview()
            make.height.equalTo(100)
        }
    }
}
setupLayout Function also has two parts.
- First part , we are giving the frame of AVKit Previewlayer equal to the ViewController frame.
- Second part , we are setting up the position of the Predictlabel.
Now you can try running the app. AND YES YOUR APPLICATION WILL CRASH!
there is one more important we need to do. IOS is really think about user privacy.So in order let allow our app using the camera we need to ask for the permission from user.We can do that by going into info.plist.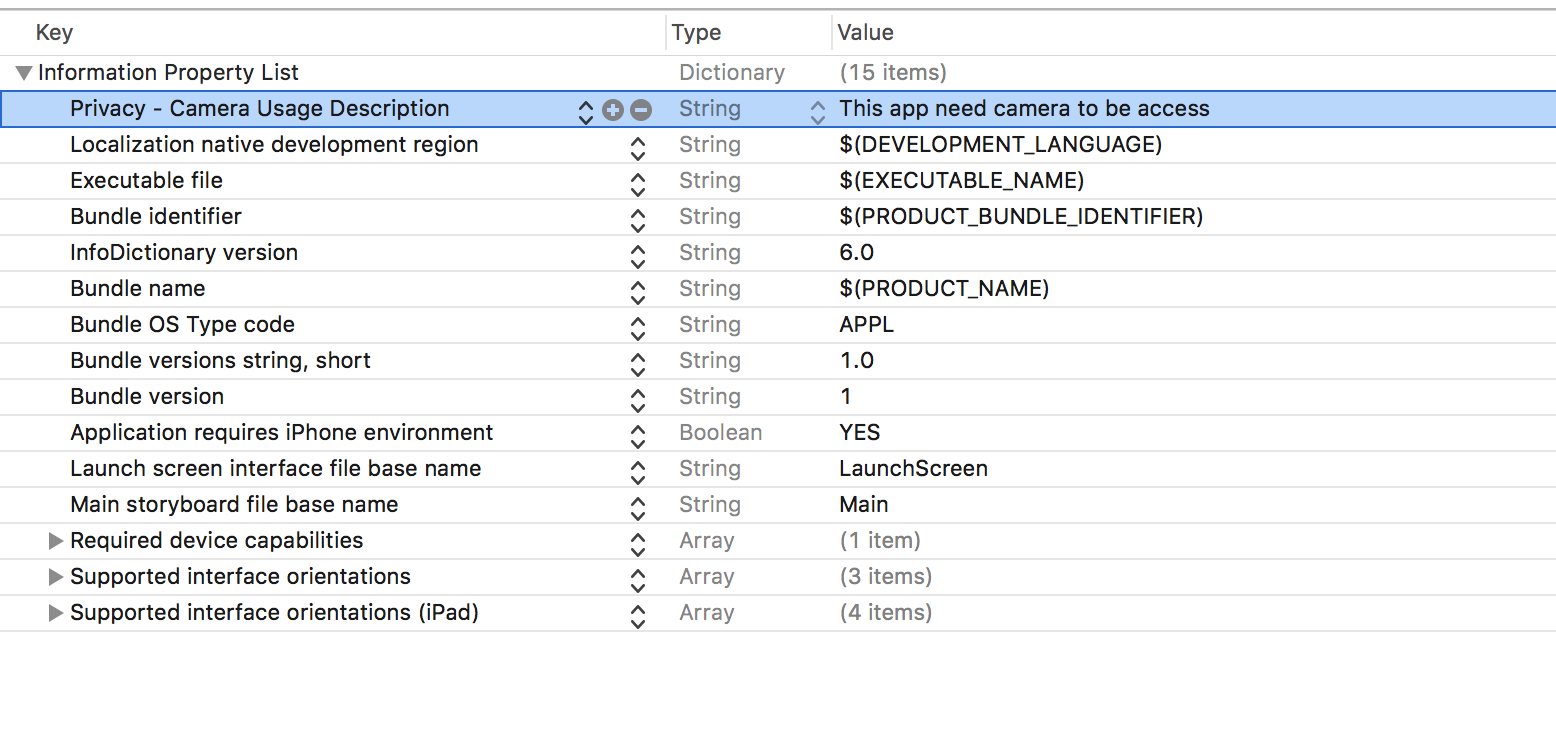 and add Privacy - Camera Usage Description.
Ok. Now trying to run the app again. Boom! Now you could see the camera with a white bottom.
3. Functionality
Ok now let's we are 50% completed. Let's do another 50%.
first , before we start , we have to download the pre-define CoreML Model because we need to use it to classify the object that we detect. Go to https://developer.apple.com/machine-learning/ and download any model that you like , and put drag it into our Xcode Project.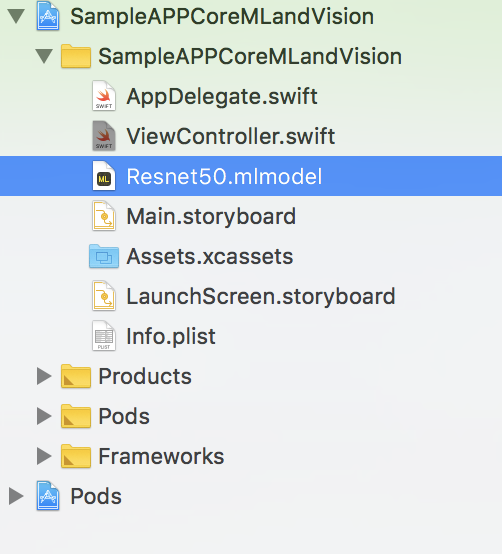
for me , I am using Resnet50. Ok now let go to the code.
CaptureAnalyzeFrame Function
// MARK: - Perform Screen Capture And Analyze
extension ViewController{
    func captureAnalyzeFrame() -> Void {

        // Capturing Frame from video
        let videoFrame = AVCaptureVideoDataOutput()
        videoFrame.setSampleBufferDelegate(self, queue: DispatchQueue(label: "videoFrame"))

        // Add output inorder to fire the delegate function
        captureSession.addOutput(videoFrame)
    }

    func captureOutput(_ output: AVCaptureOutput, didOutput sampleBuffer: CMSampleBuffer, from connection: AVCaptureConnection) {

        guard let cvPixelBuffer = CMSampleBufferGetImageBuffer(sampleBuffer) else {return}
        guard let model = try? VNCoreMLModel(for: MobileNet().model) else {return}

        // Create the request and sent it to perform Detection and Prediction
        let request = VNCoreMLRequest(model: model) { (response, err) in
            let responseObject = response.results as? [VNClassificationObservation]
            guard let result = responseObject?.first else {return}

            // Using Rx to bind data to PredictLabel to show the results.
            let resultText = result.identifier + " " + (result.confidence).description
            let resultObservale = Observable.just(resultText)
            resultObservale
                .distinctUntilChanged()
                .map{$0.description}
                .bind(to: self.predictLabel.rx.text)
                .disposed(by: self.dispose)

        }
        try? VNImageRequestHandler(cvPixelBuffer: cvPixelBuffer, options: [:]).perform([request])
    }
}
There are two function in this ViewController extension.
- First function, It use to capture the frame of the video for vision api to detect and analyze. Do you remember that we give .video as the input to the session? So here we are capture those video frame by frame and we are going to analyze it frame by frame. We are archiving that setSampleBufferDelegate methods.
- Second function, It is a delegate function. It will trigger When setSampleBufferDelegate methods passing the frame as the output. There is also two main part in this function. The 1st Part is , We are creating the request and sent to Vision API to perform the request so it can detect the object and using CoreML model that we gave to predict the object. Last part is we are using rx to bind the result to Predict Label.
That's it. Now you can run the app and see the result.
https://github.com/hengsokvisal/CoreML-VisionSampleApp/
you can find full code in my github repository