こんにちは。原健太です (@hellokenta_ja)
自己紹介
現在Standard Cognition (https://standard.ai) という会社で主にReact NativeやReactJSでアプリ開発をしています。
サンフランシスコに本社を置く「無人コンビニ」を作っている会社で、今はビザが取れるまで日本の支社で働いています。
しばらく日本にいるので、気軽にご飯とか行きましょう。
気持ち良いボトムタブバー
皆さん、ボトムタブバーって知ってますよね?
皆さんが何気なく、当たり前のように実装しているタブバー。工夫の余地が無いと思われがちなタブバー。
しかし僕は、Spotifyのアプリを触ったときに衝撃を受けました。まるで「生きている様だ」と。(ちなみにTwitterアプリとかもこんな感じです)
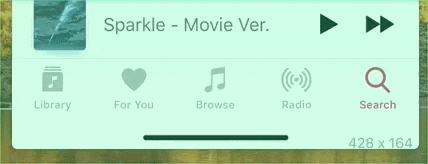
Apple Musicのタブバー(通常のタブバー)
普通の極みですね。
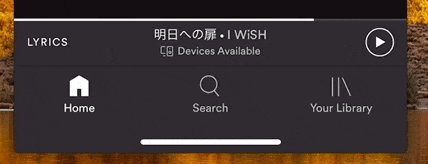
Spotifyのタブバー
ぷにゅぷにゅしていて可愛い!!!何度でも触りたくなりますね!
雑談
ちなみに僕はSpotifyのアプリが大好きで、通勤時には「通勤におすすめの曲」が表示され、雨の日には「雨の日に聞きたいプレイリスト」を表示してくれる。
そんな、僕に寄り添ってくれるSpotifyアプリが好きなのです。
ソースコード
Spotifyの宣伝みたいになってきましたが、僕はSpotifyとは一切関係ありません。
そろそろソースコードを共有します。まず下記がタブバーのそれぞれのボタンを表すコンポーネントです。
こちらでぷにゅぷにゅアニメーションを実現しています。
*このままのコードで動くわけではありません。また、react-navigationのライブラリを利用しています。
tabbar-button.js
class TabbarButton extends React.Component {
  onPress = () => {
    const {
      navigation,
      route: { key },
    } = this.props
    navigation.navigate(key)
  }

  onPressIn = () => {
    Animated.timing(this.scale, {
      toValue: 0.95,
      duration: 40,
      useNativeDriver,
    }).start()
  }

  onPressOut = () => {
    Animated.spring(this.scale, {
      toValue: 1,
      friction: 0,
      useNativeDriver,
      overshootClamping: true,
    }).start()
  }

  scale = new Animated.Value(1)

  render() {
    const {
      currentIndex,
      routeIndex,
    } = this.props

    const focused = currentIndex === routeIndex
    return (
      <TouchableOpacity
        activeOpacity={0.8}
        onPress={this.onPress}
        onPressIn={this.onPressIn}
        onPressOut={this.onPressOut}
        style={{ flex: 1 }}
      >
        <Animated.View
          style={[styles.tabBarButton, { transform: [{ scale: this.scale }] }]}
        >
          <Icon color={focused ? black : gray} />
        </Animated.View>
      </TouchableOpacity>
    )
  }
}
ポイント
-
TouchableOpacityコンポーネントのonPressIn,OnPressOutを利用する。 -
Animated.springを利用してぷにょぷにょ感をだす。timingよりspringの方が個人的には気持ちよかったです。 -
overshootClampingをtrueにしてバウンスしないようにする。 -
useNativeDriverをtrueにすることによって、ネイティブのUIスレッドでアニメーションを動かす事ができ、パフォーマンスが向上します。毎フレームごとに状態をブリッジしなくて済む。→参考URL
その他コード
あとは上記で作成したタブバーのボタンを表示するだけです。参考までに他のコードも載せておきます。
tabbar.js
export default function Tabbar({ navigation, renderIcon, getLabelText }) => {
  const state = navigation.state
  const routes = state.routes

  const currentIndex = state.index

  return (
    <SafeAreaView style={styles.container}>
      {routes.map((route, routeIndex) => (
        <TabBarButton
          key={route.key}
          route={route}
          routeIndex={routeIndex}
          navigation={navigation}
          renderIcon={renderIcon}
          currentIndex={currentIndex}
        />
      ))}
    </SafeAreaView>
  )
}
routes.js
import Tabbar from 'components/tabbar'
const Tabs = createBottomTabNavigator(
  {
    Shopping: {
      screen: Shopping,
    },
    Receipts: {
      screen: Receipts,
    },
    Settings: {
      screen: Settings,
    },
  },
  {
    initialRouteName: 'Shopping',
    tabBarComponent: Tabbar,
  }
)
著者
- 名前: 原健太
- Twitter: https://twitter.com/hellokenta_ja
- LinkedIn: https://linkedin.com/in/kenta-hara-18003797/