概要
「payjp」というgemを使うことで、簡単にクレジットカード(以下CC)購入フォームと機能を作成することができます。
本記事では、某フリマアプリのクローンアプリを開発した際に、購入機能を実装する上で登録画面のマークアップからpayjp利用したサーバーサイドの実装までを紹介していきます。
実装する機能
本記事で実装する機能
- Checkoutを利用した購入機能(この段階でのみCheckout利用)
-
payjp.jsを利用した実装
- CC登録機能
- 登録したCCをユーザー情報と紐づけて表示させる
- CC削除機能
- 購入機能(再実装)
- ユーザー新規登録登録画面でもCC登録ができるようにする(+α)
バージョン情報や前提条件
- ruby 2.5.1
- payjp 5.2.3
- 前提条件
- hamlで記述
- sassで記述
- deviseを導入しており、ログイン機能が実装されている
実装
DB設計やルーティングの違いにより、実装する上で記述内容に差異が生じるかと思います。
適宜考えて実装していただけると幸いです。
payjp gemをインストール
Gemfileに以下を記述して、bundle installします。
gem 'payjp'
payjpのサイトにアカウント登録
payjpのサイトでアカウントを登録します。
https://pay.jp/
APIキーを確認
登録が完了したら、payjpの管理画面でAPIキーを確認します。
今回確認するのは、テスト用の公開鍵(pk~)と秘密鍵(sk~)です。
こちらは後ほど使用するので、画面を残しておきましょう。

購入機能の実装(checkout利用)
続いて購入機能の実装です。
購入機能自体はpayjpで用意されているライブラリ 「Checkout」 を利用すれば、簡単に実装できます。
1.ビューファイル編集
購入確認画面のビューファイル内の 「購入する」 の記述を、以下の記述と置き換えます。
= form_with "パスを指定" do
  :plain
  %script{type: "text/javascript", src: "https://checkout.pay.jp", class:"payjp-button", "data-text": "購入する", "data-key": "公開鍵(pk_~)"}
これだけで購入に関するフォームの記述は終了です。
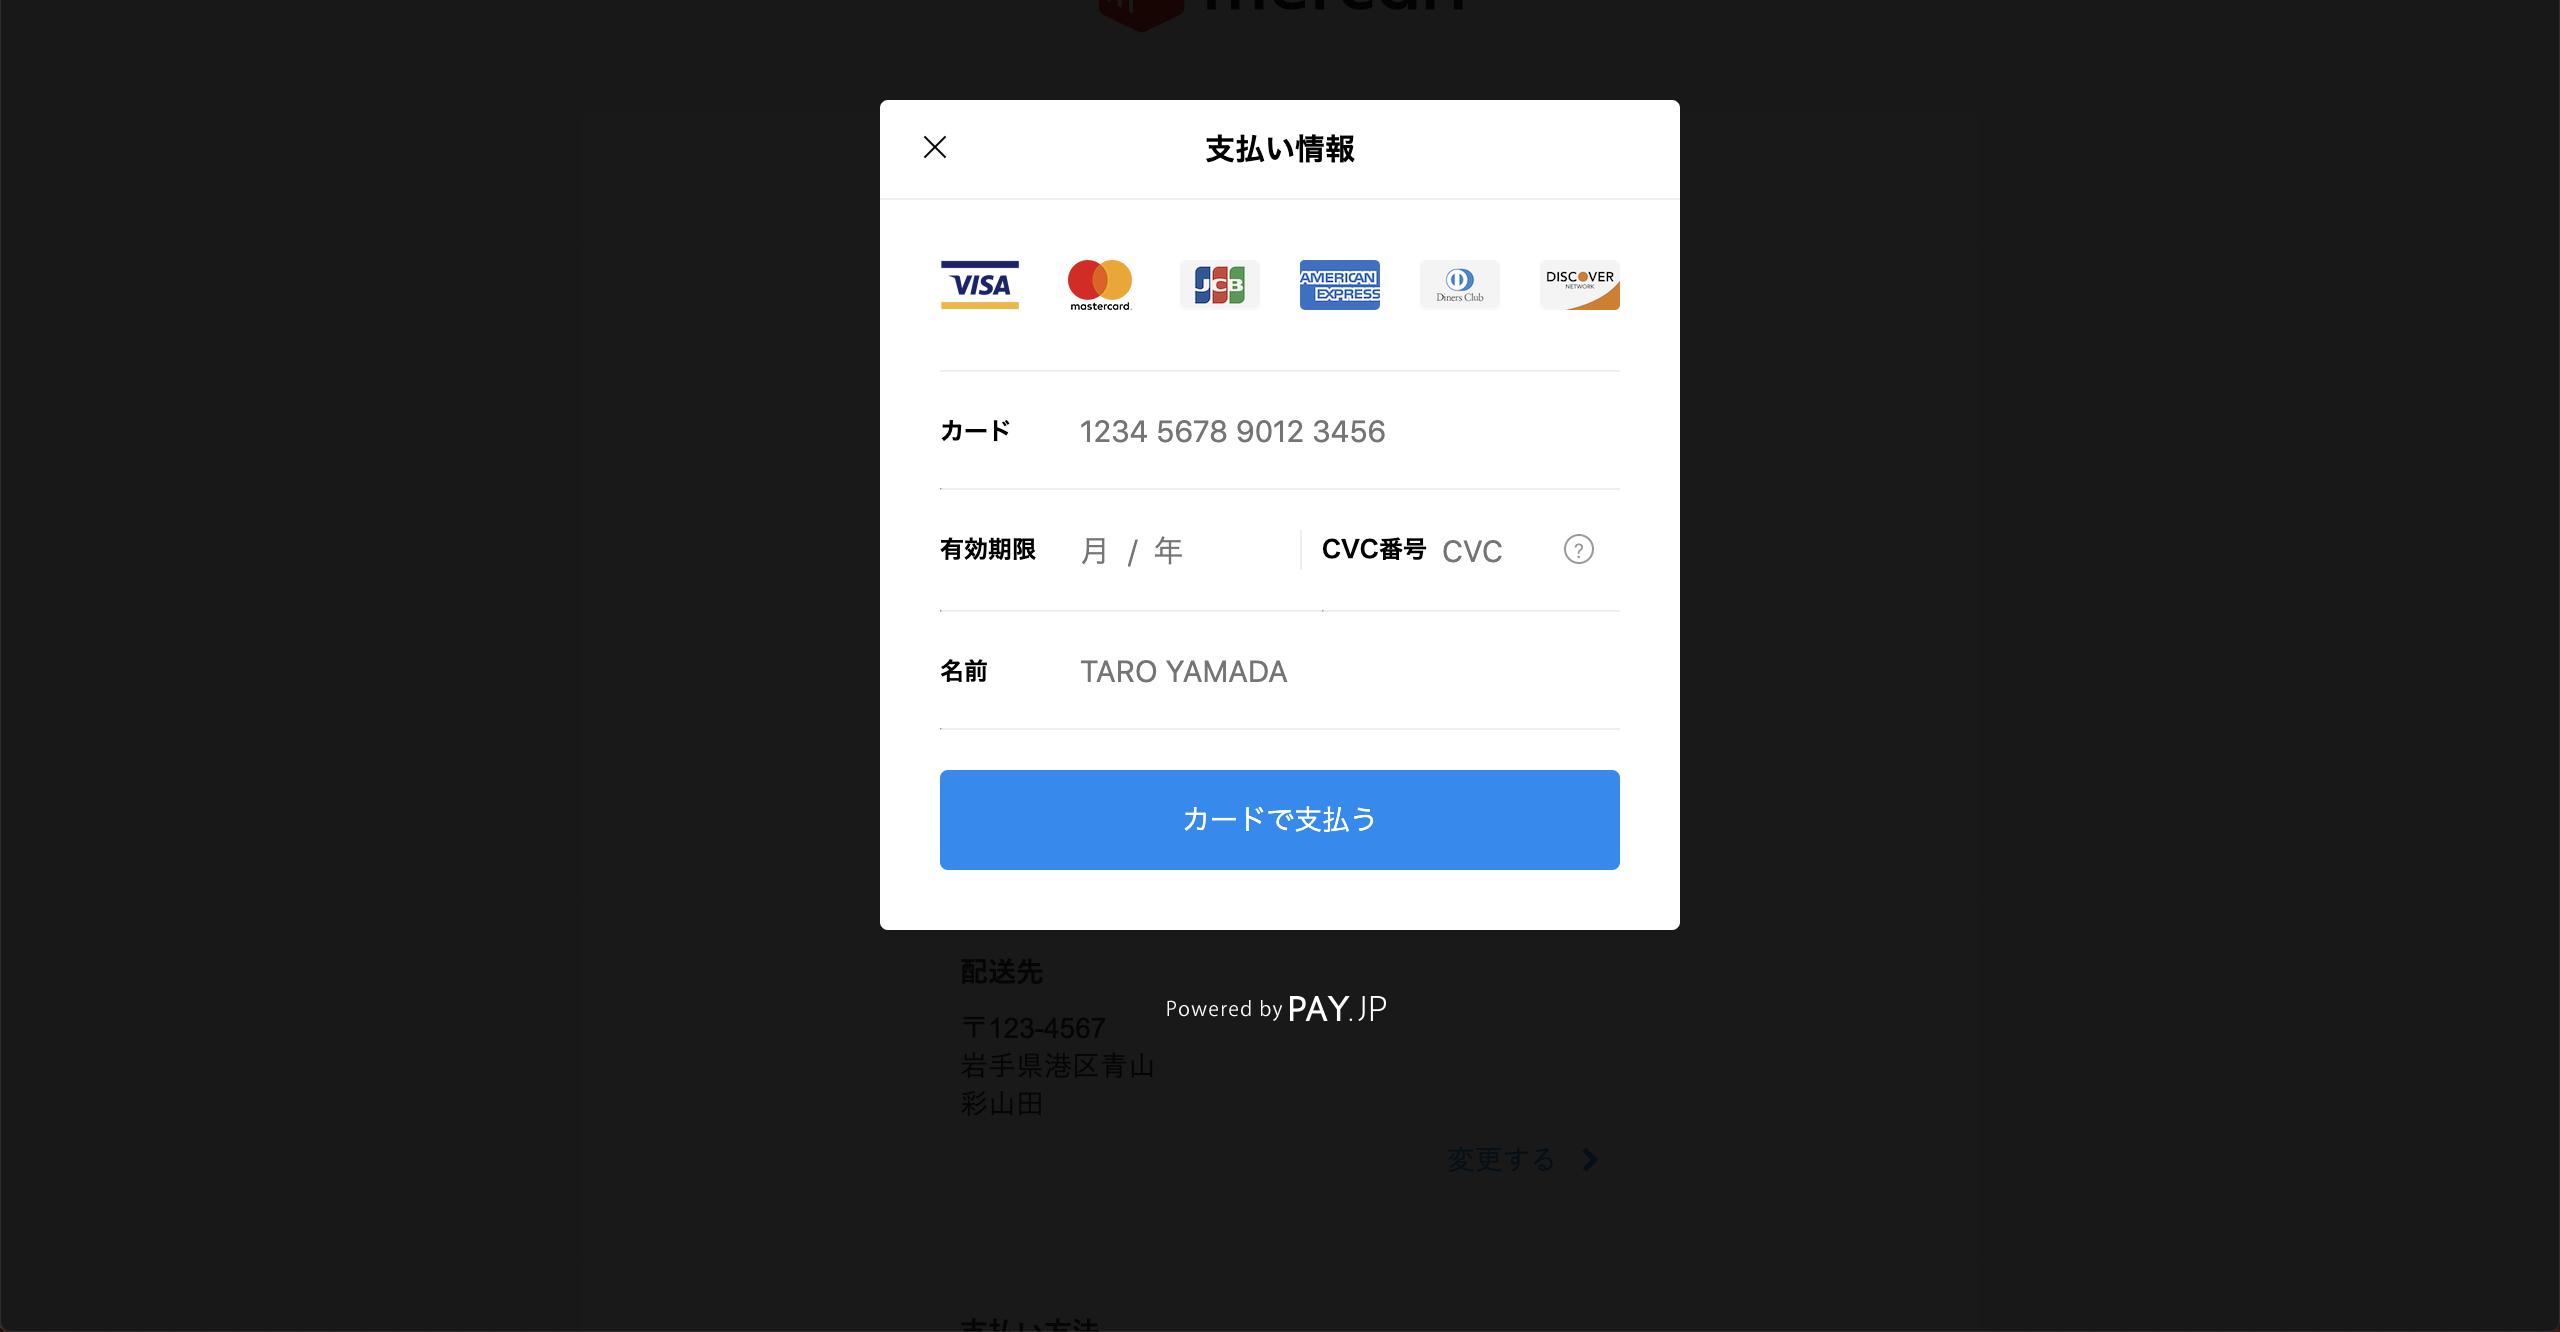
置き換えた後に表示された「購入する」をクリックすると、CC登録フォームがモーダルで表示されます。

使用するカード情報
カード: 4242424242424242(Visaのテストカード)
有効期限: 現在より未来の期日
CVC番号: 3~4桁の任意の数字
名前: 任意の名前
使用するカードはpayjpよりテストカードが用意されているので、そちらを使用しましょう。
https://pay.jp/docs/testcard
2.コントローラ編集
require 'payjp'

  def pay
    Payjp.api_key = "秘密鍵(sk_~)"
    Payjp::Charge.create(
      amount: 1100, # 決済する値段
      card: params['payjp-token'], # フォームを送信すると生成されるトークン
      currency: 'jpy'
    )
  end
後は、ルーティングを設定すれば、購入できるようになります。
実際に購入できているのが確認できます。

再実装【payjp.jsを利用】
checkoutを利用することで、簡単に購入機能が実装できました。
しかし、現在の実装では実際の運用は難しいので、実際の運用を想定して実装し直します。
実装条件
- ログインしているユーザーに紐づけてカード情報を登録する、削除もできる
- ユーザーは登録したCCを使用して、商品を購入できる
- 独自でCC登録フォームを作成する
1.テーブルの作成
マイグレーションファイルを作成し、テーブルの作成とカラムの紐付けを行います。
userは外部キーなので、references型で外部キー制約を指定しています。
class CreateCards < ActiveRecord::Migration[5.2]
  def change
    create_table :cards do |t|
      t.references  :user,           null: false,    foreign_key: true
      t.string      :customer_id,    null: false
      t.string      :card_id,        null: false
    end
  end
end
記述したら、rake db:migrate を行います。
なお、DBに顧客情報やカード情報そのものを保存することは禁止されているのでご注意ください。http://payjp-announce.hatenablog.com/entry/2017/11/10/182738
モデルの紐付け
モデルファイルを作成し、編集します。
以下、カードに関する紐付けの記述のみ載せています。
class Card < ApplicationRecord
  belongs_to :user
end
class User < ApplicationRecord
  devise :database_authenticatable, :registerable,
         :recoverable, :rememberable, :validatable

  has_many :cards # 追記する
end
2.クレジットカード登録フォームのマークアップ
続いて登録フォームを作成します。
今回は、某フリマアプリに寄せてています。
一つのファイルに以下の内容も記述すると、記述量が膨大になるため、部分テンプレートを採用しています。
.credit-update
  .credit-update__label
    クレジットカード情報入力
  .card-form
    .card-form__box
      = form_tag(cards_path, method: :post, id: 'charge-form', name: "inputForm") do |f|
        .card-form__box__number
          %label{class:'box-group--label', for: 'card_number'} カード番号
          %span.input-require
            必須
          = text_field_tag "number", "", class: 'card-number--input', type: "text", id: 'card_number', maxlength: "16", placeholder: "半角数字のみ"
          .registration-error{type: "hidden", value: "必須項目です"}
          %ul.card-list
            -# assets/imagesにimageを設置しており、それをimage_tagで呼び出しています。
            %li.card-list--item{ style: "margin-left: 0;"}
              = image_tag "visa.svg", width:"49", height:"20"
            %li.card-list--item
              = image_tag "master-card.svg", width:"34", height:"20"
            %li.card-list--item
              = image_tag "saison-card.svg", width:"30", height:"20"
            %li.card-list--item
              = image_tag "jcb.svg", width:"32", height:"20"
            %li.card-list--item
              = image_tag "american_express.svg", width:"21", height:"20"
            %li.card-list--item
              = image_tag "dinersclub.svg", width:"32", height:"20"
            %li.card-list--item
              = image_tag "discover.svg", width:"32", height:"20"

        .card-form__box__expire
          %label.box-group--label 有効期限
          %span.input-require
            必須
          .card-expire
            .card-expire__select-month
              %select#exp_month{name: "exp_month", type: "text"}
                %option{value: "1"}01
                %option{value: "2"}02
                %option{value: "3"}03
                %option{value: "4"}04
                %option{value: "5"}05
                %option{value: "6"}06
                %option{value: "7"}07
                %option{value: "8"}08
                %option{value: "9"}09
                %option{value: "10"}10
                %option{value: "11"}11
                %option{value: "12"}12
              %i.card-form-expire-icon
                = image_tag "arrow-bottom.png", size:"16x10",class:"arrow-bottom-icon5"
              %span{class: "month"} 月
            .card-expire__select-year
              %select#exp_year{name: "exp_year", type: "text"}
                %option{value: "2019"}19
                %option{value: "2020"}20
                %option{value: "2021"}21
                %option{value: "2022"}22
                %option{value: "2023"}23
                %option{value: "2024"}24
                %option{value: "2025"}25
                %option{value: "2026"}26
                %option{value: "2027"}27
                %option{value: "2028"}28
                %option{value: "2029"}29
              %i.card-form-expire-icon
                = image_tag "arrow-bottom.png", size: "16x10",class:"arrow-bottom-icon6"
              %span{class:"year"} 年

        .card-form__box__security-code
          %label.box-group--label{for: "cvc"} セキュリティーコード
          %span.input-require
            必須
          = text_field_tag "cvc", "", class: 'payment__security-code', type: "text", id: "cvc", maxlength: "4" ,placeholder: "カード背面4桁もしくは3桁の番号"
          .question-form
            %span.question-form__mark ?
            %span.question-form__text
              カード裏面の番号とは?
        #card_token
        = submit_tag "追加する", class: "card-form__box__add", id: "token_submit", type: 'button'
3.payjp.jsを編集
payjp.jsファイルを作成し、編集します。
checkoutを利用した場合、checkoutが簡単にトークンを作成してくれていましたが、それを利用しないのでpayjp.jsでトークンを生成する処理を記述する必要があります。
$(function(){

  var submit = document.getElementById("token_submit");

  submit.addEventListener('click', function(e){  // 追加するボタンが押されたらイベント発火
    e.preventDefault();  // ボタンを一旦無効化
    Payjp.setPublicKey("秘密鍵(pk_~)");
    var card = {  // 入力されたカード情報を取得
      number: document.getElementById("card_number").value,
      exp_month: document.getElementById("exp_month").value,
      exp_year: document.getElementById("exp_year").value,
      cvc: document.getElementById("cvc").value
    };
    if (card.number == "", card.exp_month == "1", card.exp_year == "2019", card.cvc == "") {
      alert("カード情報が入力されていません。"); // 送られた値がデフォルト値だった場合
    } else { // デフォルト値以外の値が送られてきた場合
      Payjp.createToken(card, function(status, response) {  // トークンを生成
        if (status === 200) {
          $("#card_number").removeAttr("name");
          $("#exp_month").removeAttr("name");
          $("#exp_year").removeAttr("name");
          $("#cvc").removeAttr("name");
          $("#card_token").append(
            $('<input type="hidden" name="payjp-token">').val(response.id)
          );
          document.inputForm.submit();  // 生成したトークンを送信する準備を整える
          alert("登録が完了しました");
        } else {
          alert("正しいカード情報を入力してください。");
        }
      });
    }
    false
  });
});
4.payjp.jsを読み込めるようにする
application.haml.hamlに以下の内容を追記します。
%script{src: "https://js.pay.jp/", type: "text/javascript"}
%script{type: "text/javascript"} Payjp.setPublicKey('公開鍵(pk_~)');
%html
  %head
    %meta{content: "text/html; charset=UTF-8", http: { equiv: "Content-Type" }}
    %title FreemarketSample59a
    = csrf_meta_tags
    = csp_meta_tag
    = stylesheet_link_tag    'application', media: 'all', 'data-turbolinks-track': 'reload'
    = javascript_include_tag 'application', 'data-turbolinks-track': 'reload'
    %script{src: "https://js.pay.jp/", type: "text/javascript"}
    %script{type: "text/javascript"} Payjp.setPublicKey('公開鍵(pk_~)');
  %body
    = yield
5.コントローラを編集
続いてコントローラを編集します。
先ほどはtransacts_controller(商品取引に関する)を編集しましたが、今回は新たにcards_controller(カードに関する)を作成し、それを編集します。
class CardsController < ApplicationController
  require 'payjp'
  before_action :set_card

  # 後ほど登録したクレジットの表示画面を作成します。
  def index
  end

  # クレジットカード情報入力画面
  def new
    if @card
      redirect_to card_path unless @card
    else
      render 'mypages/create_card'
    end
  end

  # 登録画面で入力した情報をDBに保存
  def create
    Payjp.api_key = "秘密鍵(sk_~)"
    if params['payjp-token'].blank?
      render 'mypages/create_card'
    else
      customer = Payjp::Customer.create( # ここで先ほど生成したトークンを顧客情報と紐付け、PAY.JP管理サイトに送信
        email: current_user.email,
        card: params['payjp-token'],
        metadata: {user_id: current_user.id} # 記述しなくても大丈夫です
      )
      @card = Card.new(user_id: current_user.id, customer_id: customer.id, card_id: customer.default_card)
      if @card.save
        redirect_to cards_path
      else
        render 'mypages/create_card'
      end
    end
  end

  # 後ほど削除機能を実装します。
  def destroy
  end

  private

  def set_card
    @card = Card.where(user_id: current_user.id).first if Card.where(user_id: current_user.id).present?
  end
end
秘密鍵を必ず設置するようにしましょう。
6.ルーティングを設定
ルーティングには今後実装するindex、destroyのアクションも記述します。
resources :cards , only: [:new, :index, :create, :destroy]
これでユーザーがクレジットカードを登録できるようになりました。
最後に
本記事の紹介は、一旦ここまでの実装で終わります。
また後日続きの実装を載せたいと考えているので、本記事を通して少しでも読者様の参考になれば幸いです。
ご意見やご質問がありましたらお気軽にご連絡ください。
