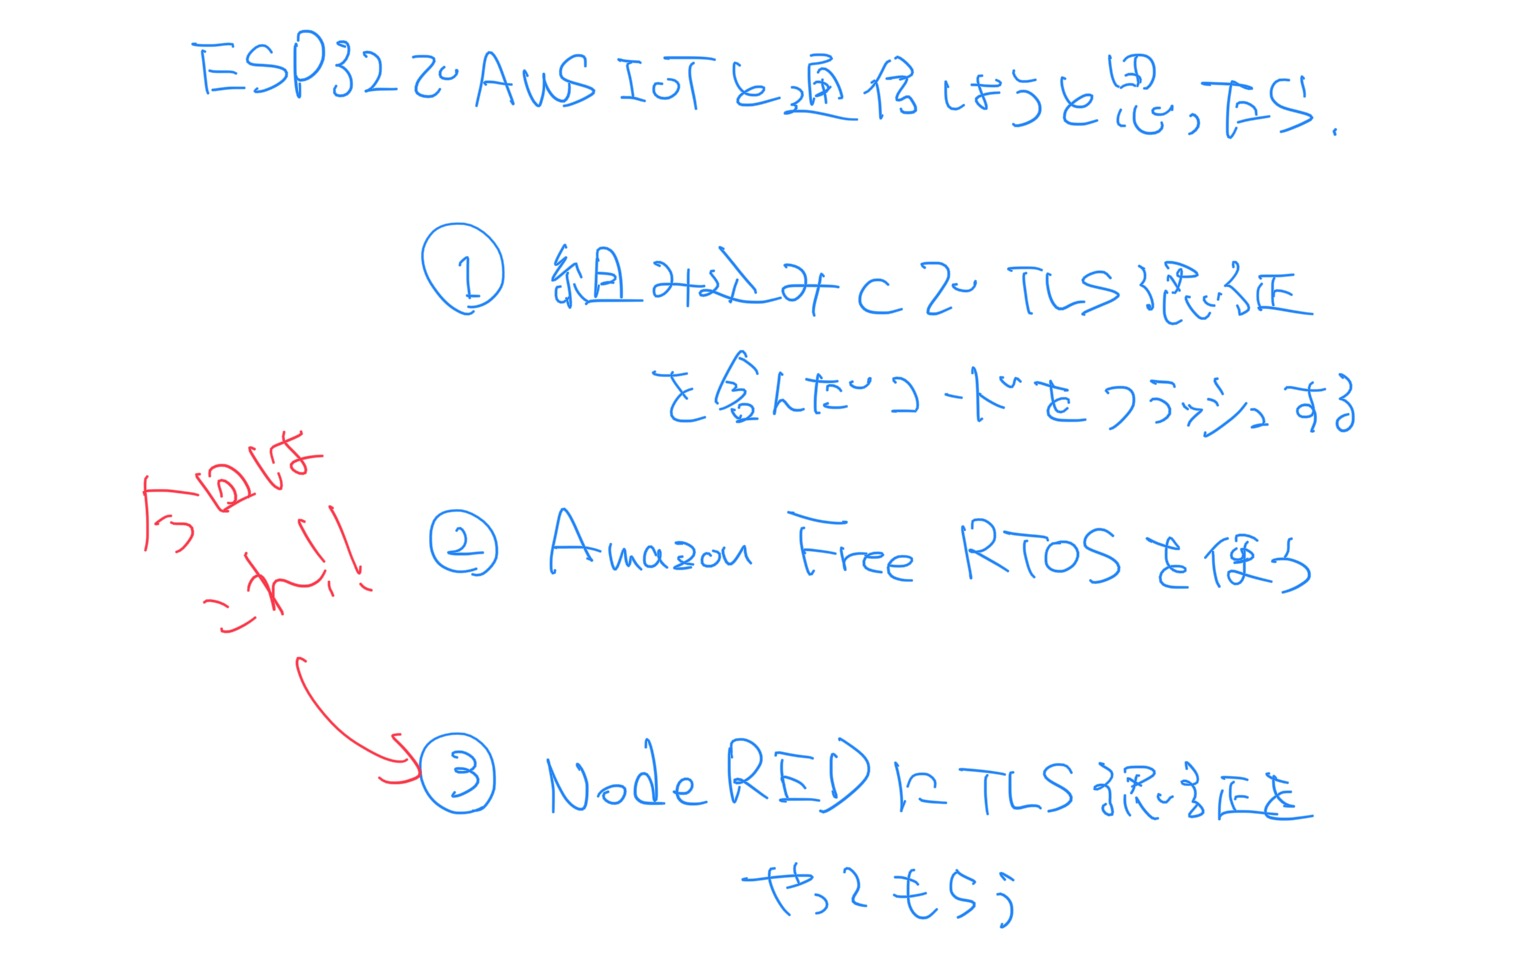
今回やろうとしていること
はじめに
この記事はエッジデバイスのAWS IoT Coreでのプロビジョニングを経験している人向けに書いております。もしまだの方は
を参照してください。
なぜNode-REDを使うのか
AWS IoT Coreとの通信にはTLS1.2認証が必要です。直接ArduinoのコードでTLS認証を行うものもありますが、上手く動かず、調べても同様の声が多かったのでよく使われているTLSBrokerであるNode-REDを使ったところあっさりできたので記事にしました。Amazon Free RTOSも良さそうなので今後試して記事にする予定です。

準備
ESP32(NodeMCU)の購入
NodeMCU。通称ESP32。通称中国のEspressif社が2017年から売り出しているマイクロコントローラー。Amazon.co.jpで1000円くらい。
Arduino IDEのインストール
マイコンのArduinoとはまた別物。Windows, MacOS, Linux対応
Arduino IDEでESP32用のライブラリーをインストール
・メニューバーの「Arduino」の「Preferences」をクリック→Additional Boards Manager URLsに
https://dl.espressif.com/dl/package_esp32_index.json
を入力し完了をクリック(今後新たにライブラリーをインストールしたい時はこの文字列をコンマで区切って新しいURLを入力します)。
・メニューバーの「Tools」から「Boards」の「Boards Manager」をクリック「ESP32」を検索しインストール。
Node-REDインスタンスの立ち上げ
Node-REDはIBMクラウドのサービスで、インスタンスの立ち上げにはIBMクラウドアカウントが必要です。
IBMクラウドアカウント作成からNode-REDインスタンス立ち上げまでの手順は以下の記事に丁寧な解説があります。
1. AWS IoTコンソールで「モノの登録」をする
1-1. 基本情報を入力
「モノの名前」は必須です。ここでは「minagawa_ESP32_NodeMCU」としました。
1-2. 認証情報をローカルに保存
証明書2つと秘密鍵をローカルの適当なフォルダに保存しておきます。これは後々Node-REDにアップロードします。
2. Node-REDの設定
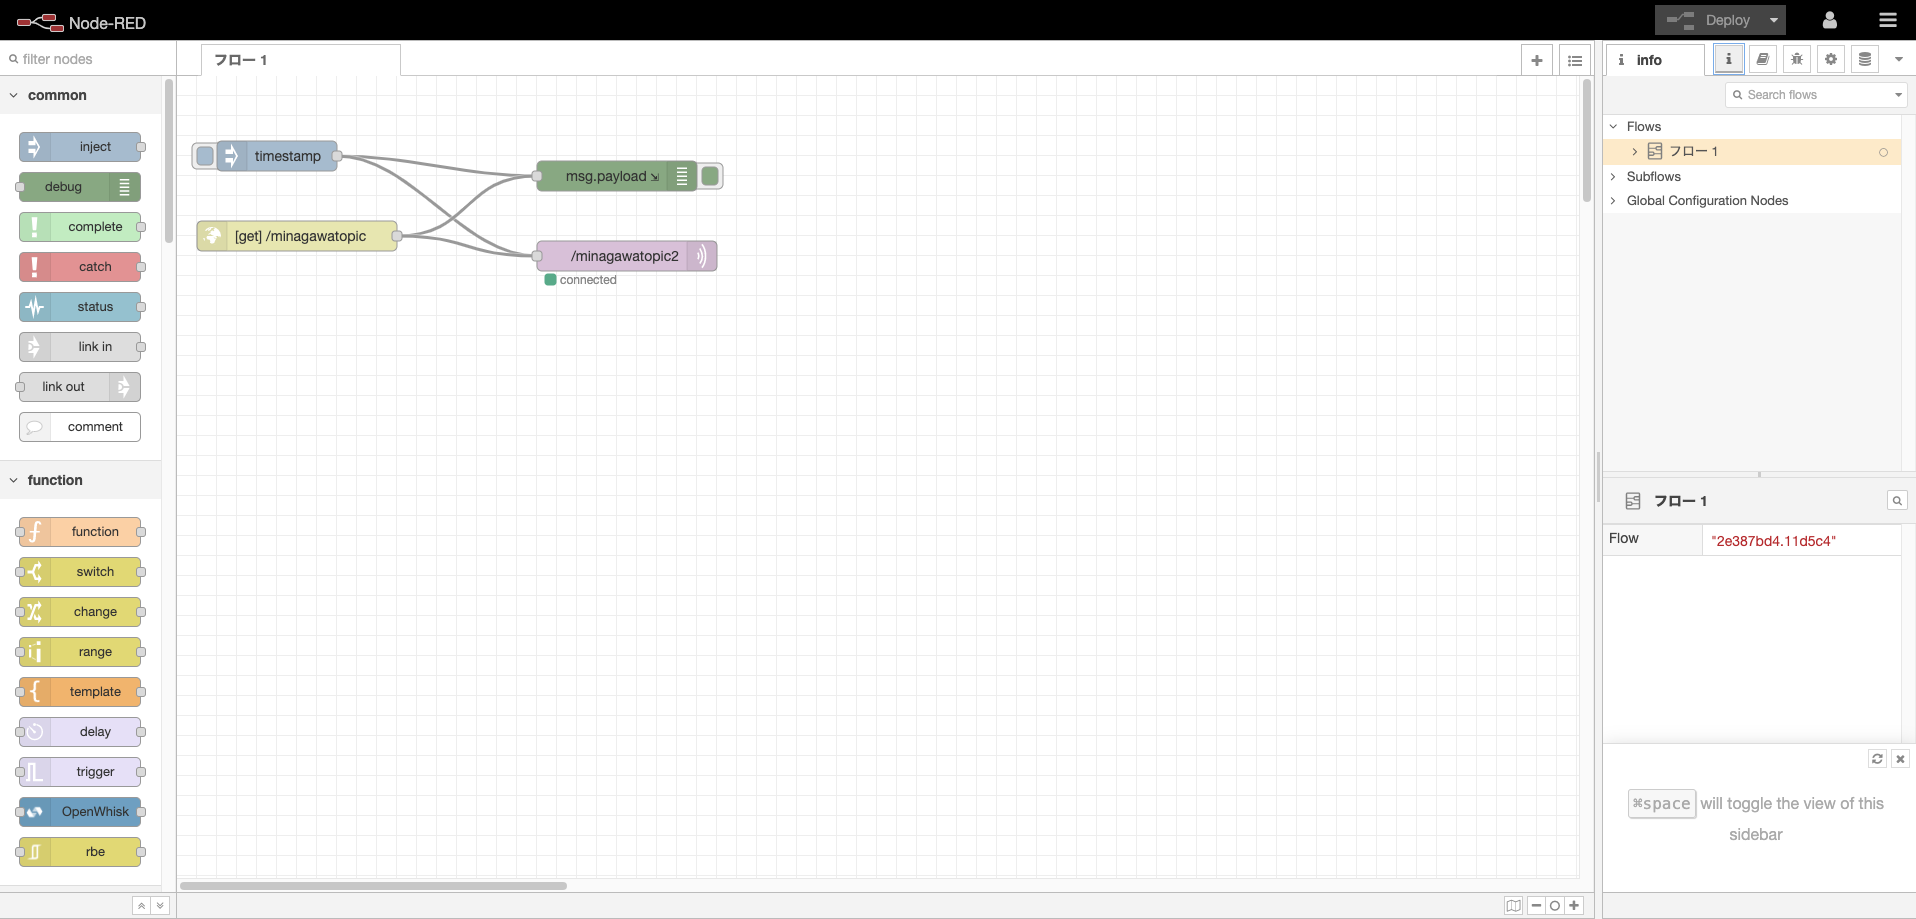
画像のような構築をしていきます。一見難しいですが、とても簡単に構築できます。

2-1. ノードの設置
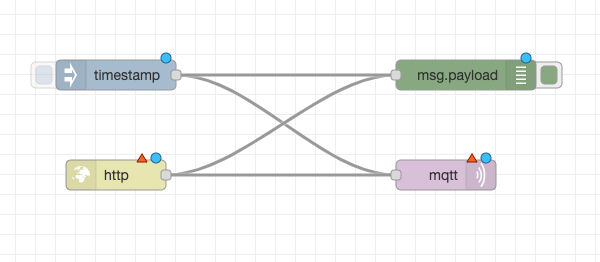
左のペインから、「inject」「debug」「mqtt out」「http in」をドラッグ&ドロップで持ってきて以下のように並べます。

それを以下のようにつなぎます。これでノートの設置は完了。

2-2. 「timestamp」と「debug」ノードの機能確認
「timestamp」ノードの左端にあるボタンをクリックしてみます。以下の表示が出るのを確認します。

右側のペインの虫マーク(デバッグマーク)をクリックして、

以下のようなタイムスタンプが表示されれば成功です。

2-3. 各ノードの設定
「timestamp」と「debug」の機能が確認できたので、今度は「mqtt out」の設定をしていきます。
MQTT OUTノードの設定
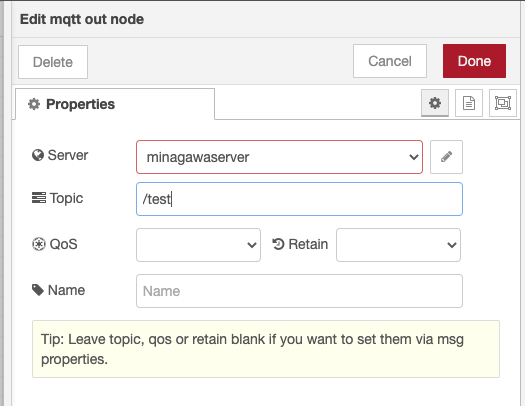
「mqtt out」ノードをダブルクリックすると以下のようなペインが表示されます。「トピック名」は「/test」としてください。「サーバー名」を適当に決め、その右にあるペンマークをクリック。

「Server」欄にはAWS IoTのカスタムエンドポイントを入力。ポートはデフォルトだと「1883」ですが、これだとTLS認証ができないので「8883」にします(社内ネットワークを使っている場合はこのポートがブロックされている場合があるので上手くいかない場合はその旨を社内ネットワークadminに聞いてみてください)。
その後「TLS configuration」をクリック。
1で保存したデバイス証明書、サーバー証明書、秘密鍵をそれぞれアップロードします(残りは空で大丈夫)。

「Update」→「Update」→「Done」とクリックしていきます。最後に画面右上にある「Deploy」をクリックして完了です(これが忘れがちなので気をつけてください)。

以下のようにデプロイから「mqtt out」ノードが「disconnected」→「connecting」→「connected」になるまでに5分ほど時間がかかります(場合によってはそれ以上)。「connected」になったら次のステップに進みます。

MQTT OUTノードの機能テスト
AWS IoT CoreのMQTTテストクライアントを開いて「/test」にサブスクライブします。
その後Node-REDに戻って「timestamp」ノードの左端をクリックします。
以下のようにタイムスタンプが正常に届いたら成功です。
画像
HTTP INノードの設定
こっちの設定は簡単です。「http in」をダブルクリックします。「Method」は「GET」、「URL」には適当なトピック名(ここでは「/minagawatopic」としました)を入力して「Done」をクリック。

2-4. Node-RED全体の機能テスト
現在開かれているNode-REDのURLの.netの部分までをコピーします。
それを適当なブラウザの検索窓に貼り付けて
「https://xxxxxxxxxxxxxx.xxxxxxxx.net/minagawatopic?temp=25」
というふうに書き換えてEnterを押します。「.net」以下の「/minagawatopic」の部分は先程HTTP INノードで設定したトピック名、「?」マーク以降は送信したいJSONの情報です。
先程のAWS IoT CoreのMQTTテストクライアントで無事メッセージが届いているか確認します。
3. ArduinoIDEでNode-REDにHTTPリクエスト送信
3-1. ESP32でHTTPリクエスト(GET)をするためのコードを持ってくる
このページ
から持ってきました。この記事の最後にコードがあります。それをコピーしてArduino IDEの「File」から「New」を選んで貼り付けます。
また「Tools」で「ESP32 Dev Module」を選択。
3-2. コードの編集
コードの序盤にあるWifiの認証情報とHTTPリクエストを送る先のURLを書き入れます。URLには先ほどブラウザで試したのと同様に「Node-REDのURL/設定したトピック?送りたいJSON」という形式で入力します。

3-3. コードの実行
チェックマークの右にある矢印マークをクリックします。

コンパイルが終わって「Connecting...」とWindowの下部に表示が出るのでESP32の「Boot Button」を長押しします。この長押し作業は最初のアップロード時のみ必要です。

プログラムが動き始めたら「Tools」の「Serial Monitor」でリアルタイムlogを確認できます。もし文字化けしている場合は画像右下にあるサンプリングレート「baud」をコードに記載してあるレートと同じにして再度トライしてください。

4. AWS IoT Coreでメッセージの確認
ここまでの設定がうまく言っていればAWS IoT CoreのMQTTテストクライアントから「/test」にサブスクライブすると5秒おきに温度データがJSONファイルで届いているのが確認できるはずです。
今回使ったコード
/*
  Rui Santos
  Complete project details at Complete project details at https://RandomNerdTutorials.com/esp32-http-get-post-arduino/

  Permission is hereby granted, free of charge, to any person obtaining a copy
  of this software and associated documentation files.

  The above copyright notice and this permission notice shall be included in all
  copies or substantial portions of the Software.
*/

# include <WiFi.h>
# include <HTTPClient.h>

const char* ssid = "REPLACE_WITH_YOUR_SSID";
const char* password = "REPLACE_WITH_YOUR_PASSWORD";

//Your Domain name with URL path or IP address with path
String serverName = "http://192.168.1.106:1880/update-sensor";

// the following variables are unsigned longs because the time, measured in
// milliseconds, will quickly become a bigger number than can be stored in an int.
unsigned long lastTime = 0;
// Timer set to 10 minutes (600000)
//unsigned long timerDelay = 600000;
// Set timer to 5 seconds (5000)
unsigned long timerDelay = 5000;

void setup() {
  Serial.begin(115200);

  WiFi.begin(ssid, password);
  Serial.println("Connecting");
  while(WiFi.status() != WL_CONNECTED) {
    delay(500);
    Serial.print(".");
  }
  Serial.println("");
  Serial.print("Connected to WiFi network with IP Address: ");
  Serial.println(WiFi.localIP());

  Serial.println("Timer set to 5 seconds (timerDelay variable), it will take 5 seconds before publishing the first reading.");
}

void loop() {
  //Send an HTTP POST request every 10 minutes
  if ((millis() - lastTime) > timerDelay) {
    //Check WiFi connection status
    if(WiFi.status()== WL_CONNECTED){
      HTTPClient http;

      String serverPath = serverName + "?temperature=24.37";

      // Your Domain name with URL path or IP address with path
      http.begin(serverPath.c_str());

      // Send HTTP GET request
      int httpResponseCode = http.GET();

      if (httpResponseCode>0) {
        Serial.print("HTTP Response code: ");
        Serial.println(httpResponseCode);
        String payload = http.getString();
        Serial.println(payload);
      }
      else {
        Serial.print("Error code: ");
        Serial.println(httpResponseCode);
      }
      // Free resources
      http.end();
    }
    else {
      Serial.println("WiFi Disconnected");
    }
    lastTime = millis();
  }
}
Lチカがしてみたい人向けのコード
以下のコードはこのサイト
から持ってきたものです。
/*
  ESP32 Blink
  esp32-blink.ino
  Rewrite of classic Blink sketch for ESP32
  Use LED on GPIO2

  DroneBot Workshop 2020
  https://dronebotworkshop.com
*/

// LED on GPIO2
int ledPin = 2;

void setup()
{
    // Set LED as output
    pinMode(ledPin, OUTPUT);

    // Serial monitor setup
    Serial.begin(115200);
}

void loop()
{
    Serial.print("Hello");
    digitalWrite(ledPin, HIGH);

    delay(500);

    Serial.println(" world!");
    digitalWrite(ledPin, LOW);

    delay(500);
}
参考資料
Node-REDの使い方を詳しく解説した記事
英語になりますが、以下のビデオはESP32の基礎を学ぶには最適です。Lチカなどの基礎コードあり。
ESP32でHTTPリクエストをする(英語)
主に以下のUdemyのコースで学んだものを記事にしました(英語)
