はじめに
Compositional LayoutsがWWDC2019で発表され、ここ数ヶ月でようやくiOS13以上をターゲットにしたプロジェクトが増えてきたのではないでしょうか?
SwiftUIを取り入れている技術の記事も目立ってきましたが、iOS14にならないと不自由も多く、最初から機能が豊富なCompositional Layoutsを選択するのも1つの判断かと思います。本記事では実際にプロジェクトに導入してみたので、どのような構成で導入してみたのかをまとめています。
追記:iOSDC2021 のスポンサーセッションでも発表しました。資料はこちら。
Compositional Layouts の優位性
そもそも、Compositional Layoutsで組むことは、何がメリットなのかというお話をざっくりしておきます。
1. UICollectionViewDelegateFlowLayout のデメリット
iOS12 以下でUICollectionViewを用いて複雑なレイアウトを組む場合、こちらを検討する人が多いでしょう。
UICollectionViewDelegateFlowLayoutをViewControllerに継承して、画面の設定を直接書いていきます。
Example
final class ExampleViewController: UIViewController, UICollectionViewDelegateFlowLayout {

    func collectionView(_ collectionView: UICollectionView, layout collectionViewLayout: UICollectionViewLayout, sizeForItemAt indexPath: IndexPath) -> CGSize {
        /* セルのサイズ */
    }

    func collectionView(_ collectionView: UICollectionView, layout collectionViewLayout: UICollectionViewLayout, minimumInteritemSpacingForSectionAt section: Int) -> CGFloat {
        /* セルの間隔 */
    }
    .
    .
    .
}
この実装にはいくつかの問題があります。その最も大きな問題は、実装する際にViewControllerと密結合してしまうことです。どうして密結合になってしまうのかというと、それは継承の関連に問題があります。
UICollectionViewの実装ではUICollectionViewDelegateの実装がほとんどの場合で必要になります。UICollectionViewDelegateFlowLayoutはそれを継承しているため、ViewControllerから実装が剥がせないのです。※1
これはViewControllerの肥大化にも繋がりよくありません。仮にenumやstructで設定を定数化して切り出したり、分岐処理を切り出すことはできても、呼び出し部分はどうしてもViewControllerに残ってしまいます。
※1: UICollectionViewDelegate(とさらに親のUIScrollViewDelegate)のAPIを使用しないなら剥がすこともできますが、その場合はそもそも設計段階でUIScrollView+UIStackViewを検討する方が適切な可能性があります。
2. UICollectionViewLayout のデメリット
UICollectionViewLayoutを継承したカスタムクラスを作成する方法もあります。
final class ExampleCollectionViewFlowLayout: UICollectionViewFlowLayout {

    override func prepare(){
        super.prepare()
        // レイアウトなどの計算
    }

    override func layoutAttributesForItem(at indexPath: IndexPath) -> UICollectionViewLayoutAttributes? {
        // IndexPathに応じたCellのAttributesを返す
    }
    .
    .
    .
}
1の時とは違いViewControllerと独立して実装できるため疎結合な作りにすることができます。その反面として、APIのライフライクルがやや難しい部分もあり、実装が容易ではないという面をもちます。
実際のところ、ほとんどのUIは1で事足りてしまうため、わざわざこちらで実装するのはオーバースペックなことが多く、疎結合にしたいがためにこちらで実装する、といったことを現場ではあまりしないのが実情でしょう。
3. Compositional Layoutsのメリット
ざっくり言えば、上であげた 1と2の良いとこどりできるよ! ってことになります。
- ①のように、ある程度決まった形で書ける
- ②のように、疎結合にできる
という点を兼ね備えています。
また、UIを組む上でも以前と比べてわかりやすくなったという点もあります。
具体的な説明に関しては、たくさん出回っているので説明はしません。
今回は、疎結合な実装方法にフォーカスしていきます。
Compositional Layouts + MVP
今回は実装を考えたプロジェクトがMVPをベースとした設計のため、それを基本にコードの記載を行っていきますが、Clean ArchitectureやVIPERなど、疎結合が実現可能なアーキテクチャーであれば、同じような形で実装を行うことができるでしょう。
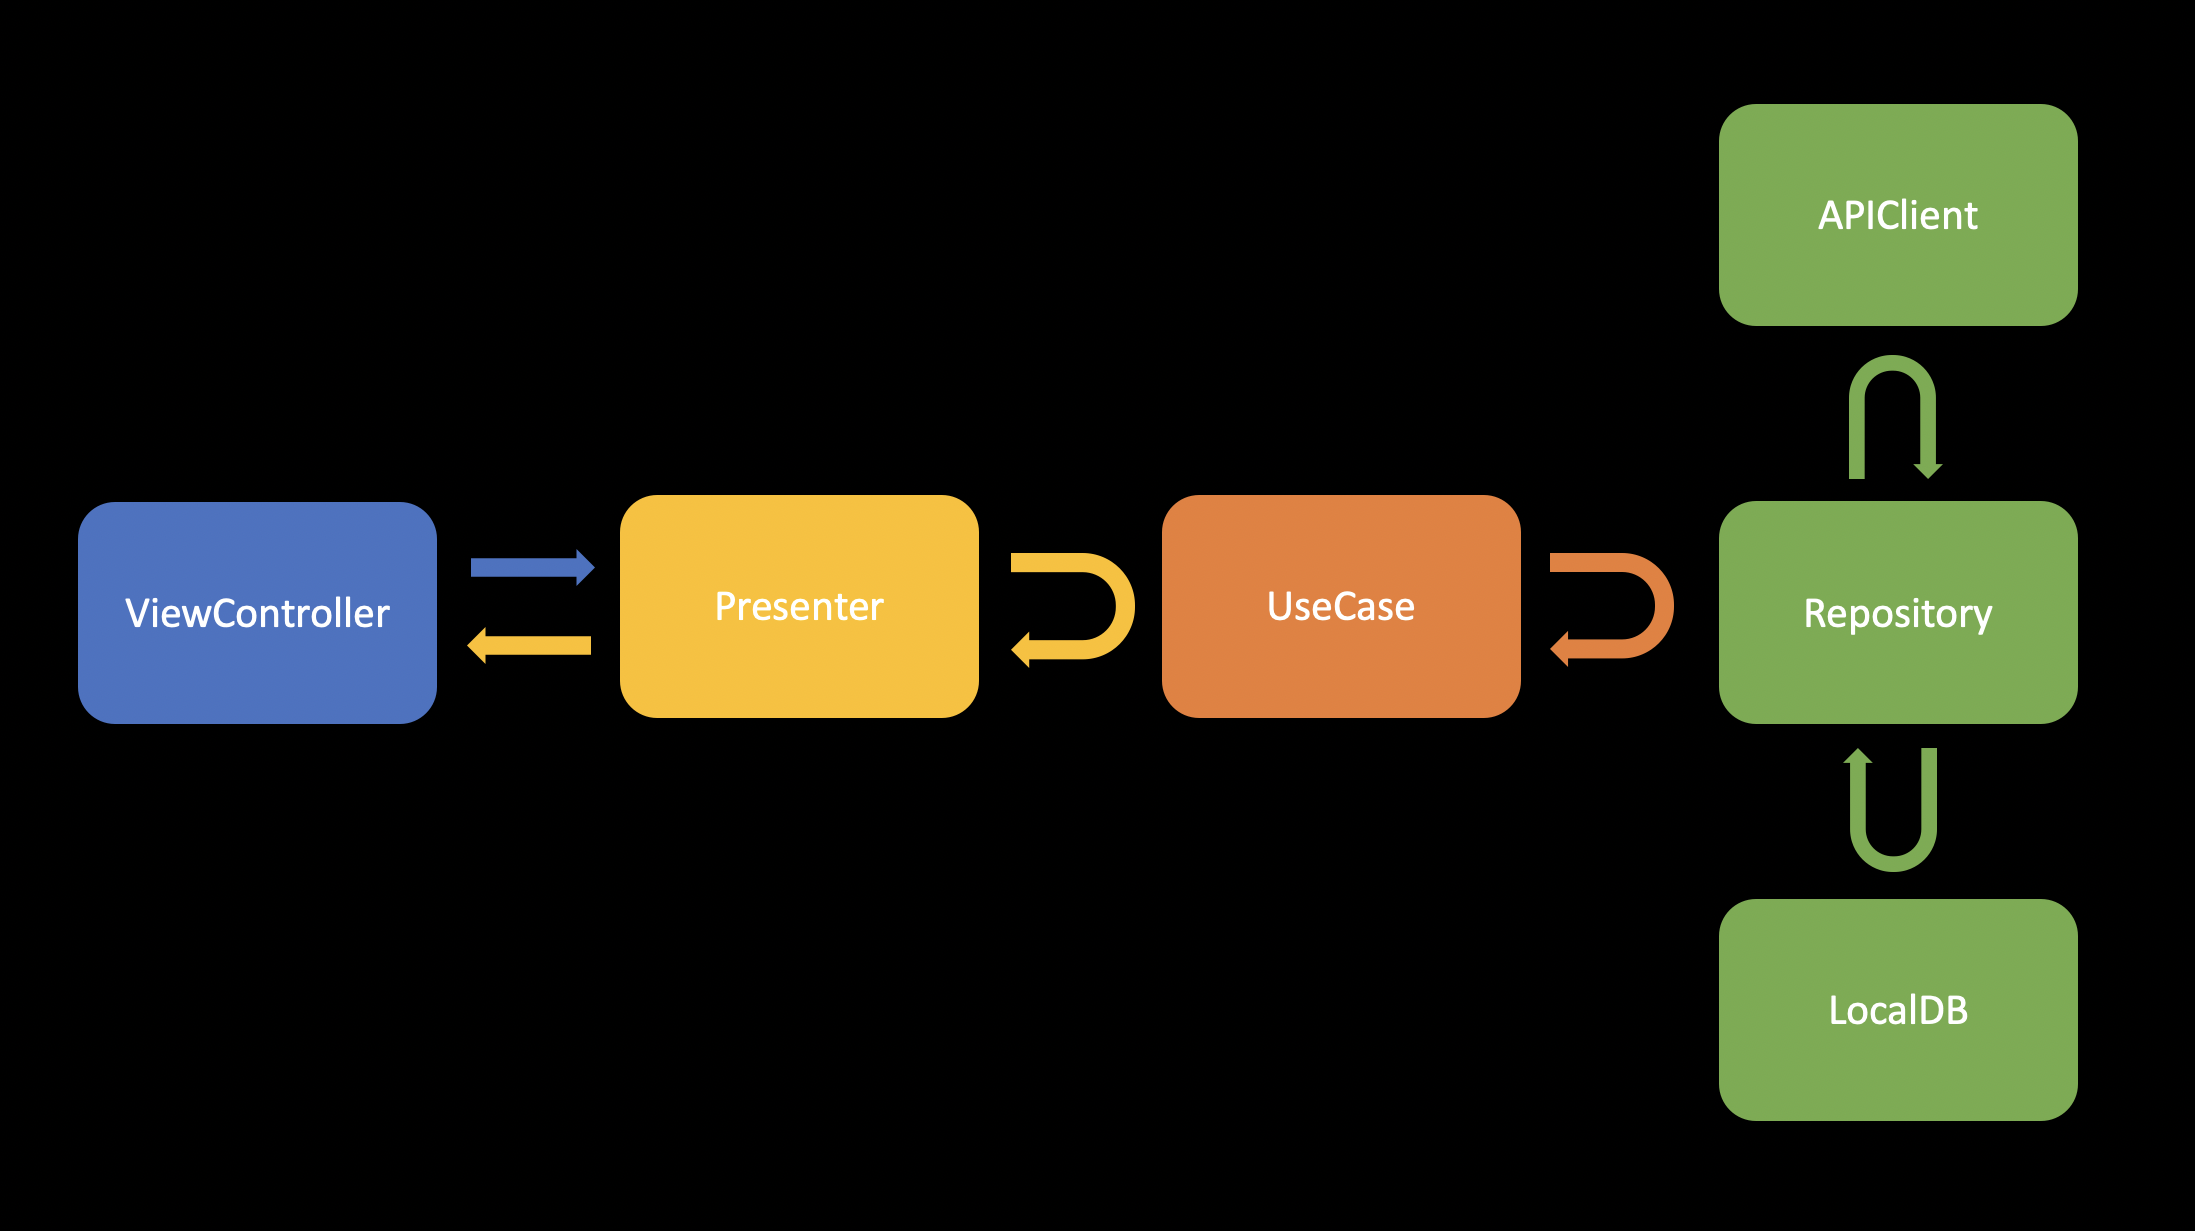
以下は、実際に運用しているアプリの構成を簡単にまとめたものです。

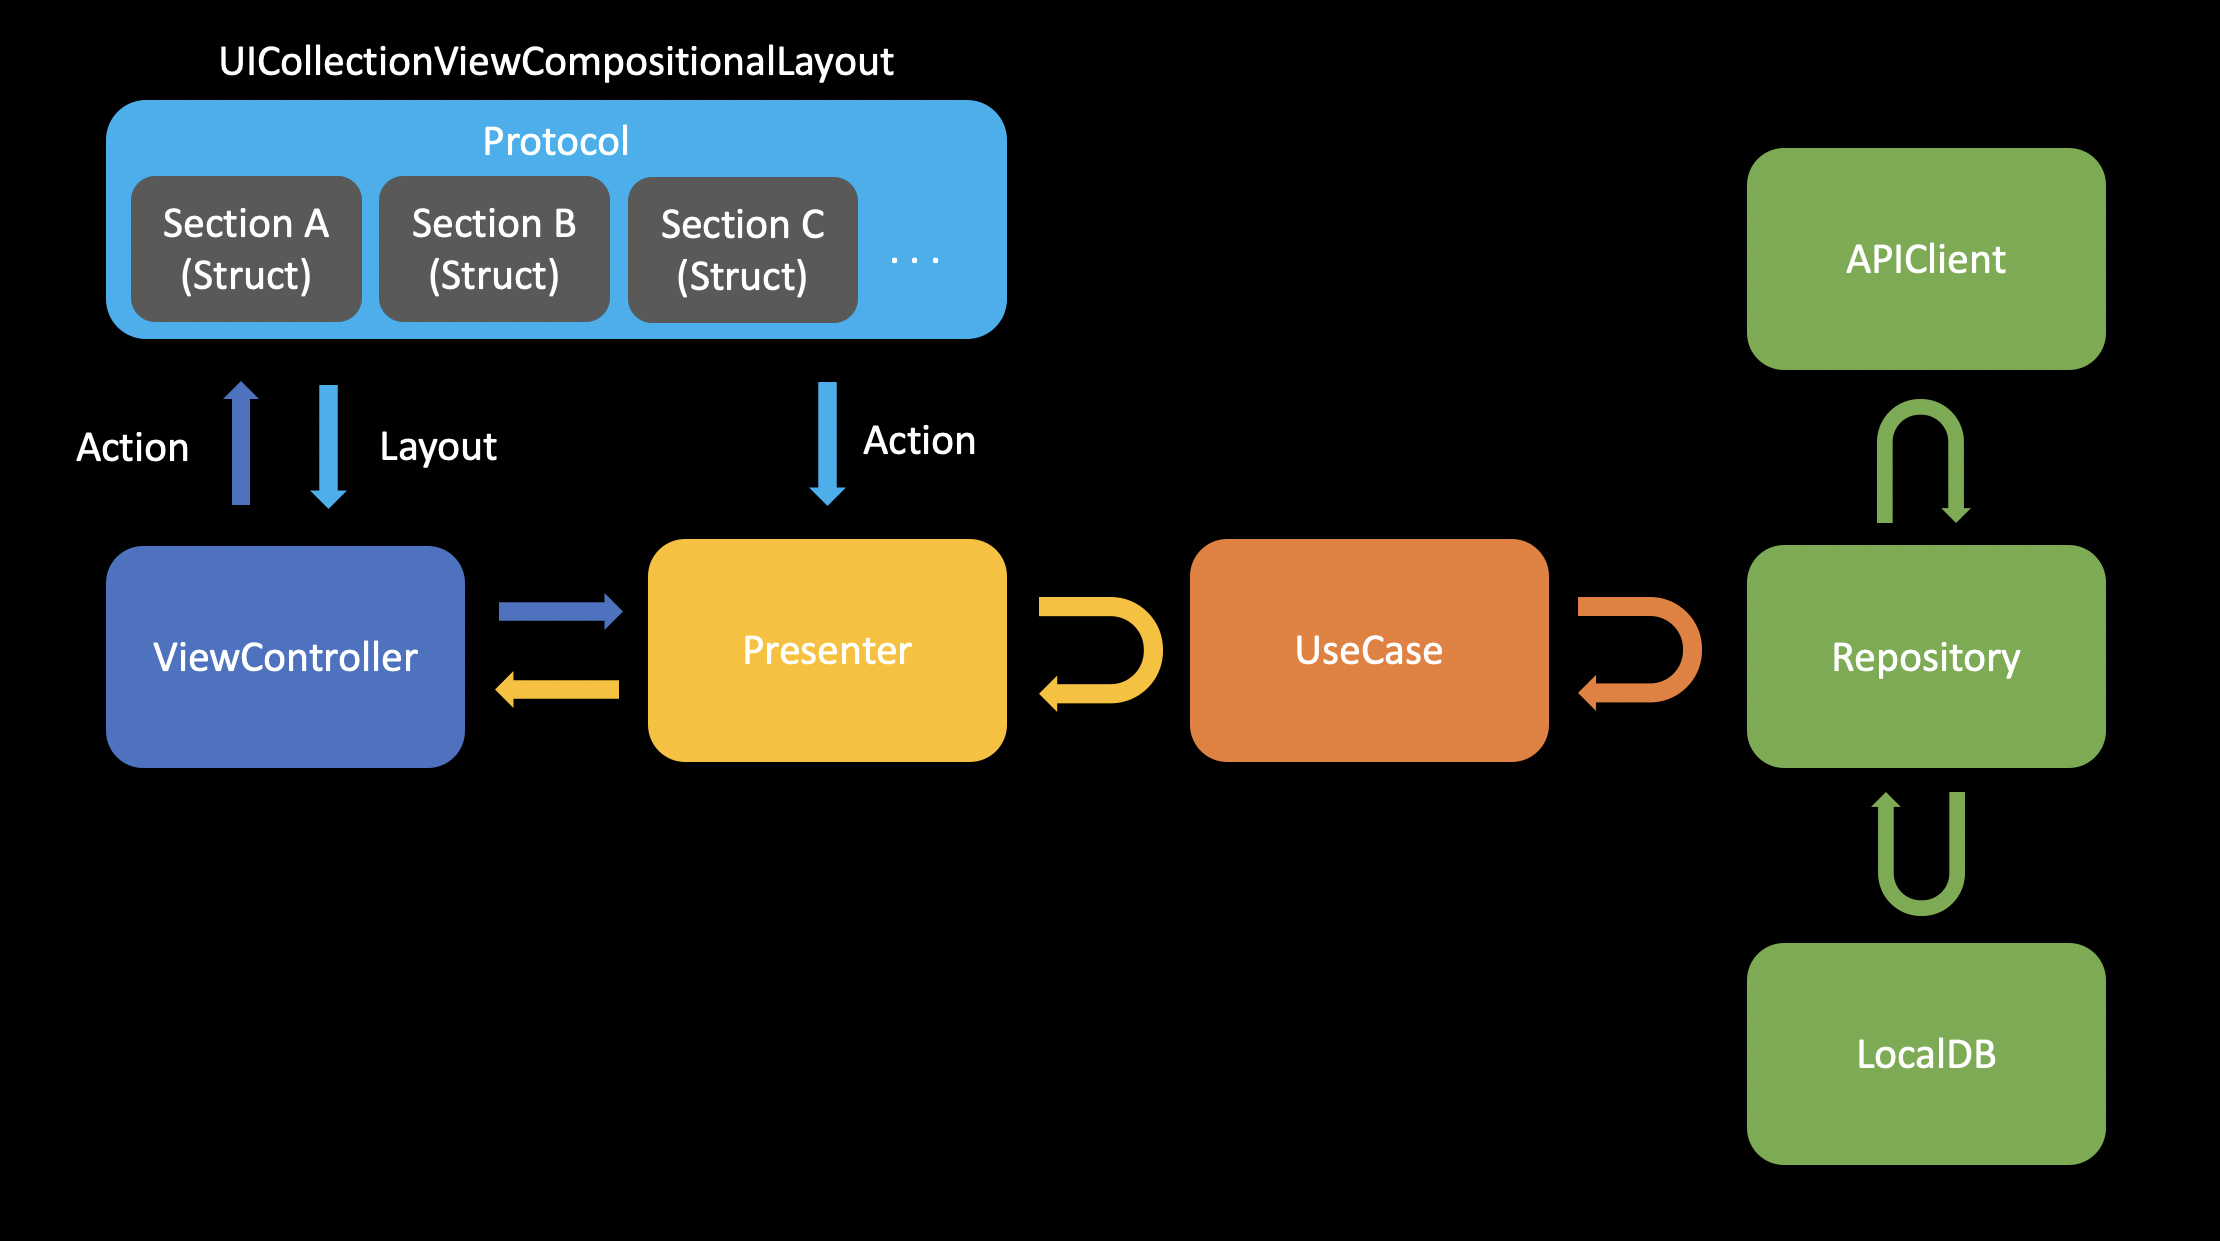
先に結論の概要から述べてしまうと、上の構成にCompositional Layoutsを導入するとこのようになります。
抽象的なプロトコルとして書き出すことで共通化し、ViewControllerに依存しないように切り出しています。
実装
具体的なコードを見ていきます。
1. 通常の実装をする
想像しやすいように、通常の実装からどのように行うかを見ていきます。
以下は、Compositional Layoutsで複数のレイアウトを組む際の簡単な例です。
final class ViewControlle: UIViewController {

    // MARK: Property

    private lazy var collectionView: UICollectionView = {
        let collection = UICollectionView(frame: .zero, collectionViewLayout: compositionalLayout)
        /* ~ 略 ~ */
        return collection
    }()

    private lazy var compositionalLayout: UICollectionViewCompositionalLayout = {
        let layout = UICollectionViewCompositionalLayout { [weak self] (section: Int, environment: NSCollectionLayoutEnvironment) -> NSCollectionLayoutSection? in
            // Section番号でレイアウトの分岐
            switch section {
            case 0: return self?.createLayoutA()
            case 1: return self?.createLayoutB()
            default: fatalError()
            }
        }
        return layout
    }()


    // MARK: Method

    private func createLayoutA() -> UICollectionViewCompositionalLayout {
        /* ~ 略 ~ */
        return UICollectionViewCompositionalLayout(section: section)
    }

    private func createLayoutB() -> UICollectionViewCompositionalLayout {
        /* ~ 略 ~ */
        return UICollectionViewCompositionalLayout(section: section)
    }
}
複数のレイアウトを構成したい場合は、レイアウトの数に合わせて、その設定メソッドが増えていきます。Compositional Layoutsでも、普通に実装した場合はViewControllerの肥大化を招きます。
この肥大化を防ぐために、分離していきます。
2. レイアウトの抽象化をする
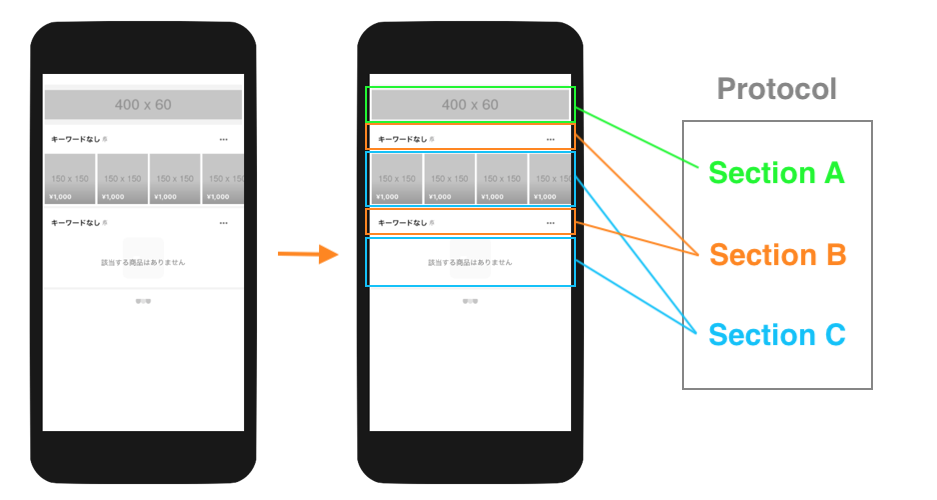
上記のコードからも分かる通り、UICollectionViewCompositionalLayoutではレイアウトをSection番号で分岐できるため、この部分を抽象化して取り出すことで、すっきりとした書き方にすることができます。
具体的には、以下のレイアウトがあった場合、図右側のような抽象化を行います。

セクションに共通する処理を整理して抽象化していきます。
例として、抽象化するとこのようになります。
protocol SectionProtocol {
    // セクションのアイテム数
    var numberOfItems: Int { get }

    // レイアウトの生成
    func layoutSection(_ view: UIView) -> NSCollectionLayoutSection

    // セルの生成
    func configureCell(_ view: UICollectionView, at indexPath: IndexPath) -> UICollectionViewCell

    // セルタップ時(引数は継承元のコントローラ名)
    func selectItem(_ controller: HogeViewController, at indexPath: IndexPath)
}
各人の実装によって抽象化されるものは変わるかと思いますが、上記は大体共通して実装することになるでしょう。これはただ抽象化しただけではなく、画面を構成するモデルの役割もはたします。
このプロトコルを各セクションごとに継承し、セクションごとに設定を記載していきます。
struct SectionA: SectionProtocol {

    let numberOfItems = 1

    func layoutSection(_ view: UIView) -> NSCollectionLayoutSection {
        /* 略 */
        return UICollectionViewCompositionalLayout(section: section)
    }

    func configureCell(_ view: UICollectionView, at indexPath: IndexPath) -> UICollectionViewCell {
        let cell = view.dequeueReusableCell(withReuseIdentifier: "your cell id", for: indexPath) as! SectionACell
        /* 略 */
        return cell
    }

    func selectItem(_ controller: ViewController, at indexPath: IndexPath) {
        // do some action
    }
}
こうすることで、ViewControllerからレイアウト部分を、別クラスとして分離することができます。
3. ViewControllerから分離する
別クラスとして分離したので、ViewControllerはこのようにすっきりとした形になります。
final class ViewController: UIViewController {

    private var sections: [SectionProtocol]

    private lazy var collectionView: UICollectionView = {
        let collection = UICollectionView(frame: .zero, collectionViewLayout: compositionalLayout)
        /* ~ 略 ~ */
        return collection
    }()

    private lazy var compositionalLayout: UICollectionViewLayout = {
        return UICollectionViewCompositionalLayout { [weak self] section, _ in
            return self?.sections[section].layoutSection(self ?? .init()) // force cast でも問題ない
        }
    }()
}
また、抽象化した他のプロパティやメソッドは、以下のように呼び出すことができます。
extension ViewController: UICollectionViewDataSource, UICollectionViewDelegate {

    func numberOfSections(in collectionView: UICollectionView) -> Int {
        sections.count
    }

    func collectionView(_ collectionView: UICollectionView, numberOfItemsInSection section: Int) -> Int {
       sections[section].numberOfItems
    }

    func collectionView(_ collectionView: UICollectionView, cellForItemAt indexPath: IndexPath) -> UICollectionViewCell {
       sections[indexPath.section].configureCell(collectionView, at: indexPath)
    }

    func collectionView(_ collectionView: UICollectionView, didSelectItemAt indexPath: IndexPath) {
       sections[indexPath.section].selectItem(self, at: indexPath)
    }
}
抽象化されているため、分岐の処理がなくとても綺麗な実装になっています。
4. MVP構成にする
抽象化したセクションのモデル一覧である
private var sections: [SectionProtocol]
をViewControllerからPresenterに移行するだけです。
この部分はMVP構成にするだけなので、構成の仕方に関して記載は致しません。後述のリポジトリを見ていただけると幸いです。
その他
セクション側でアクションの処理を行いたい場合は、ViewControllerからPresenterをフックしてあげることで、単一方向な処理を実現することができます。
具体例として、セルをタップしたい際の挙動をあげておきます。
protocol Presentable: AnyObject {
    var sections: [SectionProtocol] { get }
    func selectItem(at indexPath: IndexPath)
}

final class Presenter: Presentable {

    private var sections: [SectionProtocol]

    func selectItem(at indexPath: IndexPath) {
        // do someting
    }
}
final class ViewController: UICollectionViewDelegate {

    private(set) var presenter: Presentable!

    /* 略 */

    func collectionView(_ collectionView: UICollectionView, didSelectItemAt indexPath: IndexPath) {
        presenter.sections[indexPath.section].selectItem(self, at: indexPath)
    }
}
struct SectionA: SectionProtocol {

    /* 略 */

    func selectItem(_ controller: ViewController, at indexPath: IndexPath) {
        controller.presenter.selectItem(at: indexPath)
    }
}
先ほどの図に照らし合わせると、
このような関係になっています。
このように、抽象化して分離することで、ViewControllerの肥大化を防ぎつつ、疎結合な作りを実現することができるのです。
終わりに
少しコードが多くなってしまい、わかりづらい部分もあるかもしれません。
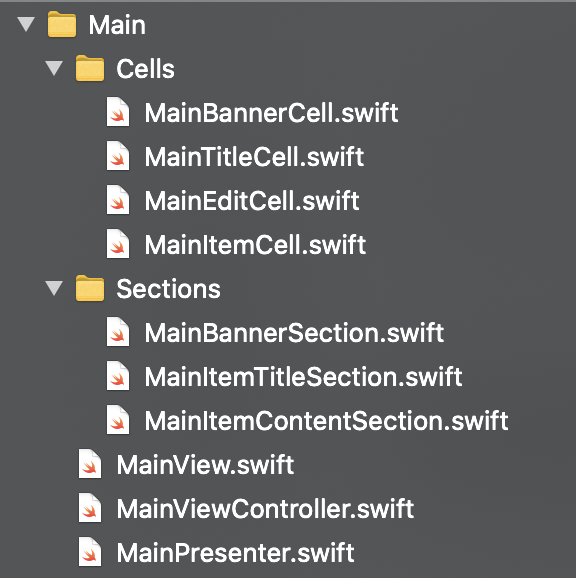
動作するリポジトリを置いておくので、こちらからコードを読んでいただけると幸いです。
そちらをみていただくと、より理解を深めることができます。
ご指摘などありましたらコメントいただけると幸いですmm
関連
Compositional Layoutsを使ってラクマのiOSアプリを改修した話
その他


