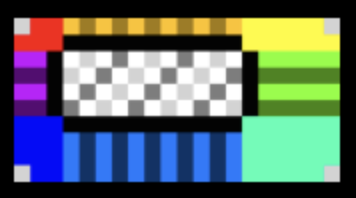
9分割スプライトとは
pixi.jsでの NineSlicePlane や unity で 9SliceSprites と呼ばれているものです。
便宜上、今記事では9分割スプライトと呼びます。
目的
ウインドウ状のものを簡単に作るため。
ウインドウって、縦横の比率が可変で、四隅の装飾は変わらず四辺は伸び縮むするようなものですよね。これを1枚の画像から作れた楽ですよね。
| 横長 | 縦長 |
|---|---|
 |
 |
作り方
これを以下のような1枚の画像から生成します。
このような点線位置で9分割します。
この分割したエリアごとに、縦横の長さが目的のサイズになるように以下のように伸縮すればよさそうですね。
- 上辺と下辺は水平方向に伸縮
- 左辺と右辺は垂直方向に伸縮
- 中央は水平・垂直方向に伸縮
3x3の矩形をもった geometry を作る
const geometry = new THREE.PlaneGeometry( width, height, 3, 3 );
const vertices = getNineFrameGeometryPostion(width, height, leftWidth, topHeight, rightWidth, bottomHeight);
geometry.setAttribute('position', new THREE.BufferAttribute( vertices, 3 ));
3x3の矩形を new THREE.PlaneGeometry( width, height, 3, 3 ) で生成。
さらに、geometry.setAttribute で頂点位置を変えます。
頂点位置の決定
width, height は 目的のサイズ、
leftWidth, rightWidth は 左辺と右辺の幅、
topHeight, bottomHeight は 上辺と下辺の高さ になります。
const getNineFrameGeometryPostion = (width:number, height:number, leftWidth:number, topHeight:number, rightWidth:number, bottomHeight:number ) => {
  const w0 = width/2;
  const h0 = height/2;
  const l = -w0 + leftWidth;
  const t = -h0 + bottomHeight;
  const r = w0 - rightWidth;
  const b = h0 - topHeight;
  return new Float32Array([
    -w0, h0, 0,
    l, h0, 0,
    r, h0, 0,
    w0, h0, 0,
    -w0, b, 0,
    l, b, 0,
    r, b, 0,
    w0, b, 0,
    -w0, t, 0,
    l, t, 0,
    r, t, 0,
    w0, t, 0,
    -w0, -h0, 0,
    l, -h0, 0,
    r, -h0, 0,
    w0, -h0, 0
  ])
}
uv の決定
テクスチャ画像のどの部分を切り取るかの uv を決めます。
const getNineFrameGeometryUv = (width:number, height:number, leftWidth:number, topHeight:number, rightWidth:number, bottomHeight:number ) => {
  const l = leftWidth / width;
  const t = (height -  topHeight)/height;
  const r = (width - rightWidth)/width;
  const b = bottomHeight/height;
  console.log({t,b, height, topHeight, bottomHeight})
  return new Float32Array([
    0, 1,
    l, 1,
    r, 1,
    1, 1,
    0, t,
    l, t,
    r, t,
    1, t,
    0, b,
    l, b,
    r, b,
    1, b,
    0, 0,
    l, 0,
    r, 0,
    1, 0,
  ])
}

const uvs = getNineFrameGeometryUv(textureOriginalWidth, textureOriginalHeight, leftWidth, topHeight, rightWidth, bottomHeight);
geometry.setAttribute('uv', new THREE.BufferAttribute( uvs, 2 ));
完成
あとはこの geometry から mesh をつくって描画すればOK!
const material = new THREE.MeshStandardMaterial({ map: texture });
const mesh = new THREE.Mesh(geometry, material);
scene.add(mesh);
課題
ウインドウの生成を目的とすると、4辺と中央は拡縮するより、画像の繰り返しの方が汎用的なものになりそう。
(画像でいえば、縞模様の縞の本数が増えるようになる方が良さそう)
関連


