背景・目的
RaspberryPiにNginxでプロキシサーバーを立ち上げて、別ポートで動いているアプリケーションにリバースプロキシをする設定をしたことはあった。しかし、Dockerとdocker-composeを使って再現性のあるコードを実装したことがなかったので、今回はそれを実装してみた。
実装
仕様
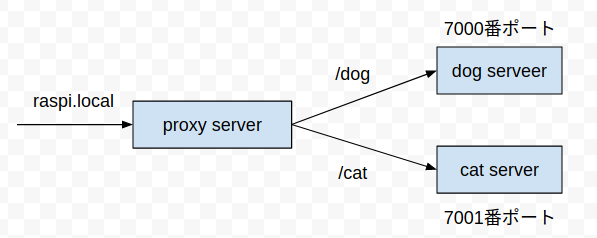
以下の図のように http://raspi.local/dog/ にアクセスした時は、proxy serverのコンテナを経由して、dog serverのコンテナに、http://raspi.local/cat/ にアクセスした時は、proxy server経由でcat serverのコンテナにアクセスするように実装する。
手順
- proxy server, dog server, cat serverのコンテナが立ち上がるようにdocker-compose.ymlにコード化
- proxy server のコンテナ内の /etc/nginx/conf.d/default.conf をリバースプロキシできるように設定する
実装内容
- 実装内容の構成ディレクトリ
.
├── README.md
├── cat-server
│   └── index.html
├── docker-compose.yml
├── dog-server
│   └── index.html
└── reverse-proxy
    ├── default.conf
    └── index.html
- 各コンテナの設定
version: "3"

services:
  dog-server:
    image: nginx
    container_name: doc-server
    volumes:
      - ./dog-server/index.html:/usr/share/nginx/html/index.html
    ports:
      - 7000:80

  cat-server:
    image: nginx
    container_name: cat-server
    volumes:
      - ./cat-server/index.html:/usr/share/nginx/html/index.html
    ports:
      - 7001:80

  reverse-proxy:
    image: nginx
    volumes:
      - ./reverse-proxy/index.html:/usr/share/nginx/html/index.html
      - ./reverse-proxy/default.conf:/etc/nginx/conf.d/default.conf
    ports:
      - 80:80
- この際注意しないといけない点は、各コンテナの80番ポートにアクセスした時にレンダリングされるhtmlはNginxのコンテナ内の /usr/share/nginx/html/index.html にあることである。コンテナ内の /etc/nginx/nginx.conf に記述されている include /etc/nginx/conf.d/*.conf; より、主な設定は
/etc/nginx/conf.d/default.conf に記載されている。以下は、その default.conf である。この6~9行目にその設定が記述されているのがわかる。したがって、各コンテナの80番ポートにリクエストが来た時にコンテナが識別できるようなhtmlを返すような設定をしたのが docker-compose.yml の volumes に記述されている。
server {
    listen       80;
    server_name  localhost;
    location / {
        root   /usr/share/nginx/html;
        index  index.html index.htm;
    }
    location /dog/ {
        proxy_pass http://192.168.11.4:7000/;
        proxy_redirect off;
    }
    location /cat/ {
        proxy_pass http://192.168.11.4:7001/;
        proxy_redirect off;
    }
    error_page   500 502 503 504  /50x.html;
    location = /50x.html {
        root   /usr/share/nginx/html;
    }
}
結果
- http://raspi.local/ にアクセスすると、以下のDockerは以下のログを吐く。
reverse-proxy_1 | 192.168.11.12 - - [11/May/2020:17:20:17 +0000] "GET / HTTP/1.1" 304 0 "-" "Mozilla/5.0 (X11; Ubuntu; Linux x86_64; rv:75.0) Gecko/20100101 Firefox/75.0" "-"
- http://raspi.local/dog/ にアクセスすると、以下のDockerは以下のログを吐く。
doc-server       | 172.22.0.1 - - [11/May/2020:17:20:56 +0000] "GET / HTTP/1.0" 304 0 "-" "Mozilla/5.0 (X11; Ubuntu; Linux x86_64; rv:75.0) Gecko/20100101 Firefox/75.0" "-"
reverse-proxy_1  | 192.168.11.12 - - [11/May/2020:17:20:56 +0000] "GET /dog/ HTTP/1.1" 304 0 "-" "Mozilla/5.0 (X11; Ubuntu; Linux x86_64; rv:75.0) Gecko/20100101 Firefox/75.0" "-"
- http://raspi.local/cat/ にアクセスすると、以下のDockerは以下のログを吐く。
cat-server       | 172.22.0.1 - - [11/May/2020:17:21:18 +0000] "GET / HTTP/1.0" 304 0 "-" "Mozilla/5.0 (X11; Ubuntu; Linux x86_64; rv:75.0) Gecko/20100101 Firefox/75.0" "-"
reverse-proxy_1  | 192.168.11.12 - - [11/May/2020:17:21:18 +0000] "GET /cat/ HTTP/1.1" 304 0 "-" "Mozilla/5.0 (X11; Ubuntu; Linux x86_64; rv:75.0) Gecko/20100101 Firefox/75.0" "-"
- このログより、プロキシサーバ経由で各サーバーに対してアクセスができていることが確認できた。
詰まったこと・課題
- nginxのイメージを使うときには、最初に/usr/share/nginx/html/index.htmlを作成しておかないといけない。
- RaspberryPiのNginx関連の初期設定とnginxのイメージのコンテナ内のNginx関連の初期設定は違うことを念頭に置かないといけない。
- /etc/nginx/conf.d/*.conf にNginxの独自の設定ファイルを配置しても認識されなかった。