はじめに
私の教授の勧めでテックブログを書いてみることになりました。
そこで、私の教授のアイデアをお借りして、教授室のドアに設置して自動的に在室かどうかとweb会議中かどうかを訪問者に教えるものを作成しました。
環境
・Rspberry pi 4 Model B
・MicroSDカード
・ディスプレイ
・PiNoir カメラモジュール V2
・MINI Microphone (USBマイク)
・作業PC
・Hibeacon mini (ビーコン)
作業の流れ
・GUIの作成
・BLEの検出
・音声付きの動画を録画
・google driveへ動画を送信
・slackへの通知
・google calendarと連携
各作業の終わりに参考URLを記しています。
システム構成
・システム構成図

1.GUIの作成
今回はTkinterを用いてGUIを作成しました。
・Tkinterのライブラリをインストール
$ sudo apt-get install python3-tk
「不在」の文字と録画ボタンをつけた画面を用意します。
import tkinter as tk
from tkinter import font

class StayManagement:
    def __init__(self, parent):
            self.font = font.Font(family="Montserrat", size=80) #フォントの設定
            self.btn = tk.Button(parent, text='録画', command=self.recording) #録画ボタン
            self.btn.place(x=10, y=10)
            self.label = tk.Label(parent, text="不在", font=self.font) #不在時の画面
            self.label.pack(anchor='center',expand=1)
            self.label.after(5000, self.search_ble) #BLE検出で使う

if __name__=='__main__':
    root = tk.Tk()
    root.title("status")
    root.geometry("640x480")
    timer = StayManagement(root)
    root.mainloop()
参考URL(1)
・Pythonで簡単なGUIを作れる「Tkinter」を使おう
2.BLEの検出
pythonのライブラリであるbluepyを用いました。
・Raspberry piへのインストール(python3)
$ sudo apt install libbluetooth3-dev libglib2.0 libboost-python-dev libboost-thread-dev
$ sudo apt install python3-pip
$ cd /usr/lib/arm-linux-gnueabihf/
$ sudo ln libboost_python-py35.so libboost_python-py34.so
$ sudo pip3 install gattlib
$ sudo pip3 install bluepy
$ sudo systemctl daemon-reload
$ sudo service bluetooth restart
Macアドレスを利用して通信可能な距離の範囲内にいるのかどうかを判断します。
取得したMacアドレスの中にHibeaconのMacアドレスがある場合「在室」と表示し、ない場合は「不在」と表示します。
import bluepy

def search_ble(self):
    list = []
    scanner = bluepy.btle.Scanner(0)
    devices = scanner.scan(3)
    for device in devices:
        list.append(device.addr)
    if "Macアドレス" in list :
        self.btn.place_forget()
        self.label.configure(text="在室") # 在室の場合
    else:
        self.btn.place(x=10, y=10)
        self.label.configure(text="不在") # 不在の場合
    self.label.after(5000, self.search_ble) # 繰り返し
・在室の場合の画面

・不在の場合の画面

参考URL(2)
・Raspberry Pi で bluepy を使ってmicro:bitをコントロール
・bluepyで始めるBluetooth Low Energy(BLE)プログラミング
3.動画の録画
不在時とWEB会議中(後述)に動画を録画してメッセージを残すための機能を実装しました。
録画と録音のコマンドを同時に実行する関数を作成しました。
import datetime
import subprocess
import wave
import numpy as np

def recording(self):
    RecordTime = 10
    dating = datetime.today().isoformat()
    file_nameH = '動画ファイル名' + '.h264'
    file_nameW = '音声ファイル名' + '.wav'
    cmd1 = 'raspivid -t ' + str(RecordTime*1000) + ' -w 640 -h 480 -fps 30 -o ' + file_nameH + ' -rot 90 '
    cmd2 = 'arecord -d ' + str(RecordTime) + ' -D plughw:1,0 -f cd ' + file_nameW

    ps1 = subprocess.Popen(cmd1.split(),stdout=subprocess.PIPE)
    ps2 = subprocess.Popen(cmd2.split(),stdout=subprocess.PIPE)
    ps1.stdout.close()
    outs,errs = ps2.communicate()

    wfile = wave.open(file_nameW, 'r')
    numsamples = wfile.getnframes()
    data = wfile.readframes(numsamples)
    wfile.close()
    result = np.frombuffer(data,dtype="int16") / float(2**15)
    # .h264型式から.mp4に変換を行う
    file_nameMp4 = 'video_files/' + dating + ".mp4"
    cmd3 = 'ffmpeg -i '+ file_nameW + ' -r 30 -i ' + file_nameH + ' -vcodec copy ' +  file_nameMp4
    time.sleep(5)
    proc = subprocess.run(cmd3.split())
    os.remove(file_nameH) #h264ファイルの削除
    os.remove(file_nameW) #wavファイルの削除
不在時とWEB会議中(後述)に表示される録画ボタンを押すと録画が始まります。
参考URL(3)
・RaspberryPi3とPythonで就寝中の自分の音声付き動画をmp4で保存する
4.google driveへ動画を送信
・pythonライブラリをインストール
pip3 install PyDrive
pip3 install google-api-python-client
Pythonプログラムと同じディレクトリにsettings.yamlとclient_secret.jsonの2つのファイルを置きます。
settings.yamlには下記を記載します。
client_config_file: client_secret.json

save_credentials: True
save_credentials_backend: file
save_credentials_file: credentials.json

get_refresh_token: True
client_secret.jsonはGoogle Cloud プラットフォームでgoogle drive apiを有効、新規プロジェクトの作成をし、認証情報を作成した後下記のボタンを押すことでダウンロードできる・・・(*)

folder_idはGoogleDrive上で取得した動画を置きたいフォルダを指定します。

指定したフォルダに動画ファイルを送信します。
from pydrive.auth import GoogleAuth
from pydrive.drive import GoogleDrive

folder_id = "上記の画像の赤枠の中のURL"
f = self.drive.CreateFile({'title': file_nameMp4,'mimeType': 'video/mp4','parents': [{'kind': 'drive#fileLink','id': folder_id}]})
f.SetContentFile(file_nameMp4)
f.Upload()
参考URL(4)
・RaspberryPi+Pythonで取得した動画をGoogleDriveに自動でアップロードする
・ラズパイで撮影した動画をグーグルドライブにアップロードする
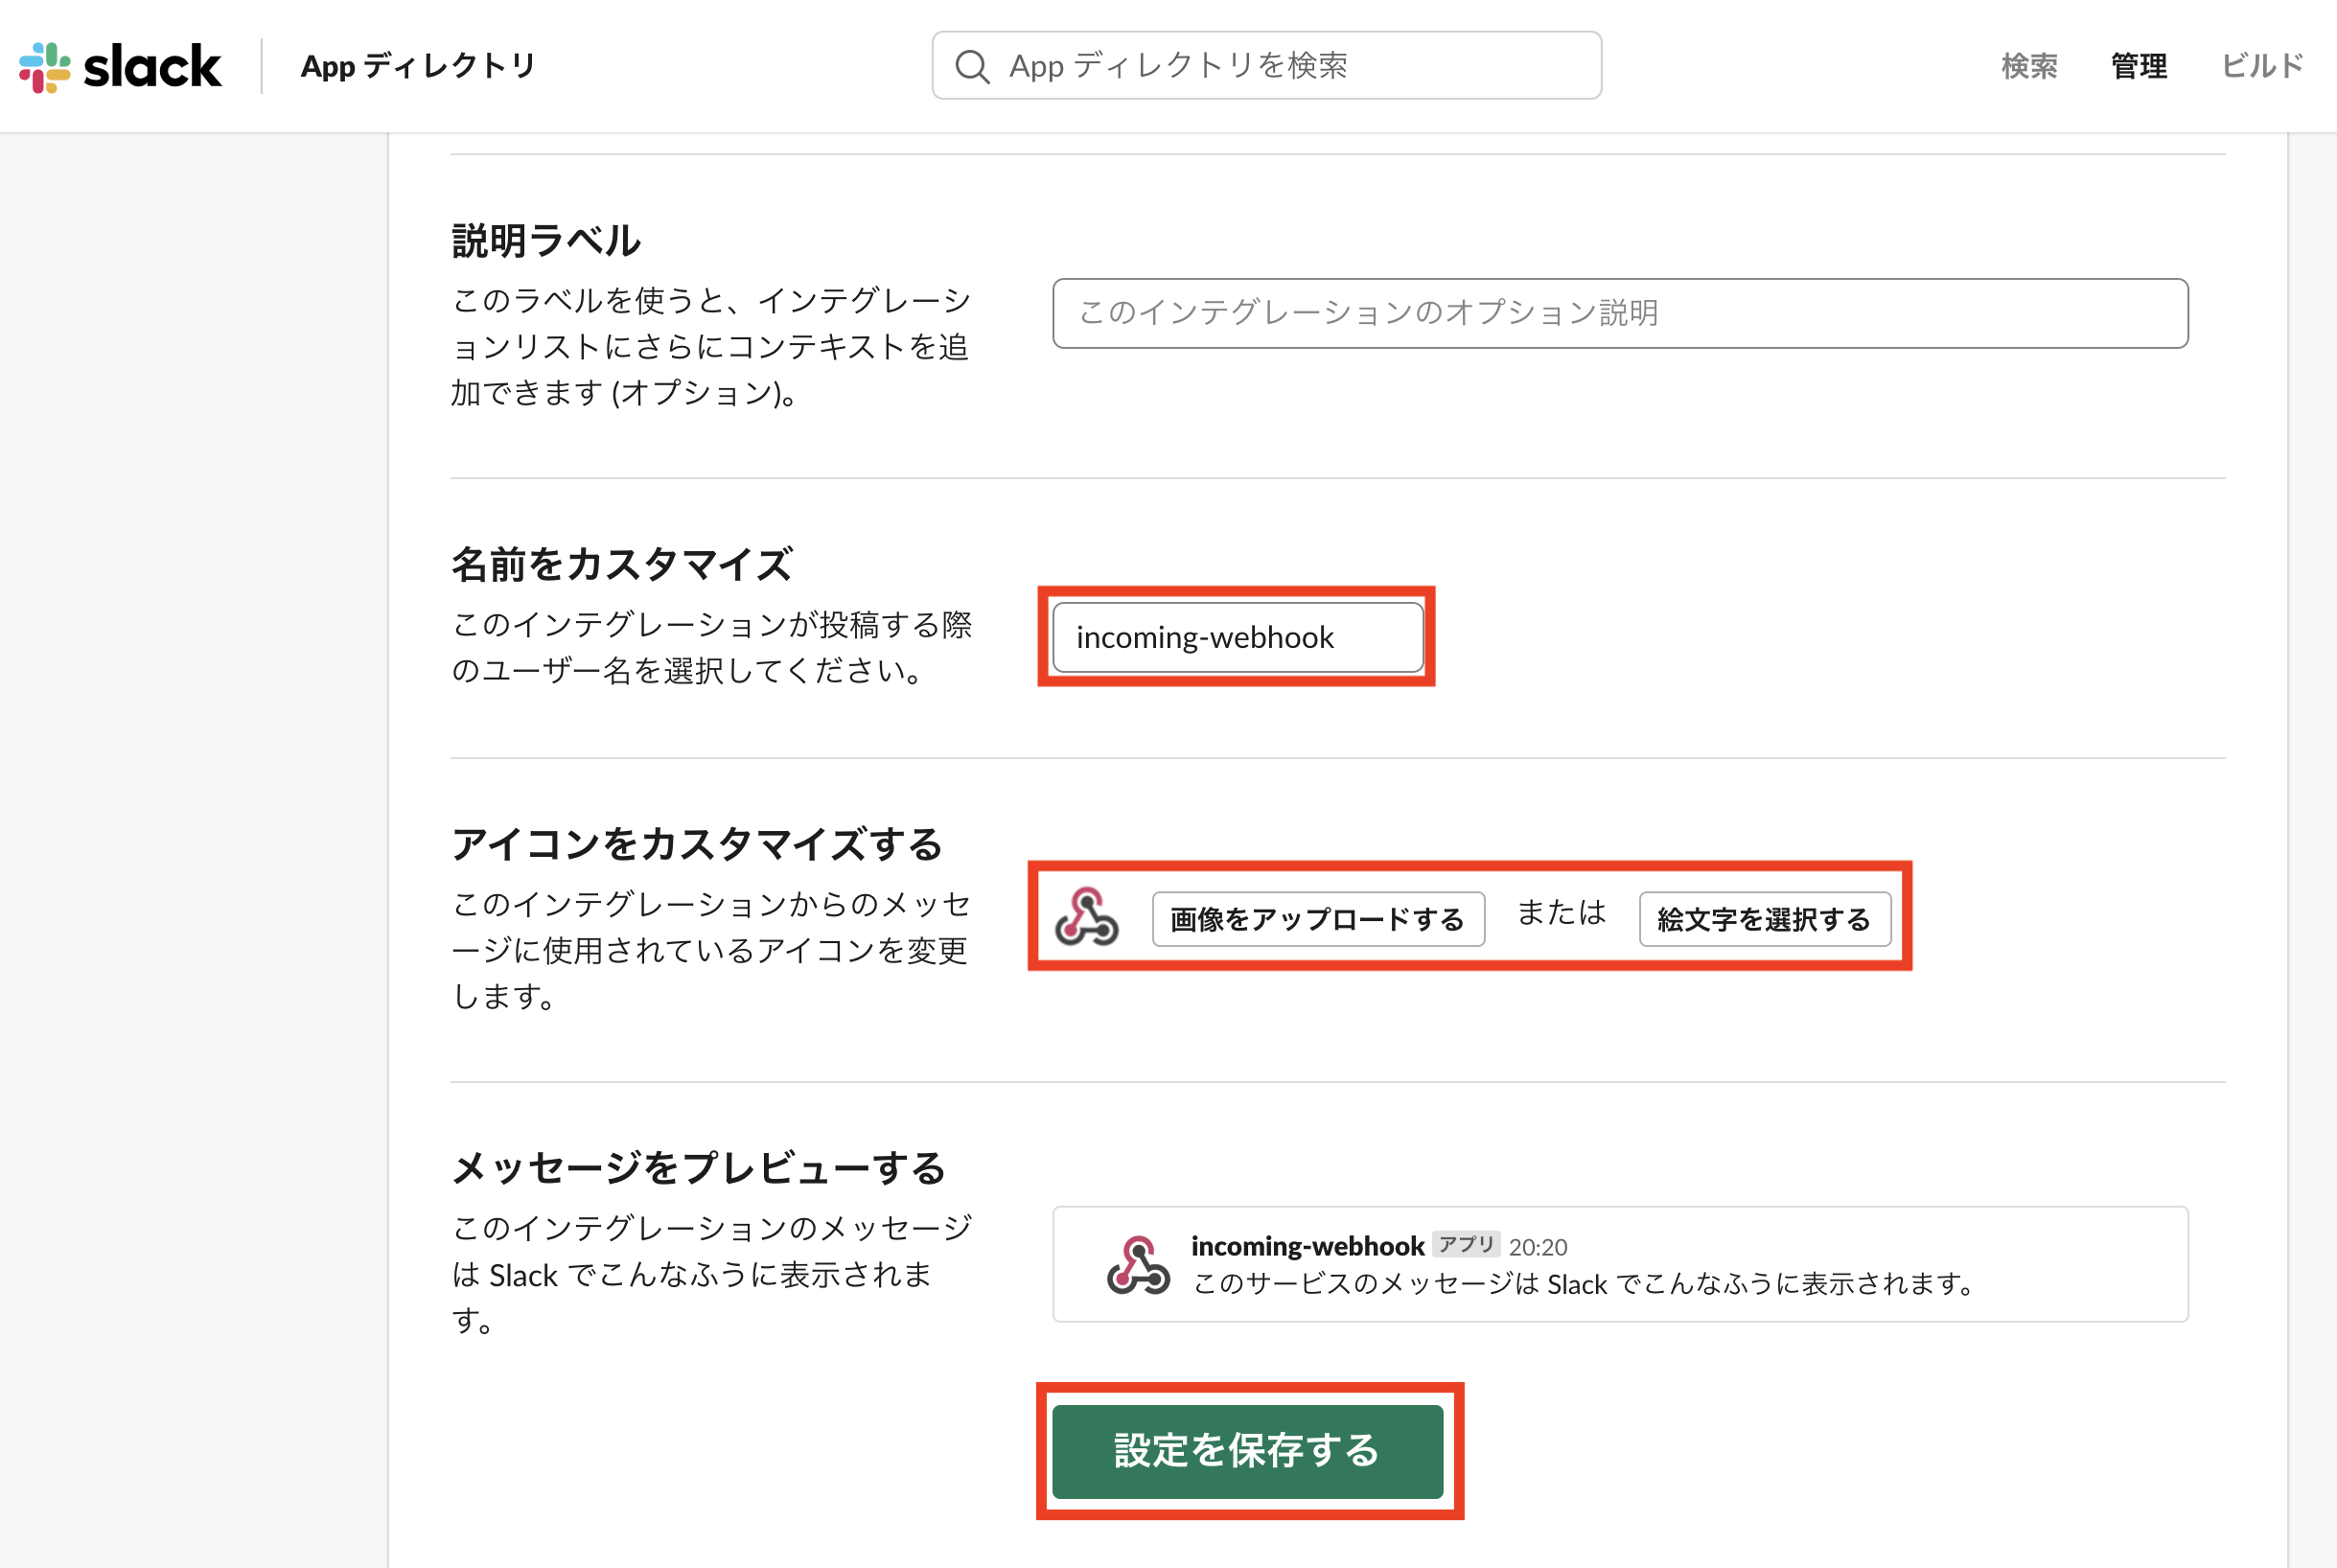
5.slackへの通知
slackで通知を受信するための準備を行います。
以下のページから設定を行います。
https://my.slack.com/services/new/incoming-webhook/
1.ワークスペースとチャンネルを選択して、「着信Webフックインテグレーションの追加」をクリックする

2.Webhook URLはPythonのプログラムで使用する

3.名前やアイコンは自由に変更して、設定を保存する
slackwebモジュールををインストール
pip3 install slackweb
slackweb.Slackの中に取得したURLを引数としていれます。
slack.notifyに投稿したい内容をいれます。
msg = "不在時に訪問者がメッセージを残されていきました"
slack =slackweb.Slack(url="https://hooks.slack.com/services/T0135K99Y4D/B012MUQ75DY/B01370FE7B8/6QMczOAfgYCBTr0CgF0W6jyh")
slack.notify(text=msg)
参考URL(5)
・RaspberryPi3で温湿度を取得してSlackに通知する
・Python3からslackに投稿する方法
6.google calendarとの連携
今回はgoogle calendar apiを使って連携を行いました。
最初の手順は(*)と同じように、google calendar apiを有効にし、jsonファイルをダウンロードします。
・google client libraryのインストール
$ pip3 install --upgrade google-api-python-client google-auth-httplib2 google-auth-oauthlib
WEB会議のURLのある予定の情報を取得し、開始時間と終了時間を取得します。
基本的にGoogle MeetのURLを追加することができる(google calendarとZOOMを連携するとZOOMのURLも添付することができるみたい・・・(**))
scheduleライブラリを用いて毎日朝の0時10分に1日の予定を取得し、予定時刻になったら画面が切り替わるようにする
・scheduleライブラリのインストール
pip3 install schedule
今回はthreadingライブラリを用いて並列処理をしています。
from __future__ import print_function
import schedule
import threading
import datetime
import pickle
import os.path
from googleapiclient.discovery import build
from google_auth_oauthlib.flow import InstalledAppFlow
from google.auth.transport.requests import Request

def calendar(self):
    SCOPES = ['https://www.googleapis.com/auth/calendar.readonly']
    gauth = GoogleAuth()
    gauth.CommandLineAuth()
    drive = GoogleDrive(gauth)
    start_time = []
    end_time = []
    creds = None
    if os.path.exists('token.pickle'):
        with open('token.pickle', 'rb') as token:
            creds = pickle.load(token)

    if not creds or not creds.valid:
        if creds and creds.expired and creds.refresh_token:
            creds.refresh(Request())
        else:
            flow = InstalledAppFlow.from_client_secrets_file('credentials.json', self.SCOPES)
            creds = flow.run_local_server()

        with open('token.pickle', 'wb') as token:
            pickle.dump(creds, token)

    service = build('calendar', 'v3', credentials=creds)

    now = datetime.datetime.utcnow().isoformat() + 'z'
    next_day = datetime.datetime.utcnow() + datetime.timedelta(days=1)
    next_day = next_day.isoformat() + 'z'
    events_result = service.events().list(calendarId='primary', timeMin=now, timeMax=next_day, singleEvents=True, orderBy='startTime').execute()
    events = events_result.get('items', [])

    if not events:
        print('No upcoming events found.')
    for event in events:
        if 'hangoutLink' in event: #web会議URLがある場合イベントだけ取得する
            start = datetime.datetime.fromisoformat(event['start'].get('dateTime', event['start'].get('date'))).strftime("%H:%M")
            end = datetime.datetime.fromisoformat(event['end'].get('dateTime', event['start'].get('date'))).strftime("%H:%M")
            self.start_time.append(start)
            self.end_time.append(end)
        else:
            print("no meeting")
    for j in range(len(self.start_time)):
        schedule.every().day.at(self.start_time[j]).do(self.skype)
        schedule.every().day.at(self.end_time[j]).do(self.finish_skype)

    def skype(self):
        self.btn.place(x=10, y=10)
        self.label.configure(text="リモート\n会議中")
        return schedule.CancelJob #一度の実行だけにする

    def finish_skype(self):
        # flagなどで画面が変わるようにする
        return schedule.CancelJob #一度の実行だけにする

    def schedule(self):
        schedule.every().day.at("00:10").do(self.calendar) #毎朝00:10に実行
        while True:
            schedule.run_pending() #時間順に実行
            time.sleep(1)
ファイルを実行するとURLが表示され、URL先でgoogleアカウントにログインし許可をするように求められます。
URLをラズパイのブラウザに入力し、googleアカウントにログインして権限の付与の許可を行います。(私はURLをラズパイ上ではなく、作業PC上で開いてしまい許可することができず時間がかかってしまいました。)
一度許可をするとPythonファイルと同じディレクトリにtoken.pickleというファイルが作成され、認証作業が要らなくなります。
・WEB会議中の画面

参考URL(6)
・【超・便利】GoogleカレンダーとZoomを連携させる・・・(**)
・【Python】Google Calendar APIを使ってGoogle Calendarの予定を取得・追加する
・Google Calendar API
・Python Scheduleライブラリでジョブ実行
・Pythonで並列化を学んでみる(マルチスレッド偏)
最後に
それぞれの機能をつなげることによって在室と不在、会議中の表示と訪問者の言付けを動画にして残すことができるようになりました。
wifi環境と電源が確保できれば使えると思います。
これで忙しい教授の助けになればと思います。また、今回の執筆にあたり、機材等でメカトラックス社様のサポートをいただきました、お礼申し上げます。
最後まで読んでいただきありがとうございます!