この記事は AWS Advent Calendar 2020 14日目の記事です。
はじめに
2020/12/4 に AWS Security Hub に統合可能な 3rd Party パートナーの製品として
Aqua Security の kube-bench が追加されたことが発表されました。
![]() AWS Security Hub adds open source tool integrations with Kube-bench and Cloud Custodian
AWS Security Hub adds open source tool integrations with Kube-bench and Cloud Custodian
https://aws.amazon.com/jp/about-aws/whats-new/2020/12/aws-security-hub-adds-open-source-tool-integration-with-kube-bench-and-cloud-custodian/
この統合により kube-bench で実行した CIS Kubernetes Benchmark および
CIS Amazon EKS Benchmark のチェック結果を AWS Security Hub で集中管理できるようになりました。
EKS クラスターで kube-bench を実行し、Security Hub に結果を取り込んでみましたのでご紹介します。
CIS Benchmark とは
CIS Benchmark は 米国の非営利団体である CIS (Center for Internet Secuirty) が公開している
各種 OS、サーバー、クラウド環境などを強化するためのガイドラインです。
CIS は 140 以上の CIS Benchmark を発行しており、PCI DSS などのコンプライアンス要件で
業界で認められているシステム強化標準との記載があった場合などに参照されます。
CIS Benchmark は CIS のサイトから PDF 形式でダウンロードできます。
https://www.cisecurity.org/cis-benchmarks/
kube-bench とは
kube-bench は 対象の環境が CIS Kubernetes Benchmark に記載されている推奨事項に
準拠しているかどうかをチェックすることができる Go 製のアプリケーションです。
Aqua Security 社が開発、OSS として公開しています。
CIS Kubernetes Benchmark だけでなく、CIS Amazon Elastic Kubernetes Service (EKS) Benchmark や
CIS Google Kubernetes Engine (GKE) Benchmark のチェックもサポートしています。
AWS Security Hub とは
AWS Security Hub は AWS 環境全体の様々なセキュリティデータを集約して
一元的に管理するためのサービスです。
Amazon GuardDuty や Inspector, Macie などの AWS サービスはもちろんのこと
多くの 3rd Party セキュリティ製品と統合されており、対応する製品のデータを Security Hub に
送信したり、逆に Security Hub のデータを製品側で受信するといったことが可能です。
内部的には AWS Security Finding Format (ASFF) と呼ばれる JSON 型のフォーマットで結果情報が
管理されているため、この形式に準拠していれば独自のデータをインポートすることもできます。
前提条件
以下のバージョンで実施しています。
- Amazon EKS: 1.17
- eksctl: 0.30.0
- kube-bench: 0.40.0
CIS Amazon EKS Benchmark v1.0 のチェックを EKS クラスター内で実行します。
EKS クラスターの構築、Security Hub の有効化といった手順は割愛します。
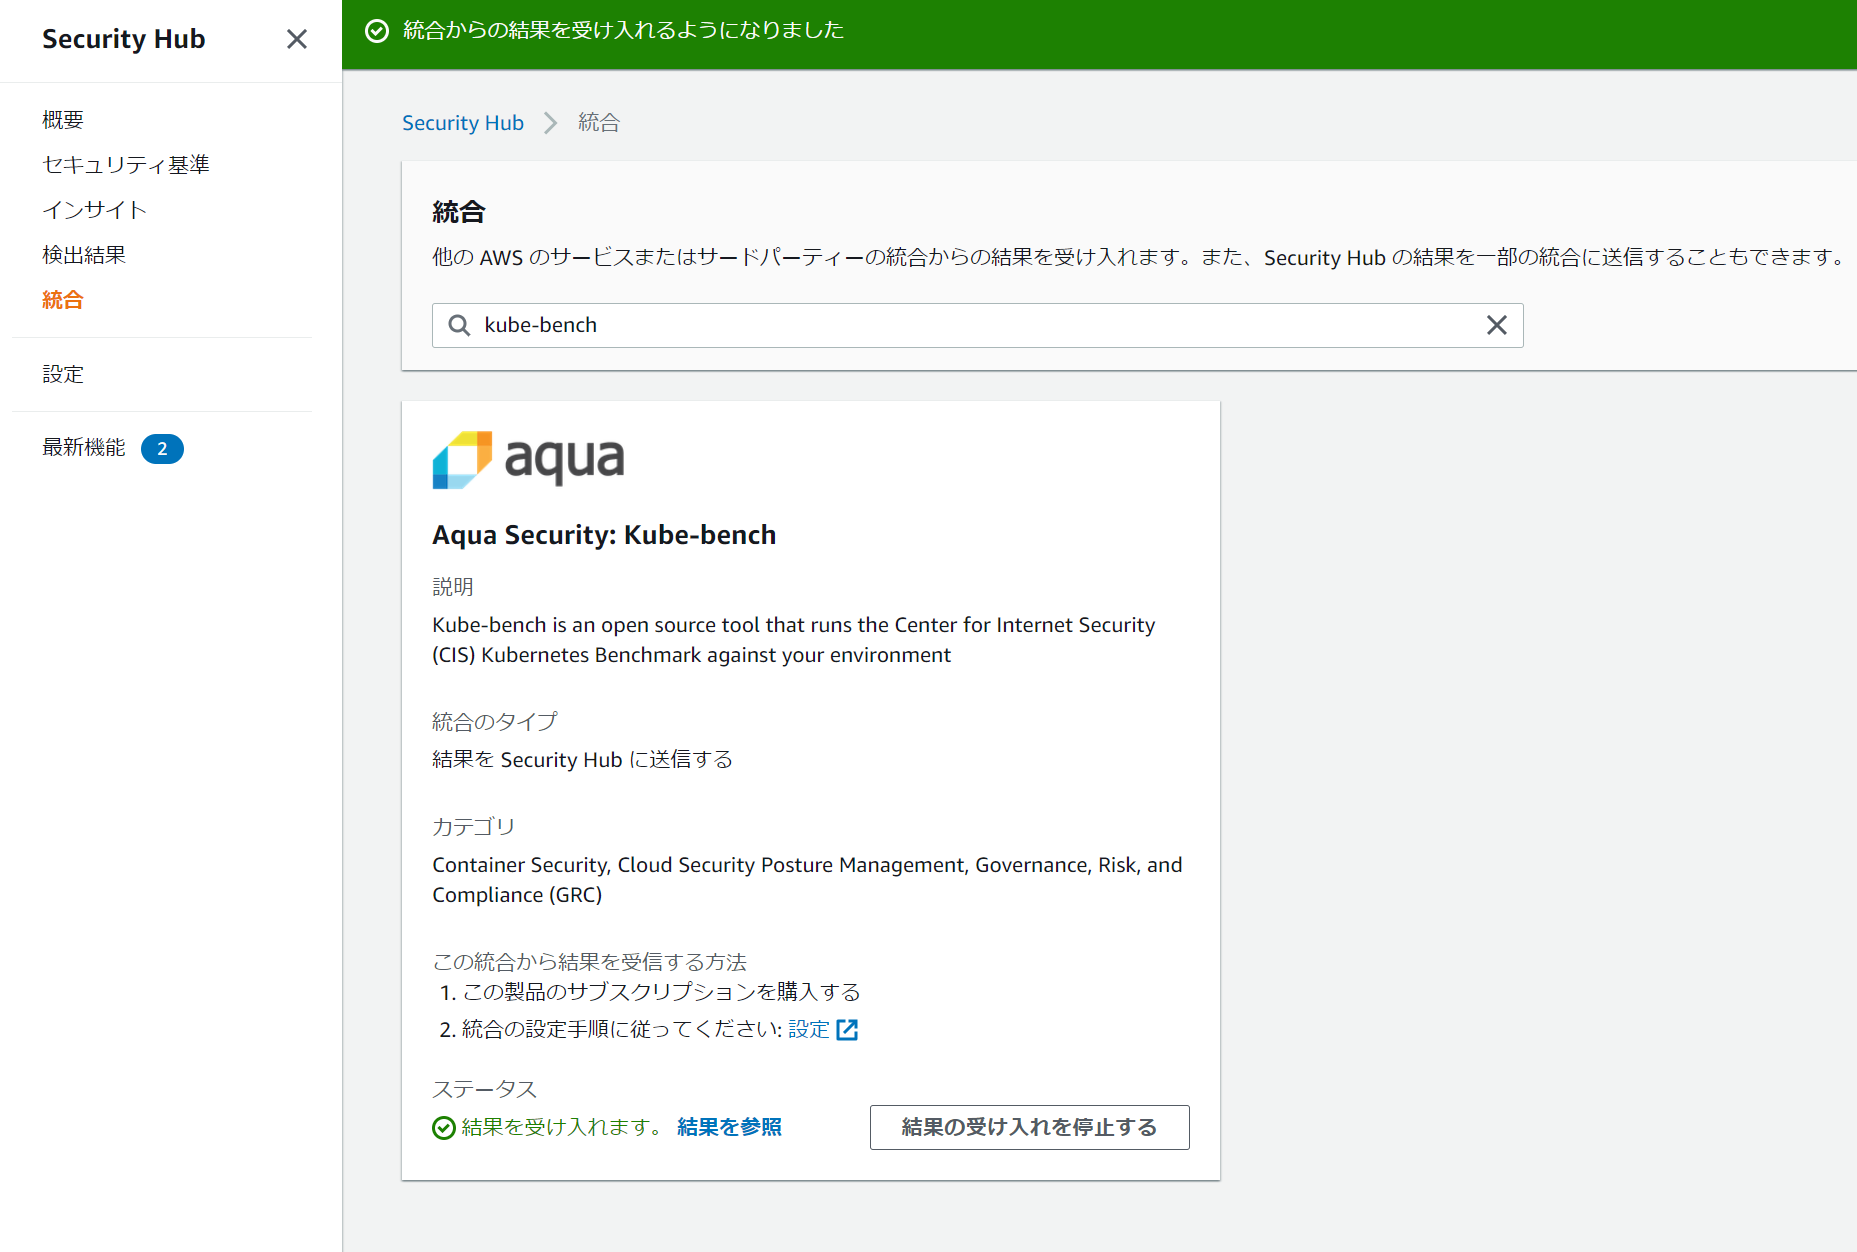
統合の有効化
Security Hub コンソールの統合から kube-bench を検索し、結果を受け入れる をクリックすると
調査結果を Security Hub に送信するために必要な IAM ポリシーに関する情報が表示されます。
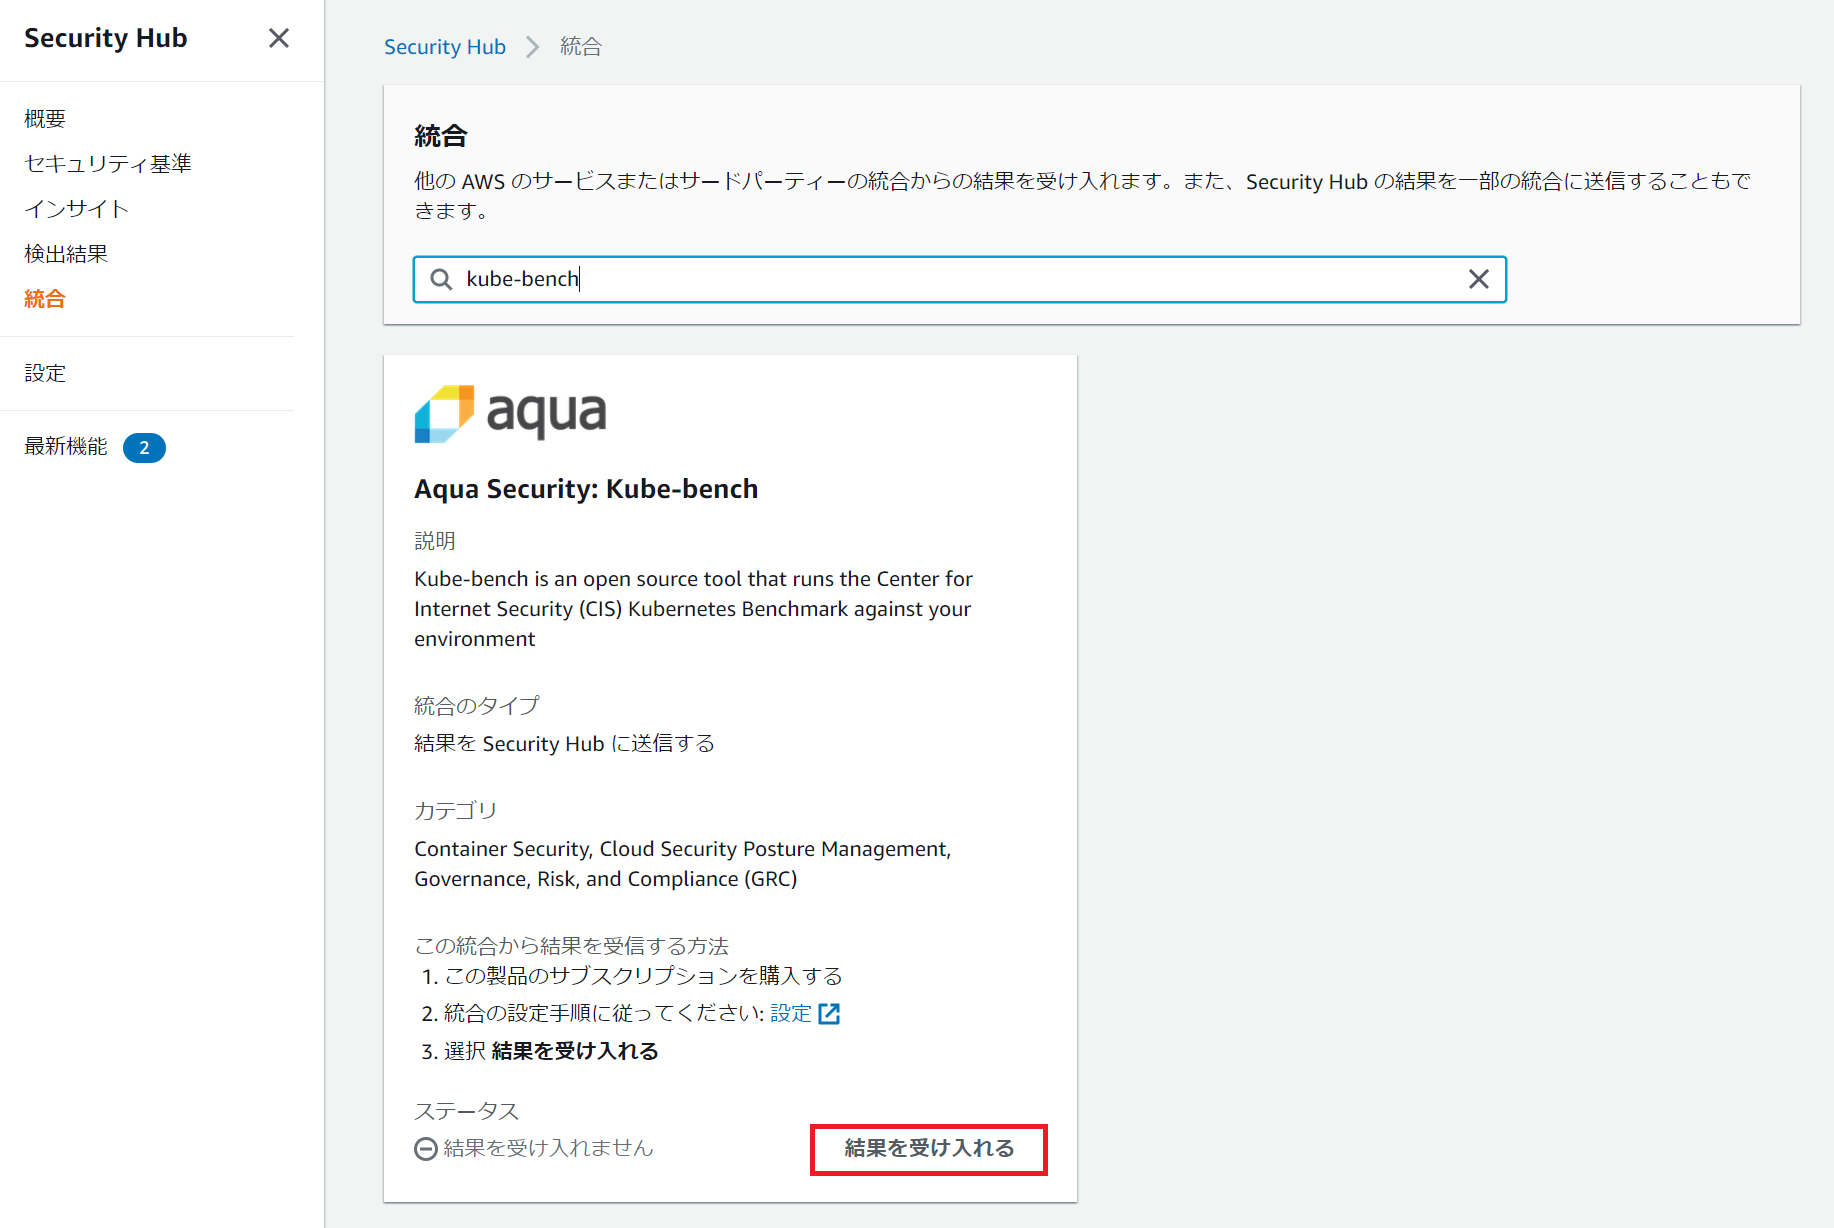
確認画面で再度結果を受け入れるを選択すると、ステータスが有効になります。
IAM ロールの設定
kube-bench を EKS クラスター内で実行するため、実行される Pod が Security Hub へ
チェック結果を送信する権限を持っている必要があります
Pod に対して AWS リソースへのアクセス権限を割り当てる方法は 2 通りあります。
- IAM Roles for Service Accounts (IRSA) を使用する
- ノードグループに設定する IAM ロールを使用する
IRSA を使用すると、IAM ロールを Kubernetes のサービスアカウントに関連付けることができます。
これにより、kube-bench が起動する pod にのみ Security Hub へのアクセス許可を提供できます。
ノードグループに設定する IAM ロールを使用した場合、そのグループ配下で起動するすべての Pod に
Security Hub へのアクセス権限が割り当てられてしまう点にご注意ください。
今回は IRSA を使用します。
IRSA を使用するために、IAM OIDC Provider を作成していない場合は先に作成しておきます。
$ eksctl utils associate-iam-oidc-provider --cluster {CLUSTER_NAME} --approve --region ap-northeast-1
次に以下のポリシーをアタッチした IAM ロールを作成します。
リージョンは適宜読み替えてください。
{
    "Version": "2012-10-17",
    "Statement": [
        {
            "Effect": "Allow",
            "Action": "securityhub:BatchImportFindings",
            "Resource": [
                "arn:aws:securityhub:ap-northeast-1::product/aqua-security/kube-bench"
            ]
        }
    ]
}
IAM ロールの信頼関係に以下のようなポリシーを追記します。
<ACCOUNT_ID>, <OIDR_PROVIDER_ID>, リージョンはご自身のものを設定してください。
Namespace に kube-bech を使用する想定で記述しています。
{
  "Version": "2012-10-17",
  "Statement": [
    {
      "Effect": "Allow",
      "Principal": {
        "Federated": "arn:aws:iam::<ACCOUNT_ID>:oidc-provider/oidc.eks.ap-northeast-1.amazonaws.com/id/<OIDC_PROVIDER_ID>"
      },
      "Action": "sts:AssumeRoleWithWebIdentity",
      "Condition": {
        "StringLike": {
          "oidc.eks.ap-northeast-1.amazonaws.com/id/<OIDC_PROVIDER_ID>:sub": "system:serviceaccount:kube-bench:*",
          "oidc.eks.ap-northeast-1.amazonaws.com/id/<OIDC_PROVIDER_ID>:aud": "sts.amazonaws.com"
        }
      }
    }
  ]
}
コンテナイメージの作成
kube-bench のコンテナイメージをビルドし、ECR に push しておく必要があります。
最初にイメージを格納するための ECR リポジトリを作成します。
$ aws ecr create-repository --repository-name k8s/kube-bench --image-tag-mutability MUTABLE
{
    "repository": {
        "repositoryArn": "arn:aws:ecr:ap-northeast-1:123456789012:repository/k8s/kube-bench",
        "registryId": "123456789012",
        "repositoryName": "k8s/kube-bench",
        "repositoryUri": "123456789012.dkr.ecr.ap-northeast-1.amazonaws.com/k8s/kube-bench",
        "createdAt": 1607747704.0,
        "imageTagMutability": "MUTABLE",
        "imageScanningConfiguration": {
            "scanOnPush": false
        },
        "encryptionConfiguration": {
            "encryptionType": "AES256"
        }
    }
}
kube-bench のソースコードを GitHub から clone します。
$ git clone https://github.com/aquasecurity/kube-bench.git
Cloning into 'kube-bench'...
remote: Enumerating objects: 4115, done.
remote: Total 4115 (delta 0), reused 0 (delta 0), pack-reused 4115
Receiving objects: 100% (4115/4115), 7.69 MiB | 5.28 MiB/s, done.
Resolving deltas: 100% (2644/2644), done.

$ cd kube-bench
Security Hub に実行結果を連携する場合、イメージをビルドする前に cfg/eks-1.0/config.yaml を編集し
実行対象の AWS アカウントおよびリージョン、クラスター名を書き換えておく必要があります。
---
AWS_ACCOUNT: "123456789012"
AWS_REGION: "ap-northeast-1"
CLUSTER_ARN: "arn:aws:eks:ap-northeast-1:123456789012:cluster/{YOUR_CLUSTER_NAME}"
コンテナイメージをビルドし、ECR に push します。
$ aws ecr get-login-password | docker login --username AWS --password-stdin https://123456789012.dkr.ecr.ap-northeast-1.amazonaws.com
Login Succeeded

$ docker build -t k8s/kube-bench .
...
Successfully built 6ad073f96455
Successfully tagged k8s/kube-bench:latest

$ docker tag k8s/kube-bench:latest 123456789012.dkr.ecr.ap-northeast-1.amazonaws.com/k8s/kube-bench:latest
$ docker push 123456789012.dkr.ecr.ap-northeast-1.amazonaws.com/k8s/kube-bench:latest
The push refers to repository [123456789012.dkr.ecr.ap-northeast-1.amazonaws.com/k8s/kube-bench]
bd6c279efeaa: Pushed
3032a8c3bf7a: Pushed
b0efa7564210: Pushed
fe4cf80d4f2c: Pushed
31c3d3db74eb: Pushed
d2e36eff2b5d: Pushed
f4666769fca7: Pushed
latest: digest: sha256:da95de0edccad7adb6fd6c80137a65b5458142efe14efa94ac44cc5c6ce6b2ef size: 1782
kube-bench の実行
サービスアカウントの作成
以下のマニフェストファイルで IAM ロールを関連付けたサービスアカウントを作成します。
apiVersion: v1
kind: ServiceAccount
metadata:
  name: kube-bench-sa
  namespace: kube-bench
  annotations:
    eks.amazonaws.com/role-arn: arn:aws:iam::123456789012:role/<IAM_ROLE_NAME>
Namespace kube-bench を作成し、apply します。
$ kubectl create ns kube-bench
kubectl create ns kube-bench

$ kubectl apply -f sa.yaml
serviceaccount/kube-bench-sa created

$ kubectl get sa -n kube-bench
NAME            SECRETS   AGE
default         1         6m32s
kube-bench-sa   1         11s
ジョブの実行
GitHub から clone した jobs-eks.yaml を開き、image, command を編集します。
command に --asff フラグを追加することで、Security Hub へ結果の送信が行われます。
更に先ほど作成したサービスアカウント名を追記します。
編集後のファイルは以下のようになります。
---
apiVersion: batch/v1
kind: Job
metadata:
  name: kube-bench
spec:
  template:
    spec:
      hostPID: true
      serviceAccountName: kube-bench-sa
      containers:
        - name: kube-bench
          image: 123456789012.dkr.ecr.region.amazonaws.com/k8s/kube-bench:latest
          command: ["kube-bench", "node", "--benchmark", "eks-1.0", "--asff"]
          volumeMounts:
            - name: var-lib-kubelet
              mountPath: /var/lib/kubelet
              readOnly: true
            - name: etc-systemd
              mountPath: /etc/systemd
              readOnly: true
            - name: etc-kubernetes
              mountPath: /etc/kubernetes
              readOnly: true
      restartPolicy: Never
      volumes:
        - name: var-lib-kubelet
          hostPath:
            path: "/var/lib/kubelet"
        - name: etc-systemd
          hostPath:
            path: "/etc/systemd"
        - name: etc-kubernetes
          hostPath:
            path: "/etc/kubernetes"
Kubernetes の job として kube-bench を実行し、正常終了することを確認します
$ kubectl apply -f job-eks.yaml -n kube-bench
job.batch/kube-bench created

$ kubectl get all -n kube-bench
NAME                   READY   STATUS      RESTARTS   AGE
pod/kube-bench-q4sbd   0/1     Completed   0          55s

NAME                   COMPLETIONS   DURATION   AGE
job.batch/kube-bench   1/1           5s         55s
Pod のログに以下のようなメッセージが出力され、ジョブがエラーとなる場合は
cfg/eks-1.0/config.yaml の記載内容が正しいか確認してください。
failed to output to ASFF: finding publish failed: MissingEndpoint: 'Endpoint' configuration is required for this service
Security Hub の検出結果を確認
通常、kube-bench の実行結果は Pod のログに出力されます。
出力例 (クリックで展開します)
$ kubectl logs -f pod/kube-bench-2j2ss -n kube-bench
[INFO] 3 Worker Node Security Configuration
[INFO] 3.1 Worker Node Configuration Files
[PASS] 3.1.1 Ensure that the proxy kubeconfig file permissions are set to 644 or more restrictive (Scored)
[PASS] 3.1.2 Ensure that the proxy kubeconfig file ownership is set to root:root (Scored)
[PASS] 3.1.3 Ensure that the kubelet configuration file has permissions set to 644 or more restrictive (Scored)
[PASS] 3.1.4 Ensure that the kubelet configuration file ownership is set to root:root (Scored)
[INFO] 3.2 Kubelet
[PASS] 3.2.1 Ensure that the --anonymous-auth argument is set to false (Scored)
[PASS] 3.2.2 Ensure that the --authorization-mode argument is not set to AlwaysAllow (Scored)
[PASS] 3.2.3 Ensure that the --client-ca-file argument is set as appropriate (Scored)
[PASS] 3.2.4 Ensure that the --read-only-port argument is set to 0 (Scored)
[PASS] 3.2.5 Ensure that the --streaming-connection-idle-timeout argument is not set to 0 (Scored)
[PASS] 3.2.6 Ensure that the --protect-kernel-defaults argument is set to true (Scored)
[PASS] 3.2.7 Ensure that the --make-iptables-util-chains argument is set to true (Scored)
[PASS] 3.2.8 Ensure that the --hostname-override argument is not set (Scored)
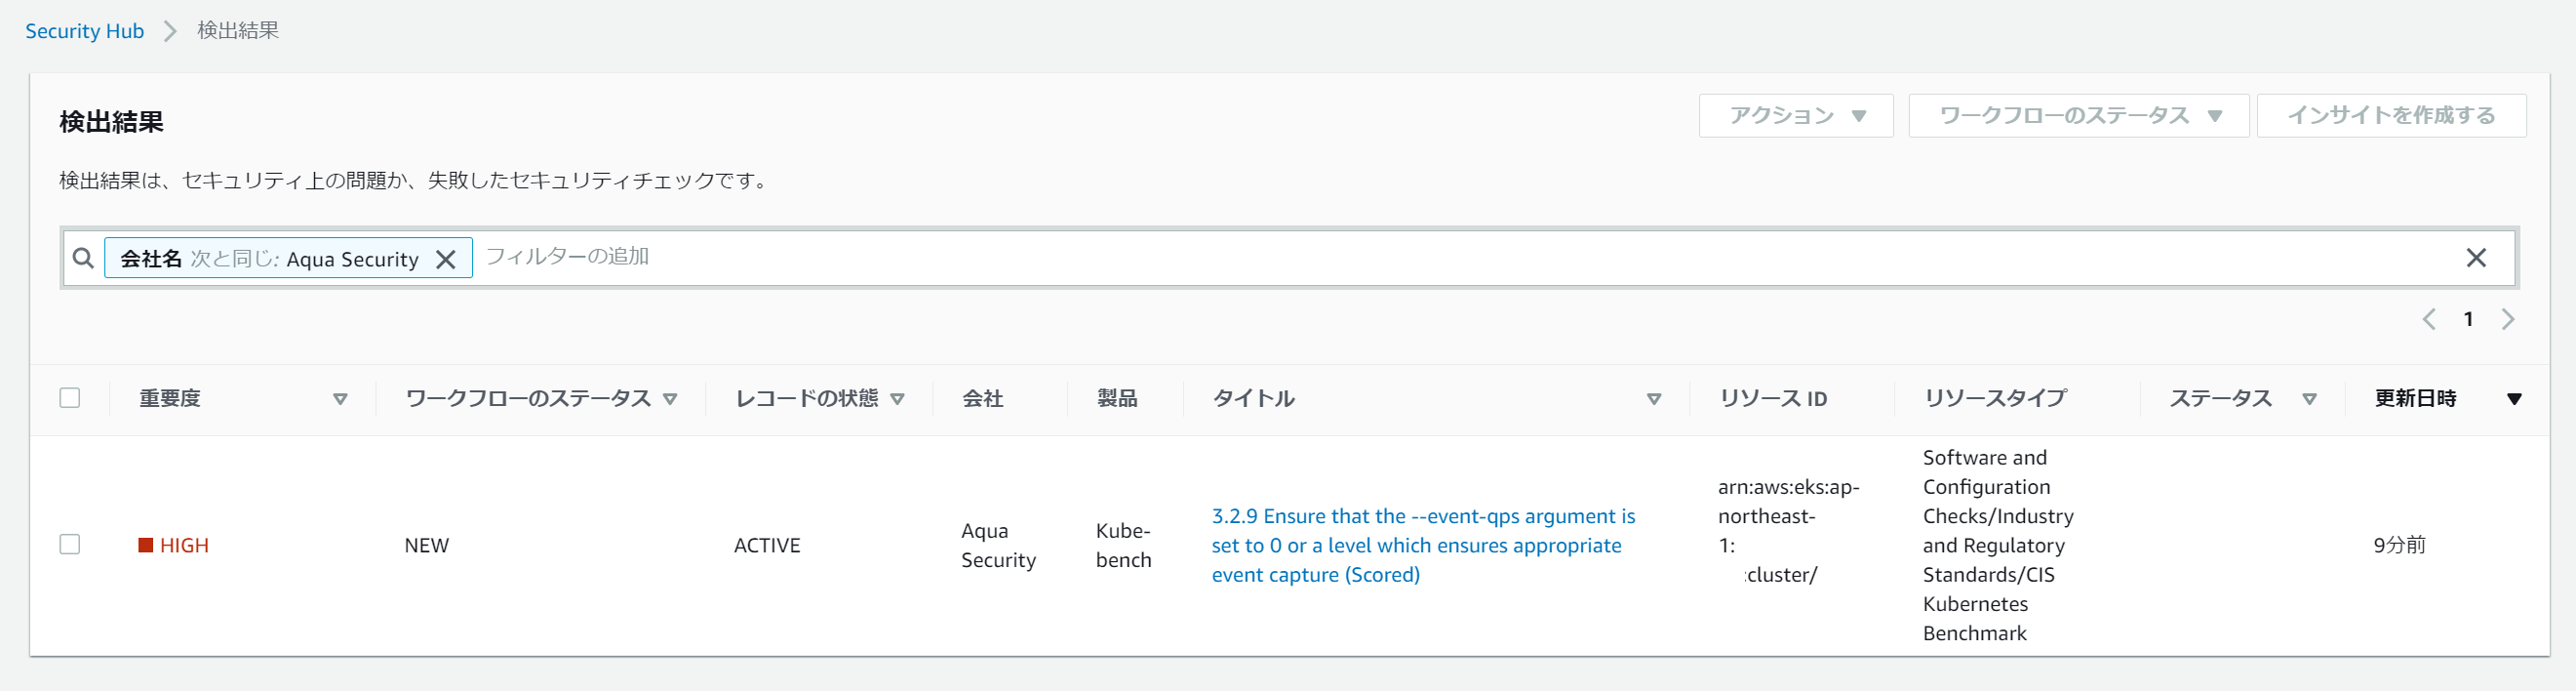
[WARN] 3.2.9 Ensure that the --event-qps argument is set to 0 or a level which ensures appropriate event capture (Scored)
[PASS] 3.2.10 Ensure that the --rotate-certificates argument is not set to false (Scored)
[PASS] 3.2.11 Ensure that the RotateKubeletServerCertificate argument is set to true (Scored)
== Remediations node ==
3.2.9 If using a Kubelet config file, edit the file to set eventRecordQPS: to an appropriate level.
If using command line arguments, edit the kubelet service file
/etc/systemd/system/kubelet.service on each worker node and
set the below parameter in KUBELET_SYSTEM_PODS_ARGS variable.
Based on your system, restart the kubelet service. For example:
systemctl daemon-reload
systemctl restart kubelet.service
== Summary node ==
14 checks PASS
0 checks FAIL
1 checks WARN
0 checks INFO
== Summary total ==
14 checks PASS
0 checks FAIL
1 checks WARN
0 checks INFO
--asff フラグを指定して、Security Hub に結果を送信した場合は
Security Hub にインポートされた件数のみがログに記載されています。
$ kubectl logs -f pod/kube-bench-q4sbd -n kube-bench
2020/12/12 14:51:07 Number of findings that were successfully imported:1
今回の環境の場合、1件であることが確認できます。
Security Hub に結果が送信されるのはチェック結果が FAIL または WARN となった
項目のみであることに注意してください。
(全てのチェックを PASS した場合、Security Hub 側には結果は生成されません。)
Security Hub コンソールの検出結果を確認すると、送信された 1 件の結果が
正常に取り込まれていることを確認できます。
カスタムインサイトの活用
Security Hub には特定のグループ化条件とフィルタを使用して、リソースや環境毎に
データを集約することができる、カスタムインサイトという機能が用意されています。
作成方法はコンソールのインサイトから任意のグループ化条件、フィルタを設定し、保存するだけです。
例えば Security Hub をマルチアカウント構成で利用している場合、マスターアカウントでは
メンバー AWS アカウントごとに検出結果を集約するような使い方ができます。
以下はグループ化条件を AWS アカウント ID に設定し、製品名 Kube-bench をフィルターに
設定したカスタムインサイトの例です。アカウント ID をクリックして、対象アカウントの
kube-bench の結果を即座に確認できるようになります。

また単一アカウントで運用している場合でも、グループ化条件をリソース ID に設定すれば、
EKS クラスター毎の検出結果を一覧化するといった使い方も可能です。
複数アカウントやクラスターを運用している環境では、カスタムインサイトの活用で
より結果を管理しやすくなるのでおすすめです。
参考
Integrating kube-bench with AWS Security Hub
https://github.com/aquasecurity/kube-bench/blob/master/docs/asff.md
Managing custom insights
https://docs.aws.amazon.com/securityhub/latest/userguide/securityhub-custom-insights.html
以上です。
参考になれば幸いです。