Ruby on Railsで複数のモデル、複数のレコードを1つのフォームで一括登録/編集したい、Javascriptはあまり書かずに...という機会があったので、その実装について今回まとめてみました。
完成イメージ
- レシピのレコードと材料のレコードを同時に作成/編集できること
- 材料レコードは一括で複数作成/編集できること
この記事を終えると、こんなアプリが出来るようになります。
前提
バージョン
- ruby 2.7.2
- rails 6.1
扱うモデル
- Recipe(レシピ) Model
- Ingredient(材料) Model
レシピは複数の材料を持っている
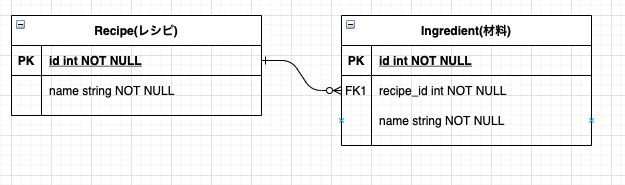
このような構成はすでに出来ている状態から始めます。具体的なmodelは以下を参考。
app/models/recipe.rb
# == Schema Information
#
# Table name: recipes
#
#  id         :integer          not null, primary key
#  name       :string           not null
#  created_at :datetime         not null
#  updated_at :datetime         not null
#
class Recipe < ApplicationRecord
  has_many :ingredients, dependent: :destroy
end
app/models/ingredient.rb
# == Schema Information
#
# Table name: ingredients
#
#  id         :integer          not null, primary key
#  recipe_id  :integer          not null
#  name       :string           not null
#  created_at :datetime         not null
#  updated_at :datetime         not null
#
# Indexes
#
#  index_ingredients_on_recipe_id  (recipe_id)
#
# Foreign Keys
#
#  recipe_id  (recipe_id => recipes.id)
#
class Ingredient < ApplicationRecord
  belongs_to :recipe
end
手順
さてここから、完成を目指して一つずつ手順を記していきます
1. accepts_nested_attributes_forを追加
app/models/recipe.rbにaccepts_nested_attributes_forを追加します。
class Recipe < ApplicationRecord
  has_many :ingredients, dependent: :destroy
  # ↓追加
  accepts_nested_attributes_for :ingredients, allow_destroy: true, reject_if: :all_blank
end
参考:ActiveRecord::NestedAttributes::ClassMethods
2. cocoonを追加
cocoonとは、複数レコードをインタラクティブに追加、編集、削除を簡単に行うことが出来るようにするGem, Packageです
-
Gemのcocoonをインストール
↓のようにGemfileにcocoonを追加して
bundle installしますgem "cocoon" -
cocoonのpackage追加
yarn add @nathanvda/cocoon -
app/javascripts/packs/application.js の編集
import Rails from "@rails/ujs"
import Turbolinks from "turbolinks"
import * as ActiveStorage from "@rails/activestorage"
import "channels"
// これを追加
import "@nathanvda/cocoon"
Rails.start()
Turbolinks.start()
ActiveStorage.start()
### 3. jqueryを使えるようにする

1.  config/webpack/plugins/jquery.jsを作成

    ```sh
$ bundle exec rails webpack:install
$ mkdir config/webpack/plugins/
$ touch config/webpack/plugins/jquery.js
-
config/webpack/plugins/jquery.jsに以下を記述
const { environment } = require('@rails/webpacker')
const jquery = require('./plugins/jquery')
environment.plugins.prepend('jquery', jquery)
module.exports = environment
3. config/webpack/environment.js でjqueryを読み込む

    ```js
const { environment } = require('@rails/webpacker')
const jquery = require('./plugins/jquery')
environment.plugins.prepend('jquery', jquery)
module.exports = environment
4. RecipeController作成とRoutesを設定
-
bundle exec rails g controller recipesでController作成
$ bundle exec rails g controller recipes
Running via Spring preloader in process 38240
create app/controllers/recipes_controller.rb
invoke erb
create app/views/recipes
invoke test_unit
create test/controllers/recipes_controller_test.rb
invoke helper
create app/helpers/recipes_helper.rb
invoke test_unit
invoke assets
invoke scss
create app/assets/stylesheets/recipes.scss
2. config/routes.rbにrecipeのpathを追加

    ```ruby
    Rails.application.routes.draw do
      root "recipes#index"
      resources :recipes, only: [:index, :new, :create]
    end
5. Recipeの一覧ページを作成
-
app/controller/recipes_controller.rbにindexアクション追加
class RecipesController < ApplicationController
def index
@recipes = Recipe.all
end
end
2. Recipeの一覧ページを作成

```shell
$ touch app/views/recipes/index.html.erb
<h1>レシピ一覧</h1>
<ul>
<% @recipes.each do |recipe| %>
<li><%= link_to recipe.name, edit_recipe_path(recipe) %></li>
<ul>
<% recipe.ingredients.each do |ingredient| %>
<li><%= ingredient.name %></li>
<% end %>
</ul>
<% end %>
</ul>
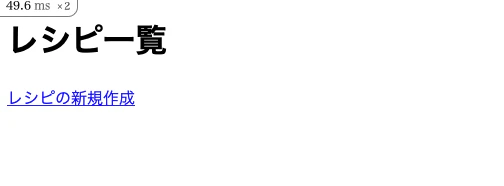
<%= link_to "レシピの新規作成", new_recipe_path %>
するとこんなページが出来上がります
6. Recipeの新規作成ページを作成
-
app/controller/recipes_controller.rbにnewアクション追加
class RecipesController < ApplicationController
~~ 省略 ~~~
def new
@recipe = Recipe.new
end
end
2. app/views/recipes/new.html.erb を作成

     ```shell
$ touch app/views/recipes/new.html.erb
<h1>レシピの新規作成</h1>
<%= render "recipes/form", model: @recipe %>
-
app/views/recipes/_form.html.erbを作成
$ touch app/views/recipes/_form.html.erb
    ```erb
    <%= form_with model: model do |form| %>
      <div>
        <%= form.label :name, "レシピ名" %>
        <%= form.text_field :name %>
     </div>
     <div id="ingredients">
       <%= link_to_add_association '材料の追加', form, :ingredients,
         data: { association_insertion_method: 'append' } %>
       <%= form.fields_for :ingredients do |ingredient| %>]
         <%# ファイル名はingredient_fieldsにしてください %>
         <%= render "recipes/ingredient_fields", f: ingredient %>
       <% end %>
      </div>
      <%= form.submit "作成する" %>
  <% end %>
-
app/views/recipes/_ingredient_fields.html.erbを作成
$ touch app/views/recipes/_ingredient_fields.html.erb
```ruby
<div class="nested-fields">
  <%= f.label :name, "材料名" %>
  <%= f.text_field :name %>
  <%= link_to_remove_association "削除", f %>
</div>
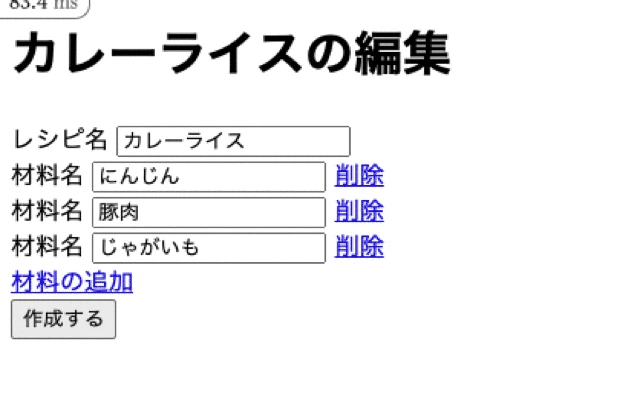
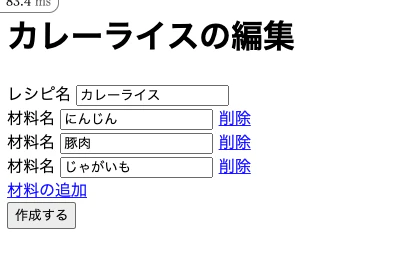
ここまで行うと、以下のような画面になります

7. レシピ、材料の作成(Create)アクションを作成
class RecipesController < ApplicationController

  def new
    @recipe = Recipe.new
  end
  # ここから
  def create
    @recipe = Recipe.new
    if @recipe.update(recipe_params)
      redirect_to root_path
    else
      render :new
    end
  end

  private

  def recipe_params
    # :idがないと毎回新しくレコードが作られてしまいます
    # :_destroyがないと削除ができないです
    params.require(:recipe).permit(:name, ingredients_attributes: [:id, :name, :_destroy])
  end
  # ここまで追加
end
createアクションの追加が完了すると、レシピと材料を一括で作成してDBに保存する処理まで出来るようになります!
8. レシピの編集ページを作成
-
app/views/recipes/edit.html.erbの作成
$ touch app/views/recipes/edit.html.erb
2. app/views/recipes/edit.html.erbの編集

    ```erb
<h1><%= @recipe.name %>の編集</h1>
<%= render "recipes/form", model: @recipe %>
- app/controllers/recipes_controller.rbの編集
class RecipesController < ApplicationController
~~ 省略 ~~
  def edit
    @recipe = Recipe.find(params[:id])
  end
~~ 省略 ~~
end
こんなページが出来上がります
9. レシピのupdateアクションを作成
app/controllers/recipes_controller.rbにupdateアクションを追加
class RecipesController < ApplicationController
~~ 省略 ~~
  def update
    @recipe = Recipe.find(params[:id])
    if @recipe.update(recipe_params)
      redirect_to root_path
    else
      render :edit
    end
  end
~~ 省略 ~~
end
これで一括の更新もできるようになりました!
終わりに
長かったですが、これで以上になります。
あまりJavaScriptを書かずに動的にフォームの追加や削除をしたいということがあったので、今回のような実装について書きました。
同じようなことがあればぜひご参考ください!