今回の制作物
Githubのリポジトリ
実装する機能
- 商品一覧を表示(Top画面)

- ログイン・ログアウト機能(Contact画面)

- カートに追加(Cart画面)

- 小計&合計金額の表示(Cart画面)

参考にした動画
注意事項
開発環境
- OS: windows10
- エディター: VScode
- ターミナル: Bash
- node.jsのバージョン: v18.17.0
今回は、初学者向けということで、TypeScriptではなく、JavaScriptで記述しています。
(TypeScriptに慣れている方は是非、TypeScriptで書いてみることをおススメします!)
今回はNext.js のロジック部分に焦点を当てるため、デザイン部分の解説は省略しております。
CSSのコードは下記のように折りたたんでいます。
CSSのコード
h1 {
    color:red;
}
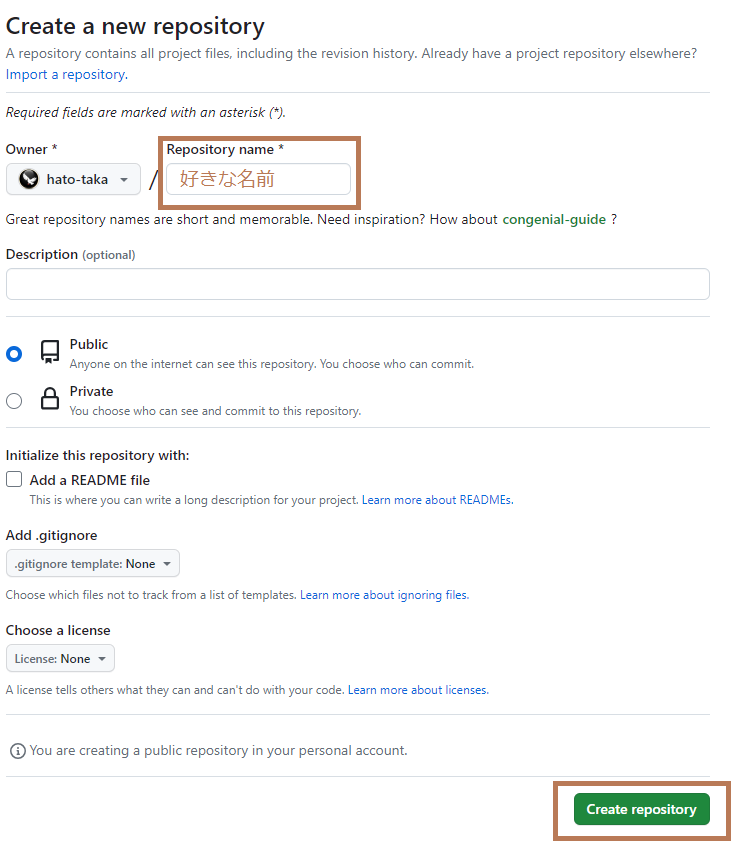
Step1: vercelでデプロイの環境を整える
① githubでリポジトリの作成
② ターミナルで npx create-next-app を実行
設定は以下の通りにしました。
今回は、srcフォルダを作成します。
√ What is your project named? ... shopping-cart
√ Would you like to use TypeScript? ... No
√ Would you like to use ESLint? ... Yes
√ Would you like to use Tailwind CSS? ... No
√ Would you like to use `src/` directory? ... Yes
√ Would you like to use App Router? (recommended) » Yes
√ Would you like to customize the default import alias (@/*)? » No
③Vercelにログイン
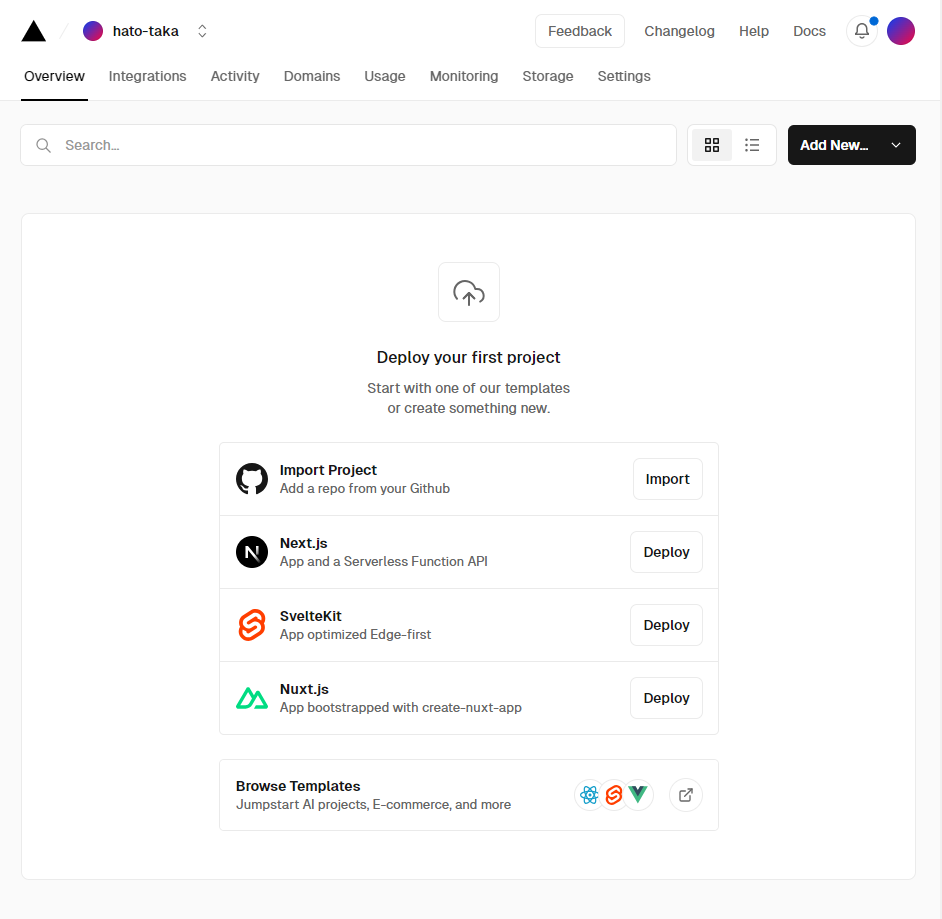
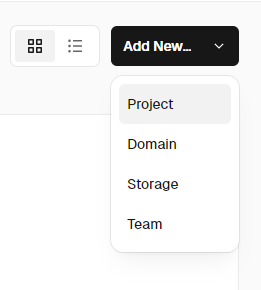
④プロジェクトを新規作成
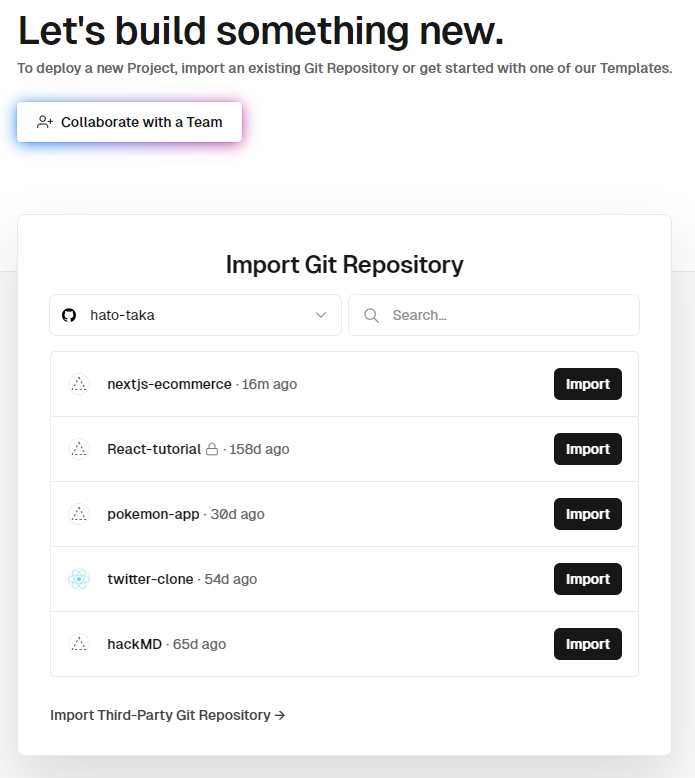
⑤Githubと連携
⑥buildが自動で開始する

Step2: App routingの設定
appフォルダの直下に、ページごとのフォルダを作成する。
今回は、cartページとcontactページを作成する。
各ページの直下に、page.jsxを作成する。
└─app
    │  favicon.ico
    │  globals.css
    │  layout.js
    │  page.js
    │
    ├─cart
    │      page.jsx
    │
    └─contact
            page.jsx
import React from "react";

const Cart = () => {
  return <div>Cart</div>;
};

export default Cart;
import React from "react";

const Contact = () => {
  return <div>Contact</div>;
};

export default Contact;
npm run dev でサーバーを起動し、
http://localhost:3000/cart にアクセスすると、「Cart」と表示されればOK!
(念のため、http://localhost:3000/contact にアクセスして「Contact」と表示されるか確認しましょう)
navigation の設定
componentsフォルダを作成し、navbar.jsxとnavbar.cssを作成する。
└─app
    ├─cart
    ├─components
    │      navbar.css
    │      navbar.jsx
    └─contact
import Link from "next/link";
import React from "react";
import "./navbar.css";

function Navbar() {
  return (
    <div className="navbar">
      <div className="links">
        <Link href="/">Shop</Link>
        <Link href="/contact">Contact</Link>
        <Link href="/cart">Cart</Link>
      </div>
    </div>
  );
}

export default Navbar;
※CSSのコードは、折りたたんでいます
navbar.css
.navbar {
  width: 100%;
  height: 80px;
  background-color: rgb(19, 19, 19);
  display: flex;
  justify-content: flex-end;
  align-items: center;
}

.links {
  margin-right: 50px;
  display: flex;
  align-items: center;
}

.links a {
  text-decoration: none;
  color: white;
  margin-left: 20px;
  font-size: 25px;
}
src/app/layout.js にnavbarコンポーネントを追加する
import { Inter } from 'next/font/google'
import './globals.css'
+ import Navbar from './components/navbar'

const inter = Inter({ subsets: ['latin'] })

export const metadata = {
  title: 'Create Next App',
  description: 'Generated by create next app',
}

export default function RootLayout({ children }) {
  return (
    <html lang="en">
      <body className={inter.className}>
+        <Navbar />
        {children}
      </body>
    </html>
  )
}
Step3 HOME画面の作成
今回は、下記の無料のAPIを使用して、商品データを取得します。
※先頭にuse client をつけることを忘れずに!
useEffectやuseStateなどのHooksを利用する場合は、CSR(クライアントサイドレンダリング)をする必要があるため
"use client";
import React, { useEffect, useState } from "react";

function Shop() {
  const [items, setItems] = useState([]);

  useEffect(() => {
    fetch("https://fakestoreapi.com/products")
      .then((res) => res.json())
      .then((json) => {
        console.log(json);
        setItems(json);
      });
  }, []);

  return (
    <div className="shop">
      <div className="shopTitle">
        <h1>E-commerce Shop</h1>
      </div>

      <div className="products">
        {items.map((item) => (
          <div key={item.id}>
            <p>{item.id}</p>
            <p>{item.title}</p>
            <p>{item.price}</p>
            <p>{item.category}</p>
            <p>{item.description}</p>
            <img src={item.image} />
          </div>
        ))}
      </div>
    </div>
  );
}

export default Shop;
+ import Shop from './components/shop'

export default function Home() {
  return (
    <main>
+      <Shop />
    </main>
  )
}
Step4 Home画面をスタイリング
Home画面にCSSを当てて、レイアウトを整えていきます。
shop.jsxにclassNameを追加して、CSSで定義していきます。
"use client";
import React, { useEffect, useState } from "react";
+ import "./shop.css";

function Shop() {
  const [items, setItems] = useState([]);

  useEffect(() => {
    fetch("https://fakestoreapi.com/products")
      .then((res) => res.json())
      .then((json) => {
        console.log(json);
        setItems(json);
      });
  }, []);

  return (
    <div className="shop">
      <div className="shopTitle">
        <h1>E-commerce Shop</h1>
      </div>

      <div className="products">
        {items.map((item) => (
+          <div key={item.id} className="product">
+            <div className="content">
+              <p className="title">
+                {item.id}. {item.title}
+              </p>
+              <img src={item.image} alt={item.title} className="image" />
+              <p className="price">${item.price}</p>
+              <p className="description">{item.description}</p>
+              <p className="category">{item.category}</p>
+            </div>
+            <button className="addToCartBtn">ADD</button>
+          </div>
        ))}
      </div>
    </div>
  );
}

export default Shop;
shop.css のコード
.shopTitle {
  margin-top: 100px;
  text-align: center;
  font-size: 40px;
}

.products {
  width: 100%;
  height: auto;
  margin: auto;
  display: grid;
  grid-template-columns: 1fr 1fr 1fr;
  place-items: start;
}

.product {
  border-radius: 15px;
  width: 300px;
  height: fit-content;
  margin: 50px auto;
  display: flex;
  flex-direction: column;
  justify-content: center;
  align-items: center;
}

.content {
  display: flex;
  flex-direction: column;
  justify-content: flex-start;
  margin-bottom: 10px;
}

.image {
  max-width: 100%;
  max-height: 300px;
  object-fit: contain;
  transition: 0.3s;
  margin: 50px auto;
}

.title {
  font-size: 1.2em;
  font-weight: bold;
}

.content {
  text-align: center;
}

.description {
  font-style: italic;
  font-size: 0.8em;
  margin: 15px auto;
  text-align: left;
}

.price {
  font-weight: bold;
  font-size: 2em;
}

.category {
  background-color: darkblue;
  color: white;
  border-radius: 100px;
  width: fit-content;
  padding: 2px 10px;
}

.image:hover {
  transform: scale(1.2);
  position: relative;
}

.product:hover {
  transition: 0.3s ease-in;
}

.title:hover,
.image:hover {
  cursor: pointer;
}

.addToCartBtn {
  background-color: transparent;
  border: 2px solid rgb(19, 19, 19);
  min-width: 100px;
  padding-left: 10px;
  padding-right: 10px;
  padding-top: 5px;
  padding-bottom: 5px;
  border-radius: 15px;
  transition: 0.3s;
}

.addToCartBtn:hover {
  background-color: rgb(19, 19, 19);
  color: white;
  cursor: pointer;
}
Step5 Contactページの作成
Contactページを作成していきます。
ログイン状態によって、画面表示が切り替わるようにuseStateを使っていきます。
"use client";

import React, { useState } from "react";
import "./contact.css";

const Contact = () => {
  const [username, setUsername] = useState("");
  const [password, setPassword] = useState("");
  const [isLogin, setIsLogin] = useState(false);

  const handleUsername = (e) => {
    setUsername(e.target.value);
  };

  const handlePassword = (e) => {
    setPassword(e.target.value);
  };

  const handleLogin = () => {
    if (username === "" || password === "") return;
    setIsLogin(true);
  };

  const handleLogout = () => {
    setUsername("");
    setPassword("");
    setIsLogin(false);
  };

  return (
    <div className="wrapper">
      <div className="content">
        {isLogin ? (
          <button className="button" onClick={handleLogout}>
            logout
          </button>
        ) : (
          <>
            <div className="input">
              ユーザー名:
              <input
                type="text"
                name="username"
                id="username"
                className="username"
                onChange={handleUsername}
              />
            </div>
            <div className="input">
              パスワード:
              <input
                type="password"
                name="password"
                id="password"
                className="password"
                onChange={handlePassword}
              />
            </div>
            <button className="button" onClick={handleLogin}>
              login
            </button>
          </>
        )}
      </div>
    </div>
  );
};

export default Contact;
contact.css
.wrapper {
  display: flex;
  align-items: center;
  height: 90vh;
}

.content {
  width: fit-content;
  margin: auto;
  text-align: center;
}

.input {
  margin: 10px auto;
}

.username,
.password {
  display: inline-block;
  margin-left: 5px;
  padding: 2.5px 5px;
}

.button {
  font-weight: bold;
  padding: 5px;
}
Step6 Cartページの作成
Cartページを作成していきます。
まずは、レイアウトを整えたいので、画像などのデータは仮で入れています
import React from "react";
import "./cart.css";

const Cart = () => {
  return (
    <div className="cart">
      <div>
        <h1>カートの商品</h1>
      </div>
      <div className="cart">
        <div className="cartItem">
          <img src="https://fakestoreapi.com/img/81fPKd-2AYL._AC_SL1500_.jpg" />
          <div className="description">
            <p>
              <b>name</b>
            </p>
            <p>price</p>
            <div className="countHandler">
              <button> - </button>
              <input value={"1"} />
              <button> + </button>
            </div>
          </div>
        </div>
      </div>

      <div className="checkout">
        <p>小計: xxxx</p>
        <button>買い物を続ける</button>
        <button>チェックアウト</button>
      </div>
    </div>
  );
};

export default Cart;
cart.css
.cart {
  display: flex;
  flex-direction: column;
  justify-content: center;
  align-items: center;
  margin-top: 30px;
}

.cartItem {
  width: 700px;
  height: 250px;
  display: flex;
  align-items: center;
  box-shadow: 0px 3px 15px rgba(0, 0, 0, 0.2);
  border-radius: 25px;
  margin: 30px;
  padding: 20px;
}

.cartItem img {
  width: 200px;
  max-height: 90%;
  object-fit: contain;
}

.cartItem .description {
  width: 100%;
  font-size: 30px;
  padding-left: 20px;
}

.cartItemTitle {
  font-weight: bold;
  font-size: 18px;
  margin-bottom: 10px;
}

.countHandler input {
  width: 40px;
  text-align: center;
  font-weight: bolder;
  margin: 0 5px;
}

.countHandler button {
  padding: 0 0.5em;
}

.subtotal {
  margin-top: 20px;
  font-size: 24px;
}

.total {
  font-size: 36px;
}

.checkout button {
  width: 150px;
  height: 50px;
  background-color: rgb(19, 19, 19);
  color: white;
  border: none;
  border-radius: 8px;
  margin: 10px;
  cursor: pointer;
}
Step7 【重要!】useContextで状態管理
srcフォルダの直下にcontextフォルダを作成し、
shop-context.jsを作成します
useContextの詳しい使い方は、下記の記事を参照ください!
 └─src
     ├─app
     │  ├─cart
     │  ├─components
     │  └─contact
+    └─context
"use client"
import { createContext, useState } from "react";

// グローバルなpropsを定義し、初期値を渡す
export const ShopContext = createContext(null);

// カート内の商品の初期状態を生成
const getDefaultCart = () => {
  const productsLength = 20;
  let cart = {};
  for (let i = 1; i < productsLength + 1; i++) {
    cart[i] = 0;
  }
  return cart;
}

export const ShopContextProvider = (props) => {
  const [cartItems, setCartItems] = useState(getDefaultCart());

  const getTotalCartAmount = () => {
    let totalAmount = 0;
    for (const item in cartItems) {
      if (cartItems[item] > 0) {
        let itemInfo = items.find((product) => product.id === Number(item));
        totalAmount += cartItems[item] * itemInfo.price;
      }
    }
    return totalAmount;
  };

  const addToCart = (itemId) => {
    setCartItems((prev) => ({ ...prev, [itemId]: prev[itemId] + 1 }));
  };

  const removeFromCart = (itemId) => {
    setCartItems((prev) => ({ ...prev, [itemId]: prev[itemId] - 1 }));
  };

  const updateCartItemCount = (newAmount, itemId) => {
    setCartItems((prev) => ({ ...prev, [itemId]: newAmount }));
  };

  const checkout = () => {
    setCartItems(getDefaultCart());
  };

  const contextValue = {
    cartItems,
    getTotalCartAmount,
    addToCart,
    removeFromCart,
    updateCartItemCount,
    checkout
  };
  return (
    <ShopContext.Provider value={contextValue}>
      {props.children}
    </ShopContext.Provider>
  )
}
layout.jsにProviderを渡す
全体をShopContextProviderで囲む
import { Inter } from 'next/font/google'
import './globals.css'
import Navbar from './components/navbar'
+ import { ShopContextProvider } from '@/context/shop-context'


const inter = Inter({ subsets: ['latin'] })

export const metadata = {
  title: 'Create Next App',
  description: 'Generated by create next app',
}

export default function RootLayout({ children }) {
  return (
    <html lang="en">
      <body className={inter.className}>
+        <ShopContextProvider>
           <Navbar />
           {children}
+        </ShopContextProvider>
      </body>
    </html>
  )
}
Shopコンポーネントを切り分けて、 Itemコンポーネントを作る
"use client";
import React, { useEffect, useState } from "react";
import "./shop.css";
+ import Item from "./item";

function Shop() {
  const [items, setItems] = useState([]);

  useEffect(() => {
    fetch("https://fakestoreapi.com/products")
      .then((res) => res.json())
      .then((json) => {
        console.log(json);
        setItems(json);
      });
  }, []);

  return (
    <div className="shop">
      <div className="shopTitle">
        <h1>E-commerce Shop</h1>
      </div>

      <div className="products">
        {items.map((item) => (
+          <Item
+            id={item.id}
+            title={item.title}
+            image={item.image}
+            price={item.price}
+            description={item.description}
+            category={item.category}
+            key={item.id}
+          />
        ))}
      </div>
    </div>
  );
}

export default Shop;
shop.jsxよりpropsを受け取り、Itemコンポーネントを作成します。
"use client";
import React from "react";

function Item({ id, title, image, price, description, category }) {
  return (
    <div key={id} className="product">
      <div className="content">
        <p className="title">
          {id}. {title}
        </p>
        <img src={image} alt={title} className="image" />
        <p className="price">${price}</p>
        <p className="description">{description}</p>
        <p className="category">{category}</p>
      </div>
      <button className="addToCartBtn">ADD</button>
    </div>
  );
}

export default Item;
Step8 カートボタンの実装
Itemコンポーネントにカートボタンを実装していきます
useContextを使い、グローバル状態変数を取得していきます
なお、propsはオブジェクトとして、一つにまとめて定数宣言する方法に変更しています。
const { id, title, image, price, description, category } = props;
"use client";
+ import { ShopContext } from "@/context/shop-context";
+ import React, { useContext } from "react";

function Item(props) {
  const { id, title, image, price, description, category } = props;
+  const { addToCart, cartItems } = useContext(ShopContext);
+  const cartItemCount = cartItems[id];

  return (
    <div key={id} className="product">
      <div className="content">
        <p className="title">
          {id}. {title}
        </p>
        <img src={image} alt={title} className="image" />
        <p className="price">${price}</p>
        <p className="description">{description}</p>
        <p className="category">{category}</p>
      </div>
+      <button className="addToCartBtn" onClick={() => addToCart(id)}>
+        カートに追加する {cartItemCount > 0 && <span>({cartItemCount}個)</span>}
+      </button>
    </div>
  );
}

export default Item;
Step9 カートのロジックの実装
仮で入れていたデータをuseContextを使って実装していきます
カート内の商品を、cartItemコンポーネントに切り分けて実装します。
data属性を使って、cartItemコンポーネントにpropsを渡します
+ "use client";

+ import React, { useContext } from "react";
  import "./cart.css";
+ import CartItem from "./cartItem";
+ import { ShopContext } from "@/context/shop-context";

const Cart = () => {
+  const { items, cartItems } = useContext(ShopContext);

  return (
    <div className="cart">
      <div>
        <h1>カートの商品</h1>
      </div>
      <div className="cart">
+        {items.map((item) => {
+          if (cartItems[item.id] !== 0) {
+            return <CartItem data={item} />;
+          }
+        })}
      </div>

      <div className="checkout">
        <p>小計: xxxx</p>
        <button>買い物を続ける</button>
        <button>チェックアウト</button>
      </div>
    </div>
  );
};

export default Cart;
"use client";
import { ShopContext } from "@/context/shop-context";
import React, { useContext } from "react";

function CartItem(props) {
  const { id, title, image, price } = props.data;
  const { cartItems, addToCart, removeFromCart, updateCartItemCount } =
    useContext(ShopContext);

  return (
    <div className="cartItem">
      <img src={image} />
      <div className="description">
        <p className="cartItemTitle">{title}</p>
        <p>$ {price}</p>
        <div className="countHandler">
          <button onClick={() => removeFromCart(id)}> - </button>
          <input
            value={cartItems[id]}
            onChange={(e) => updateCartItemCount(Number(e.target.value), id)}
          />
          <button onClick={() => addToCart(id)}> + </button>
        </div>
      </div>
    </div>
  );
}

export default CartItem;
Step10 合計金額の表示&カートを空にする機能の実装
"use client";

import React, { useContext } from "react";
import "./cart.css";
import CartItem from "./cartItem";
import { ShopContext } from "@/context/shop-context";

const Cart = () => {
+ const { items, cartItems, getTotalCartAmount, checkout } =
    useContext(ShopContext);
+ // 小数点第2位で四捨五入
+ const totalAmount = Math.round(getTotalCartAmount() * 100) / 100;

  return (
    <div className="cart">
      <div>
        <h1>カートの商品</h1>
      </div>
      <div className="cart">
        {items.map((item) => {
          if (cartItems[item.id] !== 0) {
            return <CartItem data={item} key={item.id} />;
          }
        })}
      </div>

+      {totalAmount > 0 ? (
+        <div className="checkout">
+          <p className="total">合計: ${totalAmount}</p>
+          <button
+            onClick={() => {
+              checkout();
+            }}
+          >
+            カートを空にする
+          </button>
+        </div>
+     ) : (
+       <h1> cart is empty</h1>
+     )}
    </div>
  );
};

export default Cart;
"use client";
import { ShopContext } from "@/context/shop-context";
import React, { useContext } from "react";

function CartItem(props) {
  const { id, title, image, price } = props.data;
  const { cartItems, addToCart, removeFromCart, updateCartItemCount } =
    useContext(ShopContext);

  return (
    <div className="cartItem">
      <img src={image} />
      <div className="description">
        <p className="cartItemTitle">{title}</p>
        <p>$ {price}</p>
        <div className="countHandler">
          <button onClick={() => removeFromCart(id)}> - </button>
          <input
            value={cartItems[id]}
            onChange={(e) => updateCartItemCount(Number(e.target.value), id)}
          />
          <button onClick={() => addToCart(id)}> + </button>
        </div>
+        <p className="subtotal">小計: ${price * cartItems[id]}</p>
      </div>
    </div>
  );
}

export default CartItem;
完成です!!
まとめ
いかがだったでしょうか?
Next.jsを使えば、ショッピングサイトが手軽に作れ、デプロイまで簡単にできます。
ログイン機能の追加など、是非、アレンジしてみてください!
分からない点やご不明な点がございましたら、お気軽に質問投稿ください!
なるべく答えるようにいたします!
さいごに
弊社では、エンジニア積極採用中です!!
株式会社ワクトで、あなたの「ワクワク」を仕事にしませんか?