はじめに
この記事は「自宅サーバー構築記録」の一部です。
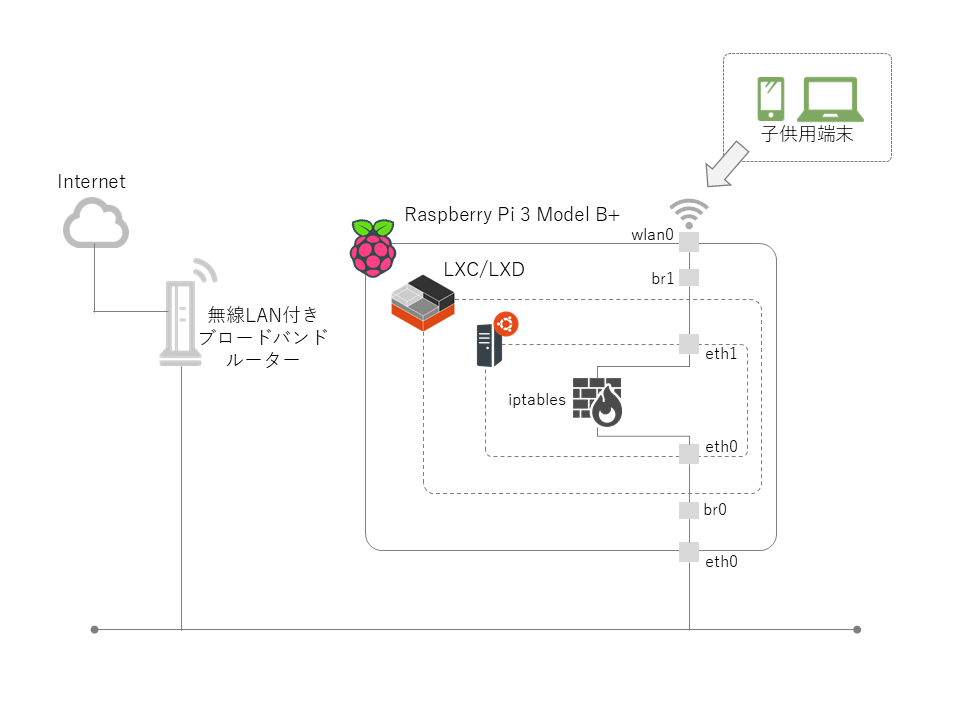
今回は Raspberry Pi 3 Model B+ を無線AP化して、iptables という Linux の Firewall を使って子供たちのインターネット接続を制御しようという試みです。
構成図
やったこと
Raspberry Pi 3 Model B+ を無線AP化する
hostapd をインストール
pi@raspberrypi:~ $
pi@raspberrypi:~ $ sudo apt install hostapd -y
pi@raspberrypi:~ $
hostapdの設定
とりあえず最低限の設定
pi@raspberrypi:~ $
pi@raspberrypi:~ $ sudo cat /etc/hostapd/hostapd.conf
##### hostapd configuration file ##############################################
interface=wlan0
bridge=br1
 :
##### IEEE 802.11 related configuration #######################################
ssid=**********
country_code=JP
channel=5 ← チャンネルは既存のWifiと重複しないように
 :
##### WPA/IEEE 802.11i configuration ##########################################
wpa=2
wpa_passphrase=**********
 :
pi@raspberrypi:~ $
hostapd を起動。
pi@raspberrypi:~ $
pi@raspberrypi:~ $ sudo systemctl start hostapd
Failed to start hostapd.service: Unit hostapd.service is masked.
pi@raspberrypi:~ $
pi@raspberrypi:~ $ sudo systemctl umask hostapd
Unknown operation umask.
pi@raspberrypi:~ $
pi@raspberrypi:~ $ sudo systemctl start hostapd
pi@raspberrypi:~ $
pi@raspberrypi:~ $ sudo systemctl enable hostapd
pi@raspberrypi:~ $
無線LANインターフェース(wlan0)をブリッジ接続する
有線LANインターフェース(eth0)のブリッジは「Raspberry Pi 3 Model B+ に lxc/lxd でコンテナ環境を構築した件」で作成済み
pi@raspberrypi:~ $
pi@raspberrypi:~ $ sudo vi /etc/network/interfaces
 :
auto br1
iface br1 inet manual
    bridge_ports wlan0
    bridge_stp off
 :
pi@raspberrypi:~ $
DHCPを無効化し固定IPを割り当てる
/etc/network/interfaces に記述しても動作するが /etc/dhcpcd.conf に記述するように注意書きがしてあるのでそれに従って設定する。
参考:「Raspbian jessie で bridge する備忘録」
pi@raspberrypi:~ $
pi@raspberrypi:~ $ sudo vi /etc/dhcpcd.conf
 :
denyinterfaces eth0 wlan0
 :
interface br1
static ip_address=192.168.133.12/24
 :
pi@raspberrypi:~ $
再起動して確認
pi@raspberrypi:~ $
pi@raspberrypi:~ $ sudo reboot
pi@raspberrypi:~ $

pi@raspberrypi:~ $
pi@raspberrypi:~ $ ip add show wlan0
4: wlan0: <BROADCAST,MULTICAST,UP,LOWER_UP> mtu 1500 qdisc pfifo_fast master br1 state UP group default qlen 1000
    link/ether b8:27:eb:f5:4e:d8 brd ff:ff:ff:ff:ff:ff
pi@raspberrypi:~ $
pi@raspberrypi:~ $ ip add show br1
5: br1: <BROADCAST,MULTICAST,UP,LOWER_UP> mtu 1500 qdisc noqueue state UP group default qlen 1000
    link/ether b8:27:eb:f5:4e:d8 brd ff:ff:ff:ff:ff:ff
    inet 192.168.133.12/24 brd 192.168.13.255 scope global br1
       valid_lft forever preferred_lft forever
    inet6 fe80::1404:2bff:fe4b:3a85/64 scope link
       valid_lft forever preferred_lft forever
pi@raspberrypi:~ $
pi@raspberrypi:~ $ sudo brctl show
bridge name     bridge id               STP enabled     interfaces
br0             8000.b827eba01b8d       no              eth0
br1             8000.b827ebf54ed8       no              wlan0
pi@raspberrypi:~ $
LXCコンテナを作る
pi@raspberrypi:~ $
pi@raspberrypi:~ $ lxc launch images:ubuntu/16.04 firewall
pi@raspberrypi:~ $
コンテナにアタッチして iptables と iptables-persistent をインストール
iptables は firewall 本体
iptables-persistent は firewall の設定を保存するために必要
pi@raspberrypi:~ $
pi@raspberrypi:~ $ lxc exec firewall  /bin/bash
root@firewall:~#
root@firewall:~# apt install iptables iptables-persistent
root@firewall:~#
root@firewall:~#
root@firewall:~# ls -al /etc/iptables/
total 12
drwxr-xr-x  2 root root 4096 May 22 07:14 .
drwxr-xr-x 69 root root 4096 May 22 07:14 ..
-rw-r--r--  1 root root  187 May 22 07:14 rules.v4
root@firewall:~#
root@firewall:~#
root@firewall:~# cat /etc/iptables/rules.v4
# Generated by iptables-save v1.6.0 on Wed May 22 07:14:08 2019
*filter
:INPUT ACCEPT [6:1964]
:FORWARD ACCEPT [0:0]
:OUTPUT ACCEPT [3:197]
COMMIT
# Completed on Wed May 22 07:14:08 2019
root@firewall:~#
root@firewall:~# iptables -L
Chain INPUT (policy ACCEPT)
target     prot opt source               destination

Chain FORWARD (policy ACCEPT)
target     prot opt source               destination

Chain OUTPUT (policy ACCEPT)
target     prot opt source               destination
root@firewall:~#
root@firewall:~# exit
pi@raspberrypi:~ $