目次
1ネットワーク設計
2.EC2構築と各種インストール
3ドメイン周り設定
4.セキュリティ設定
5.コスト低減
6.参考文献
2.アプリサーバ側設定
下図の要領・手順でEC2の構築と各種インストールを行います。
- EC2構築
- Apacheインストール
- PHPインストール
- Gitインストール
- Homebrewインストール
- Bootstrapインストール
- MySQLクライアントインストール
- タイムゾーン設定
- ドキュメントルートのファイルパーミッション設定
- EC2へIAMロール「S3Access(ポリシー「S3FullAccess」)」付与
- クライアント端末へAWS CLI設定

2-1.EC2構築
①OS-Amazon Linux2

②インスタンスタイプ-t2.medium
キーペアを新規作成します。
その他の値はデフォルトで作成します。


③キーペアのパーミッションはデフォルトで使うと権限の設定が適切でないと拒絶されます。権限を解放しすぎても適切でないと拒絶されますが"600"がいい塩梅だそうです。
➜  terminal-default-start
➜  terminal-default-start
➜  terminal-default-start ssh -i EC2_Stockproduct_key.pem ec2-user@35.79.219.27
The authenticity of host '35.79.219.27 (35.79.219.27)' can't be established.
ED25519 key fingerprint is SHA256:8yr3LAnWiFvx99FQccJYBaS6ZwsXblCvCrKUhRvK4ws.
This key is not known by any other names
Are you sure you want to continue connecting (yes/no/[fingerprint])? yes
Warning: Permanently added '35.79.219.27' (ED25519) to the list of known hosts.
@@@@@@@@@@@@@@@@@@@@@@@@@@@@@@@@@@@@@@@@@@@@@@@@@@@@@@@@@@@
@         WARNING: UNPROTECTED PRIVATE KEY FILE!          @
@@@@@@@@@@@@@@@@@@@@@@@@@@@@@@@@@@@@@@@@@@@@@@@@@@@@@@@@@@@
Permissions 0644 for 'EC2_Stockproduct_key.pem' are too open.
It is required that your private key files are NOT accessible by others.
This private key will be ignored.
Load key "EC2_Stockproduct_key.pem": bad permissions
ec2-user@35.79.219.27: Permission denied (publickey,gssapi-keyex,gssapi-with-mic).
➜  terminal-default-start
➜  terminal-default-start
➜  terminal-default-start chmod 644 EC2_Stockproduct_key.pem
➜  terminal-default-start
➜  terminal-default-start
➜  terminal-default-start ssh -i EC2_Stockproduct_key.pem ec2-user@35.79.219.27
@@@@@@@@@@@@@@@@@@@@@@@@@@@@@@@@@@@@@@@@@@@@@@@@@@@@@@@@@@@
@         WARNING: UNPROTECTED PRIVATE KEY FILE!          @
@@@@@@@@@@@@@@@@@@@@@@@@@@@@@@@@@@@@@@@@@@@@@@@@@@@@@@@@@@@
Permissions 0644 for 'EC2_Stockproduct_key.pem' are too open.
It is required that your private key files are NOT accessible by others.
This private key will be ignored.
Load key "EC2_Stockproduct_key.pem": bad permissions
ec2-user@35.79.219.27: Permission denied (publickey,gssapi-keyex,gssapi-with-mic).
➜  terminal-default-start
➜  terminal-default-start
➜  terminal-default-start
➜  terminal-default-start chmod 600 EC2_Stockproduct_key.pem
➜  terminal-default-start
➜  terminal-default-start ssh -i EC2_Stockproduct_key.pem ec2-user@35.79.219.27
   ,     #_
   ~\_  ####_        Amazon Linux 2
  ~~  \_#####\
  ~~     \###|       AL2 End of Life is 2025-06-30.
  ~~       \#/ ___
   ~~       V~' '->
    ~~~         /    A newer version of Amazon Linux is available!
      ~~._.   _/
         _/ _/       Amazon Linux 2023, GA and supported until 2028-03-15.
       _/m/'           https://aws.amazon.com/linux/amazon-linux-2023/

[ec2-user@ip-10-255-1-33 ~]$
[ec2-user@ip-10-255-1-33 ~]$
[ec2-user@ip-10-255-1-33 ~]$
2-2.apacheのインストール
➜  terminal-default-start ssh -i pf2-key.pem ec2-user@54.178.41.241
The authenticity of host '54.178.41.241 (54.178.41.241)' can't be established.
ED25519 key fingerprint is SHA256:zYHA3oNom8ELEmCQUGnBKbG5HJG2q1I5qL2LiGC+T9s.
This key is not known by any other names
Are you sure you want to continue connecting (yes/no/[fingerprint])? yes
Warning: Permanently added '54.178.41.241' (ED25519) to the list of known hosts.
  ,     #_
  ~\_  ####_        Amazon Linux 2
 ~~  \_#####\
 ~~     \###|       AL2 End of Life is 2025-06-30.
 ~~       \#/ ___
  ~~       V~' '->
   ~~~         /    A newer version of Amazon Linux is available!
     ~~._.   _/
        _/ _/       Amazon Linux 2023, GA and supported until 2028-03-15.
      _/m/'           https://aws.amazon.com/linux/amazon-linux-2023/

[ec2-user@ip-172-31-5-41 ~]$
[ec2-user@ip-172-31-5-41 ~]$
[ec2-user@ip-172-31-5-41 ~]$
[ec2-user@ip-172-31-5-41 ~]$ sudo yum install httpd
<略>
完了しました!
[ec2-user@ip-172-31-5-41 ~]$
[ec2-user@ip-172-31-5-41 ~]$
[ec2-user@ip-172-31-5-41 ~]$ systemctl status httpd
● httpd.service - The Apache HTTP Server
  Loaded: loaded (/usr/lib/systemd/system/httpd.service; disabled; vendor preset: disabled)
  Active: inactive (dead)
    Docs: man:httpd.service(8)
[ec2-user@ip-172-31-5-41 ~]$
[ec2-user@ip-172-31-5-41 ~]$ systemctl status httpd.service
● httpd.service - The Apache HTTP Server
  Loaded: loaded (/usr/lib/systemd/system/httpd.service; disabled; vendor preset: disabled)
  Active: inactive (dead)
    Docs: man:httpd.service(8)
[ec2-user@ip-172-31-5-41 ~]$
[ec2-user@ip-172-31-5-41 ~]$ sudo yum install httpd
読み込んだプラグイン:extras_suggestions, langpacks, priorities, update-motd
amzn2-core                                                                                                                                                                         | 3.6 kB  00:00:00
パッケージ httpd-2.4.58-1.amzn2.x86_64 はインストール済みか最新バージョンです
何もしません
[ec2-user@ip-172-31-5-41 ~]$
[ec2-user@ip-172-31-5-41 ~]$
[ec2-user@ip-172-31-5-41 ~]$ sudo systemctl start httpd.service
[ec2-user@ip-172-31-5-41 ~]$ systemctl status httpd.service
● httpd.service - The Apache HTTP Server
  Loaded: loaded (/usr/lib/systemd/system/httpd.service; disabled; vendor preset: disabled)
  Active: active (running) since 土 2024-03-16 12:46:13 UTC; 12s ago
    Docs: man:httpd.service(8)
Main PID: 3448 (httpd)
  Status: "Total requests: 0; Idle/Busy workers 100/0;Requests/sec: 0; Bytes served/sec:   0 B/sec"
  CGroup: /system.slice/httpd.service
          ├─3448 /usr/sbin/httpd -DFOREGROUND
          ├─3449 /usr/sbin/httpd -DFOREGROUND
          ├─3450 /usr/sbin/httpd -DFOREGROUND
          ├─3451 /usr/sbin/httpd -DFOREGROUND
          ├─3452 /usr/sbin/httpd -DFOREGROUND
          └─3453 /usr/sbin/httpd -DFOREGROUND

3月 16 12:46:13 ip-172-31-5-41.ap-northeast-1.compute.internal systemd[1]: Starting The Apache HTTP Server...
3月 16 12:46:13 ip-172-31-5-41.ap-northeast-1.compute.internal systemd[1]: Started The Apache HTTP Server.
[ec2-user@ip-172-31-5-41 ~]$
[ec2-user@ip-172-31-5-41 ~]$
[ec2-user@ip-172-31-5-41 ~]$ sudo systemctl enable httpd.service
Created symlink from /etc/systemd/system/multi-user.target.wants/httpd.service to /usr/lib/systemd/system/httpd.service.
[ec2-user@ip-172-31-5-41 ~]$
[ec2-user@ip-172-31-5-41 ~]$ systemctl list-unit-files -t service | grep httpd
httpd.service                                 enabled
[ec2-user@ip-172-31-5-41 ~]$
[ec2-user@ip-172-31-5-41 ~]$
2-3.php7.4のインストール
[ec2-user@ip-172-31-5-41 ~]$
[ec2-user@ip-172-31-5-41 ~]$ php -v
-bash: php: コマンドが見つかりません
[ec2-user@ip-172-31-5-41 ~]$
[ec2-user@ip-172-31-38-12 ~]$ sudo amazon-linux-extras enable php7.4
<略>
 42 *php7.4=latest            enabled      [ =stable ]
<略>
[ec2-user@ip-172-31-38-12 ~]$
[ec2-user@ip-172-31-38-12 ~]$ sudo yum install  php php-devel php-mbstring php-pdo php-gd php-mysqlnd php-cli php-common php-xml php-fpm php-json
<略>
完了しました!
[ec2-user@ip-172-31-38-12 ~]$
[ec2-user@ip-172-31-5-41 ~]$ php -v
PHP 7.4.33 (cli) (built: Dec 12 2023 14:32:04) ( NTS )
Copyright (c) The PHP Group
Zend Engine v3.4.0, Copyright (c) Zend Technologies
[ec2-user@ip-172-31-5-41 ~]$
[ec2-user@ip-172-31-5-41 ~]$ sudo touch /var/www/html/index.php
[ec2-user@ip-172-31-5-41 ~]$ sudo nano /var/www/html/index.php
index.phpを編集して、以下を記述
<?php phpinfo();
[ec2-user@ip-172-31-5-41 ~]$ cd /etc/httpd/conf
[ec2-user@ip-172-31-5-41 conf]$ ls
httpd.conf  magic
[ec2-user@ip-172-31-5-41 conf]$ sudo nano httpd.conf
※Directory indexのindex.htmlの後にindex.phpを追記します。
ファイルの編集後、httpd.serviceを再起動させます。
<IfModule dir_module>
    DirectoryIndex index.html index.php
</IfModule>

[ec2-user@ip-172-31-5-41 conf]$ sudo systemctl restart httpd.service
ブラウザでEC2のパブリックIPアドレスをURL欄に入力します。
phpのプログラミングで文字列操作をするため、mbstringが有効になっているか確認をします。

"Multibyte Support"が"enabled"になっているのを確認してください。
disabledであれば、以下の手順で有効化してください。
2-4.homebrewのインストール
インストール前にgitとec2-userのパスワード登録が必要とのこと
[root@ip-172-31-38-12 ~]#
[root@ip-172-31-38-12 ~]# sudo yum install git
<略>
Complete!
[root@ip-172-31-38-12 ~]#
[root@ip-172-31-38-12 ~]#
[root@ip-172-31-38-12 ~]# git version
git version 2.40.1
[root@ip-172-31-38-12 ~]#
[root@ip-172-31-38-12 ~]#
[root@ip-172-31-38-12 ~]#
[root@ip-172-31-38-12 ~]# client_loop: send disconnect: Broken pipe
➜  terminal-default-start
➜  terminal-default-start
➜  terminal-default-start ssh -i pf2-key.pem ec2-user@52.195.228.78
Last login: Wed Mar 20 13:15:09 2024 from softbank060106242141.bbtec.net
   ,     #_
   ~\_  ####_        Amazon Linux 2
  ~~  \_#####\
  ~~     \###|       AL2 End of Life is 2025-06-30.
  ~~       \#/ ___
   ~~       V~' '->
    ~~~         /    A newer version of Amazon Linux is available!
      ~~._.   _/
         _/ _/       Amazon Linux 2023, GA and supported until 2028-03-15.
       _/m/'           https://aws.amazon.com/linux/amazon-linux-2023/

7 package(s) needed for security, out of 12 available
Run "sudo yum update" to apply all updates.
[ec2-user@ip-172-31-38-12 ~]$
[ec2-user@ip-172-31-38-12 ~]$
[ec2-user@ip-172-31-38-12 ~]$
[ec2-user@ip-172-31-38-12 ~]$ sudo passwd ec2-user
ユーザー ec2-user のパスワードを変更。
新しいパスワード:
新しいパスワードを再入力してください:
passwd: すべての認証トークンが正しく更新できました。
[ec2-user@ip-172-31-38-12 ~]$
[ec2-user@ip-172-31-38-12 ~]$
[ec2-user@ip-172-31-38-12 ~]$ /bin/bash -c "$(curl -fsSL https://raw.githubusercontent.com/Homebrew/install/master/install.sh)"
==> Checking for `sudo` access (which may request your password)...

あなたはシステム管理者から通常の講習を受けたはずです。
これは通常、以下の3点に要約されます:

    #1) 他人のプライバシーを尊重すること。
    #2) タイプする前に考えること。
    #3) 大いなる力には大いなる責任が伴うこと。

<略>

Warning: /home/linuxbrew/.linuxbrew/bin is not in your PATH.

<略>

[ec2-user@ip-172-31-38-12 ~]$
[ec2-user@ip-172-31-38-12 ~]$
[ec2-user@ip-172-31-38-12 ~]$ export PATH=/home/linuxbrew/.linuxbrew/bin:$PATH
[ec2-user@ip-172-31-38-12 ~]$ brew -v
Homebrew 4.2.14
[ec2-user@ip-172-31-38-12 ~]$
[ec2-user@ip-172-31-38-12 ~]$ brew install gcc
==> Auto-updating Homebrew...
<略>
[ec2-user@ip-172-31-38-12 ~]$
2-5.Spoutのインストール
[ec2-user@ip-172-31-38-12 ~]$
[ec2-user@ip-172-31-38-12 ~]$
[ec2-user@ip-172-31-38-12 ~]$ php -r "copy('https://getcomposer.org/installer', 'composer-setup.php');"
[ec2-user@ip-172-31-38-12 ~]$
[ec2-user@ip-172-31-38-12 ~]$ php -r "if (hash_file('sha384', 'composer-setup.php') === 'dac665fdc30fdd8ec78b38b9800061b4150413ff2e3b6f88543c636f7cd84f6db9189d43a81e5503cda447da73c7e5b6') { echo 'Installer verified'; } else { echo 'Installer corrupt'; unlink('composer-setup.php'); } echo PHP_EOL;"
Installer verified
[ec2-user@ip-172-31-38-12 ~]$
[ec2-user@ip-172-31-38-12 ~]$
[ec2-user@ip-172-31-38-12 ~]$ php composer-setup.php
All settings correct for using Composer
Downloading...

Composer (version 2.7.2) successfully installed to: /home/ec2-user/composer.phar
Use it: php composer.phar

[ec2-user@ip-172-31-38-12 ~]$
[ec2-user@ip-172-31-38-12 ~]$ php -r "unlink('composer-setup.php');"
[ec2-user@ip-172-31-38-12 ~]$
[ec2-user@ip-172-31-38-12 ~]$ sudo mv composer.phar /usr/local/bin/composer
[ec2-user@ip-172-31-38-12 ~]$
[ec2-user@ip-172-31-38-12 ~]$
[ec2-user@ip-172-31-38-12 ~]$ cd /var/www/html
[ec2-user@ip-172-31-38-12 html]$
[ec2-user@ip-172-31-38-12 html]$ sudo chmod 777 -R /var/www/html
[ec2-user@ip-172-31-38-12 html]$ composer require "box/spout"
./composer.json has been created
Running composer update box/spout
Loading composer repositories with package information
Updating dependencies
Lock file operations: 1 install, 0 updates, 0 removals
  - Locking box/spout (v3.3.0)
Writing lock file
Installing dependencies from lock file (including require-dev)
Package operations: 1 install, 0 updates, 0 removals
  - Downloading box/spout (v3.3.0)
  - Installing box/spout (v3.3.0): Extracting archive
1 package suggestions were added by new dependencies, use `composer suggest` to see details.
Package box/spout is abandoned, you should avoid using it. No replacement was suggested.
Generating autoload files
No security vulnerability advisories found.
Using version ^3.3 for box/spout
[ec2-user@ip-172-31-38-12 html]$
[ec2-user@ip-172-31-38-12 html]$
[ec2-user@ip-172-31-38-12 html]$ ls -l
合計 12
-rw-rw-r-- 1 ec2-user ec2-user   55  3月 20 13:48 composer.json
-rw-rw-r-- 1 ec2-user ec2-user 3177  3月 20 13:48 composer.lock
-rwxrwxrwx 1 root     root       17  3月 20 13:02 index.php
drwxrwxr-x 4 ec2-user ec2-user   53  3月 20 13:48 vendor
[ec2-user@ip-172-31-38-12 html]$
[ec2-user@ip-172-31-38-12 html]$
[ec2-user@ip-172-31-38-12 html]$
2-6.gitでサンプルをダウンロード
手前味噌で恐縮ですが、以下要領でgitでサンプルアプリをダウンロードしてください。
git clone https://github.com/Hatanaka-in-github/site-sourcecode241020.git
2-7.MySQLクライアントインストール
[ec2-user@ip-172-31-38-12 ~]$
[ec2-user@ip-172-31-38-12 ~]$ yum list installed | grep mariadb
mariadb-libs.x86_64                   1:5.5.68-1.amzn2.0.1           installed
[ec2-user@ip-172-31-38-12 ~]$
[ec2-user@ip-172-31-38-12 ~]$ sudo yum remove mariadb-libs
読み込んだプラグイン:extras_suggestions, langpacks, priorities, update-motd
<略>
完了しました!
[ec2-user@ip-172-31-38-12 ~]$
[ec2-user@ip-172-31-38-12 ~]$ yum info mysql
読み込んだプラグイン:extras_suggestions, langpacks, priorities, update-motd
エラー: 表示するパッケージはありません
[ec2-user@ip-172-31-38-12 ~]$
[ec2-user@ip-172-31-38-12 ~]$ sudo yum localinstall -y https://dev.mysql.com/get/mysql80-community-release-el7-11.noarch.rpm
<略>
完了しました!
[ec2-user@ip-172-31-38-12 ~]$
[ec2-user@ip-172-31-38-12 ~]$ sudo yum-config-manager --disable mysql57-community
読み込んだプラグイン:extras_suggestions, langpacks, priorities, update-motd
<略>
[ec2-user@ip-172-31-38-12 ~]$
[ec2-user@ip-172-31-38-12 ~]$ sudo yum-config-manager --enable mysql80-community
読み込んだプラグイン:extras_suggestions, langpacks, priorities, update-motd
<略>
[ec2-user@ip-172-31-38-12 ~]$
[ec2-user@ip-172-31-38-12 ~]$ sudo yum install -y mysql-community-client
<略>
完了しました!
[ec2-user@ip-172-31-38-12 ~]$
[ec2-user@ip-172-31-38-12 ~]$ mysql --version
mysql  Ver 8.0.36 for Linux on x86_64 (MySQL Community Server - GPL)
[ec2-user@ip-172-31-38-12 ~]$
MySQLクライアントをEC2にインストールしたタイミングで自機PCにSQLクライアントソフトをインストールし、DBにアクセスできるか確認をします。

EC2へのSSH越しにRDSへのアクセスを行い、EC2とRDSが相互にアクセス可能かも確認します。
自機PCのクライアントソフトは、MySQL Workbenchを使います。
メニュー画面左上の「+」アイコンで新規接続のパラメータを入力し、そのパターンのセットを追加します。

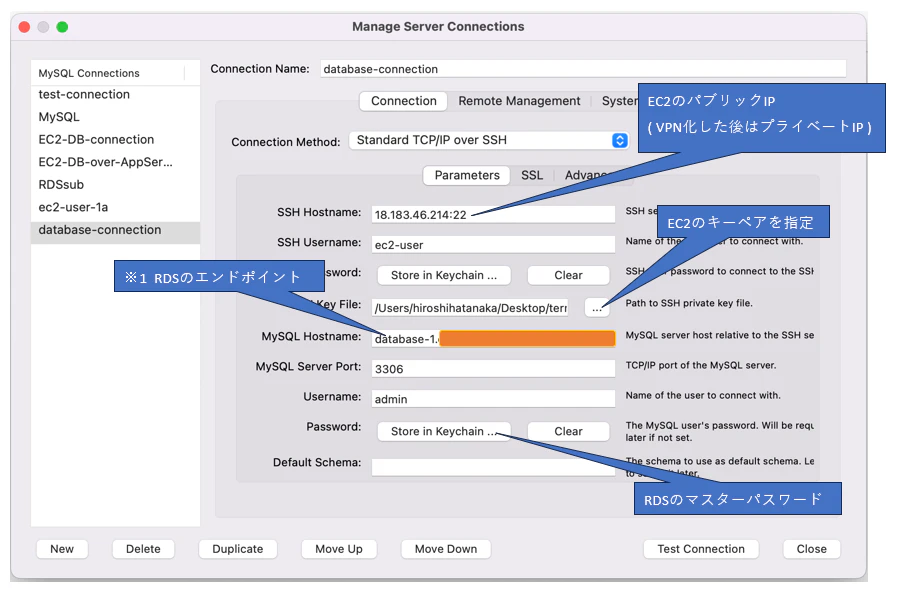
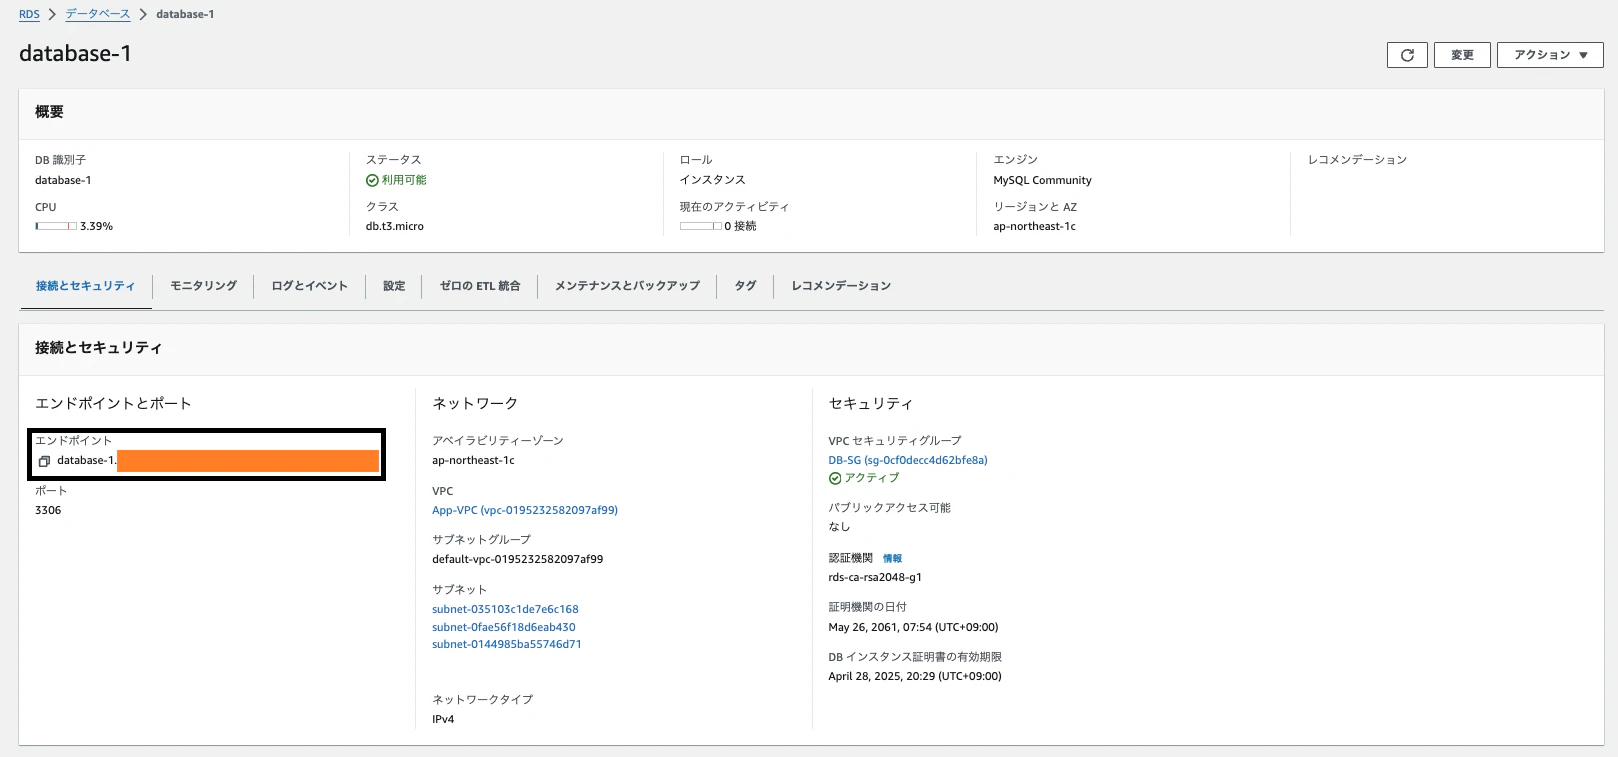
※1 RDSのエンドポイントの値は、RDSの詳細画面から確認し、
コピーした値を貼り付けます。
DBへの接続に必要な情報の入力が終わったら、「Test Connection」を押下します。
ポップアップに「Successfully made the MySQL connection」と表示されたら、
必要な情報が入力されてますので、一旦画面を閉じて、ダブルクリックで接続を開始して下さい。

DBに接続後、以下の要領でDBとテーブル(表)を3つ作成します。
create database mydb[※任意のデータベース名];
CREATE TABLE `process_progress` (
  `AUTO_ID` int NOT NULL AUTO_INCREMENT,
  `入出庫日` text,
  `入力日` varchar(30) DEFAULT NULL,
  `品名` text,
  `品番` text,
  `管理番号` text,
  `シリアル` text,
  `数量` int DEFAULT '0',
  `発工程` text,
  `受工程` varchar(15) DEFAULT NULL,
  `損品数` int DEFAULT '0',
  `保留数` int DEFAULT '0',
  `規格1` text,
  `規格2` text,
  `備考` text,
  `入力者` varchar(30) DEFAULT NULL,
  `工程キー` text,
  `シリアル工程` text,
  `exe_flg` int NOT NULL DEFAULT '0',
  `dplx_flg` int DEFAULT '0',
  PRIMARY KEY (`AUTO_ID`)
) ENGINE=InnoDB AUTO_INCREMENT=41 DEFAULT CHARSET=utf8mb4 COLLATE=utf8mb4_0900_ai_ci;
CREATE TABLE `IOSchedule` (
  `AUTO_ID` int NOT NULL AUTO_INCREMENT,
  `依頼番号` varchar(15) DEFAULT NULL,
  `管理番号` text,
  `入出庫日` varchar(15) DEFAULT NULL,
  `入力日` varchar(30) DEFAULT NULL,
  `品名` text,
  `数量` varchar(15) NOT NULL DEFAULT '0',
  `担当者` text,
  `入力者` varchar(30) DEFAULT NULL,
  `備考` text,
  `ステータス` varchar(10) DEFAULT '1_調整中',
  `更新者` text,
  `更新日` text,
  `exe_flg` int NOT NULL DEFAULT '0',
  PRIMARY KEY (`AUTO_ID`)
) ENGINE=InnoDB AUTO_INCREMENT=4 DEFAULT CHARSET=utf8mb4 COLLATE=utf8mb4_0900_ai_ci;
CREATE TABLE `NGtable` (
  `AUTO_ID` int NOT NULL AUTO_INCREMENT,
  `exe_flg` int NOT NULL DEFAULT '0',
  `入力日` varchar(30) DEFAULT NULL,
  `入力者` tinytext,
  `入出庫日` varchar(30) DEFAULT NULL,
  `品名` text,
  `管理番号` text,
  `型番` text,
  `シリアル` text,
  `規格1` text,
  `規格2` text,
  `NG理由` text,
  `工程` varchar(20) DEFAULT NULL,
  `備考欄1` text,
  `備考欄2` text,
  PRIMARY KEY (`AUTO_ID`)
) ENGINE=InnoDB AUTO_INCREMENT=3 DEFAULT CHARSET=utf8mb4 COLLATE=utf8mb4_0900_ai_ci;
2-8.タイムゾーン設定
- タイムゾーン設定(Apache)
上記記事の通り、タイムゾーンの設定をします。
[ec2-user@ip-10-255-1-206 html]$
[ec2-user@ip-10-255-1-206 html]$ sudo timedatectl set-timezone Asia/Tokyo
[ec2-user@ip-10-255-1-206 html]$
[ec2-user@ip-10-255-1-206 html]$ sudo timedatectl
      Local time: 日 2024-05-12 21:05:04 JST
  Universal time: 日 2024-05-12 12:05:04 UTC
        RTC time: 日 2024-05-12 12:05:05
       Time zone: Asia/Tokyo (JST, +0900)
     NTP enabled: yes
NTP synchronized: yes
 RTC in local TZ: no
      DST active: n/a
[ec2-user@ip-10-255-1-206 html]$
[ec2-user@ip-10-255-1-206 html]$
[ec2-user@ip-10-255-1-206 html]$
[ec2-user@ip-10-255-1-206 html]$
[ec2-user@ip-10-255-1-206 html]$
-
タイムゾーン設定(php)
「php.ini」を設定し、タイムゾーンを「Asia/Tokyo」に設定します。
「Module Setting」の[Date]項目配下の「;date.timezone」のコメントアウトを外し、
「=」のあとに「Asia/Tokyo」を記述します。
2-9.ファイル操作を伴うプログラミングのパーミッション設定
ここで作成予定のWebアプリは、ファイル操作を伴うためドキュメントルート/var/www/html配下のパーミッション設定について考慮する必要があります。
ターミナル上からコマンドでパーミッションの解放をするのもセキュリティ上心もとなさを感じてましたが、以下の記事を目にしたことで、苦肉の策ではありますが、ある程度考えがまとまりました。
phpの実行権限者とWebサーバの実行権限者が、それぞれの設定ファイルに記載されており、デフォルトでは両方とも"apache"とのことだそうです。
[ec2-user@ip-172-31-38-12 ~]$
[ec2-user@ip-172-31-38-12 ~]$ locate php-fpm
/etc/php-fpm.conf
/etc/php-fpm.d
/etc/logrotate.d/php-fpm
/etc/nginx/conf.d/php-fpm.conf
/etc/php-fpm.d/www.conf
/etc/systemd/system/php-fpm.service.d
/usr/lib/systemd/system/php-fpm.service
/usr/lib/systemd/system/httpd.service.d/php-fpm.conf
/usr/lib/systemd/system/nginx.service.d/php-fpm.conf
/usr/lib/tmpfiles.d/php-fpm.conf
/usr/sbin/php-fpm
/usr/share/doc/php-fpm-7.4.33
/usr/share/doc/php-fpm-7.4.33/php-fpm.conf.default
/usr/share/doc/php-fpm-7.4.33/www.conf.default
/usr/share/licenses/php-fpm-7.4.33
/usr/share/licenses/php-fpm-7.4.33/fpm_LICENSE
/usr/share/man/man8/php-fpm.8.gz
/var/log/php-fpm
[ec2-user@ip-172-31-38-12 ~]$
[ec2-user@ip-172-31-38-12 ~]$ cd /etc/php-fpm.d/
[ec2-user@ip-172-31-38-12 php-fpm.d]$
[ec2-user@ip-172-31-38-12 php-fpm.d]$ ls
www.conf
[ec2-user@ip-172-31-38-12 php-fpm.d]$ cat www.conf
; Start a new pool named 'www'.
; the variable $pool can we used in any directive and will be replaced by the
; pool name ('www' here)
[www]
<略>
; Unix user/group of processes
; Note: The user is mandatory. If the group is not set, the default user's group
;       will be used.
; RPM: apache user chosen to provide access to the same directories as httpd
user = apache
; RPM: Keep a group allowed to write in log dir.
group = apache
<略>
[ec2-user@ip-172-31-38-12 php-fpm.d]$
[ec2-user@ip-172-31-38-12 php-fpm.d]$
[ec2-user@ip-172-31-38-12 php-fpm.d]$
[ec2-user@ip-172-31-38-12 php-fpm.d]$
[ec2-user@ip-172-31-38-12 php-fpm.d]$ cd
[ec2-user@ip-172-31-38-12 ~]$
[ec2-user@ip-172-31-38-12 ~]$
[ec2-user@ip-172-31-38-12 ~]$
[ec2-user@ip-172-31-38-12 ~]$ locate httpd.conf
/etc/httpd/conf/httpd.conf
/usr/lib/tmpfiles.d/httpd.conf
[ec2-user@ip-172-31-38-12 ~]$
[ec2-user@ip-172-31-38-12 ~]$ cd /etc/httpd/conf/
[ec2-user@ip-172-31-38-12 conf]$
[ec2-user@ip-172-31-38-12 conf]$ cat httpd.conf
#
<略>
#
# User/Group: The name (or #number) of the user/group to run httpd as.
# It is usually good practice to create a dedicated user and group for
# running httpd, as with most system services.
#
User apache
Group apache
<略>
[ec2-user@ip-172-31-38-12 conf]$
[ec2-user@ip-172-31-38-12 conf]$ cd
[ec2-user@ip-172-31-38-12 ~]$
[ec2-user@ip-172-31-38-12 ~]$
[ec2-user@ip-172-31-38-12 ~]$
[ec2-user@ip-172-31-38-12 ~]$
この"apache"にドキュメントルート配下のファイル、ディレクトリの所有者になってもらえば、phpが所有者権限でファイル操作を行えます。
[ec2-user@ip-172-31-38-12 ~]$
[ec2-user@ip-172-31-38-12 ~]$ sudo chown -R apache:apache /var/www/html
[ec2-user@ip-172-31-38-12 ~]$
[ec2-user@ip-172-31-38-12 ~]$ cd /var/www/html
[ec2-user@ip-172-31-38-12 html]$ ls -l
合計 12
-rw-rw-r-- 1 apache apache   55  3月 20 13:48 composer.json
-rw-rw-r-- 1 apache apache 3177  3月 20 13:48 composer.lock
-rwxrwxrwx 1 apache apache   17  3月 20 13:02 index.php
drwxrwxr-x 4 apache apache   53  3月 20 13:48 vendor
[ec2-user@ip-172-31-38-12 html]$
[ec2-user@ip-172-31-38-12 html]$
[ec2-user@ip-172-31-38-12 html]$ cd
[ec2-user@ip-172-31-38-12 ~]$
[ec2-user@ip-172-31-38-12 ~]$
[ec2-user@ip-172-31-38-12 ~]$ sudo chmod -R 773 /var/www/html
[ec2-user@ip-172-31-38-12 ~]$ cd /var/www/html
[ec2-user@ip-172-31-38-12 html]$ ls
ls: ディレクトリ . を開くことが出来ません: Permission denied
[ec2-user@ip-172-31-38-12 html]$
[ec2-user@ip-172-31-38-12 html]$
[ec2-user@ip-172-31-38-12 html]$
chownコマンドでフォルダごと所有者を変更し、chmodコマンドで権限を
変更(773)したタイミングで、デフォルトユーザー"ec2-user"は、
フォルダ内を確認することができなくなりました。
2-10.EC2にS3へのアクセス権を付与
作成したEC2に、S3に対する権限を付与します。
AWSでは権限の管理はIAMという機能で制御します。
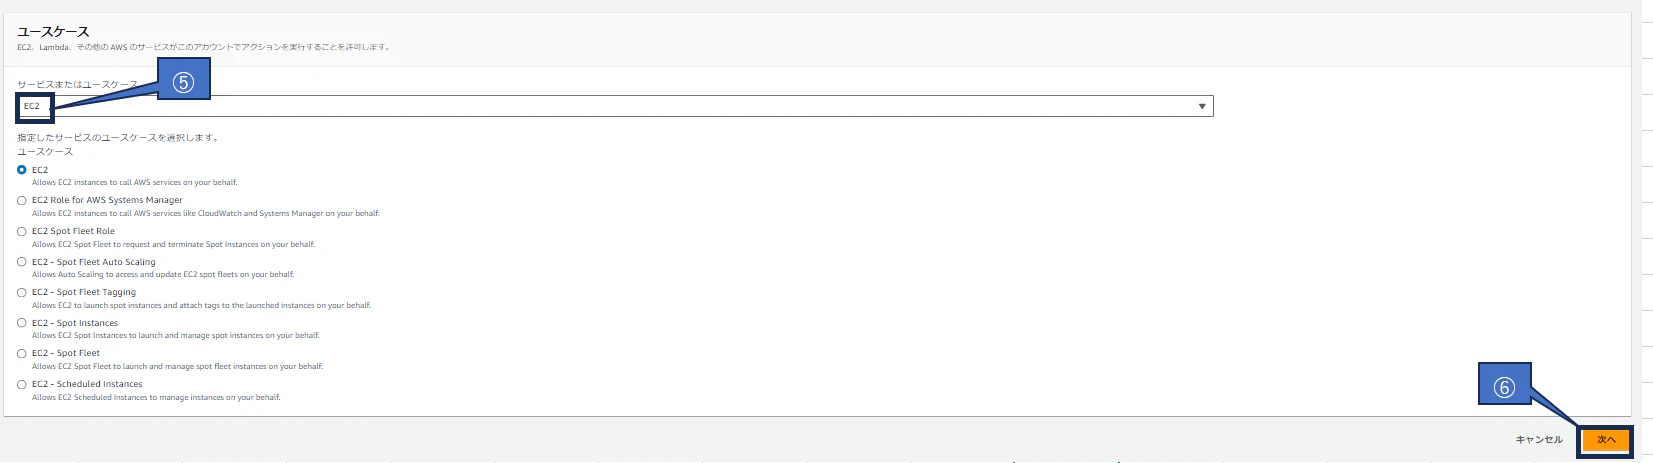
①IAMロール「S3Access」の設定

ユースケースに「EC2」を設定し、「次へ」を押下します。
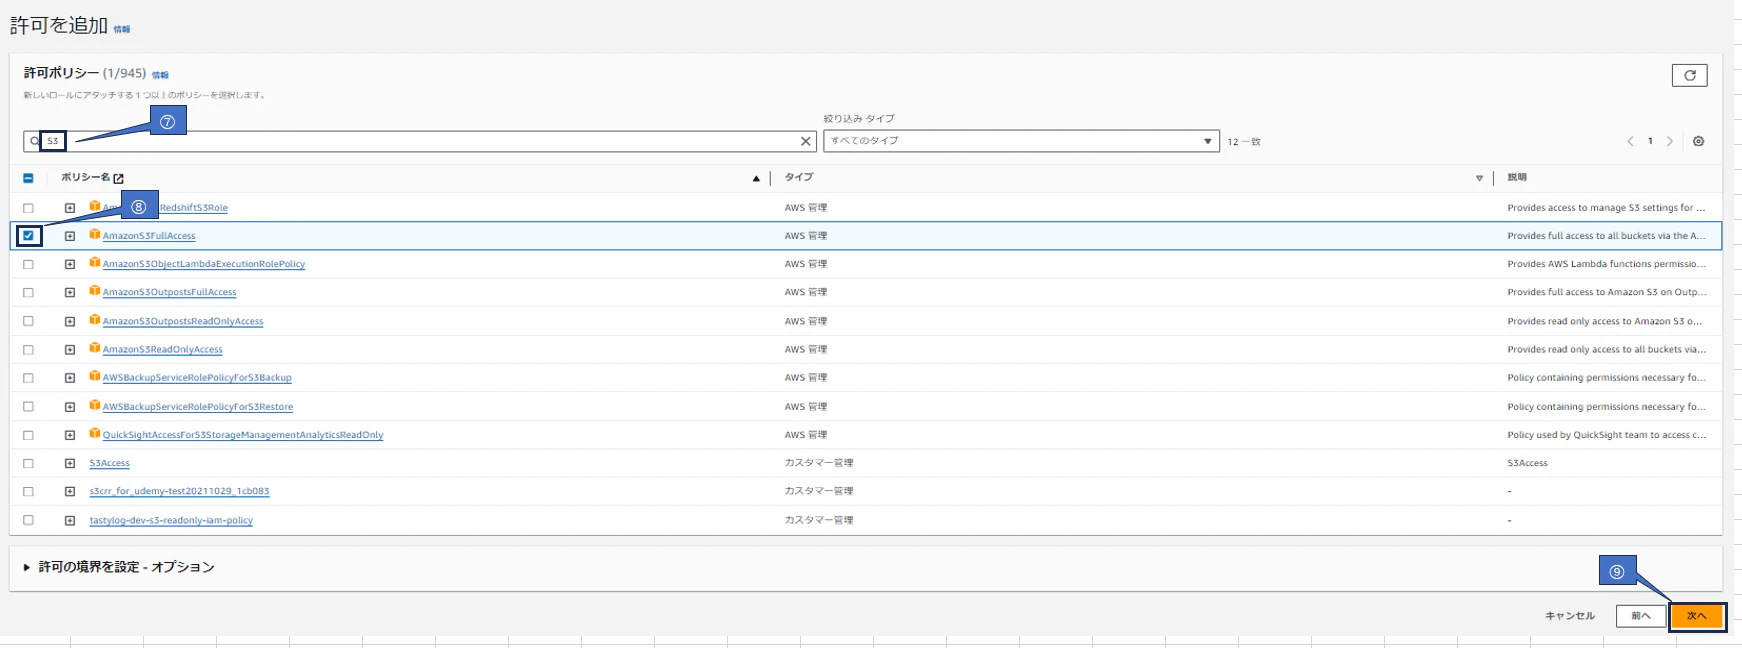
遷移した「許可を追加」画面で、検索窓に「S3」と入力し、「AmazonS3FullAccess」にチェックを入れます。
②EC2の設定画面で、作成したアプリサーバを選択します。
アクション「セキュリティ」>「IAMロールを変更」を選択します。

遷移後の画面で上記IAMロールを選択します。

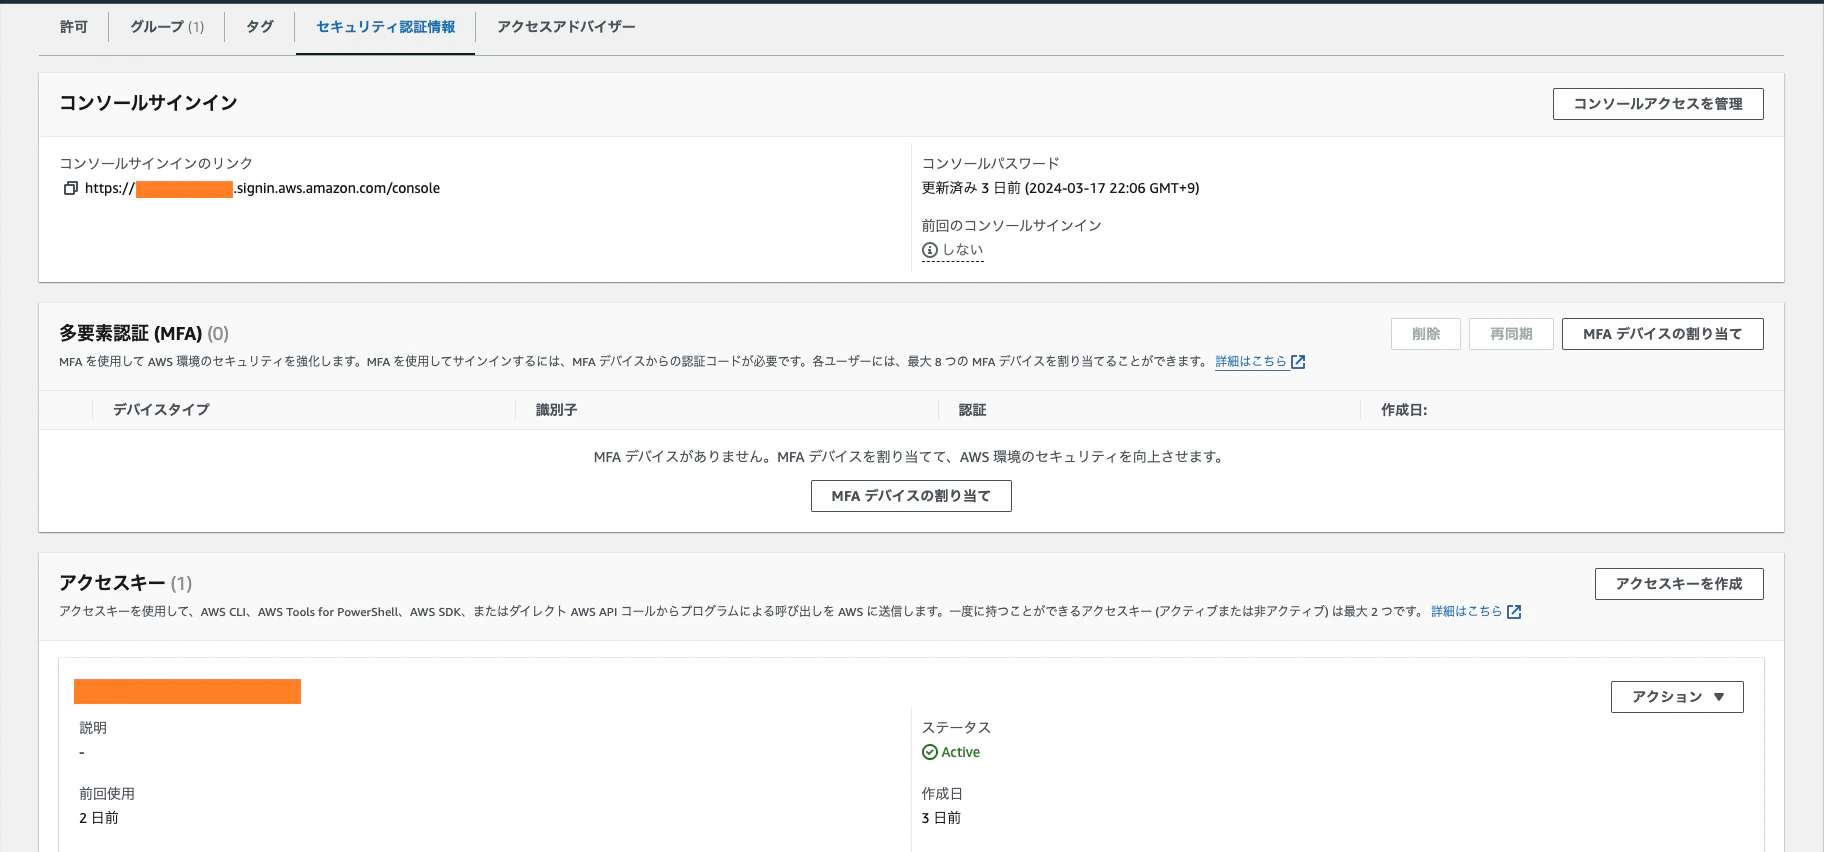
③IAMユーザの設定画面から新規ユーザまたは既存のユーザを選択し、
セキュリティ認証情報のタブから「アクセスキーの作成」を押す。
④「コマンドラインインターフェイス(CLI)」を選択し、最下行にチェックを入れ、「次へ」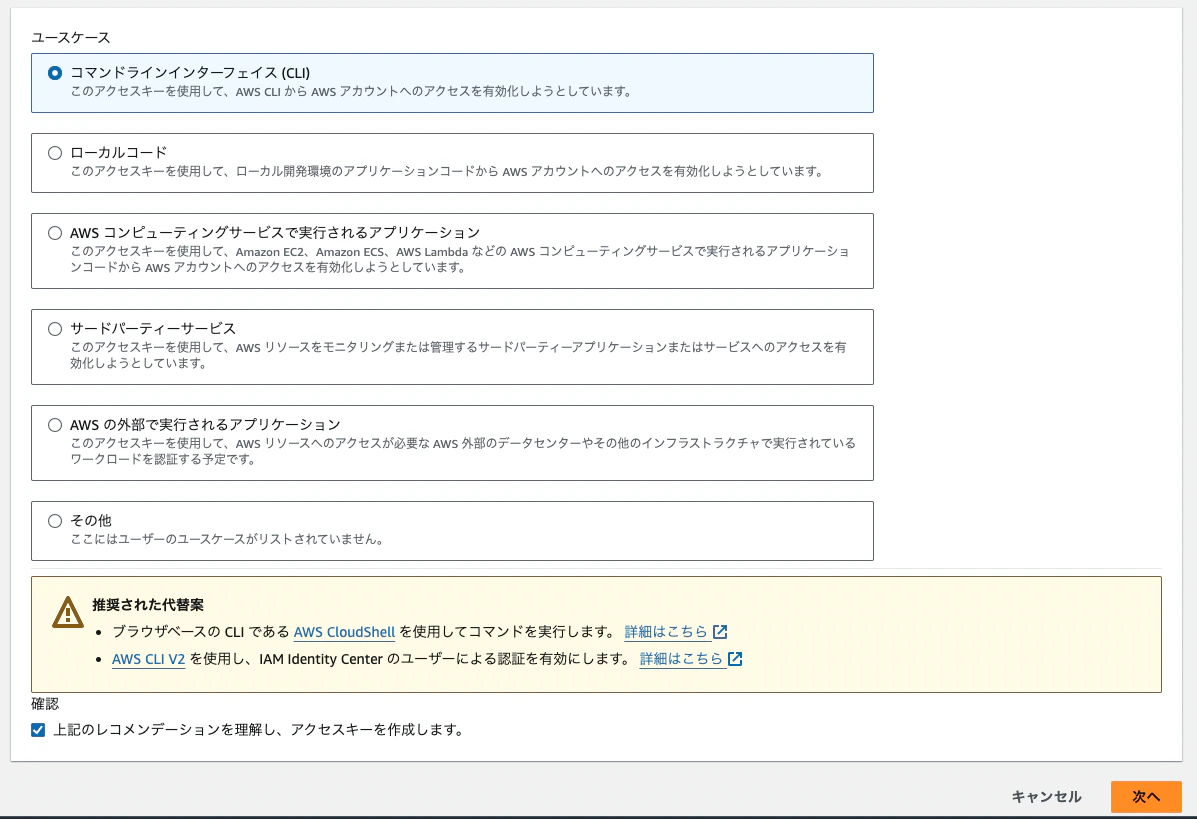
2-11.クライアント端末にaws cliでS3へのアクセスおよびコマンド操作の許可設定
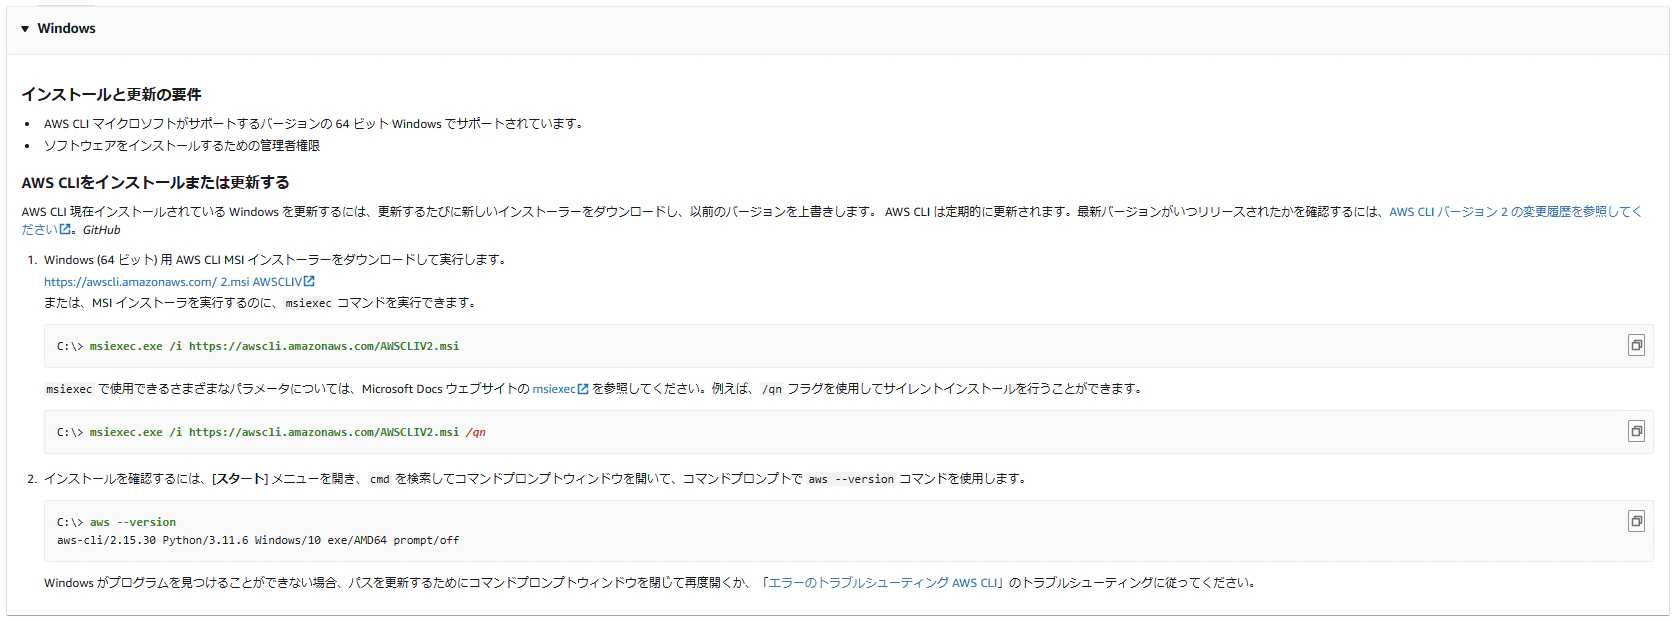
①"AWS CLI"インストール
②「アクセスキーを取得」画面まで進み、「.csvファイルをダウンロード」から、アクセスキー情報を取得
③ターミナルを開き、"aws configure"と入力。ダウンロードしたCSVファイルの情報を入力
[ec2-user@ip-172-31-38-12 ~]$
[ec2-user@ip-172-31-38-12 ~]$ aws configure
AWS Access Key ID [None]: ********************
AWS Secret Access Key [None]: ****************************************
Default region name [None]: ap-northeast-1
Default output format [None]:
[ec2-user@ip-172-31-38-12 ~]$
[ec2-user@ip-172-31-38-12 ~]$ ws s3 ls
-bash: ws: コマンドが見つかりません
[ec2-user@ip-172-31-38-12 ~]$ aws s3 ls
2023-05-05 06:35:14 amplify-src-dev-153504-deployment
2023-05-04 12:45:24 amplify-terminaldefaultstart-dev-214516-deployment
2022-02-24 14:03:18 myawsbusket20220224
2023-01-22 01:46:14 pfsourcecode20230121
[ec2-user@ip-172-31-38-12 ~]$
[ec2-user@ip-172-31-38-12 ~]$
[ec2-user@ip-172-31-38-12 ~]$
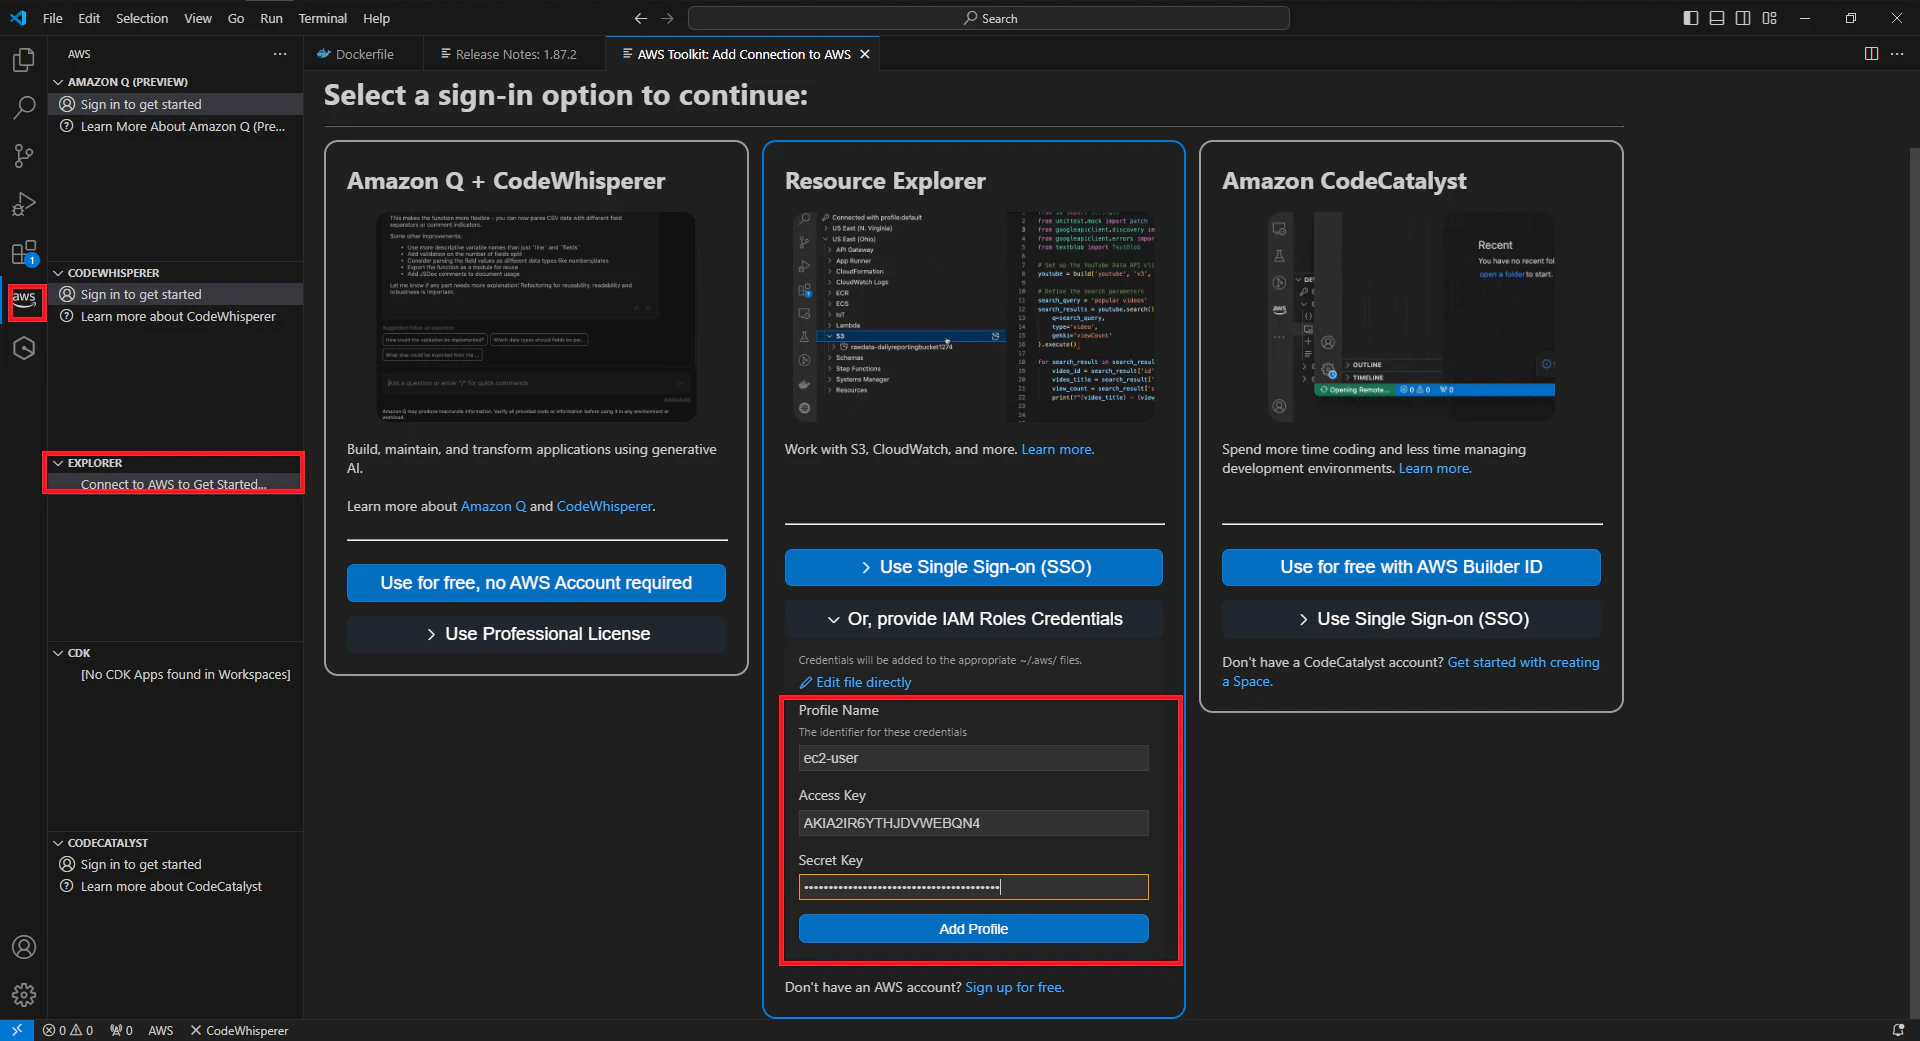
④VScodeに下記拡張機能をインストール

⑤上記拡張機能をインストールした段階で、AWSのアイコンが出てくるので、それを開き、EXPLORERのログイン画面に上記アクセスキー情報を入力
⑥EXPLORERのプルダウンのとなり、"・・・" マークから「Show or Hide Regions」を選択。東京を選択。

⑦S3にソースコードを格納し、Vscodeで編集して、aws cliでドキュメントルートに移動させる。
[ec2-user@ip-192-168-2-88 ~]$ cd /var/www/html
[ec2-user@ip-192-168-2-88 html]$ aws s3 cp s3://sourcecode/ver0.2 ./ --recursive
次節では、ドメイン周りの設定を行っていきます。