目的
Amazon Elastic Container Service(ECS) を使って、可搬性と集約性が高めれるか体験
目標
可搬性の確認のため、Web アプリを日本からアメリカのリージョンへ移行がどのくらい時間がかかるか確認する
>期待する効果:ハードウェア型仮想化と比べ、コンテナ型仮想化は、イメージが少量だから時間が半分で移行できる
集約性確認のため、python2系と3系のApp を安く簡単に使えるか確認する
>期待する効果:異なるライブラリやミドルウェアver を同一VM で動かせるから、集約性が上がる
特に、昼用のapp と夜用のapp が、ライブラリver 違いで動かないって時に効果的か?
前提
centos7 が動いている(私は、win PC で、VirtualBox 上にcentos7 を動かしている)
GitHub のユーザを持っている
持ってない方は、下のサイトが分かりやすい
https://tech-camp.in/note/programming/4756/
pip を使うため、利用できなければ、下のコマンドで実行
sudo apt install python-pip
yum を使うため、利用できなければ、下のコマンドを実行
sudo apt install yum
curl を使うため、利用できなければ、下のコマンドを実行
sudo apt install curl
作業
Amazon CLI の導入
コンテナイメージを作成して、ECS にアップ
アップしたコンテナを別リージョンへする
Virtual Box の設定変更(必要な人だけ)
事前準備として、作業ログを残したいので、Virtual Box のVM へssh ツールでログインできるようにする
VM を停止する
Virtual Box の該当VM を選択 > (右クリックから)設定
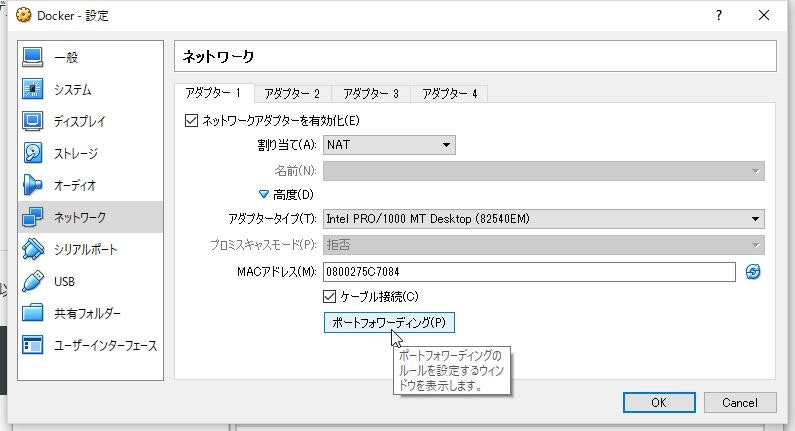
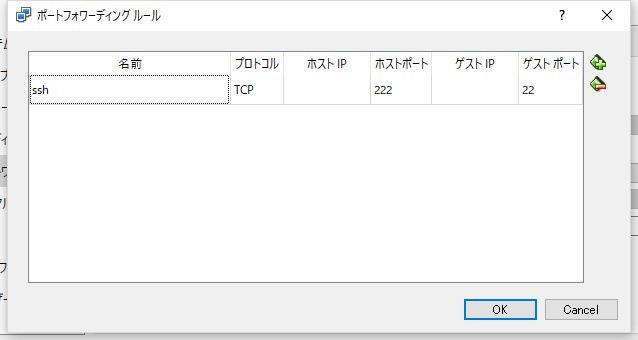
下の図のように、ネットワーク > 高度 > ポートフォワーディング

OK > OK
で、設定終了
VM を起動する
Virtual Box のコンソール画面上で{
ip addr show
nic を確認する。私は、 enp0s3
nic の自動起動設定を行う
nmcli connection modify enp0s3 connection.autoconnect yes
サーバを再起動
reboot
nic が起動していることを確認する
ip addr show
nic にinet add などの情報があればok
}
ssh クライアント上で{
対象のvm へログインする
私の場合、
127.0.0.1:222
以降は、ssh クライアント上での操作を示す
}
Ubuntu 等のLinux OS で作業する場合
ログを取るために下のように実行しましょう
sudo script /home/academy_usr/デスクトップ/today.log
Amazon CLI の導入
下の公式サイト通り、実行
https://docs.aws.amazon.com/ja_jp/cli/latest/userguide/installing.html
インストール
sudo pip install awscli
sudo aws --version
バージョン情報が出力されればok
Docker の導入
コンテナ管理を効率化してくれるナイスミドルなDcoker を導入する
下のサイトがとても分かりやすいので参照
http://docs.docker.jp/engine/getstarted/index.html
下のページを参照
http://docs.docker.jp/engine/getstarted/step_one.html
(Ubuntu の場合)
スクリプトでインストール
$ curl -fsSL get.docker.com -o get-docker.sh
$ sudo sh get-docker.sh
sudo docker version
バージョン情報が出力されればok
(Windows の場合)
下に実行したコマンドを抜粋
which curl
sudo curl -fsSL https://get.docker.com/ | sh
sudo reboot
sudo systemctl start docker
sudo docker run hello-world
Hello from Docker!
と出力されればok
作ったコンテナを一括削除する
docker rm -f docker ps -a -q
※Qiita 仕様で、変に見えますが、上のコードを一文でコピーして実行
Docker-compose の導入
下のサイトを参照
https://github.com/docker/compose/releases/
qiita の特殊記号とかぶるので、変なコードっぽくなってますが、全文コピペして下さい
sudo curl -L https://github.com/docker/compose/releases/download/1.19.0/docker-compose-`uname -s-uname -m` -o /usr/local/bin/docker-compose
sudo chmod +x /usr/local/bin/docker-compose
docker-compose --version
Compose ファイルの作成
手間な人は、下のコマンドで、compose ファイルを作っています。
curl -LO https://raw.githubusercontent.com/HaHatake/wordpress/master/docker-compose.yml
自作したい方は、下のサイトを参考に作ってみましょう。
https://github.com/HaHatake/wordpress/blob/master/docker-compose.yml
コンテナ起動
先程ダウンロードした compose を実行
docker-compose up -d
15分程で、コンテナの起動が確認できる
docker ps
コンテナのIP を確認する
docker ps
docker inspect
ESC を使ってみる
下のサイトを参照
https://docs.aws.amazon.com/ja_jp/AmazonECS/latest/developerguide/ECS_GetStarted.html
ECS コンソールにログイン > リージョンを バージニア北部 に変更 >
Tips
イメージを作ろうとすると下のコードが出た
Dockerfile parse error line 1: unknown instruction: 400:
よく見ると、Dockerfile の中身が、404 になってた。
curl でアドレスを間違っていたようだ。修正済み。
Docker イメージの作成(別の内容にしたため、トラシュー側へ){
簡単なweb appをGitHub へアップしているので、作るのが手間な人は下を参考
mkdir -m 777 awstest
cd awstest
curl https://raw.githubusercontent.com/HaHatake/AWStest/master/app.py > app.py
curl https://raw.githubusercontent.com/HaHatake/AWStest/master/requirements.txt > requirements.txt
curl https://raw.githubusercontent.com/HaHatake/AWStest/master/Dockerfile > Dockerfile
curl https://raw.githubusercontent.com/HaHatake/AWStest/master/docker-compose.yml > docker-compose.yml
Docker の勉強のため、下のサイトのコードを参考になればgood
https://github.com/HaHatake/AWStest
sudo docker build ./ -t webtest
uccessfully tagged webtest:latest のような出力がされればok
sudo docker images
下のように出力されればok
webtest latest 400b99f177c0 16 minutes ago 687MB
コンテナの起動
作成したイメージを走らせる
今回は、上で作成したwebtest イメージを起動してコンテナにする
sudo docker run -d -it -p 50080:80 webtest
下のコマンドで、webtest が稼働していることを確認する。
sudo docker ps -a
CONTAINER ID IMAGE COMMAND CREATED STATUS PORTS NAMES
abe086a9a514 webtest "/bin/sh -c 'python …" 4 minutes ago Up 4 minutes 0.0.0.0:50080->80/tcp wizardly_bell
稼働したコンテナのip を確認する
