最近 electron-vue を利用してデスクトップアプリを開発してます。
mac/windows両方のデスクトップアプリが簡単に作れるなんて・・・本当に便利な世の中になりました。
今回はその開発の中で実装した自動アップデート機能について簡単にまとめておきたいと思います。
(mac/windows両者アプリはストア経由での配信ではありません)
自動アップデート自体はElectronのautoUpdaterモジュールを利用します。
MacのautoUpdaterには、内部的にSquirrel.Macが使われており、
Windows上でのautoUpdaterでは Squirrel.Windowsが利用されています。
使うもの
用意しておく環境
- Github
- Heroku
Nutsってなに?
アップデート用のサーバになります。
ElectronのautoUpdaterモジュールを利用してMac/Windowsの自動アップデートを実装するわけですが
サーバサイド側のアップデートチェックAPIや、アップデート用ファイルのダウンロードAPIなど、autoUpdaterに対応したサーバを構築するのって手間です。
Squirrel.Macのサーバサポートについて
Nutsはアップデートに必要なAPIをいろいろ用意してくれるサーバを簡単に構築できます。
しかもMac/Windows両方対応。(すごい)
下記画像の通り、Deploy to Herokuボタンで簡単にHerokuデプロイでき、かつGithubと連携させることができるのです。
Githubと連携させるということは、GithubでReleaseしたファイルをアップデート用のファイルとして扱うことができます。
デプロイできたらHeroku側の環境変数の設定で
GITHUB_REPO (リリースで使うリポジトリ名)
GITHUB_TOKEN (GithubのPersonal access token)
API_PASSWORD (空でOK)
API_USERNAME (空でOK)
必要項目を入力しておきます。
プライベートリポジトリを対象にできますので安心ですね。
これでNutsのデバック用APIでレスポンスを確認できます。
https://xxxxxxxxxx.herokuapp.com/api/versions
詳しくはドキュメントを参照!
https://nuts.gitbook.com/api.html
Electron側の実装
electron-vueのフォルダ構成に従い下記のようなファイルを作りました。
(src配下には index.jsだったりindex.dev.jsがあります。Electronメインプロセスの処理部分ですね)
(エラー処理とかは省いてます。ソースもサンプルから)
'use strict';
const os = require('os');
const {app, autoUpdater, dialog} = require('electron');
const version = app.getVersion();
const platform = os.platform() + '_' + os.arch();

const updaterFeedURL = 'https://xxxxxxxx.herokuapp.com/update/' + platform + '/' + version;

function appUpdater() {

	autoUpdater.setFeedURL(updaterFeedURL);
	autoUpdater.on('error', err => console.log(err));
	autoUpdater.on('checking-for-update', () => console.log('checking-for-update'));
	autoUpdater.on('update-available', () => console.log('update-available'));
	autoUpdater.on('update-not-available', () => console.log('update-not-available'));
	autoUpdater.on('update-downloaded', (event, releaseNotes, releaseName) => {
		let message = app.getName() + ' ' + releaseName;
		if (releaseNotes) {
			const splitNotes = releaseNotes.split(/[^\r]\n/);
			message += '\n\nリリース内容:\n';
			splitNotes.forEach(notes => {
				message += notes + '\n\n';
			});
		}
		dialog.showMessageBox({
			type: 'question',
			buttons: ['再起動', 'あとで'],
			defaultId: 0,
			message: '新しいバージョンをダウンロードしました。再起動しますか?',
			detail: message
		}, response => {
			if (response === 0) {
				setTimeout(() => autoUpdater.quitAndInstall(), 1);
			}
		});
	});
	autoUpdater.checkForUpdates();

}
exports = module.exports = {
	appUpdater
};
これを同じくsrc配下のindex.jsで呼び出してあげます
import { app, BrowserWindow , Menu} from 'electron'
const {appUpdater} = require('./autoupdater');
const isDev = require('electron-is-dev');
const version = app.getVersion();

省略..........

/**
 * Auto Updater
 *
 * Uncomment the following code below and install `electron-updater` to
 * support auto updating. Code Signing with a valid certificate is required.
 * https://simulatedgreg.gitbooks.io/electron-vue/content/en/using-electron-builder.html#auto-updating
 */

// import { autoUpdater } from 'electron-updater'

// autoUpdater.on('update-downloaded', () => {
//   autoUpdater.quitAndInstall()
// })

app.on('ready', () => {
  appUpdater();
})
アプリのバージョン指定はpackage.jsonに記述します。
{
  "name": "Sample App",
  "version": "3.2.0",
  "author": "testsan",

//余談ですが開発用ビルドでこのバージョンをelectron側で参照しても
//package.jsonで指定したバージョンは取得できません。electron自体のバージョンが表示されます。
electron-vueのsrc/index.jsには元からAuto Updater用のロジックがコメントアウトで記載されてますが
今回はサンプルソースから必要ロジックを記述してるので、その部分はコメントアウトのままです。
実装後、本番用ビルドしたアプリを起動すれば
autoUpdaterのcheckForUpdatesが行われますので、新しいバージョンがあればサーバからファイルダウンロードし
そのあと更新通知のダイアログがでます。

(Heroku側のApplication Logsを見ればサーバリクエストの様子がみれます)
(ファイルダウンロード後なので起動してからダイアログがでるまで時間がかかります)
(開発用ビルドのアプリでは確認できません、後述のcode signing)
ビルドについて
上記画像のようなダイアログが表示されるのは、当然ビルドした新しいバージョンのファイルをGithub Releaseしている状態です。
ここではMac用、Windows用のビルドの仕方を紹介します。
Mac
Mac用にビルドしてアプリのファイルを作成するわけですが、
ElectronのautoUpdaterを利用するにはコードサイニングが必要になります。アプリの署名ですね。
Apple Developer Programに登録して
https://developer.apple.com/account/mac/certificate
からCERファイル(証明書ファイル)をダウンロードする必要があります。
CERファイルを作成するにはMacのキーチェーンアクセスから
CSRファイル(CertificateSigningRequest.certSigningRequest)を作成します。
そして最終的には.p12ファイルを書き出すわけです。
electron-vueのビルドにはelectron-builderが使われてますが
electron-builderでコードサイニングを行うには.p12ファイルが必要になります。
では.p12ファイルが作成できたらどのようにしてelectron-builderに指定してあげるのか?
上記ドキュメントに書いてありました。
必要な環境変数を設定してあげれば、electron-builderがコードサイニングしてくれます。
export CSC_LINK=~/electron/project/xxxxx.p12 (.p12ファイルの場所)
export CSC_KEY_PASSWORD=xxxxx(.p12書き出すさいに指定したパスワード)
export CSC_IDENTITY_AUTO_DISCOVERY=true (defaultでtrueのはずなのでいらないかも)
macのターミナルで上記を叩くだけです。
そのあとelectron-vueプロジェクト配下で
npm run build
すればビルド時にコードサイニングされ、アプリファイルが出来上がります。
buildフォルダ配下に下記のファイルができあがり。
testapp-3.2.0-mac.zip
testapp-3.2.0.dmg
testapp-3.2.0.dmg.blockmap
mac/testapp.app
Windows
Windowsの場合は、ストア経由でなければWindowsアプリ用の署名は必要ありません。
Windows用にビルドしてファイルを作成するだけです。
Windowsの場合はインストーラのほうがいいので、インストーラ作成の方法を紹介します。
(MacからWindows用のインストーラ作成を前提としています)
使うもの
- electron-winstaller
npm install --save-dev electron-winstaller
package.jsonと同じ階層に下記ファイルを用意
(electronプロジェクトのパスが/Users/xxxxxxx/electron/project/の場合)
var winstaller = require('electron-winstaller');

winstaller.createWindowsInstaller({
  appDirectory: '/Users/xxxxxxx/electron/project/build/win-unpacked',
  outputDirectory: '/Users/xxxxxxx/electron/project/build/',
  authors: 'testapp',
  exe: 'testapp.exe'
})
.then(() => console.log('It worked!'))
.catch(e => console.log(`No dice: ${e.message}`));
ビルドする
./node_modules/.bin/build --win --x64
Windows用のビルド、インストーラの作成は色々方法がありますが、
自分は上記ビルドの仕方で落ち着きました。
buildフォルダ配下に下記のファイルができあがり。
win-unpacked/
squireele-windows/
squireele-windows/testapp Setup 3.2.0.exe
squireele-windows/testapp-3.2.0-full.nupkg
RELEASES
Github Release
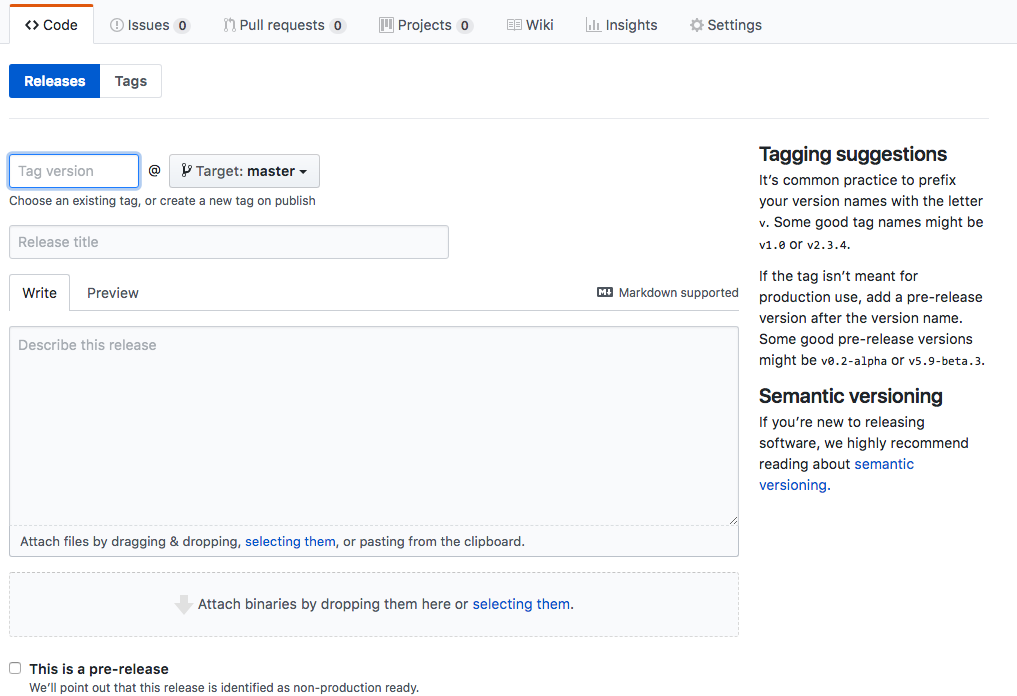
ビルドして出来上がったアプリファイル(Mac/Windows)をGithub Releaseします。
Tag Versionにはpackage.jsonで指定したバージョンを。
Rellease titleは autoUpdaterのreleaseNameになります。
Describe this releaseはautoUpdaterのreleaseNotesになります。
そして ドロップするファイルは
testapp-3.2.0-mac.zip
testapp-3.2.0-full.nupkg
RELEASES
になります。
(RELEASESファイルはWindowsの自動アップデートで必要です。)
リリース後、
https://xxxxxxxxxx.herokuapp.com/api/versions
でレスポンスを確認してみてください。
Nutsはキャッシュがあるようですので、最新の状態にするには
https://xxxxxxxxxx.herokuapp.com/api/refresh
を叩いてキャッシュクリアする必要があります。
これでアプリから自動アップデートのダイアログを表示させることができます。
おわり
以上が"electron-vueで自動アップデートを実装する"でした。
electronは独学だったので、ネットで情報集めるのがとても苦労しました。
(方法が色々あったり、情報が古かったり)
トライアンドエラーですね。。。。
自分はVue.jsが好きなので、ElectronでもVue.jsを使いました。
レンダープロセスで利用するjsフレームワークは他に色々ありますが
自動更新の流れはどれも一緒ですよね。
自分みたいな独学Electron使いの参考になれれば幸いです。

