最近、Fluentd + ElasticSearch + Kibana を組み合わせてログの収集・可視化をやっている取り組みをよく見ます。
私もちょっと触ってみたいなーと思っていたのですが、ElasticSearchよりSolrの方がまだ少しは知っていたので、Fluentd + Solr (可視化部分はまた後日) やってみました。
Solrは、Apacheだから(?)同じApache仲間のFlumeと連携させる記事はよく見ますが、Fluentdとの連携はあまり見ないので色々不安でしたが、Fluentdのプラグインを作ってくださっている方がいたので助かりました。
環境
- CentOS 6.6 (32bit)
- Fluentd 0.12.15
- プラグイン: fluent-plugin-out-solr 0.0.8
- Apache Solr 5.3.1
- Oracle JDK 8 Update 65
Fluentd
言わずと知れた、OSSのログ収集ソフトウェア。概念も設定ファイルもシンプルなので(XMLは書くのちょっとしんどいですよね)、比較的簡単に使えると思います。
Fluentdのページをみてインストールします。(昔やったのでどうやったか忘れた)
また、Solrと連携するためのプラグインをインストールしておきます。
haruyamaさんが作られたfluent-plugin-out-solrというプラグインがあったので、こちらを使わせていただきました。
# gem install fluent-plugin-out-solr
Fluentdの設定
fluent-plugin-out-solrのREADMEを参考にして、以下のように設定ファイルを記述します。
<source>
  type tail
  format /^\[(?<gckind>[^\(]*).*, (?<timeSec>[0-9\.]*) secs\]$/
  path /home/hashiwa/fluentd/app/jvm.log
  tag gclog
</source>

<match gclog>
  type solr
  host localhost
  port 8983
  core collection1
  include_tag_key true
  tag_key tag
  time_field timestamp
#  utc # if you do not want to use localtime
#  commit true # if you want to commit explicitly

  flush_interval 3s
</match>
"type solr"がFluentdで収集したデータをSolrに送り付けることを意味しているのかな。"host"と"port"はSolrが起動しているマシンのホスト名とポート番号、"core"はデータの送り先であるSolrのコアですね。"tag"や"timestamp"も含めています(要らないかもしれないけど、念のためREADMEにしたがう)。3秒ごとにSolrに送信します。
Fluentdが収集する対象ログのフォーマットについてです。
後述しますが、GCログなどをjvm.logに出力するようにJavaアプリを動かします。収集対象のGCログは以下のようなフォーマットです。
[GC (Allocation Failure)  11516K->6578K(45312K), 0.0499020 secs]
[Full GC (Ergonomics)  32437K->25509K(90880K), 0.9429995 secs]
上記の1行目と2行目は、Fluentdによって以下のようにパースされることを期待しています。
| gckind | timeSec | |
|---|---|---|
| 1行目 | "GC" | "0.0499020" |
| 2行目 | "Full GC" | "0.9429995" |
Solr
OSSの全文検索エンジンソフトウェアで、ElasticSearchとよく比較されます。
こんな感じでインストールしました。
Solrの設定
まず、念のためにコピーしたサーバーディレクトリを使用してSolrを起動します。
$ cp -r server testfluentd_server
$ bin/solr start -d testfluentd_server
次に、最小構成でcollection1コアを作成します。
$ bin/solr create_core -c collection1 -d basic_configs
http://localhost:8983/solr/#/collection1 にブラウザでアクセスし、Solrのコンソールからcollection1の画面を出せることを確認します。
そして、Solrの設定ファイルを編集していきます。
solrconfig.xmlの編集。
--- testfluentd_server/solr/collection1/conf/solrconfig.xml-org 2015-12-30 21:58:16.
+++ testfluentd_server/solr/collection1/conf/solrconfig.xml     2015-12-30 21:57:54.
@@ -146,10 +146,8 @@
        modification REST API calls will be allowed; otherwise, error responses will
        sent back for these requests.
   -->
-  <schemaFactory class="ManagedIndexSchemaFactory">
-    <bool name="mutable">true</bool>
-    <str name="managedSchemaResourceName">managed-schema</str>
-  </schemaFactory>
+  <schemaFactory class="ClassicIndexSchemaFactory"/>
+

   <!-- ~~~~~~~~~~~~~~~~~~~~~~~~~~~~~~~~~~~~~~~~~~~~~~~~~~~~~~~~~~~~~~~~~~~~~
        Index Config - These settings control low-level behavior of indexing
@@ -352,7 +350,7 @@
       -->

     <autoSoftCommit>
-      <maxTime>${solr.autoSoftCommit.maxTime:-1}</maxTime>
+      <maxTime>${solr.autoSoftCommit.maxTime:10}</maxTime>
     </autoSoftCommit>

     <!-- Update Related Event Listeners
@@ -876,6 +874,19 @@
        http://wiki.apache.org/solr/ExtractingRequestHandler

     -->
+  <requestHandler name="/update" class="solr.UpdateRequestHandler">
+    <lst name="defaults">
+      <str name="update.chain">uuid</str>
+    </lst>
+  </requestHandler>
+
+  <updateRequestProcessorChain name="uuid">
+    <processor class="solr.UUIDUpdateProcessorFactory">
+      <str name="fieldName">id</str>
+    </processor>
+    <processor class="solr.RunUpdateProcessorFactory" />
+  </updateRequestProcessorChain>
+
   <requestHandler name="/update/extract"
                   startup="lazy"
                   class="solr.extraction.ExtractingRequestHandler" >
@@ -1382,26 +1393,6 @@
         <str>yyyy-MM-dd</str>
       </arr>
     </processor>
-    <processor class="solr.AddSchemaFieldsUpdateProcessorFactory">
-      <str name="defaultFieldType">strings</str>
-      <lst name="typeMapping">
-        <str name="valueClass">java.lang.Boolean</str>
-        <str name="fieldType">booleans</str>
-      </lst>
-      <lst name="typeMapping">
-        <str name="valueClass">java.util.Date</str>
-        <str name="fieldType">tdates</str>
-      </lst>
-      <lst name="typeMapping">
-        <str name="valueClass">java.lang.Long</str>
-        <str name="valueClass">java.lang.Integer</str>
-        <str name="fieldType">tlongs</str>
-      </lst>
-      <lst name="typeMapping">
-        <str name="valueClass">java.lang.Number</str>
-        <str name="fieldType">tdoubles</str>
-      </lst>
-    </processor>
     <processor class="solr.RunUpdateProcessorFactory"/>
   </updateRequestProcessorChain>
編集のポイントは以下です(あまり理解していないので、間違っていたり不要な設定があるかも)。
- schema.xmlを使ったスキーマ定義を有効化するため
- ClassicIndexSchemaFactoryへの変更
- AddSchemaFieldsUpdateProcessorFactoryの設定削除
- fluent-plugin-out-solrのREADMEにしたがって、
- autoSoftCommit.maxTimeを10に変更
- /updateにUpdateRequestHandlerを設定
- updateRequestProcessorChainを設定
そして、スキーマを以下のように設定します。
<?xml version="1.0" encoding="UTF-8" ?>
<schema name="testfluentd-schema" version="1.5">
   <field name="id"      type="string"   indexed="true" stored="true" required="true"/>
   <!-- <field name="id"      type="uuid"   indexed="true" stored="true" required="true"/> -->

   <field name="time"      type="string"  indexed="true" stored="true"/>
   <field name="gckind"    type="string"  indexed="true" stored="true"/>
   <field name="timeSec"   type="double"  indexed="true" stored="true"/>
   <field name="tag"       type="string"  indexed="true" stored="true"/>
   <field name="timestamp" type="tdate"   indexed="true" stored="true"/>

   <!-- _version_ field must exist in schema -->
   <field name="_version_" type="long" indexed="true" stored="true"/>

   <fieldType name="long" class="solr.TrieLongField" precisionStep="0" positionIncrementGap="0"/>
   <fieldType name="double" class="solr.TrieDoubleField" />
   <fieldType name="uuid" class="solr.UUIDField" indexed="true" />
   <fieldType name="string" class="solr.StrField" sortMissingLast="true" />
   <fieldType name="tdate" class="solr.TrieDateField" />

   <!-- QueryElevationComponent requires the schema to have a uniqueKeyField. -->
   <uniqueKey>id</uniqueKey>

</schema>
- "gckind"と"timeSec"はfluentd.confで定義した、Fluentdが収集するデータですね。"tag"と"timestamp"も、fluentd.confで収集を有効化していますので、スキーマに定義します。
- "id"は、QueryElevationComponentを使っていると必要らしく、ないとSolrの起動時にエラーになります。
- "_version_"も必須なようです。
実行
Solrを再起動しておきます。
$ bin/solr stop ; bin/solr start -d testfluentd_server
以下のようなテストアプリを実行します。GCログはjvm.logに出ます。クラスロードのログも出ますが、Fluentdの収集対象外です。
java -XX:+UseParallelGC -verbose:gc -verbose:class A > jvm.log 2> server.log
import java.util.*;

public class A {
  public static void main(String[] args) throws Exception {
    List<Object> list = new ArrayList<>();
    while(true) {
      long start = System.currentTimeMillis();
      list = createList(10000000);
      long end = System.currentTimeMillis();
      System.err.println(start + ": " + (end-start) + " msec");
      Thread.sleep(1000);
    }
  }

  static List<Object> createList(int num) {
    List<Object> ret = new ArrayList<>();
    for (int i=0 ; i<num ; i++)
      ret.add(new Object());

    return ret;
  }
}
Fluentdを実行して、GCログをSolrに流し込みます。
$ fluentd -c fluentd.conf
これで、次々にGCログのデータがSolrに溜まっていく状態になっているはずです。
試しに、Solrのコンソールから http://localhost:8983/solr/#/collection1/query でクエリを実行してみます。
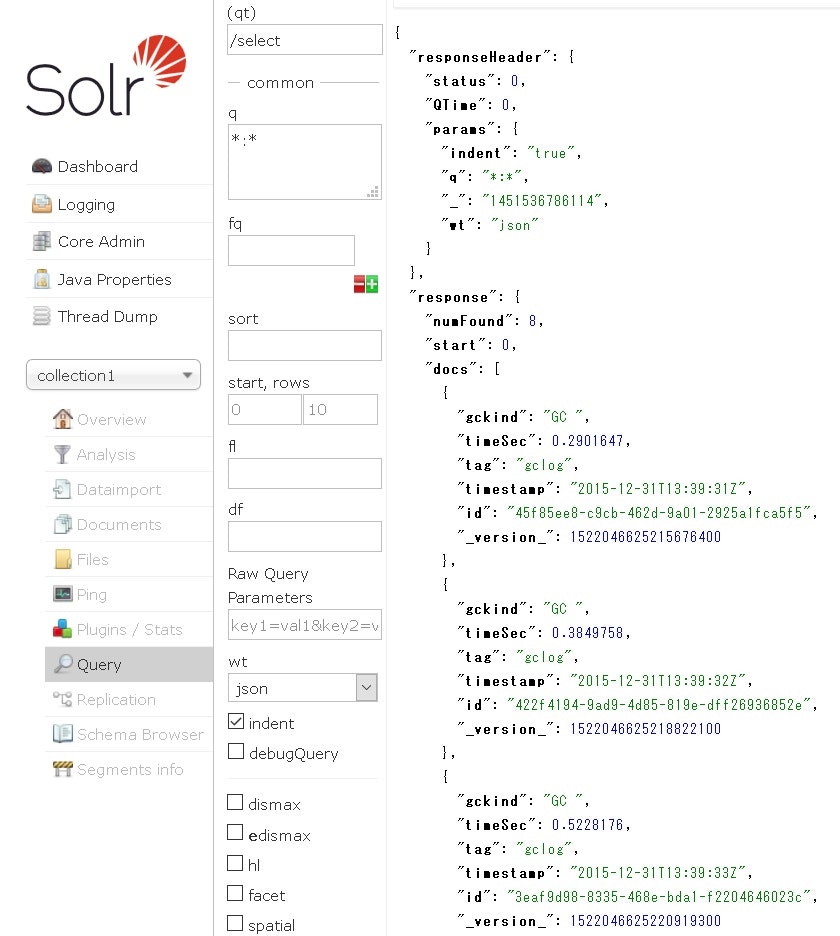
ちゃんとGCログが検索されました!
次は、いろいろな種類のログ(クラスロードとか)を収集して、Banana(Solrと連携するためのKibana)で可視化してみたいな。