概要
なにか動くものを作ってみたい。
ということで「トイレのドアにつけると利用時間が見える機械」を作ってみました。
動画も作成してみましたのでよろしくおねがいします。

結論
このような仰々しい形になりました。
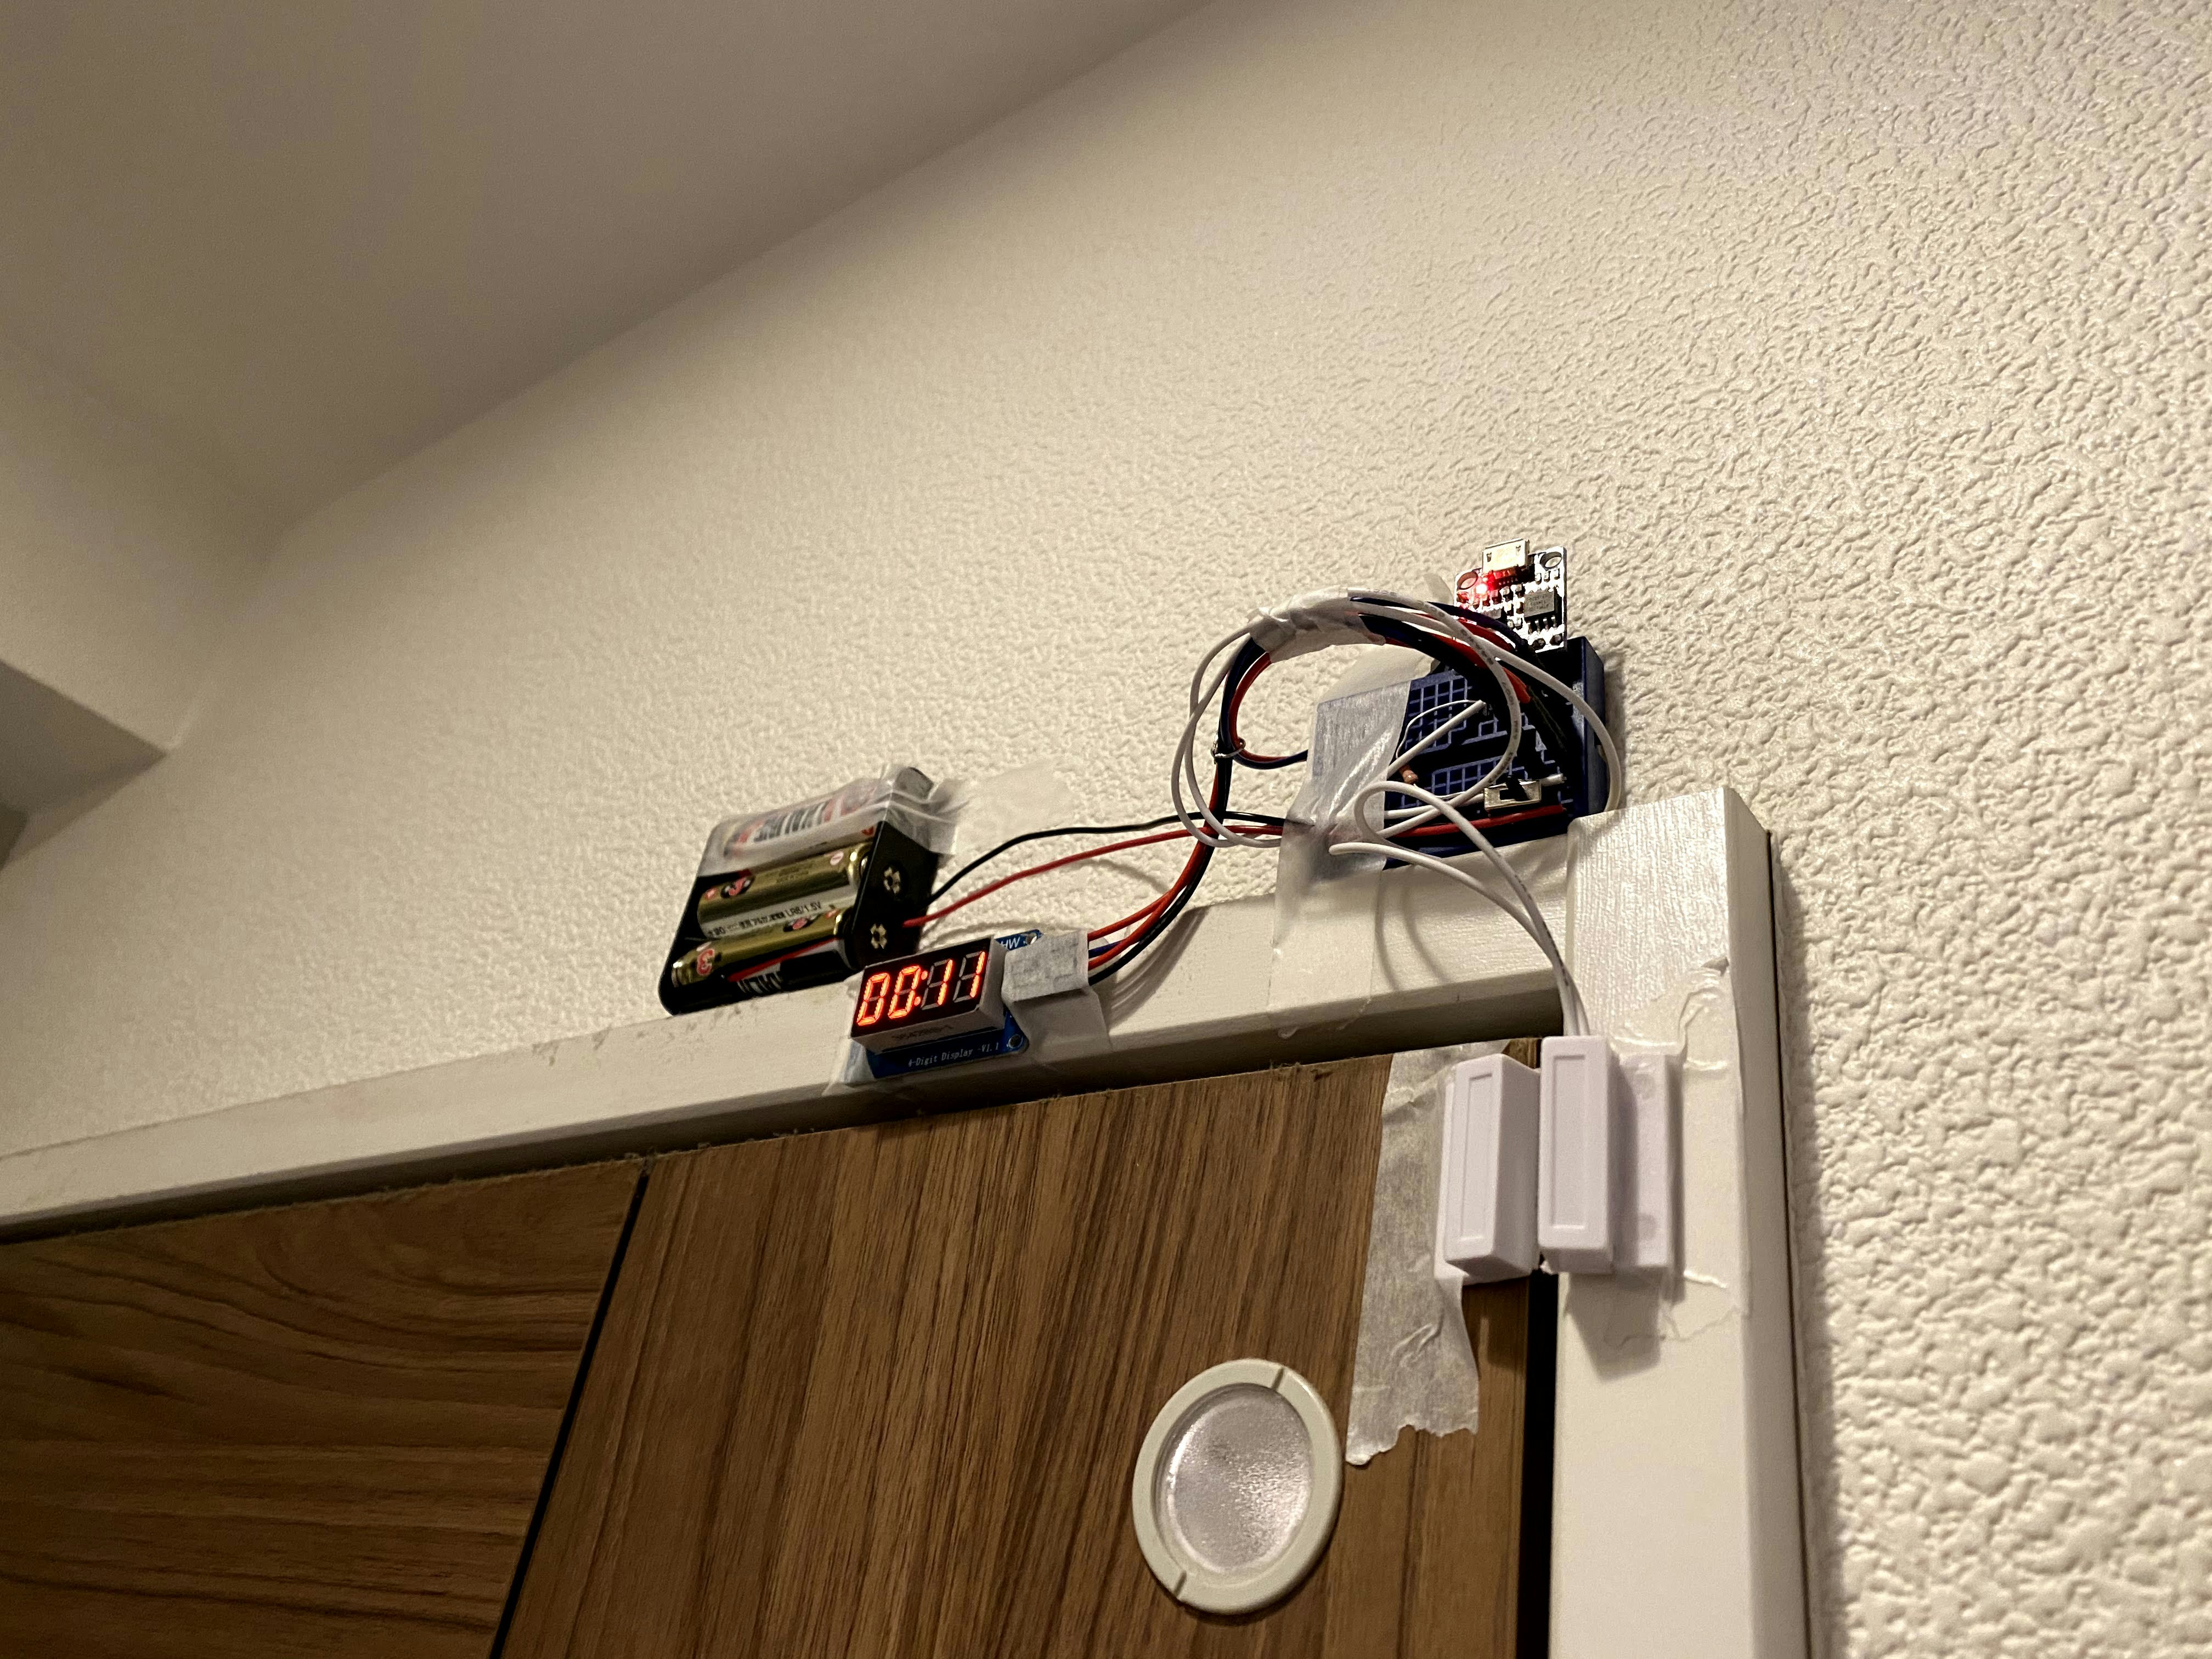
利用した部品
総額2,336円です。
ただ、ジャンパワイヤキットが高いので…
もう少し圧縮できるかと思います。
※2020年3月15日の価格です。
Digispark Kickstarter Attiny85
249円+100円
Door Sensor
62円
4セグLED
68円
ブレッドボード
231円
ジャンパケーブル系
180円
抵抗セット
121円
スイッチ
131円
ジャンパワイヤキット
1,043円
電池ケース
41円
電池(100円ショップの安物です)
110円
手順
1.Digispark Kickstarter Attiny85への書き込み準備
Digispark Kickstarter Attiny85はArduinoの標準として利用できないため、下記のサイトを参考に進めます。
https://digistump.com/wiki/digispark/tutorials/connecting
【Windowsの方のみ】
ドライバが必要ということなので、こちらからダウンロード
https://github.com/digistump/DigistumpArduino/releases/download/1.6.7/Digistump.Drivers.zip
[Arduino]>[Preferences]

[追加のボードマネージャーのURL]

こちらに下記のJSONファイルURLを追加します。
http://digistump.com/package_digistump_index.json
【MACの方のみ】
これだけだとコンパイルでErrorが発生します。
***** bad CPU type in executable
下記のフォーラムにある通り、「MACが32bitをサポートしなくなったため発生している」ということらしいです。
https://digistump.com/board/index.php?topic=3249.0
フォーラムの最後に書いてあるコマンドを実行したところ、改善しました。
cd ~/Library/Arduino15/packages/arduino/tools/avr-gcc
mv 4.8.1-arduino5 orig.4.8.1
ln -s /Applications/Arduino.app/Contents/Java/hardware/tools/avr 4.8.1-arduino5
2.[7セグLED]ライブラリ準備
7セグLEDに関しても標準のものでは動作しません。
こちらのフォーラムを参考にさせていただきました。
https://forum.arduino.cc/index.php?topic=442087.0
こちらのGITHUBにあるコードで動作するということでしたので、ZIP形式でダウンロードしてLibraryフォルダにコピーしました。
https://github.com/reeedstudio/libraries/tree/master/DigitalTube
Libraryは下記のPathにあるそうです
C:\Users\{user name}\Documents\Arduino\libraries
/Users/{user name}/Documents/Arduino/libraries
3.図面
下記のような図面で作成しました。
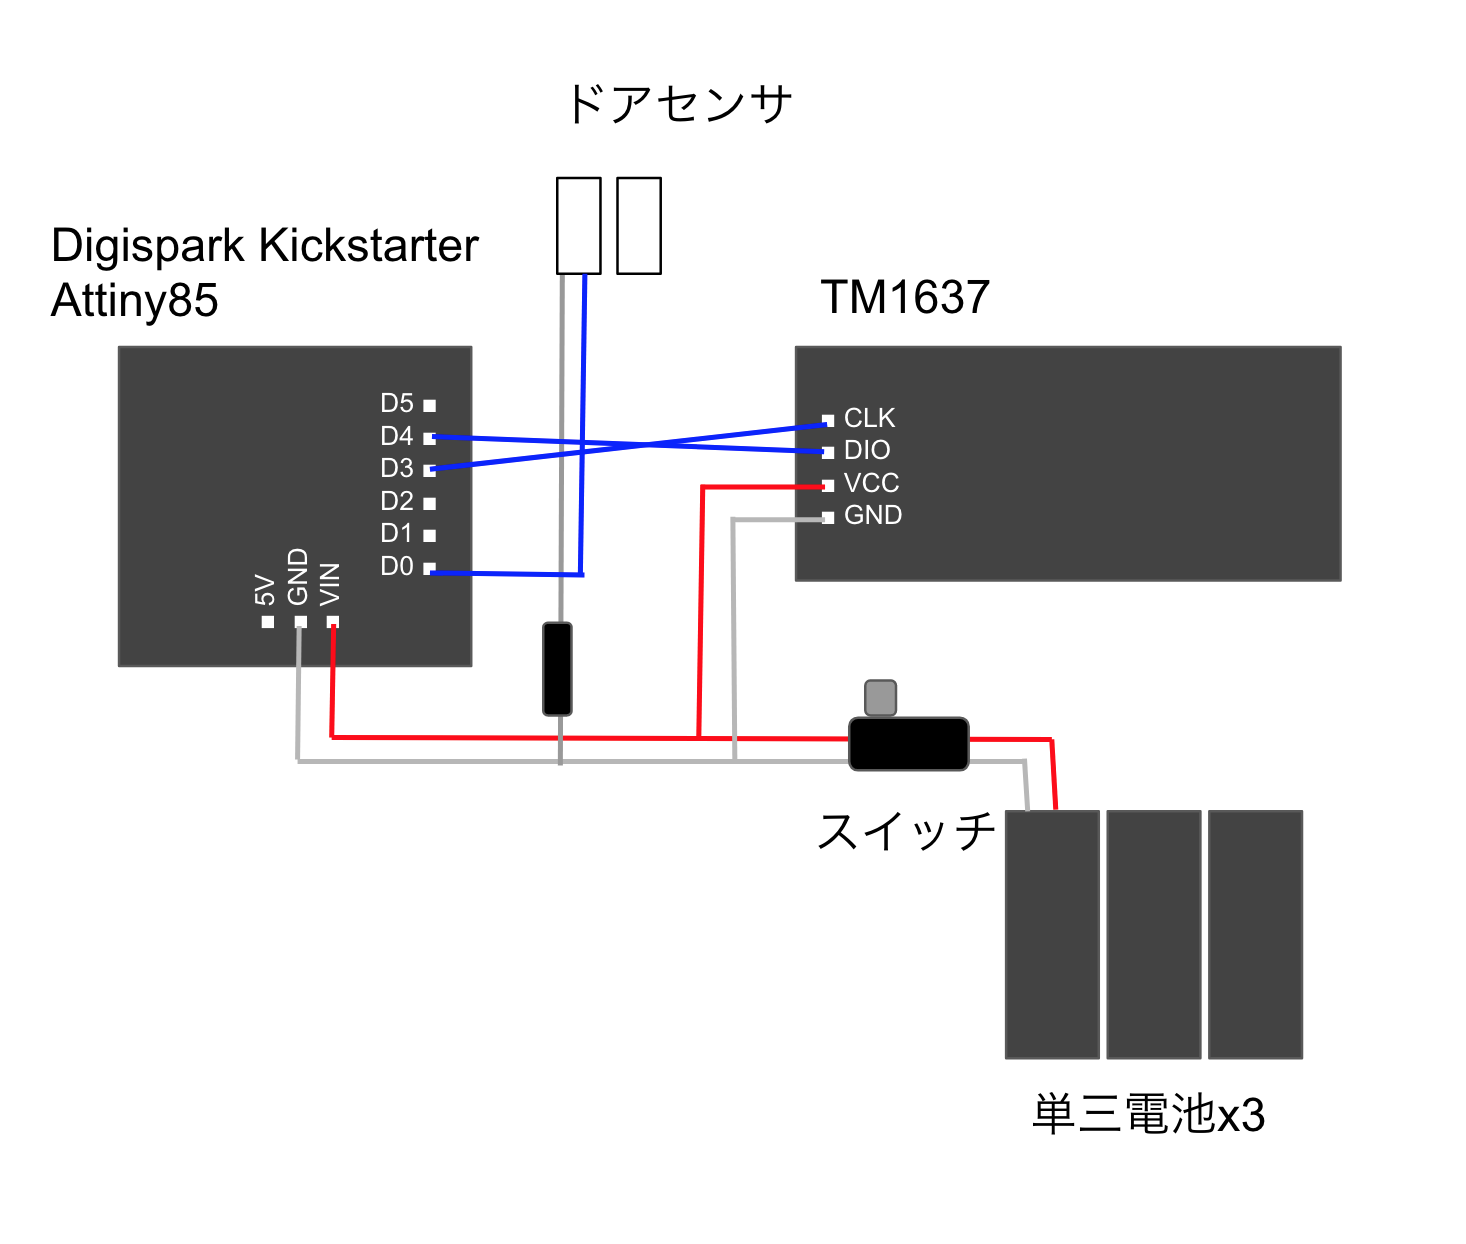
ドアセンサがD0でLEDはD3,D4を利用しています。
注意点としては電池以外でテストする場合電圧が安定しないもので行うと、表示がうまく出来ません。
ご注意ください。
4.コーディング
# include "TM1637.h"
# define CLK 3
# define DIO 4

TM1637 tm1637(CLK,DIO);
unsigned long opentm = millis();

void setup()
{
  pinMode(0, INPUT);
  tm1637.init();
  tm1637.set(BRIGHT_TYPICAL);
  tm1637.point(1);
}

void loop()
{
  unsigned long nowtm = millis();
  uint8_t door = digitalRead(0);
  if(!door){
    opentm = nowtm;
  }

  tm1637.display(3,((nowtm-opentm)/1000%60)%10);
  tm1637.display(2,((nowtm-opentm)/1000%60)/10);
  tm1637.display(1,((nowtm-opentm)/1000/60)%10);
  tm1637.display(0,((nowtm-opentm)/1000/60)/10);
  delay(1000);
}
millis()で起動からのmsが取得できるため、doorに依存して初期化するような単純なコードです。
表示に関しては0が一番上らしいので、この様になっています。
5.動作確認

YOUTUBEの方にもう少し長い動画も細かいところも乗っているので参考いただけると幸いです。
ありがとうございました