カスタムディレクティブを使いこなす
Vueではv-modelやv-showなど以外にも、自分でディレクティブを定義することができる
<!-- HTML -->
<div id="hoge">
  もしかして<span v-highlight>ほげぇ</span>ですか?
</div>

<!-- Vue -->
<script>
Vue.directive('highlight', {
    inserted: (el) => {
      el.style.backgroundColor = 'yellow';
    }
  });

new Vue({
    el: '#hoge',
});
</script>

directiveメソッドの使い方は以下の通り
directive(name,def)
nameでディレクティブ名を、
defで、そのディレクティブが行う動作を定義する
ディレクティブのフック関数を定義する
「どのタイミングでディレクティブを実行するか」をフック関数が決めている。
例えば、先の例のinserted:もこれに該当する
他にも下記のようなフック関数が存在する。
-
bind:
- ディレクティブが初めて対象の要素にひも付いた時に 1 度だけ呼ばれる。
-
inserted:
- ひも付いている要素が親 Node に挿入された時。
-
update:
- 要素を抱合している親コンポーネントが更新された時。
-
componentUpdated:
- 抱合している小コンポーネントが更新された時。
-
unbind:
- ディレクティブがひも付いている要素から取り除かれた時に 1 度だけ呼ばれる。
引数をみてみる
上記の例では、フック関数の引数にelしか取っていない。
実際には、他にも引数があるが、省略されている。
それぞれの引数を確認していこう
-
el:ディレクティブが適用された要素
-
binding:以下のプロパティを持っているバインド情報オブジェクト
- name
- ディレクティブの名前(highlight)
- value
- ディレクティブが受け取った値("Yellow")
- expression
- 文字列としてのバインド式("color")
- ....etc
- name
プラグインを使ってみる
プラグインを有効化する
プラグインはCDNとして呼び込むことが可能。今回はvee-validateを使用してみた。
<!-- HTML -->
<script src="https://cdn.jsdelivr.net/npm/vee-validate@latest/dist/vee-validate.js"></script>
<div id="app">
    <form>
        <label for="name">URL:</label>
        <input v-validate="'required|url'" data-vv-as="URL" id="url" name="url" />
    </form>
    <span v-if="errors.has('url')">{{ errors.first('url') }}</span>
</div>

<!-- Vue -->
<script>
Vue.use(VeeValidate, { locale: 'ja' });

new Vue({
    el: '#app'
});
</script>
下記のメソッドでプラグインを有効化する
Vue.use('有効化するプラグイン名', 'プラグインのオプション');
単一ファイルコンポーネントとは
単一ファイルコンポーネントとは、コンポーネントを構成するtemplate要素、script要素,style要素を一つにまとめたもの。
import時にはtemplateタグで囲まれた要素が渡される
<template>
  <div class="hello">
    <h1>{{ msg }}</h1>
    <h2>Essential Links</h2>
    <ul>
      <li>
        <a
          href="https://vuejs.org"
          target="_blank"
        >
          Core Docs
        </a>
      </li>
      <li>
        <a
          href="https://forum.vuejs.org"
          target="_blank"
        >
          Forum
        </a>
      </li>
      <li>
        <a
          href="https://chat.vuejs.org"
          target="_blank"
        >
          Community Chat
        </a>
      </li>
      <li>
        <a
          href="https://twitter.com/vuejs"
          target="_blank"
        >
          Twitter
        </a>
      </li>
      <br>
      <li>
        <a
          href="http://vuejs-templates.github.io/webpack/"
          target="_blank"
        >
          Docs for This Template
        </a>
      </li>
    </ul>
    <h2>Ecosystem</h2>
    <ul>
      <li>
        <a
          href="http://router.vuejs.org/"
          target="_blank"
        >
          vue-router
        </a>
      </li>
      <li>
        <a
          href="http://vuex.vuejs.org/"
          target="_blank"
        >
          vuex
        </a>
      </li>
      <li>
        <a
          href="http://vue-loader.vuejs.org/"
          target="_blank"
        >
          vue-loader
        </a>
      </li>
      <li>
        <a
          href="https://github.com/vuejs/awesome-vue"
          target="_blank"
        >
          awesome-vue
        </a>
      </li>
    </ul>
  </div>
</template>

<script>
export default {
  name: 'HelloWorld',
  data () {
    return {
      msg: 'Welcome to Your Vue.js App'
    }
  }
}
</script>

<!-- Add "scoped" attribute to limit CSS to this component only -->
<style scoped>
h1, h2 {
  font-weight: normal;
}
ul {
  list-style-type: none;
  padding: 0;
}
li {
  display: inline-block;
  margin: 0 10px;
}
a {
  color: #42b983;
}
</style>
ここで style-scopedに注目してほしい
style-scopedで定義されたデザインは配下のコンポーネントでのみ有効になる。
もしこれがstyleだけだと、全体にデザインが適用されてしまうので注意が必要
。
vue-cliを使ったroutesの設定
routesの設定はsrc/routes/index.jsに記述する
import Vue from 'vue'
import Router from 'vue-router'
import HelloWorld from '@/components/HelloWorld'
Vue.use(Router)

export default new Router({
  routes: [
    {
      path: '/',
      name: 'HelloWorld',
      component: HelloWorld
    },
    {
      path: '/top',
      redirect: '/'
    }
  ]
})
ここで作成されたroute設定は、src/main.jsでVueインスタンスと紐づけられる。
import Vue from 'vue'
import App from './App'
import router from './router'

Vue.config.productionTip = false

/* eslint-disable no-new */
new Vue({
  el: '#app',
  router,
  components: { App },
  template: '<App/>'
})
routerはrouter: routerの省略系。プロパティ名と変数名が同じ時は、このように省略することができる。
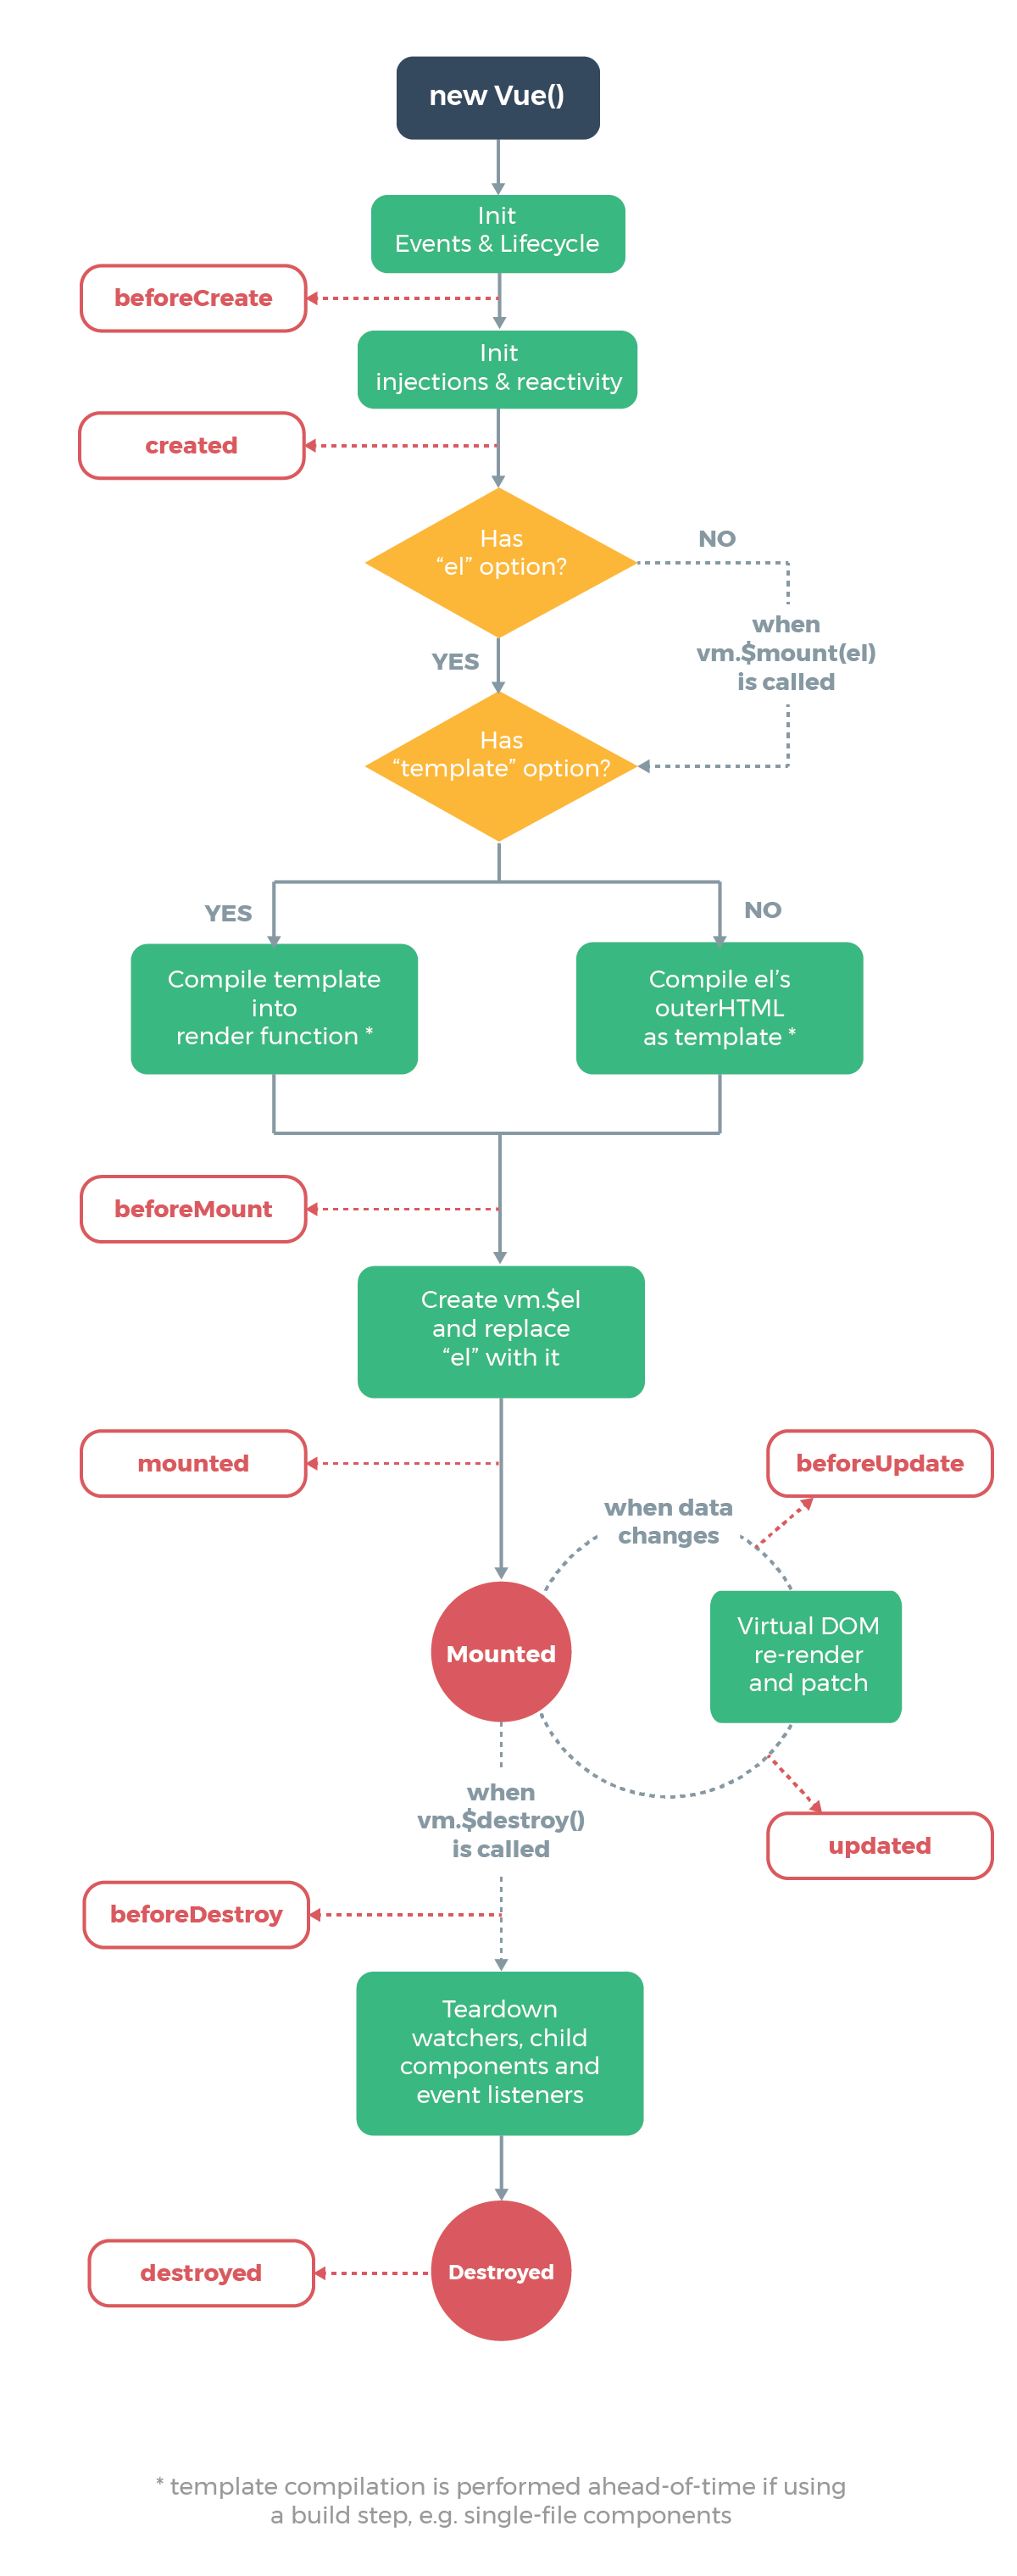
Vueのライフサイクルフック
Vueインスタンスは インスタンスの生成→要素へのマウント→データの変更に応じたビューの更新→破棄の一連の流れを辿る。
これをライフサイクルと呼び、この流れの中で都度呼ばれるメソッドをライフサイクルフックと呼ぶ。
- beforeCreate...created
- Vueインスタンスの生成まで
- bwforeMount...mounted
- インスタンスをページに紐づけるまで
- beforeUpdate...updated
- Viewの更新(再描画)まで(データに更新が会った時しか呼ばれない)
- beforeDestroy...destroyed
- インスタンスの破棄まで
Vueのリアクティブな挙動
dataについて
dataに格納されているプロパティはリアクティブデータと呼び、プロパティの値が替わるたびにViewの再描画が行われる。
timerを設定して、一定時間ごとにcurrentを更新した場合の動作を見てみよう
<!-- HTML -->
<div id="app">
  <p>現在時刻:{{ current.toLocaleString() }}</p>
</div>

<!-- Vue -->
<script>
  new Vue({
    el: '#app',
    data: {
      current: new Date()
    },
    created: function () {
      let that = this;
      this.timer = setInterval(function () {
        that.current = new Date();
      }, 1000);
    },
    beforeDestroy: function () {
      clearInterval(this.timer);
    }
  });
</script>

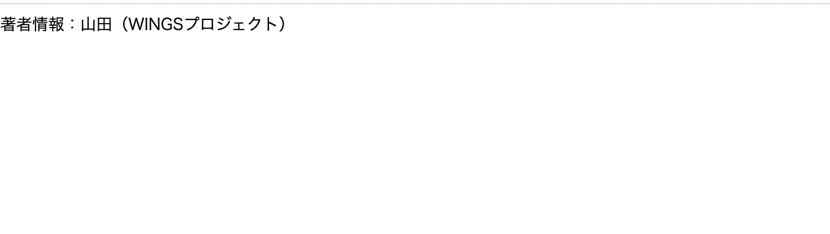
一方でプロパティの追加・削除時にはこれらの変更が検知されることはなく、再描画が行われない。
<!-- HTML -->
<div id="app">
  <p>著者情報:{{ author.name }}({{ author.company }})</p>
</div>

<!-- Vue -->
<script>
  let app = new Vue({
    el: '#app',
    data: {
      author: {
        name: '山田'
      }
    },
    created: function () {
      let that = this;
      this.timer = setTimeout(function () {
        that.author.company = 'WINGSプロジェクト';
      }, 1000);
    },
    beforeDestroy: function () {
      clearInterval(this.timer);
    }
  });
</script>
今回はauthor.companyを追加したが、Viewの再描画は行われなかった。
Vue.setメソッドを使うことで、追加をViewへ伝播させることができる
<!-- HTML -->
<div id="app">
  <p>著者情報:{{ author.name }}({{ author.company }})</p>
</div>

<!-- Vue -->
<script>
  let app = new Vue({
    el: '#app',
    data: {
      author: {
        name: '山田',
        // company: ''
      }
    },
    created: function () {
      let that = this;
      this.timer = setTimeout(function () {
        Vue.set(that.author, 'company', 'WINGSプロジェクト');
      }, 3000);
    },
    beforeDestroy: function () {
      clearInterval(this.timer);
    }
  });
</script>
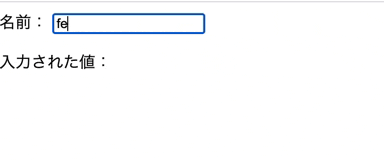
watchについて
プロパティに変化があった場合、その変更を監視してViewに伝播させることを先述した。
watchオプションを使うことで、変更があった時の動作を細かく設定することができる
今回は入力後2秒後に文字列が大文字になるようにした
<!-- HTML -->
<div id="app">
  <label>名前:
    <input type="text" v-model="name" />
  </label>
  <p>入力された値:{{upperName}}</p>
</div>

<!-- Vue -->
<script>
  new Vue({
    el: '#app',
    data: {
      name: '',
      upperName: ''
    },
    created: function () {
      this.delayFunc = _.debounce(this.getUpper, 2000);
    },
    watch: {
      name: function (newValue, oldValue) {
        this.delayFunc();
      }
    },
    methods: {
      getUpper: function () {
        this.upperName = this.name.toUpperCase();
      }
    }
  });
</script>
$watchメソッドを使ってこのように書き換えることもできる
!-- HTML -->
<div id="app">
  <label>名前:
    <input type="text" v-model="name" />
  </label>
  <p>入力された値:{{upperName}}</p>
</div>

<!-- Vue -->
<script>
  new Vue({
    el: '#app',
    data: {
      name: '',
      upperName: ''
    },
    created: function () {
      let that = this;
      this.delayFunc = _.debounce(this.getUpper, 2000);
      let watch = this.$watch('name',function(newVal,oldVal) {

      })
    },
    watch: {
      name: function (newValue, oldValue) {
        this.delayFunc();
      }
    },
    methods: {
      getUpper: function () {
        this.upperName = this.name.toUpperCase();
      }
    }
  });
</script>