はじめに
ASP.NET Core 3.1 RazorPagesで工数管理アプリを作ってみるの番外編として投稿します。
最近、社内外でアンケートを取る機会が多くあります。基本的に既存のサービスとか、紙とかで取ることが多いのですが、ASP.NET Core 3.1 RazorPagesで工数管理アプリを作ってみるで取り組んでいることを応用したらサクッとアンケートアプリを作れるのでは?ということで作ってみました。
ASP.NET Core 3.1 RazorPagesで工数管理アプリを作ってみる③-Identity編
ASP.NET Core Identity を使って簡単に認証承認機能を実装した方法を紹介しています。
ASP.NET Core 3.1 RazorPagesで工数管理アプリを作ってみる②-マスタ管理編
スキャフォールディング機能を使ってマスタ管理機能を実装した方法を紹介しています。
ASP.NET Core 3.1 RazorPagesで工数管理アプリを作ってみる①-設計編
記事を書くきっかけや設計思想を紹介しています。
出来上がったものはこんな感じ
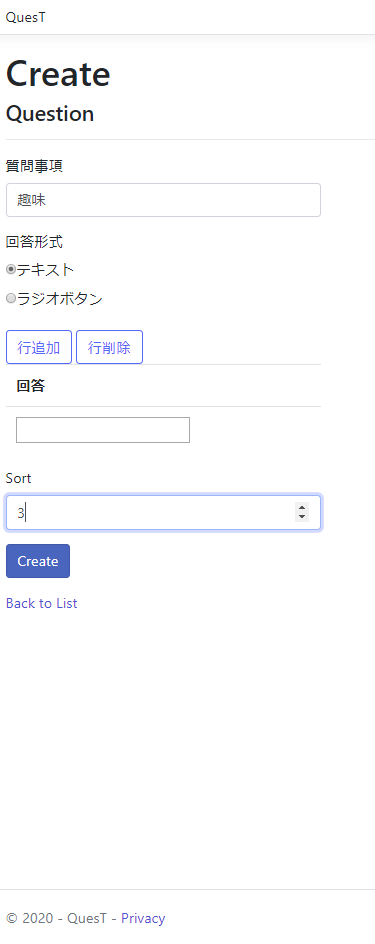
質問内容を登録します。

登録した質問に回答することができます。

さっそく作ってみる
VSCodeを使って新しいWEBアプリを作る
まずは、下記コマンドで認証機能付きのWEBアプリ”QuesT” を作ります。
dotnet new webapp --auth Individual -uld -o QuesT
--auth Individual
これは、ASP.NETcore Identity の認証を使うため。
質問内容を編集する際は登録されたアカウントでログインする必要があります。
-uld
これは、ユーザで任意のDBを使うため。指定しないとSQLiteベースになります。
DBの設定をする
今回はローカルSQLServerを使って開発していきます。
{
  "ConnectionStrings": {
    "DefaultConnection": "Server=localhost;Database=quest;Trusted_Connection=True;MultipleActiveResultSets=true"
  },
  "Logging": {
    "LogLevel": {
      "Default": "Information",
      "Microsoft": "Warning",
      "Microsoft.Hosting.Lifetime": "Information"
    }
  },
  "AllowedHosts": "*"
}
次に/Data/ApplicationDbContext.csを編集します。
public class ApplicationDbContext : IdentityDbContext
    {
        public ApplicationDbContext(DbContextOptions<ApplicationDbContext> options)
            : base(options)
        {
        }

        protected override void OnModelCreating(ModelBuilder modelBuilder)
        {
            //IdentityのDB設定を行う
            base.OnModelCreating(modelBuilder);

            //複合主キーの設定
            modelBuilder.Entity<AnswerDetail>()
                .HasKey(c => new { c.AnswerID, c.AnswerDetailID });
            modelBuilder.Entity<QuestionDetail>()
                .HasKey(c => new { c.QuestionID, c.QuestionDetailID });
        }

        //質問内容
        public DbSet<Question> Question { get; set; }
        //選択形式の質問の選択肢
        public DbSet<QuestionDetail> QuestionDetail { get; set; }
        //回答情報
        public DbSet<Answer> Answer { get; set; }
        //回答内容
        public DbSet<AnswerDetail> AnswerDetail { get; set; }
    }
/Modelsの配下にデータモデルを作ります。
namespace QuesT.Models
{
    public class Answer
    {
        public int AnswerID { get; set; }

        [Display(Name = "回答日付")]
        public DateTime AnswerDatetime { get; set; }

        public virtual ICollection<AnswerDetail> AnswerDetails { get; set; }
    }
}
namespace QuesT.Models
{
    public class AnswerDetail
    {
        public Answer Answer { get; set; }

        public int AnswerID { get; set; }
        public int AnswerDetailID { get; set; }

        public int QuestionID { get; set; }

        public string QuestionName { get; set; }

        public string AnswerDetailString { get; set; }
    }
}
namespace QuesT.Models
{
    public class Question
    {
        public int QuestionID { get; set; }

        [Required]
        [StringLength(50)]
        [Display(Name = "質問事項")]
        public string QuestionName { get; set; }

        [Required]
        [Display(Name = "回答形式")]
        public string QuestionType { get; set; }

        public int Sort { get; set; }

        public virtual ICollection<QuestionDetail> QuestionDetails { get; set; }
    }
}
namespace QuesT.Models
{
    public class QuestionDetail
    {
        public Question Question { get; set; }

        public int QuestionID { get; set; }

        public int QuestionDetailID { get; set; }

        public string QuestionString { get; set; }
    }
}
DBマイグレーションとスキャフォールディング
必要なパッケージをインストールします。
dotnet add package Microsoft.VisualStudio.Web.CodeGeneration.Design
dotnet add package Microsoft.EntityFrameworkCore
dotnet add package Microsoft.EntityFrameworkCore.Design
dotnet add package Microsoft.EntityFrameworkCore.SqlServer
次に.NET core Identity のアカウント登録/ログイン/ログアウトの画面をスキャフォールディングします。
dotnet aspnet-codegenerator identity -dc QuesT.Data.ApplicationDbContext --files="Account.Register;Account.Login;Account.Logout"
次にアンケートの質問を管理する画面とアンケートの回答画面をスキャフォールディングします。
dotnet aspnet-codegenerator razorpage -m Question -dc QuesT.Data.ApplicationDbContext -udl -outDir Pages\Questions --referenceScriptLibraries
dotnet aspnet-codegenerator razorpage -m Answer -dc QuesT.Data.ApplicationDbContext -udl -outDir Pages\Answers --referenceScriptLibraries
最後にDBマイグレーションを行って、アップデートします。
dotnet ef migrations add 1st_migration
dotnet ef database update
スキャフォールディングした画面を少しいじる
※create画面のみを例に出していますが、適宜他の画面も修正する必要があります。
先に固定値のファイルを作っておきます
    public static class Const
    {
        public static string questionType_Text ="text";
        public static string questionType_RadioButton ="radiobutton";
    }
アンケートの質問を管理する画面
create画面のcsファイルを下記に様に変更します。
namespace QuesT.Pages.Questions
{
    public class CreateModel : PageModel
    {
        private readonly QuesT.Data.ApplicationDbContext _context;

        public CreateModel(QuesT.Data.ApplicationDbContext context)
        {
            _context = context;
        }

        public IActionResult OnGet()
        {
            return Page();
        }

        [BindProperty]
        public Question Question { get; set; }

        //質問情報の選択肢リストをページモデルに追加
        [BindProperty]
        public List<QuestionDetail> QuestionDetails { get; set; }

        // To protect from overposting attacks, please enable the specific properties you want to bind to, for
        // more details see https://aka.ms/RazorPagesCRUD.
        public async Task<IActionResult> OnPostAsync()
        {
            if (!ModelState.IsValid)
            {
                return Page();
            }

            //質問情報をDBに格納
            Question.QuestionDetails = QuestionDetails;
            _context.Question.Add(Question);
            await _context.SaveChangesAsync();

            return RedirectToPage("./Index");
        }
    }
}
@page
@using QuesT.Data
@model QuesT.Pages.Questions.CreateModel

@{
    ViewData["Title"] = "Create";
}
<script>
/**
 * 行追加
 */
function insertRow(id) {
    // テーブル取得
    var table = document.getElementById(id);
    // 行を行末に追加
    var row = table.insertRow(-1);
    // セルの挿入
    var cell1 = row.insertCell(-1);

    // テーブルインデックスからリストインデックス取得
    var idx = row.rowIndex - 1;

    // 入力欄用 HTML
    var input = '<input type="text" name="QuestionDetails[' + idx + '].QuestionString" />'+
                '<input type="hidden" name="QuestionDetails[' + idx + '].QuestionID" value="0" />'+
                '<input type="hidden" name="QuestionDetails[' + idx + '].QuestionDetailID" value="' + idx + '" />'

    // セルの内容入力
    cell1.innerHTML = input;
}

/**
 * 行削除
 */
function deleteRow(obj) {

    // テーブル取得
    var table = document.getElementById(id);
    // 行末を削除
    var row = table.deleteRow(-1);
}
</script>
<h1>Create</h1>

<h4>Question</h4>
<hr />
<div class="row">
    <div class="col-md-4">
        <form method="post">
            <div asp-validation-summary="ModelOnly" class="text-danger"></div>
            <div class="form-group">
                <label asp-for="Question.QuestionName" class="control-label"></label>
                <input asp-for="Question.QuestionName" class="form-control" />
                <span asp-validation-for="Question.QuestionName" class="text-danger"></span>
            </div>
            <div class="form-group">
                <label asp-for="Question.QuestionType" class="control-label"></label>
                <div class="radio"><label><input asp-for="Question.QuestionType" type="radio" value="@Const.questionType_Text" />テキスト</label></div>
                <div class="radio"><label><input asp-for="Question.QuestionType" type="radio" value="@Const.questionType_RadioButton" />ラジオボタン</label></div>
                @* <div class="radio"><label><input asp-for="Question.QuestionType" type="radio" value="@Const.questionType_PullDown" />プルダウン</label></div>
                <div class="radio"><label><input asp-for="Question.QuestionType" type="radio" value="@Const.questionType_CheckBox" />チェックボックス</label></div> *@
            </div>
            <button type="button" class="btn btn-outline-primary" onclick="insertRow('QuestionDetail_table')">行追加</button>
            <button type="button" class="btn btn-outline-primary" onclick="deleteRow('QuestionDetail_table')">行削除</button>
            <div class="form-group">
                <table class="table table-hover " id="QuestionDetail_table">
                    <thead>
                        <tr>
                            <th scope="col">回答</th>
                        </tr>
                    </thead>
                    <tbody>
                        <tr id="QuestionDetailList{0}">
                            <td>
                                <input type="text" name="QuestionDetails[0].QuestionString" />
                                <input type="hidden" name="QuestionDetails[0].QuestionID" value="0" />
                                <input type="hidden" name="QuestionDetails[0].QuestionDetailID" value="0" />
                            </td>
                        </tr>
                    </tbody>
                </table>
            </div>
            <div class="form-group">
                <label asp-for="Question.Sort" class="control-label"></label>
                <input asp-for="Question.Sort" class="form-control" />
                <span asp-validation-for="Question.Sort" class="text-danger"></span>
            </div>
            <div class="form-group">
                <input type="submit" value="Create" class="btn btn-primary" />
            </div>
        </form>
    </div>
</div>

<div>
    <a asp-page="Index">Back to List</a>
</div>

@section Scripts {
    @{await Html.RenderPartialAsync("_ValidationScriptsPartial");}
}
アンケートに回答する画面
Create画面のcsファイルを下記に様に変更します。
namespace QuesT.Pages.Answers
{
    public class CreateModel : PageModel
    {
        private readonly QuesT.Data.ApplicationDbContext _context;

        public CreateModel(QuesT.Data.ApplicationDbContext context)
        {
            _context = context;
        }

        // public IActionResult OnGet()から変更
        public async Task OnGetAsync()
        {
            //アンケートの質問を取得
            Questions = await _context.Question.Include(Question => Question.QuestionDetails).ToListAsync();
        }

        [BindProperty]
        public Answer Answer { get; set; }

        //回答情報のリストをページモデルに追加
        [BindProperty]
        public List<AnswerDetail> AnswerDetails { get; set; }
        //質問情報のリストをページモデルに追加
        public List<Question> Questions { get; set; }

        // To protect from overposting attacks, please enable the specific properties you want to bind to, for
        // more details see https://aka.ms/RazorPagesCRUD.
        public async Task<IActionResult> OnPostAsync()
        {
            if (!ModelState.IsValid)
            {
                return Page();
            }

            //質問の回答をDBに格納
            Answer.AnswerDetails = AnswerDetails;
            Answer.AnswerDatetime = DateTime.Now;
            _context.Answer.Add(Answer);

            await _context.SaveChangesAsync();

            return RedirectToPage("./Index");
        }
    }
}
@page
@using quest.Data
@model quest.Pages.Answers.CreateModel

@{
    ViewData["Title"] = "Create";
}

<h1>Create</h1>

<h4>Answer</h4>
<hr />
<div class="row">
    <div class="col-md-4">
        <form method="post">
            <div asp-validation-summary="ModelOnly" class="text-danger"></div>
            @* <div class="form-group">
                <label asp-for="Answer.AnswerDatetime" class="control-label"></label>
                <input asp-for="Answer.AnswerDatetime" class="form-control" />
                <span asp-validation-for="Answer.AnswerDatetime" class="text-danger"></span>
            </div> *@
            @{
                int idx=0;
                @foreach(var Question in Model.Questions){
                    <div class="form-group">
                    <input type="hidden" name="AnswerDetails[@idx].AnswerID" value="@idx" />
                    <input type="hidden" name="AnswerDetails[@idx].AnswerDetailID" value="@idx" />
                    <input type="hidden" name="AnswerDetails[@idx].QuestionID" value="@Question.QuestionID" />
                    <input type="hidden" name="AnswerDetails[@idx].QuestionName" value="@Question.QuestionName" />

                    <label class="control-label">@Question.QuestionName</label>

                    @if(Question.QuestionType == Const.questionType_Text){

                        <input type="text" class="form-control" name="AnswerDetails[@idx].AnswerDetailString" />
                    }
                    else if(Question.QuestionType == Const.questionType_RadioButton)
                    {
                        @foreach(var QuestionDetail in Question.QuestionDetails){
                            <div class="radio"><label><input type="radio" name="AnswerDetails[@idx].AnswerDetailString" value="@QuestionDetail.QuestionString" />@QuestionDetail.QuestionString</label></div>
                        }
                    }

                    </div>
                    idx++;
                }

            }
            <div class="form-group">
                <input type="submit" value="Create" class="btn btn-primary" />
            </div>
        </form>
    </div>
</div>

<div>
    <a asp-page="Index">Back to List</a>
</div>

@section Scripts {
    @{await Html.RenderPartialAsync("_ValidationScriptsPartial");}
}
セキュリティまわりをすこしいじる
初期ユーザ登録用の処理を作る
/Logics/IdentityLogic.csというファイルを作ります。
この例だと、
ID:admin@localhost
PASS:!QAZ2wsx
が初期ユーザとなります。
namespace QuesT.Logics
{
    public static class IdentityLogic
    {
        public static void SeedUsers (UserManager<IdentityUser> userManager)
        {
            if (userManager.FindByEmailAsync("admin@localhost").Result == null)
            {
                IdentityUser user = new IdentityUser();
                user.UserName = "admin@localhost";
                user.Email = "admin@localhost";
                user.EmailConfirmed = true;

                IdentityResult result = userManager.CreateAsync(user, "!QAZ2wsx").Result;
            }
        }
    }
}
/Startup.csのConfigureメソッドをこんな感じで修正します。
//引数に UserManager<IdentityUser> userManager を追加
public void Configure(IApplicationBuilder app, IWebHostEnvironment env,UserManager<IdentityUser> userManager)
{

 ・・・

  //この行を追加
  IdentityLogic.SeedUsers(userManager);
}
各画面に承認機能をつける
下記ページモデルクラスの属性に[Authorize]を追加、または変更します。
これで、アンケートに答える画面以外はログイン認証しないとアクセスできません。
- QuesT.Areas.Identity.Pages.Account.RegisterModel
- QuesT.Pages.Answers.DeleteModel
- QuesT.Pages.Answers.DetailsModel
- QuesT.Pages.Answers.EditModel
- QuesT.Pages.Answers.IndexModel
- QuesT.Pages.Questions.CreateModel
- QuesT.Pages.Questions.DeleteModel
- QuesT.Pages.Questions.DetailsModel
- QuesT.Pages.Questions.EditModel
- QuesT.Pages.Questions.IndexModel
画面の見栄えを少し整える
ヘッダのメニューを消す
/Pages/Shared/_Layout.cshtmlを下記の通り修正してヘッダメニューを無効化します。
<!DOCTYPE html>
<html lang="en">
<head>
<meta charset="utf-8" />
<meta name="viewport" content="width=device-width, initial-scale=1.0" />
<title>@ViewData["Title"] - QuesT</title>
<link rel="stylesheet" href="~/lib/bootstrap/dist/css/bootstrap.min.css" />
<link rel="stylesheet" href="~/css/site.css" />
</head>
<body>
<header>
<nav class="navbar navbar-expand-sm navbar-toggleable-sm navbar-light bg-white border-bottom box-shadow mb-3">
<div class="container">
@* <a class="navbar-brand" asp-area="" asp-page="/Index">QuesT</a> *@
QuesT
<button class="navbar-toggler" type="button" data-toggle="collapse" data-target=".navbar-collapse" aria-controls="navbarSupportedContent"
aria-expanded="false" aria-label="Toggle navigation">
<span class="navbar-toggler-icon"></span>
</button>
@* <div class="navbar-collapse collapse d-sm-inline-flex flex-sm-row-reverse">
<partial name="_LoginPartial" />
<ul class="navbar-nav flex-grow-1">
<li class="nav-item">
<a class="nav-link text-dark" asp-area="" asp-page="/Index">Home</a>
</li>
<li class="nav-item">
<a class="nav-link text-dark" asp-area="" asp-page="/Privacy">Privacy</a>
</li>
</ul>
</div> *@
</div>
</nav>
</header>
<div class="container">
<main role="main" class="pb-3">
@RenderBody()
</main>
</div>
<footer class="border-top footer text-muted">
<div class="container">
© 2020 - QuesT - <a asp-area="" asp-page="/Privacy">Privacy</a>
</div>
</footer>
<script src="~/lib/jquery/dist/jquery.min.js"></script>
<script src="~/lib/bootstrap/dist/js/bootstrap.bundle.min.js"></script>
<script src="~/js/site.js" asp-append-version="true"></script>
@RenderSection("Scripts", required: false)
</body>
</html>
実際に使ってみる
ここまで来ると質問内容の登録 → アンケートに回答の流れを実施することができます。
VScode で F5 を押してデバッグを開始します。
適宜質問内容を入力・登録する
https://localhost:5001/questions/create にアクセスして適宜質問内容を入力・登録します。
質問内容の一覧を確認する
https://localhost:5001/questions/index で登録した質問の一覧を確認できます。

アンケートに回答する
https://localhost:5001/Answers/Create にアクセスすれば入力した質問項目に回答できます。
この画面はログインしていなくてもアクセス可能です。
アンケートの回答を確認する
https://localhost:5001/Answers/index にアクセスすれば回答の一覧を確認することができます。
適宜修正を加えれば回答結果を一覧で確認できるようになります。

まとめ
途中、かなり端折った部分もありますがアンケートフォームの作成くらいであればサクッと?作ることができたと思います。
(実際の開発にかかった実作業時間は2Hくらい・・・・途中自分で作りこんだバグも含めて・・・)
この後、Auzreへデプロイして運用してみようと思いますが、その部分については需要があれば別の投稿で記載します。