Javaで画像内の文字を抽出をするアプリをつくってみたく、
試しにGCPのCloud Vision APIを使ってみました。
Google Cloud Vision APIとは
Google Cloud Platformが提供している機械学習サービスの一種です。
様々な種類の画像解析を行ってくれます。
サンプルコードの実行
公式サンプルに沿って、動かしてみます。 (2019/04/08時点)
前提条件
- Mavenプロジェクトで実施
- GCPのアカウントを持っていること(APIの利用、認証キー発行で必要になります)
ライブラリ追加
VisionAPI のライブラリを追加します。
今回はMavenを利用するので、pom.xmlに以下記載を追加します。
<dependency>
   <groupId>com.google.cloud</groupId>
   <artifactId>google-cloud-vision</artifactId>
   <version>1.49.0</version>
</dependency>
認証情報の設定
GCPのAPIを利用するときに認証情報が必要になります。
GCPのコンソール上から認証情報を作成し、JSONファイルをダウンロードします
ダウンロードしたJSONファイルを任意のパスに配置し、配置したパスを環境変数で指定するようです。
set GOOGLE_APPLICATION_CREDENTIALS=[PATH]
公式ドキュメントのWindowsでの設定コマンドがset になっていますが、
setで設定すると、そのコマンドプロンプト内でしか有効になりません。
別プロセスからの参照ができず、cmdを終了すると設定した内容はなくなります。
永続的に設定した内容を残す場合は、
Windowsのシステムプロパティ画面、もしくはsetxで指定が必要です。
macで設定する場合もbash_profileに追記が必要そうですね。
この環境変数設定の仕様を知らず、eclipseで動かしてたので少しハマりました。
サンプルコードの実行
ローカル画像でのテキストの検出のサンプルを実行してみます。
detectText(String filePath, PrintStream out)にファイルパスと解析結果の出力先を投げればいいようです。
一旦、ファイルパスはオンコードで実行してみます。
public class ImgDetect {
    public static void main(String[] args) {
    	try {
    		//読み込み画像を指定
    		String inputImgPath = "{絶対パス}.jpeg";

    		//解析結果をテキストファイルで抽出
    		PrintStream outputResultPath = new PrintStream(new FileOutputStream("{絶対パス}/Result.txt"), true);

    		detectText(inputImgPath, outputResultPath);
    	}
    	catch (FileNotFoundException e) {
    		e.printStackTrace();
    		}
    	catch (Exception e) {
    		e.printStackTrace();
    		}
    }

    //サンプルコードより引用
    public static void detectText(String filePath, PrintStream out) throws Exception, IOException {
    	  List<AnnotateImageRequest> requests = new ArrayList<>();

    	  ByteString imgBytes = ByteString.readFrom(new FileInputStream(filePath));

    	  Image img = Image.newBuilder().setContent(imgBytes).build();
    	  Feature feat = Feature.newBuilder().setType(Type.TEXT_DETECTION).build();
    	  AnnotateImageRequest request =
    	      AnnotateImageRequest.newBuilder().addFeatures(feat).setImage(img).build();
    	  requests.add(request);

    	  try (ImageAnnotatorClient client = ImageAnnotatorClient.create()) {
    	    BatchAnnotateImagesResponse response = client.batchAnnotateImages(requests);
    	    List<AnnotateImageResponse> responses = response.getResponsesList();

    	    for (AnnotateImageResponse res : responses) {
    	      if (res.hasError()) {
    	        out.printf("Error: %s\n", res.getError().getMessage());
    	        return;
    	      }

    	      // For full list of available annotations, see http://g.co/cloud/vision/docs
    	      for (EntityAnnotation annotation : res.getTextAnnotationsList()) {
    	        out.printf("Text: %s\n", annotation.getDescription());
    	        out.printf("Position : %s\n", annotation.getBoundingPoly());
    	      }
    	    }
    	  }
    	}
	}
今回以下の画像でテストしてみました。
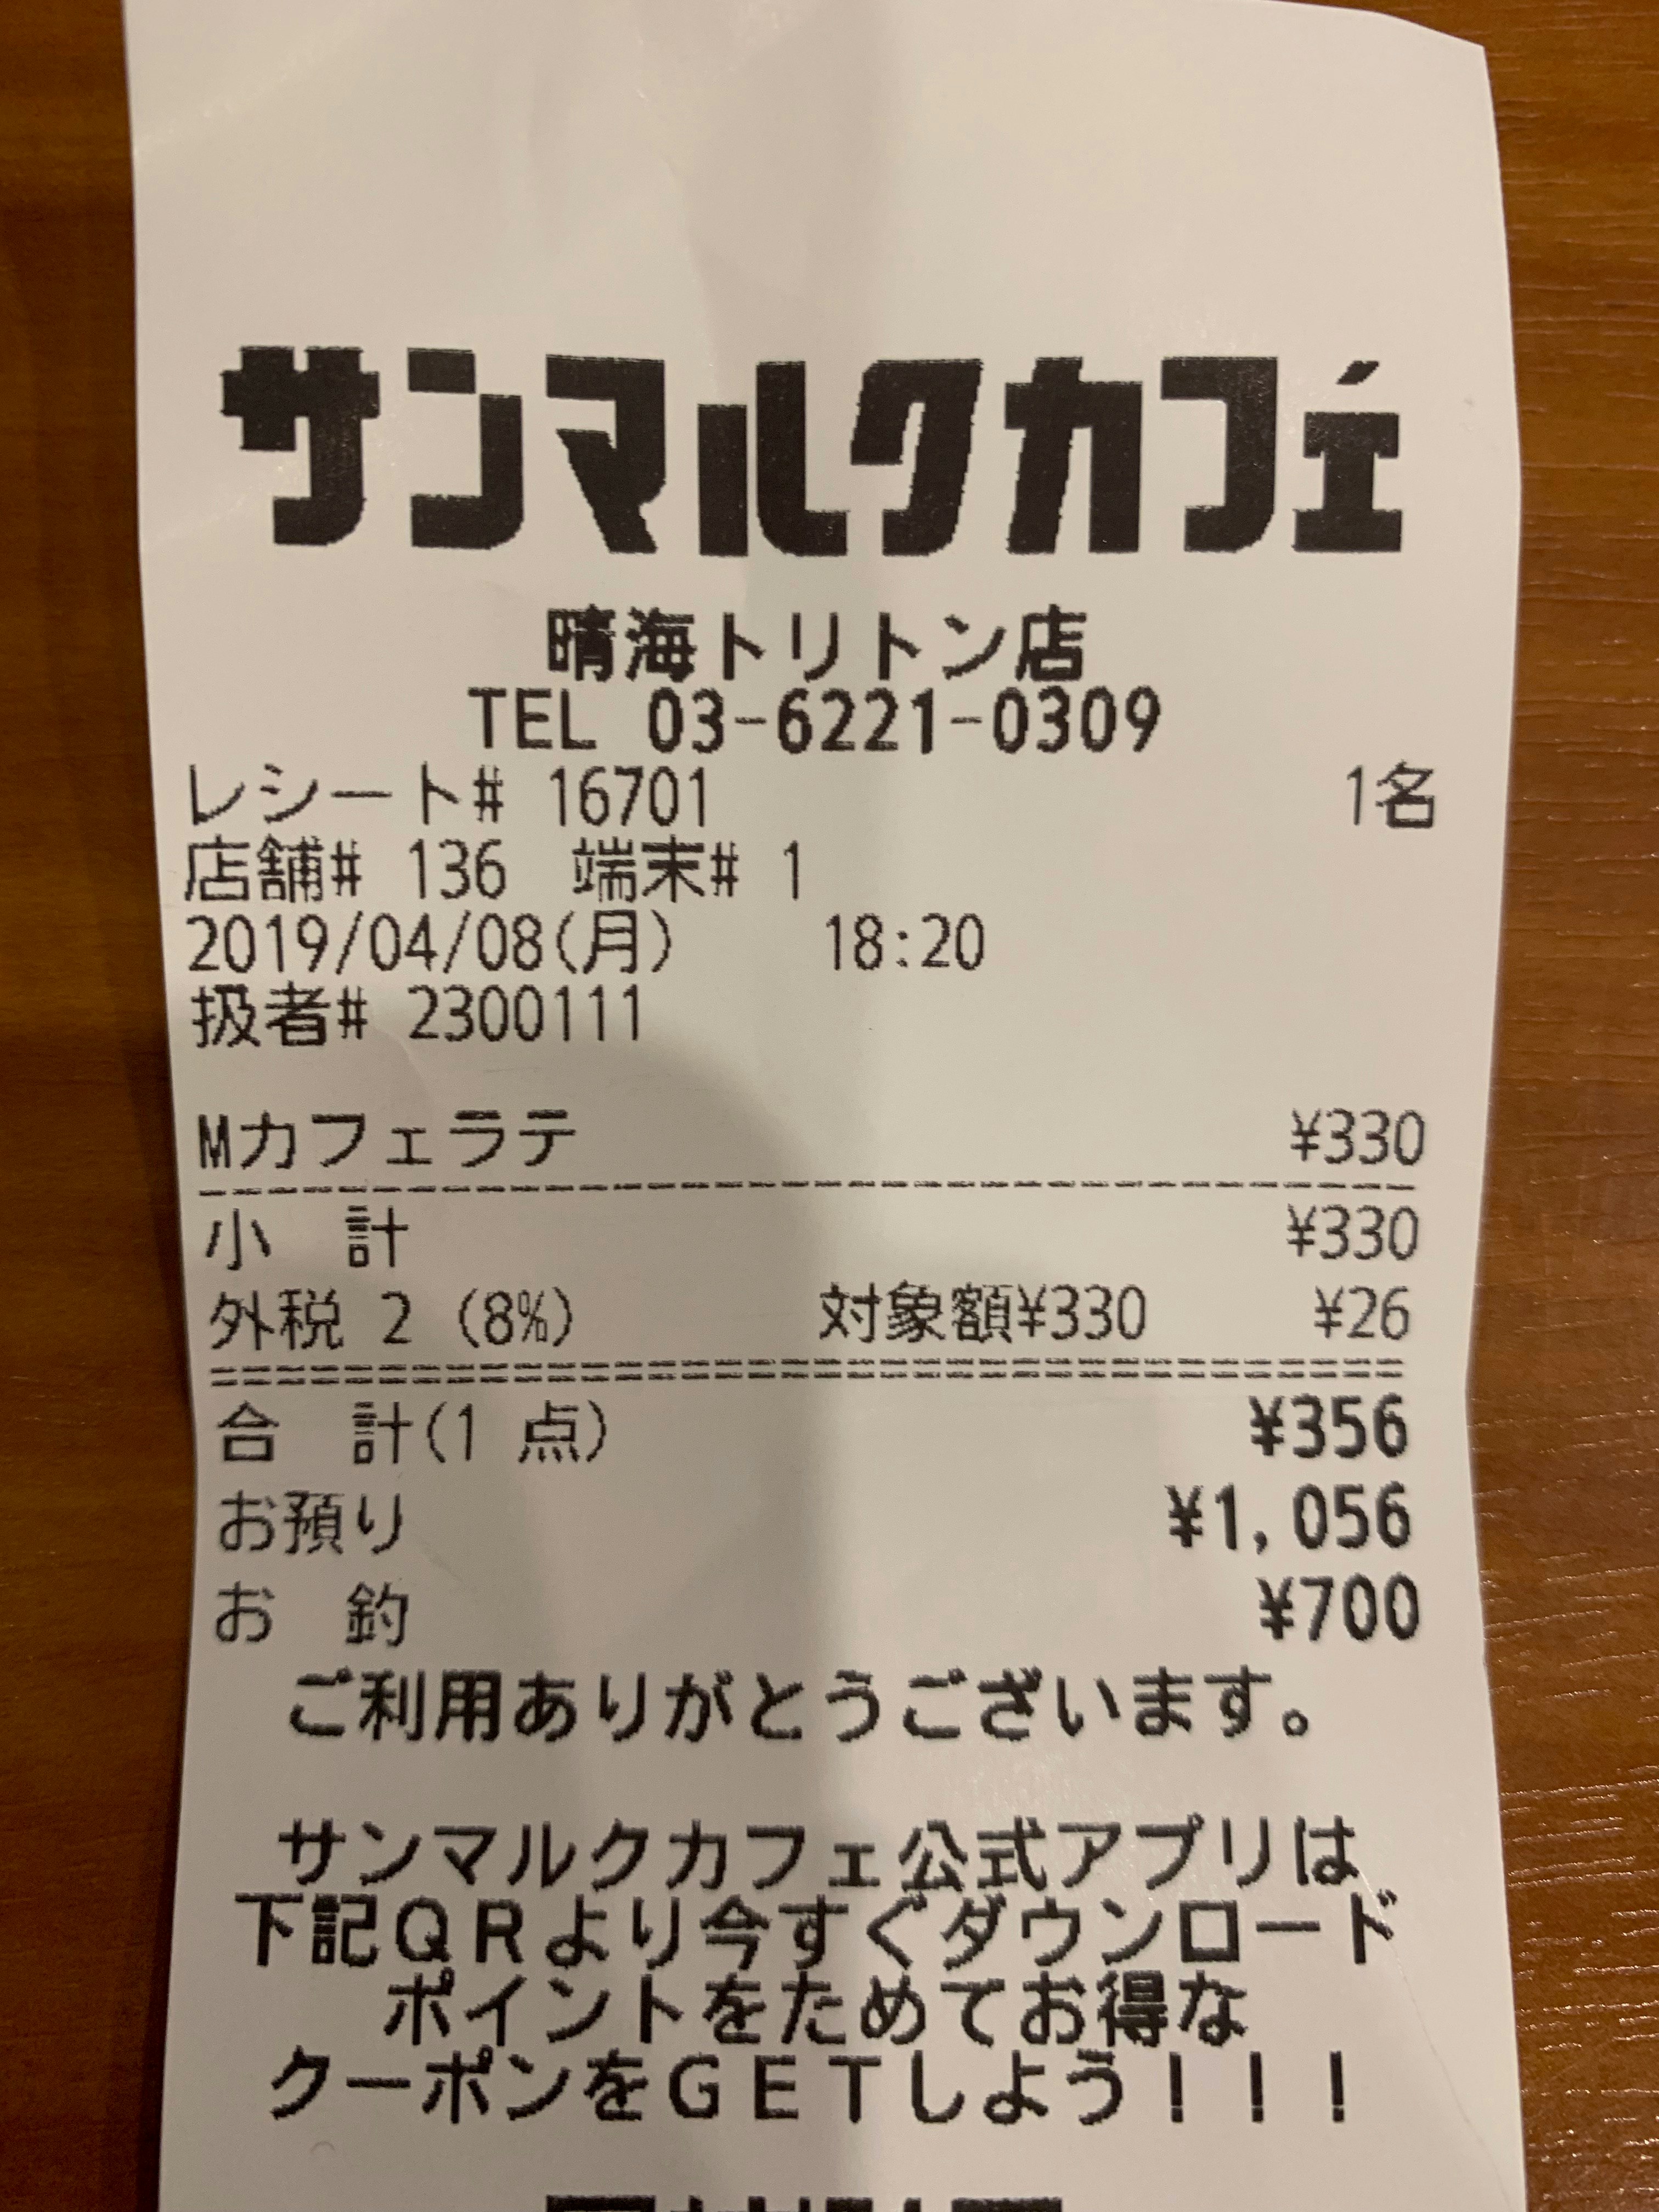
以下、解析結果です。
Text: 晴海トリトン店
TEL 03-6221-0309
佲
レシート# 16701
店舗# 136端末# 1
2019/04/08(月) 18:20
扱者# 230011 1
# 330
# 330
対象額¥330 ¥26
# 356
1, 056
¥700
Mカフェラテ
小 計
外税2 (8%)
合計(1点)
お預り
お釣
ご利用ありがとうございます
サンマルクカフェ公式アプリは
下記QRより今すぐダウンロード
ポイントをためてお得な
クーポンをGETしよう!
ほぼほぼ正しく検出できています! 気になったのは以下の点でしょうか。
- 上部のお店ロゴが読み込まれていない。文字として認識されなかった?
- 誤認識:1名 → 佲
- 誤認識:¥ → #
- 検出順が不明。一部、上から順番ではない。
あとは、各文字の座標情報も取得できます。
Position : vertices {
  x: 334
  y: 1100
}
vertices {
  x: 2624
  y: 1100
}
vertices {
  x: 2624
  y: 3877
}
vertices {
  x: 334
  y: 3877
}

Text: 晴海
Position : vertices {
  x: 994
  y: 1104
}
vertices {
  x: 1271
  y: 1104
}
vertices {
  x: 1271
  y: 1243
}
vertices {
  x: 994
  y: 1243
}

Text: トリトン
Position : vertices {
  x: 1313
  y: 1112
}
vertices {
  x: 1834
  y: 1112
}
vertices {
  x: 1834
  y: 1243
}
vertices {
  x: 1313
  y: 1243
}

~省略~
今回はローカル実行で行いましたが、
リモート実行だと、解析する画像をクラウドストレージにいれて解析するみたいですね。
今後、VisionAPIを使って簡単な画像解析アプリをつくってみたいと思います。