はじめに
初めに、私たちが所属しているサークル、システム工学研究会は様々なサーバーを運営しています。
例えば、ハッカソンや授業で用いるAPIサーバー、他にはWebサイトのHTTPサーバー、NASサーバーなど様々なものがあります。
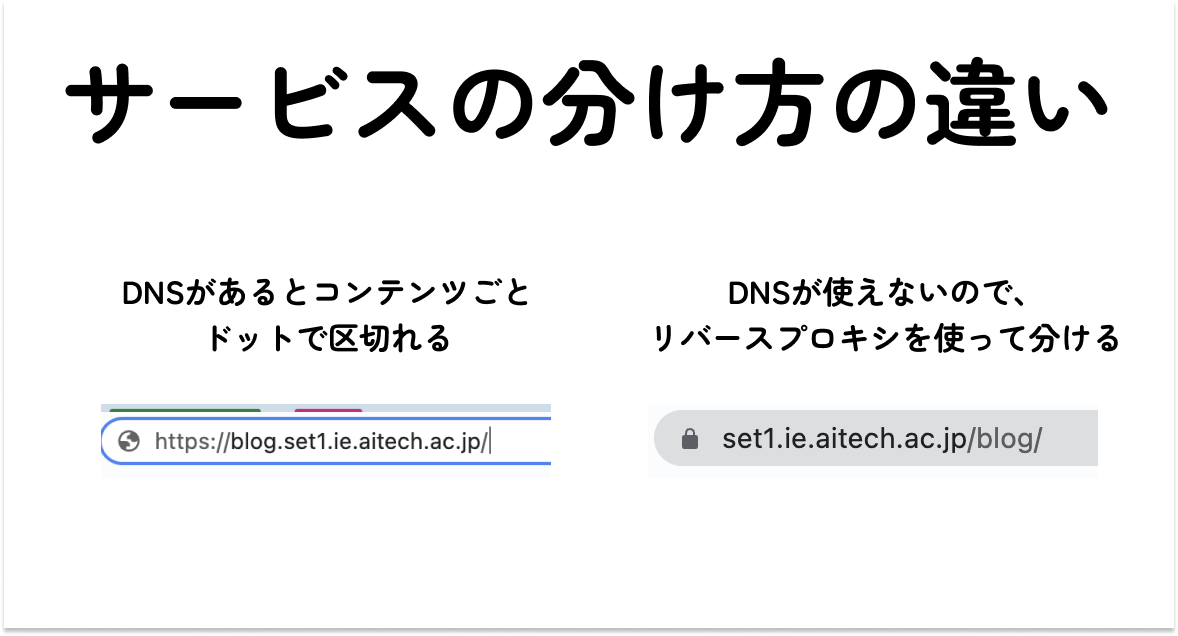
しかし、大学側の規定として、解放されているポートが80番と443番のみであったり、DNSが解放されていないため、例えば、WordPressの公開URLをhttps://blog.set1.ie.aitech.ac.jpとしたいところですが、https://set1.ie.aiteach.ac.jp/blogのように/を用いてサービスを切り分けなければならないため、リバースプロキシを学ぶ必要があるなど、様々な制約がありました。
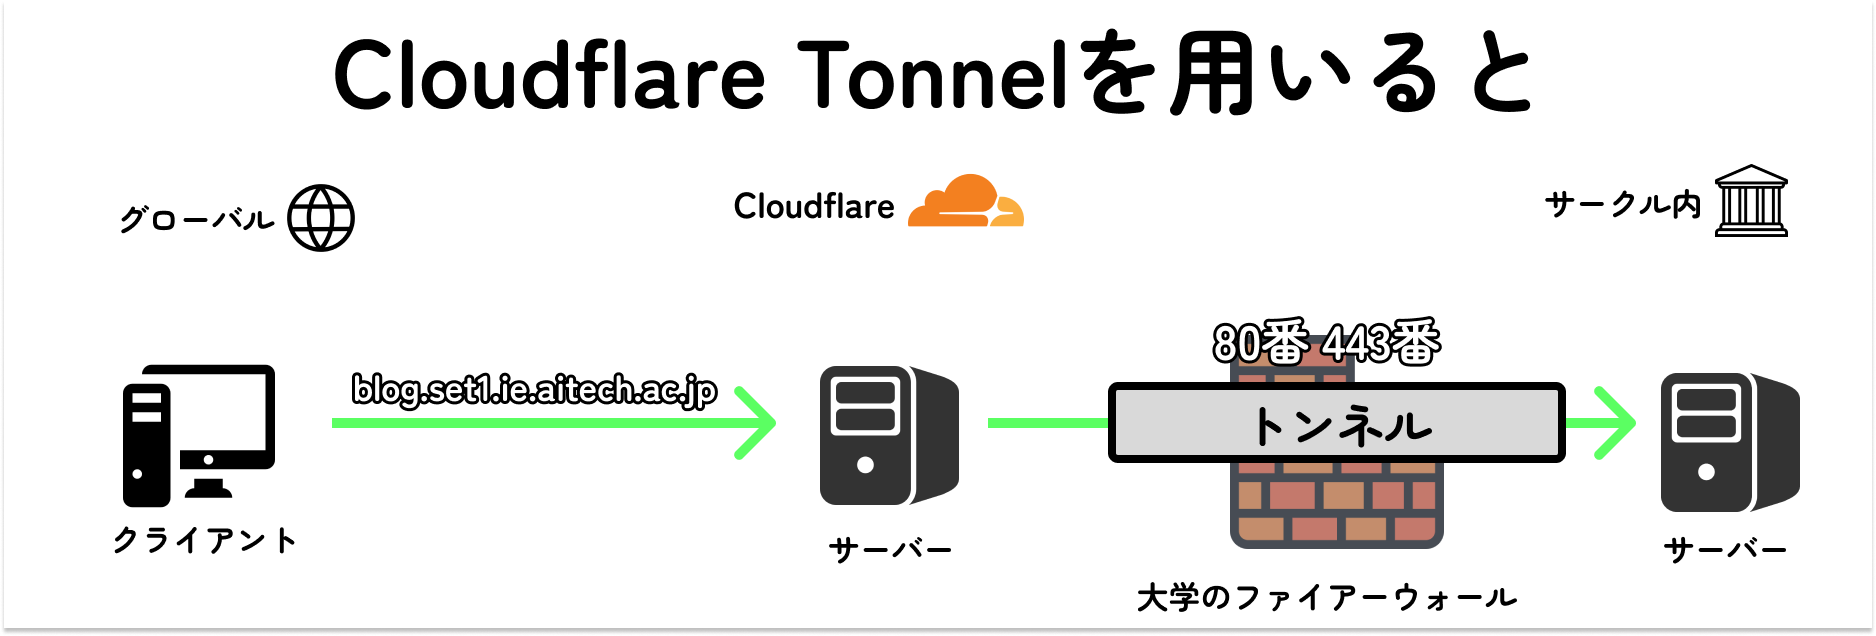
そこで、ngrok的な便利なTonnel技術を用いて、簡単に公開ができれば今後管理が楽になると考え、このサービスを導入しました。
導入背景
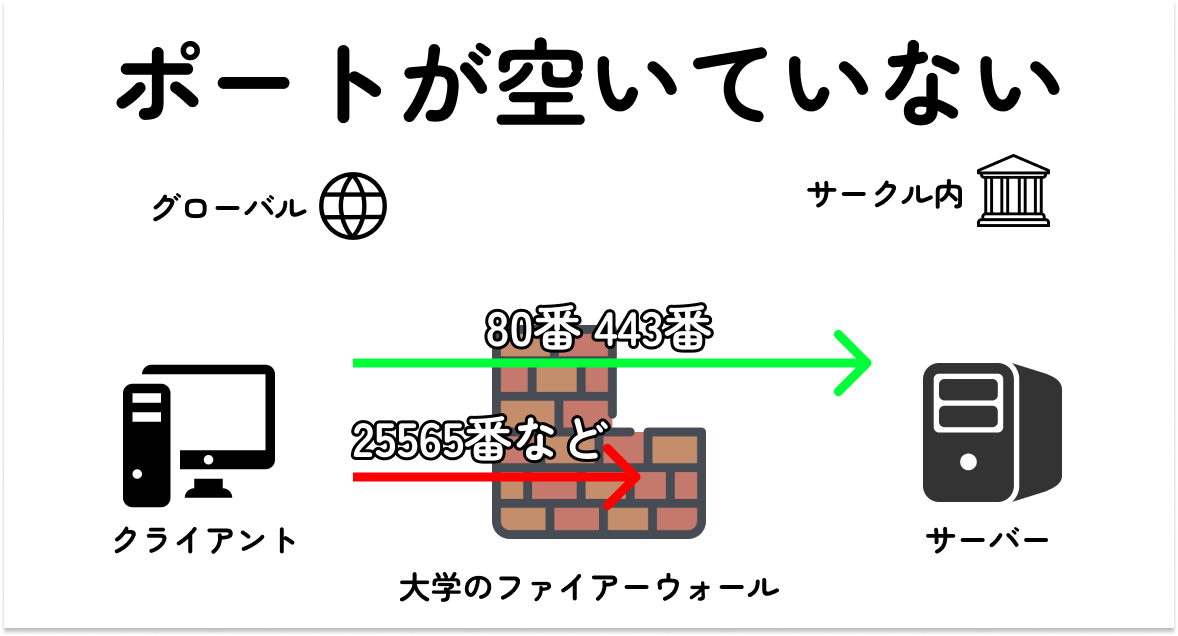
- ポートの空いている場所が2つしかない!!
- 80番と443番のみ
- DNSが使えない。
- 大学側から、サークルのDNSにお問い合わせをしてくれないため、リバースプロキシを使わなければ公開ができない。
導入メリット
- ポート解放やDNSをする必要がない。
- ポート解放をしなくてもlocalhost:8080などローカルなIPとURLをCloudflareが結びつけてくれるため、簡単に公開ができる
公式サイト
導入してよかった点
- サークルのような4年間で人材が完全に入れ替わってしまうような環境においてもサーバーの引き継ぎが簡単になった。
- 我がサークルのような特殊な環境においても、デプロイができる。
- リバースプロキシというめんどくさい手続きを省くことができた。
懸念点
- 一度に送信ができるデータ量は100MBまで
- NASとか動画データをバンバン送信しまくるサーバーでは不向きなこともある
- VPNのような動作をさせるため、組織でVPNが禁止の場合は、使えない場合がある。
- 情シスに確認をとりましょう
- うちのサークルは、ここの部分が払拭できず、未だ動作確認のみで終わっている状況です。
導入方法
インストールを行う
まず、CloudflareTunnelを使うために、クライアントをサーバーにインストールしましょう。
インストールする詳しい内容や最新のバージョンは以下を参考にしてみてください。
Cloudflaredをダウンロードする。
root@CloudflareTonnel:~# wget https://github.com/cloudflare/cloudflared/releases/latest/download/cloudflared-linux-amd64.deb
--2022-11-07 10:27:55--  https://github.com/cloudflare/cloudflared/releases/latest/download/cloudflared-linux-amd64.deb
Resolving github.com (github.com)... 20.27.177.113
Connecting to github.com (github.com)|20.27.177.113|:443... connected.
HTTP request sent, awaiting response... 302 Found
Location: https://github.com/cloudflare/cloudflared/releases/download/2022.10.3/cloudflared-linux-amd64.deb [following]
--2022-11-07 10:27:55--  https://github.com/cloudflare/cloudflared/releases/download/2022.10.3/cloudflared-linux-amd64.deb
Reusing existing connection to github.com:443.
HTTP request sent, awaiting response... 302 Found
Location: https://objects.githubusercontent.com/github-production-release-asset-2e65be/106867604/1f134130-bf76-40fb-b345-700c43894bc9?X-Amz-Algorithm=AWS4-HMAC-SHA256&X-Amz-Credential=AKIAIWNJYAX4CSVEH53A%2F20221107%2Fus-east-1%2Fs3%2Faws4_request&X-Amz-Date=20221107T102755Z&X-Amz-Expires=300&X-Amz-Signature=fb6815c21d683759399ff1914b8043c24a0ccc322999d19b0f3d77340865be38&X-Amz-SignedHeaders=host&actor_id=0&key_id=0&repo_id=106867604&response-content-disposition=attachment%3B%20filename%3Dcloudflared-linux-amd64.deb&response-content-type=application%2Foctet-stream [following]
--2022-11-07 10:27:55--  https://objects.githubusercontent.com/github-production-release-asset-2e65be/106867604/1f134130-bf76-40fb-b345-700c43894bc9?X-Amz-Algorithm=AWS4-HMAC-SHA256&X-Amz-Credential=AKIAIWNJYAX4CSVEH53A%2F20221107%2Fus-east-1%2Fs3%2Faws4_request&X-Amz-Date=20221107T102755Z&X-Amz-Expires=300&X-Amz-Signature=fb6815c21d683759399ff1914b8043c24a0ccc322999d19b0f3d77340865be38&X-Amz-SignedHeaders=host&actor_id=0&key_id=0&repo_id=106867604&response-content-disposition=attachment%3B%20filename%3Dcloudflared-linux-amd64.deb&response-content-type=application%2Foctet-stream
Resolving objects.githubusercontent.com (objects.githubusercontent.com)... 185.199.108.133, 185.199.109.133, 185.199.110.133, ...
Connecting to objects.githubusercontent.com (objects.githubusercontent.com)|185.199.108.133|:443... connected.
HTTP request sent, awaiting response... 200 OK
Length: 16655506 (16M) [application/octet-stream]
Saving to: 'cloudflared-linux-amd64.deb'

cloudflared-linux-amd64.deb                    82%[==============================================================================>                  ]  13.05M  --.-KB/s    in 22s

2022-11-07 10:28:18 (611 KB/s) - Connection closed at byte 13680640. Retrying.

--2022-11-07 10:28:19--  (try: 2)  https://objects.githubusercontent.com/github-production-release-asset-2e65be/106867604/1f134130-bf76-40fb-b345-700c43894bc9?X-Amz-Algorithm=AWS4-HMAC-SHA256&X-Amz-Credential=AKIAIWNJYAX4CSVEH53A%2F20221107%2Fus-east-1%2Fs3%2Faws4_request&X-Amz-Date=20221107T102755Z&X-Amz-Expires=300&X-Amz-Signature=fb6815c21d683759399ff1914b8043c24a0ccc322999d19b0f3d77340865be38&X-Amz-SignedHeaders=host&actor_id=0&key_id=0&repo_id=106867604&response-content-disposition=attachment%3B%20filename%3Dcloudflared-linux-amd64.deb&response-content-type=application%2Foctet-stream
Connecting to objects.githubusercontent.com (objects.githubusercontent.com)|185.199.108.133|:443... connected.
HTTP request sent, awaiting response... 206 Partial Content
Length: 16655506 (16M), 2974866 (2.8M) remaining [application/octet-stream]
Saving to: 'cloudflared-linux-amd64.deb'

cloudflared-linux-amd64.deb                   100%[+++++++++++++++++++++++++++++++++++++++++++++++++++++++++++++++++++++++++++++++=================>]  15.88M   417KB/s    in 14s

2022-11-07 10:28:34 (209 KB/s) - 'cloudflared-linux-amd64.deb' saved [16655506/16655506]
Cloudflaredをインストールする
root@CloudflareTonnel:~# apt install ./cloudflared-linux-amd64.deb
Reading package lists... Done
Building dependency tree... Done
Reading state information... Done
Note, selecting 'cloudflared' instead of './cloudflared-linux-amd64.deb'
cloudflared is already the newest version (2022.10.3).
0 upgraded, 0 newly installed, 0 to remove and 0 not upgraded.
ログインを行う
下記コマンドを入力して、表示されたURLをウェブブラウザに入力してログインを行いましょう。
ブラウザからログインができるのはすごく便利ですよね。
root@CloudflareTonnel:~# cloudflared tunnel login
Please open the following URL and log in with your Cloudflare account:

https://dash.cloudflare.com/argotunnel?callback=ごにょごにょ

Leave cloudflared running to download the cert automatically.

You have successfully logged in.
If you wish to copy your credentials to a server, they have been saved to:
/root/.cloudflared/cert.pem
トンネルを作成する
ここで、トンネルを作成しましょう。
トンネルを作成すると、Created tunnel mattermost with id のあとに、UUIDが表示されるので控えておくといいです。
トンネルは、一つの端末で一つ以上作成することはできないので注意をしましょう。
root@CloudflareTonnel:~# cloudflared tunnel create トンネル名
Tunnel credentials written to /root/.cloudflared/ごにょごにょ.json. cloudflared chose this file based on where your origin certificate was found. Keep this file secret. To revoke these credentials, delete the tunnel.

Created tunnel mattermost with id ごにょごにょUUIDが出てくる
DNSに登録をする
ここでDNSを登録します。
自分の好きなURLとどのトンネルを通るのかを設定します。
$ cloudflared tunnel route dns さっき出てきたごにょごにょUUIDを突っ込む 好きなサブドメイン名.自分のドメイン
$ cloudflared tunnel route dns さっき出てきたごにょごにょUUIDを突っ込む blog.example.com
2022-11-07T10:36:56Z INF Added CNAME blog.example.com which will route to this tunnel tunnelID=ごにょごにょ
コンフィグを変更をする
コンフィグの設定を行います。
ここで、トンネルからやってきた内容と、サーバー側のサービスを結びつける作業を行います。
記入する内容として、以下のものがあります。
よくありがちのミスとして、ymlを書く場所を間違えがちなので、注意をしましょう。
 - hostname: ここに好きなURLを
   service: サービスのIPアドレスとポート番号
localhostで設定すると失敗することがあるので、127.0.0.1で設定してあげましょう。
mkdir /etc/cloudflared/
sudo vim /etc/cloudflared/config.yml
tunnel: ごにょごにょ
credentials-file: /ユーザー名/.cloudflared/ごにょごにょ.json

ingress:
    - hostname: blog.example.com
      service: http://127.0.0.1:3000
    - service: http_status:404
cloudflaredをサービス登録する
cloudflaredをサービス登録して、systemctlを用いてバックグラウンドで動いてもらうように設定をしましょう。
sudo cloudflared service install
cloudflaredを再起動をして、設定を反映させましょう。
sudo systemctl restart cloudflared
動作確認
あとは、自分の設定したURLにアクセスして、想定したページが表示されれば完了です。
この時の画像はGrowiサーバーを建てた時の写真です。

まとめ
今回は、CloudflareTunnelを用いてWebサイトを簡単にデプロイする方法をまとめました。
ngrokのような動作をするため、簡単にデプロイができます。
またTunnel技術を用いたことで、ポート解放やDNSのようなめんどくさい部分をパッケージかしてくれました。
皆さんも、この技術を用いて、自分のサービスをデプロイしてみてはいかがでしょうか?
余談 RaspberuPiでこれを行いたい場合は、以下のURLが参考になりました。
参考文献