はじめに
皆さんこんにちは。今回はナイーブベイズにて自殺ツイートを判別できるか試してみます。
データセット作成とEDA、ルールベースでの検出の流れは下記をご参照ください。
その前にワードクラウドを描いてみる
自殺ツイートと無関係なツイートの特徴の違いを見るためにワードクラウドを描いてみます。janomeでトークナイズした後、ワードクラウドを描きます。
!pip install janome
!pip install demoji

from pprint import pprint
import re
import demoji
from janome.tokenizer import Tokenizer
import collections
%matplotlib inline
from wordcloud import WordCloud
import matplotlib.pyplot as plt
## データ読み込み
import pandas as pd
df = pd.read_csv('/content/drive/MyDrive/suicide_detection/input/train.csv', encoding='UTF-8')

## 関数群の定義
def get_nouns(sentence, noun_list):
    for token in t.tokenize(sentence):
        split_token = token.part_of_speech.split(',')
        ## 一般名詞を抽出
        if split_token[0] == '名詞' and split_token[1] == '一般':
            noun_list.append(token.surface)

def depict_word_cloud(noun_list):
    ## 名詞リストの要素を空白区切りにする(word_cloudの仕様)
    noun_space = ' '.join(map(str, noun_list))
    ## word cloudの設定(フォントの設定)
    wc = WordCloud(background_color="white", font_path=r"/usr/share/fonts/truetype/fonts-japanese-gothic.ttf", width=1000,height=1000)

    wc.generate(noun_space)
    ## 出力画像の大きさの指定
    plt.figure(figsize=(10,10))
    ## 目盛りの削除
    plt.tick_params(labelbottom=False,
                    labelleft=False,
                    labelright=False,
                    labeltop=False,
                   length=0)
    ## word cloudの表示
    plt.imshow(wc)
    plt.show()
自殺ツイートは「自分、気持ち、心、人、社会」といった内省する自分への思いや葛藤が見受けられます。
一方無関係なツイートは天気関係のツイートを引っ張ってきたため「天気」や、4/1のツイートのため「エイプリルフール、年度、月」といったワードが目立ちます。
ナイーブベイズ判別器について
ナイーブベイズはスパムメールの分別などに用いられています。そのシンプルさを活かして今回は自殺ツイートを見分けられるのか試してみます。
モデル作成の流れとしては
形態素解析⇒TF-IDF算出⇒ナイーブベイズモデル作成 でやってみます。
まずはMecabと新語にも対応できるように辞書(mecab-ipadic-NEologd)をインストールします。
# 形態素分析ライブラリーMeCab と 辞書(mecab-ipadic-NEologd)のインストール
!apt-get -q -y install sudo file mecab libmecab-dev mecab-ipadic-utf8 git curl python-mecab > /dev/null
!git clone --depth 1 https://github.com/neologd/mecab-ipadic-neologd.git > /dev/null
!echo yes | mecab-ipadic-neologd/bin/install-mecab-ipadic-neologd -n > /dev/null 2>&1
!pip install mecab-python3 > /dev/null

# シンボリックリンクによるエラー回避
!ln -s /etc/mecabrc /usr/local/etc/mecabrc
2023/02/08まで上記方法でNEologd辞書がgoogle colabでも使えたんですが、なぜかRuntime errorが発生してしまいました。ひとまず、Ochasenで分かち書きします。
#形態素解析(一般名詞・動詞:基礎型・形容詞:基礎型)&スペース区切りをデータフレームに格納
#形態素解析(一般名詞・動詞・形容詞(動詞と形容詞は基礎型)を抽出対象とした)
#スペース区切り分かち書き
def mecab_analysis(text):

    t = MeCab.Tagger('-Ochasen')

    node = t.parseToNode(text)

    words = []

    while node:
        if node.surface != "":  # ヘッダとフッタを除外

            word_type = node.feature.split(',')[0]
            sub_type = node.feature.split(',')[1]
            features_ = node.feature.split(',')

            #品詞を選択
            if word_type in ["名詞"]:
#                if sub_type in ['一般']:
                    word = node.surface
                    words.append(word)

            #動詞、形容詞[基礎型]を抽出(名詞のみを抽出したい場合は以下コードを除く)
            elif word_type in ['動詞','形容詞'] and not (features_[6] in stop_words):
                words.append(features_[6])

        node = node.next

        if node is None:
            break

    return " ".join(words)

#形態素結果をリスト化し、データフレームdf1に結果を列追加する
df['words'] = df['tweet'].apply(mecab_analysis)
それでは、データを分割します。
#ナイーブベイズモデル作成に必要なライブラリのインポート
from sklearn.feature_extraction.text import CountVectorizer
from sklearn.feature_extraction.text import TfidfTransformer
from sklearn.naive_bayes import MultinomialNB

#データ前処理
from sklearn import preprocessing
from sklearn.model_selection import train_test_split
from imblearn.over_sampling import RandomOverSampler

X_train, X_test, y_train, y_test = train_test_split(X, y, test_size=0.2, stratify=y, random_state=42)
X_train, X_valid, y_train, y_valid = train_test_split(X_train, y_train, test_size=0.2, stratify=y_train, random_state=42)
分割したデータの割合を見てみましょう。
(unique, counts) = np.unique(y_train, return_counts=True)
np.asarray((unique, counts)).T
array([[   0, 3201],
       [   1,  318]])
だいぶ不均衡です。オーバーサンプリングしてみます。
ros = RandomOverSampler()
X_train, y_train = ros.fit_resample(np.array(X_train).reshape(-1, 1), np.array(y_train).reshape(-1, 1));
train_os = pd.DataFrame(list(zip([x[0] for x in X_train], y_train)), columns = ['words', 'suicide']);

X_train = train_os['words'].values
y_train = train_os['suicide'].values

(unique, counts) = np.unique(y_train, return_counts=True)
np.asarray((unique, counts)).T
array([[   0, 3201],
       [   1, 3201]])
そろいました!
次にCountVectorizerを用いてBoWを作成し、TF-IFD変換して単語に重みづけします。
#BoW作成
clf = CountVectorizer()
X_train_cv =  clf.fit_transform(X_train)
X_test_cv = clf.transform(X_test)

#TF-IDF変換
tf_transformer = TfidfTransformer(use_idf=True).fit(X_train_cv)
X_train_tf = tf_transformer.transform(X_train_cv)
X_test_tf = tf_transformer.transform(X_test_cv)
最後にナイーブベイズモデルを作成します。
nb_clf = MultinomialNB()
nb_clf.fit(X_train_tf, y_train)
nb_pred = nb_clf.predict(X_test_tf)
title = ["suicide","not-suicide"]

from sklearn.metrics import classification_report, confusion_matrix
print('Classification Report for Naive Bayes:\n',classification_report(y_test, nb_pred, target_names=title))
Classification Report for Naive Bayes:
               precision    recall  f1-score   support

     suicide       0.97      0.68      0.80      1000
 not-suicide       0.19      0.78      0.31       100

    accuracy                           0.68      1100
   macro avg       0.58      0.73      0.55      1100
weighted avg       0.90      0.68      0.75      1100
自殺でない(not-suicide)ツイートの判別が難しいようです。
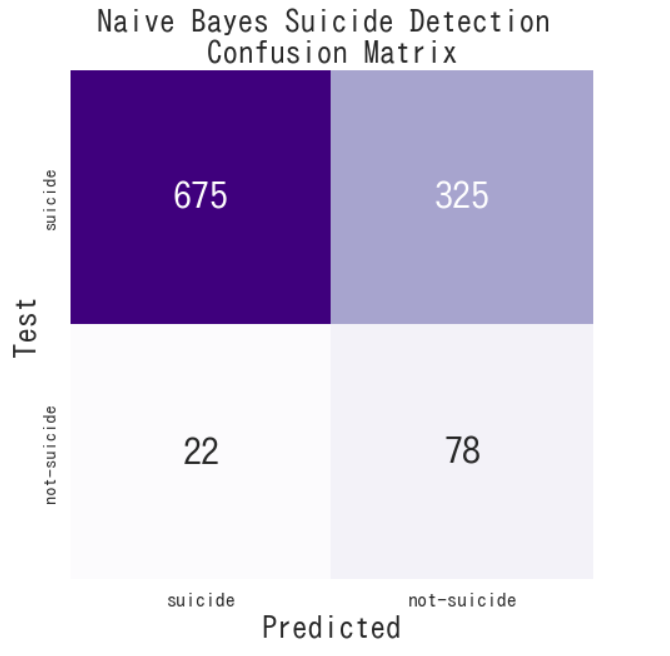
混同行列もかいてみます。
import seaborn as sns
def conf_matrix(y, y_pred, title, labels):
    fig, ax =plt.subplots(figsize=(7.5,7.5))
    ax=sns.heatmap(confusion_matrix(y, y_pred), annot=True, cmap="Purples", fmt='g', cbar=False, annot_kws={"size":30})
    plt.title(title, fontsize=25)
    ax.xaxis.set_ticklabels(labels, fontsize=16)
    ax.yaxis.set_ticklabels(labels, fontsize=14.5)
    ax.set_ylabel('Test', fontsize=25)
    ax.set_xlabel('Predicted', fontsize=25)
    plt.show()

conf_matrix(y_test,nb_pred,'Naive Bayes Suicide Detection \nConfusion Matrix', title)

大きく外しちゃっていますね。
なぜこのような結果になるのでしょうか。実際の自殺ツイートと無関係なツイートの分かち書き結果を見てみます。

自殺ツイートの原文は
「辛くなってきた。やめて死にたい。辛い。今みんな異性との別れはまじきついわー。20代」
無関係なツイートは
「やらかしたことに気づいた。死にたい。イシュカ死亡フラグ。・・・」
という感じで、「死ぬ」「死亡」が入っていたらえいやーで「自殺ツイート」と認識されてしまうのだと考えます。
あれ、そうだとすると"Test-not-suicide"× "Predicted-suicide"のFPが高くなる気がするんですが、
FNが多くなるのはなぜ・・・?混乱してきました。
ちょっと整理してみます。
参考
形態素解析は下記ページを参照しました。
https://qiita.com/hima2b4/items/1bf18f88897ddf2c4715
ナイーブベイズモデル作成は下記ページを参照しました。
https://www.kaggle.com/code/ludovicocuoghi/detecting-bullying-tweets-pytorch-lstm-bert

