ゆめみの日常
※伯方の塩は博多でつくっているわけではないそうです。
このスレッドをながめていたら、昔Twitterで見た「ずんどこきよしのプログラム」っぽいものが作れるんじゃないかと思い、CoreBluetoothで作ってみました。
そして出来たのがこちら。(※音が流れるので注意!)
https://twitter.com/u11238123/status/1198624428143214592
アプリ通信の流れについて
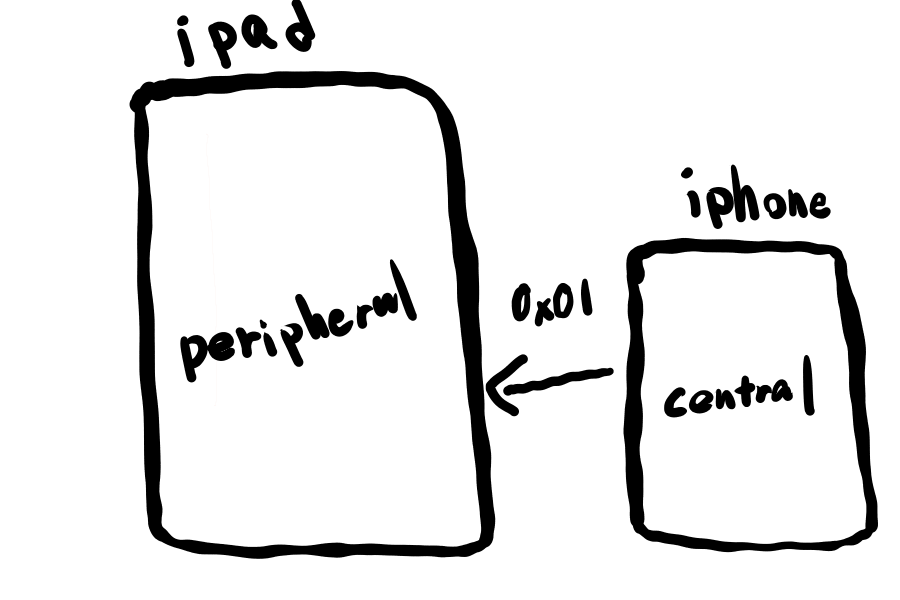
このアプリはCentral(動画内でのiPhone)側からPeripheral(動画内でのiPad)側にwriteをして音声を出力しています。
Bluetoothは固有の名称などがたくさんあり、それを全て説明していると1つ記事がかけてしまうので詳しく知りたい方は過去に僕がまとめた記事があるのでそれを参照してください。
また、この記事ではCentralの実装の解説だけに絞り、音の再生部分などは省略します🙇♂️
centralの実装
Central側でデータを書き込む流れは以下のような感じです。
① Bluetoothの使用許可をinfo.plistに書く
② CBCentralManagerのインスタンスを作る
③ デバイスがBluetoothを使用可能か判定
④ スキャンを開始する
⑤ 検出したperipheralとコネクトする
⑥ peripheralのServiceを検出する
⑦ Serviceの中のCharacteristicを検出する
⑧ 検出したCharacteristicに対してwriteする
① Bluetoothの使用許可をinfo.plistに書く
ios13からiosデバイスでBluetoothを使用する際permissionの許可が必須になったため記載してあげる必要があります。
    <key>NSBluetoothAlwaysUsageDescription</key>
    <string>伯方の塩で使うよ</string>
ここに記載した文章がアプリ内のアラートに表示されますが、大手などのアプリでもいい加減なものを複数観測しているので、審査の際は書いてあればOKなのかなと思います。
ですが、ユーザに不信感を与えるので何に使うかは詳しく書いておいた方が良いと思います。
② CBCentralManagerのインスタンスを作る
CBCentralManagerのインスタンスを作成すると各種delegateメソッドが呼ばれるようになります。
class ViewController: UIViewController {
    var centralManager: CBCentralManager!

    override func viewDidLoad() {
        super.viewDidLoad()
        centralManager = CBCentralManager(delegate: self, queue: nil)
    }
}
extension ViewController: CBCentralManagerDelegate, CBPeripheralDelegate{}
③ デバイスがBluetoothを使用可能か判定
状態の取得はPeripheralと同じく以下のようなcaseが用意されています。
poweredOn以外の時に無理やり次に進もうとするとクラッシュする可能性があるので注意が必要です。
    func centralManagerDidUpdateState(_ central: CBCentralManager) {
        switch central.state {

        case .unknown:
            print("よくわかないけどダメ!")
        case .resetting:
            print("システムとの接続がよくわからんからダメ!")
        case .unsupported:
            print("Bluetooth許可されてないじゃんダメ!")
        case .unauthorized:
            print("このデバイスBluetooth使えないからダメ!")
        case .poweredOff:
            print("Bluetooth offになってるからダメ!")
        case .poweredOn:
            print("つかえるよ!!!")
        @unknown default:
            fatalError("へんなのきたからダメ!")
        }
    }
④ スキャンを開始する
poweredOnの状態(Bluetoothが使用可能)な場合以下のようにスキャンを開始するメソッドを呼び出します。
伯方の塩(Peripheral)の記事の方でuuidgenを使って作成したUUIDを指定しています。
scanForPeripheralsの第一引数にはnilを指定することも可能で、nilを指定した場合は見つかった全てのPeripheralが検知のメソッドに飛んできます。
    func centralManagerDidUpdateState(_ central: CBCentralManager) {
        if central.state == .poweredOn {
            central.scanForPeripherals(withServices: [CBUUID(string: "19688AFB-4E68-4F21-BCBA-421220280930")], options: nil)
        }
    }
⑤ 検出したperipheralとコネクトする
scanForPeripheralsが呼ばれて指定したServiceを持つPeripheralを見つけると**centralManager(_ central: CBCentralManager,didDiscover peripheral: CBPeripheral,advertisementData: [String : Any],rssi RSSI: NSNumber)**メソッドが呼ばれます。
この時注意しなくてはいけないのがconnectを行うperipheralはメンバに保持しておかないといけないという点です。
これ以降に呼ばれるメソッドにもperipheralは引数として保持していますが、ローカルに保持していないperipheralに対してwriteなどを行なっても実行されません。
    var myPeripheral: CBPeripheral!

    func centralManager(_ central: CBCentralManager,
                        didDiscover peripheral: CBPeripheral,
                        advertisementData: [String : Any],
                        rssi RSSI: NSNumber) {
         myPeripheral = peripheral
         myCentralManager.connect(myPeripheral, options: nil)
    }
今回は使用していない2つの引数ですが、advertisementDataはその名のとうりperipheral側でadvertiseで持たせたデータが入っています。
RSSIはperipheralの電波強度が入っています。よくRSSIはcentralとperipheral間の距離だと勘違いしている人がいますが、電波強度なのでperipheralの充電が減ったりすると当然値が変化してしまいます。
そのためRSSI==距離ではないので注意
⑥ peripheralのServiceを検出する
コネクトが成功したらメンバとして保持しておいたperipheralにdelegateをセットしてServiceの検索を行います。
こちらもスキャンを行なっていた時同様nilを指定するとコネクトしているPeripheralの全てのServiceを検出します。
    func centralManager(_ central: CBCentralManager, didConnect peripheral: CBPeripheral) {
        myPeripheral.delegate = self
        myPeripheral.discoverServices([CBUUID(string: "19688AFB-4E68-4F21-BCBA-421220280930")])
    }
⑦ Serviceの中のCharacteristicを検出する
Serviceを検出すると以下のメソッドに渡ってくるのでその中でServiceの保持しているCharacteristicをさらに探しに行きます。
discoverCharacteristicsの第一引数にもnilを渡した場合はServiceの保持しているすべてのCharacteristicがそのまま渡されることになります。
    func peripheral(_ peripheral: CBPeripheral, didDiscoverServices error: Error?) {
        if error != nil {
            print(error)
        }
        peripheral.services.forEach { servie in
           if service.uuid.uuidString == "19688AFB-4E68-4F21-BCBA-421220280930" {
               myPeripheral.discoverCharacteristics([CBUUID(string: "999889FF-42B0-4FC8-B5BC-0CAB8C323FD2")], for: service)
           }
        }
    }
⑧ 検出したCharacteristicに対してwriteする
あとはperipheralに向けて値をwriteするだけです。
冒頭の動画では0x01, 0x02, 0x03の値をランダムに送ってperipheral側で音声を出力していました。
    let sendData: [UInt8] = [0x01, 0x02, 0x03]

    func peripheral(_ peripheral: CBPeripheral, didDiscoverCharacteristicsFor service: CBService, error: Error?) {
        if error != nil {
            print(error)
        }

        service.characteristics?.forEach{ characteristic in
            if characteristic.uuid.uuidString == "999889FF-42B0-4FC8-B5BC-0CAB8C323FD2"{
                let data = Data(bytes: [sendData.randomElement()!])
                myPeripheral!.writeValue(data, for: targetCharacteristic, type: .withResponse)
            }
        }
    }
writeは必ずこのメソッドの中で呼ばなければいけないかというとそうではなく、このメソッドに到達した時点でwriteできることが可能だということが証明されるものだと考えてください。
peripheralを他のクラスに渡してwriteやread,notifyなどを行うことも可能です。
Peripheralをiosで実装した際のキャッシュ問題
ios以外でperipheralを作った時は問題ないんですが、CoreBluetoothでPeripheralを実装するともともとデバイスの保持しているServiceやCharacteristicしか検出することができません。
これがデバイスがGATTをキャッシュしていることが問題で起こる問題です。
以下のメソッドの中で再度Serviceの検出を行うことで追加したServiceを見つけることができます。
    func peripheral(_ peripheral: CBPeripheral, didModifyServices invalidatedServices: [CBService]) {
        myPeripheral.discoverServices([CBUUID(string: "19688AFB-4E68-4F21-BCBA-421220280930")])
    }

