はじめに
私がロボットに関して興味を持っており,ロボットの経路を作成したいと思っている.
経路生成を実施するためには,干渉判定の処理が必要である.自作で干渉判定の処理を作成したが,処理時間が長いためライブラリを使用しようと考えた.
Pythonにて経路生成を実装しているため,Python用の干渉判定ライブラリを調査したところ python-fcl が候補となった.
本記事では,python-fcl の使用方法を説明する.
python-fcl は下記の GitHub に保存されている.
・https://github.com/BerkeleyAutomation/python-fcl
本記事で実装すること
・python-fcl の使用方法を説明する
本記事では実装できないこと(将来実装したい内容)
・経路生成(RRTなど)に python-fcl を組み込む
・ロボットを python-fcl で定義する
動作環境
・macOS Sequoia (バージョン15.5)
・Python3 (3.10.9)
・Numpy (1.23.5) (数値計算用ライブラリ)
・python-fcl (4.1.2) (干渉判定用ライブラリ)
python-fcl の使用方法
python-fcl の使用方法を説明する.
python-fcl のインストール方法
python-fcl のインストール方法は下記の通りである.
私は下記を実施したら,python-fcl が動いた.(以前にxcodeよりC++をインストールしていたから,簡単に動いたかもしれない)
pip install python-fcl
python-fcl で使用可能な干渉物
python-fcl で使用可能な干渉物を下表にまとめた.
| No | 名称 |
|---|---|
| 1 | 直方体 |
| 2 | 球 |
| 3 | カプセル(円柱+半球) |
| 4 | 円錐 |
| 5 | 円柱 |
| 6 | 平面 |
| 7 | 半空間(無限の平面) |
| 8 | 凸多面体 |
| 9 | 三角形 |
| 10 | メッシュ |
| 11 | 楕円体 |
干渉物の回転を定義
fcl で干渉物を定義するが,干渉物の回転も与えることができる.
そのため,干渉物の回転を先に関数化することによって,後ほど干渉物に回転を与えれるようにする.
import numpy as np
import fcl

def rotation_z(theta):
    """
    z軸へtheta回転させた時の回転行列を返す

    パラメータ
        theta(float): 回転角度 [rad]

    戻り値
        rotation(numpy.ndarray): 回転行列
    """
    rotation = np.array([[np.cos(theta), -np.sin(theta), 0],
                         [np.sin(theta),  np.cos(theta), 0],
                         [0,              0,             1]])

    return rotation

def rotation_y(theta):
    """
    y軸へtheta回転させた時の回転行列を返す

    パラメータ
        theta(float): 回転角度 [rad]

    戻り値
        rotation(numpy.ndarray): 回転行列
    """
    rotation = np.array([[ np.cos(theta), 0, np.sin(theta)],
                         [ 0,             1, 0            ],
                         [-np.sin(theta), 0, np.cos(theta)]])

    return rotation

def rotation_x(theta):
    """
    x軸へtheta回転させた時の回転行列を返す

    パラメータ
        theta(float): 回転角度 [rad]

    戻り値
        rotation(numpy.ndarray): 回転行列
    """
    rotation = np.array([[1, 0,              0            ],
                         [0, np.cos(theta), -np.sin(theta)],
                         [0, np.sin(theta),  np.cos(theta)]])

    return rotation
直方体 (Box) の定義方法
fcl で直方体を定義する方法を説明する.
fcl.Box() で直方体の各辺の長さを与える.
fcl.Transform() で干渉物の回転行列と平行移動を与える.
fcl.CollisionObject() で干渉物オブジェクトを作成する.
# x軸に1,y軸に2,z軸に3の長さを持つ直方体
box1 = fcl.Box(1, 2, 3)
# 直方体の基準点を(0, 0, 0),回転行列を無回転で定義 (今回は原点かつ無回転)
tra1 = fcl.Transform()
# 干渉判定用のオブジェクト作成 (今回は無回転の直方体)
col1 = fcl.CollisionObject(box1, tra1)

# 1辺が2の長さを持つ立方体
box2 = fcl.Box(2, 2, 2)
# 立方体の基準点を(0, 0, 5),回転行列を無回転で定義
tra2 = fcl.Transform(np.array([0, 0, 5]))
# 干渉判定用のオブジェクト作詞
col2 = fcl.CollisionObject(box2, tra2)

# x軸に3.1,y軸に2.4,z軸に1.1の長さを持つ直方体
box3 = fcl.Box(3.1, 2.4, 1.1)
# z軸に90度回転させた回転行列
rotation = rotation_z(np.deg2rad(90))
# 直方体の基準点を(3.2, 3.5, 3.1),回転行列をz軸に90度回転で定義
# fcl.Transform には,回転行列, 平行移動したい位置の順番に引数を与える必要がある
tra3 = fcl.Transform(rotation, np.array([3.2, 3.5, 3.1]))
# 干渉判定用のオブジェクト作詞
col3 = fcl.CollisionObject(box3, tra3)
球 (Sphere) の定義方法
fcl で球を定義する方法を説明する.
fcl.Sphere() で球の半径を与える.
# 半径1の球
sph1 = fcl.Sphere(1)
# 球の基準点を(1, 1, 0),回転行列を無回転で定義
tra1 = fcl.Transform(np.array([1, 1, 0]))
# 干渉判定用のオブジェクト作成 (今回は無回転の直方体)
col1 = fcl.CollisionObject(sph1, tra1)

# 半径2の球
sph2 = fcl.Sphere(2)
# z軸に180度回転させた回転行列
rotation = rotation_z(np.deg2rad(180))
# 球の基準点を(3.1, 3.3, 3.0),回転行列をz軸に180度回転で定義
# fcl.Transform には,回転行列, 平行移動したい位置の順番に引数を与える必要がある
tra2 = fcl.Transform(rotation, np.array([3.1, 3.3, 3.0]))
# 干渉判定用のオブジェクト作詞
col2 = fcl.CollisionObject(sph2, tra2)
カプセル (Capsule) の定義方法
fcl でカプセルを定義する方法を説明する.
fcl.Capsule() でカプセルの半球の半径,円柱の高さを与える.
# 円柱部分の高さが2,半径1の半球
cap1 = fcl.Capsule(1, 2)
# カプセルの基準点を(10, 3, 0),回転行列を無回転で定義
tra1 = fcl.Transform(np.array([10, 3, 0]))
# 干渉判定用のオブジェクト作成 (今回は無回転の直方体)
col1 = fcl.CollisionObject(cap1, tra1)

# 円柱部分の高さが20.4,半径5.2の半球
cap2 = fcl.Capsule(5.2, 20.4)
# x軸に90度回転させた回転行列
rotation = rotation_x(np.deg2rad(90))
# カプセルの基準点を(1.5, 2.2, 3),回転行列をx軸に90度回転で定義
# fcl.Transform には,回転行列, 平行移動したい位置の順番に引数を与える必要がある
tra2 = fcl.Transform(rotation, np.array([1.5, 2.2, 3]))
# 干渉判定用のオブジェクト作詞
col2 = fcl.CollisionObject(cap2, tra2)
円錐 (Cone) の定義方法
fcl で円錐を定義する方法を説明する.
fcl.Cone() で円錐の底面の半径,高さを与える.
# 底面の半径2,高さ1の円錐
con1 = fcl.Cone(2, 1)
# 円錐の基準点を(1, 0, 5),回転行列を無回転で定義
tra1 = fcl.Transform(np.array([1, 0, 5]))
# 干渉判定用のオブジェクト作成 (今回は無回転の直方体)
col1 = fcl.CollisionObject(con1, tra1)

# 底面の半径1.2, 高さ5.7の円錐
con2 = fcl.Cone(1.2, 5.7)
# y軸に45度回転させた回転行列
rotation = rotation_y(np.deg2rad(45))
# 円錐の基準点を(1, 5.2, 9.9),回転行列をx軸に90度回転で定義
# fcl.Transform には,回転行列, 平行移動したい位置の順番に引数を与える必要がある
tra2 = fcl.Transform(rotation, np.array([1, 5.2, 9.9]))
# 干渉判定用のオブジェクト作詞
col2 = fcl.CollisionObject(con2, tra2)
円柱 (Cylinder) の定義方法
fcl で円柱を定義する方法を説明する.
fcl.Cylinder() で円柱の半径,高さを与える.
# 半径100,高さ1の円柱
cyl1 = fcl.Cylinder(100, 1)
# 円柱の基準点を(0, 0, 0),回転行列を無回転で定義
tra1 = fcl.Transform()
# 干渉判定用のオブジェクト作成 (今回は無回転の直方体)
col1 = fcl.CollisionObject(cyl1, tra1)

# 底面の半径1.55, 高さ80.99の円錐
cyl2 = fcl.Cylinder(1.55, 80.99)
# z軸に45度回転させ,y軸に30度回転させた回転行列
rotation = np.dot( rotation_y(np.deg2rad(30)), rotation_z(np.deg2rad(45)) )
# 円柱の基準点を(0, 10.1, 3.9),回転行列をx軸に90度回転で定義
# fcl.Transform には,回転行列, 平行移動したい位置の順番に引数を与える必要がある
tra2 = fcl.Transform(rotation, np.array([0, 10.1, 3.9]))
# 干渉判定用のオブジェクト作詞
col2 = fcl.CollisionObject(cyl2, tra2)
平面 (Plane) の定義方法
fcl で平面を定義する方法を説明する.
fcl.Plane() で平面のパラメータを与える.
# ax + by + cz + d = 0 という平面を表す
# z = 0の平面 (0 * x + 0 * y + 1 * z + 0 = 0よりz = 0の平面となる)
# Planeのパラメータは小数点でないとエラーが発生する
pln1 = fcl.Plane(np.array([0.0, 0.0, 1.0]), 0.0)
# 平面の基準点を(0, 0, 0),回転行列を無回転で定義
tra1 = fcl.Transform()
# 干渉判定用のオブジェクト作成 (今回は無回転の直方体)
col1 = fcl.CollisionObject(pln1, tra1)

# ax + by + cz + d = 0 という平面を表す
# z = 0の平面 (1 * x + 0 * y + 0 * z - 5 = 0よりx = 5の平面となる)
# Planeのパラメータは小数点でないとエラーが発生する
pln2 = fcl.Plane(np.array([1.0, 0.0, 0.0]), -5.0)
# 平面の基準点を(0, 0, 0),回転行列を無回転で定義
tra2 = fcl.Transform()
# 干渉判定用のオブジェクト作詞
col2 = fcl.CollisionObject(pln2, tra2)
半空間 (HalfSpace) の定義方法
fcl で平面を定義する方法を説明する.
fcl.Halfspace() で半空間のパラメータを与える.
# ax + by + cz + d <= 0 という半空間を表す
# z <= 0の半空間 (0 * x + 0 * y + 1 * z + 0 = 0よりz <= 0の半空間となる)
# Halfspaceのパラメータは小数点でないとエラーが発生する
hsp1 = fcl.Halfspace(np.array([0.0, 0.0, 1.0]), 0.0)
# 半空間の基準点を(0, 0, 0),回転行列を無回転で定義
tra1 = fcl.Transform()
# 干渉判定用のオブジェクト作成 (今回は無回転の直方体)
col1 = fcl.CollisionObject(hsp1, tra1)

# ax + by + cz + d <= 0 という平面を表す
# y <= -1の半空間 (0 * x + 1 * y + 0 * z + 1 = 0よりy <= -1の半空間となる)
# Halfspaceのパラメータは小数点でないとエラーが発生する
hsp2 = fcl.Halfspace(np.array([1.0, 0.0, 0.0]), -5.0)
# 半空間の基準点を(0, 0, 0),回転行列を無回転で定義
tra2 = fcl.Transform()
# 干渉判定用のオブジェクト作詞
col2 = fcl.CollisionObject(hsp2, tra2)
凸多面体 (Convex) の定義方法
fcl で凸多面体 (どの2点を選んでも、その間を結ぶ線分が必ず立体内部に収まる.立方体は凸多面体である.星形の多面体は凸多面体ではない.) を定義する方法を説明する.
fcl.Convex() で凸多面体のパラメータを与える.
# 凸多面体を構成する頂点群を定義
verts = np.array([[1.0, 1.0, 1.0],
                  [2.0, 1.0, 1.0],
                  [1.0, 2.0, 1.0],
                  [1.0, 1.0, 2.0]], dtype=np.float64)

tris = np.array([[0, 2, 1],
                 [0, 3, 2],
                 [0, 1, 3],
                 [1, 2, 3]], dtype=np.int64)

faces = np.concatenate((3 * np.ones((len(tris), 1), dtype=np.int64), tris), axis=1).flatten()

convex = fcl.Convex(verts, len(tris), faces)
# verts: (N, 3) のfloat64配列
# len(tris): 三角形面の数 (int)
# faces: (num_faces * 4)のint64配列で,各面の頂点数(3) + 頂点インデックス3つを連結したもの
# 半空間の基準点を(0, 0, 0),回転行列を無回転で定義
tra1 = fcl.Transform()
# 干渉判定用のオブジェクト作成 (今回は無回転の直方体)
col1 = fcl.CollisionObject(convex, tra1)
三角形 (TriangleP) の定義方法
fcl で三角形を定義する方法を説明する.
fcl.TriangleP() で三角形のパラメータを与える.
# 三角形の頂点を定義
vert1  = np.array([1.0, 2.0, 3.0])
vert2  = np.array([2.0, 1.0, 3.0])
vert3  = np.array([3.0, 2.0, 1.0])
# TrianglePオブジェクトの生成
tri1 = fcl.TriangleP(vert1, vert2, vert3)
# 三角形の基準点を(0, 0, 0),回転行列を無回転で定義
tra1 = fcl.Transform()
# 干渉判定用のオブジェクト作成 (今回は無回転の直方体)
col1 = fcl.CollisionObject(tri1, tra1)

# TrianglePオブジェクトの生成
tri2 = fcl.TriangleP(vert1, vert2, vert3)
# z軸に90度回転させ,y軸に60度回転させた回転行列
rotation = np.dot( rotation_y(np.deg2rad(60)), rotation_z(np.deg2rad(90)) )
# 三角形の基準点を(1.3, 1.1, 5.9)
tra2 = fcl.Transform(rotation, np.array([1.3, 1.1, 5.9]))
# 干渉判定用のオブジェクト作成 (今回は無回転の直方体)
col2 = fcl.CollisionObject(tri2, tra2)
メッシュ (Mesh) の定義方法
fcl でメッシュを定義する方法を説明する.
fcl.BVHModel() でメッシュのパラメータを与える.
# 三角形ポリゴンの定義
# 頂点座標(N x 3 配列)
vertices = np.array([
    [0.0, 0.0, 0.0],  # 頂点0
    [1.0, 0.0, 0.0],  # 頂点1
    [0.5, 1.0, 0.0],  # 頂点2
    [0.5, 0.5, 1.0]   # 頂点3
], dtype=np.float64)

# 三角形インデックス(M x 3 配列)
triangles = np.array([
    [0, 1, 2],  # 三角形0
    [0, 1, 3],  # 三角形1
    [1, 2, 3],  # 三角形2
    [2, 0, 3]   # 三角形3
], dtype=np.int32)

# BVHモデルの作成
mesh = fcl.BVHModel()
# モデル構築開始(頂点数・三角形数を指定)
mesh.beginModel(len(vertices), len(triangles))
# 頂点・三角形をモデルに追加
mesh.addSubModel(vertices, triangles)
# モデル構築終了(BVH構築も同時に行われる)
mesh.endModel()
# 三角形の基準点を(0, 0, 0),回転行列を無回転で定義
tra1 = fcl.Transform()
# 干渉判定用のオブジェクト作成 (今回は無回転のメッシュ)
col1 = fcl.CollisionObject(mesh, tra1)
楕円体 (Ellipsoid) の定義方法
fcl で楕円体を定義する方法を説明する.
fcl.Ellipsoid() で楕円体のパラメータを与える.
# x軸に3,y軸に1,z軸に5の長さを持つ楕円体
elp1 = fcl.Ellipsoid(3, 1, 5)
# 楕円体の基準点を(0, 0, 0),回転行列を無回転で定義
tra1 = fcl.Transform()
# 干渉判定用のオブジェクト作成 (今回は無回転の直方体)
col1 = fcl.CollisionObject(elp1, tra1)

# x軸に1.5,y軸に0.4,z軸に9.5の長さを持つ楕円体
elp2 = fcl.Ellipsoid(1.5, 0.4, 9.5)
# z軸に180度回転させ,y軸に45度回転させた回転行列
rotation = np.dot( rotation_y(np.deg2rad(45)), rotation_z(np.deg2rad(180)) )
# 楕円体の基準点を(0.5, 4.2, 2.5)平行移動
tra2 = fcl.Transform(rotation, np.array([0.5, 4.2, 2.5]))
# 干渉判定用のオブジェクト作詞
col2 = fcl.CollisionObject(elp2, tra2)
python-fcl による干渉判定処理
上記にて,干渉物の定義方法を説明した.
次は定義した干渉物を使用した,下記の処理方法を説明する.
・干渉判定 (Collision Detection)
・最短距離計算 (Distance Computation)
・連続干渉判定 (Continuous Collision Detection)
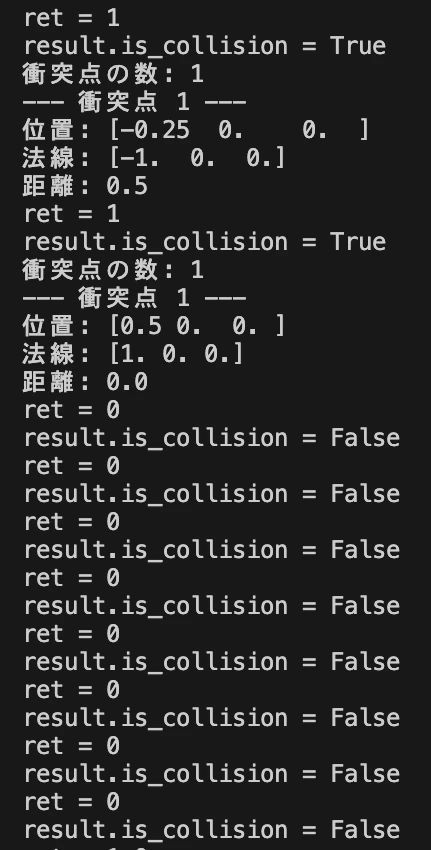
干渉判定 (Collision Detection)
python-fcl にて,干渉判定の処理方法を説明する.
今回は球と立方体の干渉判定を実施してみた.
# 半径0.5の球
sph = fcl.Sphere(0.5)
# 干渉物の基準点は原点,回転は無回転とする
sph_tf = fcl.Transform()
sphere_obj = fcl.CollisionObject(sph, sph_tf)

# 衝突リクエストと結果オブジェクト
# num_max_contacts ... 最大の衝突点数
# enable_contact ... 衝突点情報の有無
request = fcl.CollisionRequest(num_max_contacts=10, enable_contact=True)

# 判定実行
for i in range(10):
    # 1辺が1の立方体
    box = fcl.Box(i, i, i)
    box_tf = fcl.Transform(np.array([i, 0.0, 0.0]))
    box_obj = fcl.CollisionObject(box, box_tf)

    # 結果オブジェクトのインスタンスを生成
    # 結果オブジェクトを使い回すと,前回の情報が残ったままとなっているから,毎回インスタンスを生成する
    result = fcl.CollisionResult()
    ret = fcl.collide(sphere_obj, box_obj, request, result)
    print(f"ret = {ret}")
    print(f"result.is_collision = {result.is_collision}")
    if result.is_collision:
        print("衝突点の数:", len(result.contacts))
        for i, contact in enumerate(result.contacts):
            print(f"--- 衝突点 {i+1} ---")
            print("位置:", contact.pos)                 # 衝突点の座標
            print("法線:", contact.normal)              # 接触面の法線ベクトル
            print("距離:", contact.penetration_depth)   # めり込み量(負の距離)
結果は以下となり,想定通りの結果となった.
最短距離計算 (Distance Computation)
python-fcl にて,最短距離計算の処理方法を説明する.
今回は球と立方体の最短距離計算を実施してみた.
# 円柱の半径を0.5,高さを2.0
cyl = fcl.Cylinder(0.5, 2.0)
# 円柱の基準点(中点)は原点、回転を無回転とする
cyl_tf = fcl.Transform()
# 干渉物オブジェクトの作成
cyl_obj = fcl.CollisionObject(cyl, cyl_tf)

# カプセルの半球の半径を0.4,円柱の高さを1.5
cap = fcl.Capsule(0.4, 1.5)
# カプセルの基準点(中点)は[1.2, 0.0, 0.0]、回転を無回転とする
cap_tf = fcl.Transform(np.array([1.2, 0.0, 0.0]))
# 干渉物オブジェクトの作成
cap_obj = fcl.CollisionObject(cap, cap_tf)

# 干渉判定と異なる箇所 ↓
# 距離計算用リクエストと結果オブジェクトを定義
request = fcl.DistanceRequest()
result  = fcl.DistanceResult()

# 距離計算実行
ret = fcl.distance(cyl_obj, cap_obj, request, result)

# 結果表示
# min_distance > 0: 衝突していない
# min_distance = 0: 接触 (境界で接している)
# min_distance < 0: 干渉 (めり込んでいる)
print(f"Distance: {result.min_distance}")
print(f"Nearest point on cylinder: {result.nearest_points[0]}")
print(f"Nearest point on capsule: {result.nearest_points[1]}")
# 干渉判定と異なる箇所 ↑
結果は以下となった.最短距離が0.3であるのは想定通りだが,最短距離の位置のz軸が-0.3となる理由は不明である.z軸が0.0でも,-0.1でも最短距離は0.3になるため,どうして-0.3が一意に決まったのかは不明.

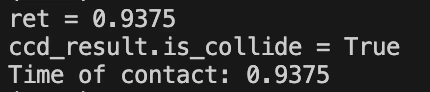
連続干渉判定 (Continuous Collision Detection)
python-fcl にて,連続干渉判定の処理方法を説明する.
今回は立方体と立方体の連続干渉判定を実施してみた.
# 1辺が1の立方体
box1 = fcl.Box(1.0, 1.0, 1.0)
# 初期位置(中心点)は原点,姿勢は無回転
box1_tf_start = fcl.Transform()
# 干渉物オブジェクトの作成
box1_obj = fcl.CollisionObject(box1, box1_tf_start)
# 終了位置はx方向に1.5移動
box1_tf_end = fcl.Transform(np.array([1.5, 0, 0]))

# 1辺が1の立方体
box2 = fcl.Box(1.0, 1.0, 1.0)
# 初期位置はxに2.5,姿勢は無回転
box2_tf_start = fcl.Transform(np.array([2.5, 0, 0]))
# 干渉物オブジェクトの作成
box2_obj = fcl.CollisionObject(box2, box2_tf_start)
# 終了位置は初期位置と同じ
box2_tf_end = box2_tf_start

# 連続干渉判定用リクエストと結果
ccd_request = fcl.ContinuousCollisionRequest()
ccd_result  = fcl.ContinuousCollisionResult()

# 連続干渉判定の実行
ret = fcl.continuousCollide(
    box1_obj, box1_tf_end,
    box2_obj, box2_tf_end,
    ccd_request, ccd_result)

print(f"ret = {ret}")
print(f"ccd_result.is_collide = {ccd_result.is_collide}")
if ccd_result.is_collide:   # 干渉あり
    # 干渉時の時間
    print(f"Time of contact: {ccd_result.time_of_contact}")
上記を実施すると結果は以下となった.
結果としては,干渉なしとなった.retには干渉した時の時間が(0, 1)で保存され,初期位置から目標位置へ連続干渉をしても,干渉しなかったら1が返ってくる.

想定の動きとしては,目標位置に移動するとちょうどbox1とbox2が接するような処理としていたのが問題であった.そのため,box1_tf_endをx方向に1.6移動させると干渉があるのではないかと思われる.
box1_tf_end = fcl.Transform(np.array([1.6, 0.0, 0]))
結果は以下となった.干渉なしと想定外の結果となった.
box1_tf_endとbox2_tf_startを以下のように修正したら,上手くいった.
box1_tf_end = fcl.Transform(np.array([0, 1.6, 0]))
box2_tf_start = fcl.Transform(np.array([0, 2.5, 0]))
box1_tf_end = fcl.Transform(np.array([0, 0, 1.6]))
box2_tf_start = fcl.Transform(np.array([0, 0, 2.5]))
y,z軸だけを移動させると干渉ありになるが,x軸だけを移動させると干渉なしになる理由がわからない.
そのため,x軸だけでなく,y,z軸も以下のように微小に動かすことが必要である.
epsilon = 1e-6
box1_tf_end = fcl.Transform(np.array([1.6, epsilon, epsilon]))
box2_tf_start = fcl.Transform(np.array([2.5, epsilon, epsilon]))
python-fcl を使用することによって,どのような環境でも構築でき,経路生成に活かすことができる.
また,ロボットも python-fcl により定義することができるようになる.
複数の干渉物をAABBとして,一つにまとめる
複数の干渉物を AABB(Axis-Aligned Bounding Box) として,一つにまとめる方法を説明する.
今回は複数の円をAABbとして,一つにまとめるソースコードを下記に記す.
objects = []

# 円形の干渉物を定義 (円の位置 (x, y) と半径を定義)
circles = [[0.8, 0.8, 0.3], [1.2, 0.8, 0.3], [1.2, 1.2, 0.3], [0.8, 1.2, 0.3]]
for x, y, radius in circles:
    # fclに円が定義されていないため,楕円のz軸を0として円とする
    circle = fcl.Ellipsoid(radius, radius, 0.0)
    # 円の中心点が原点であるため,中心点を平行移動させる
    translation = fcl.Transform(np.array([x, y, 0.0]))
    obj = fcl.CollisionObject(circle, translation)
    # モデルを追加
    objects.append(obj)

# DynamicAABBTreeCollisionManager に登録
manager1 = fcl.DynamicAABBTreeCollisionManager()
manager1.registerObjects(objects)
manager1.setup()

# DynamicAABBTreeCollisionManager に登録
manager2 = fcl.DynamicAABBTreeCollisionManager()
manager2.registerObjects(objects)
manager2.setup()

# 干渉判定で使用するリクエストと干渉データ
request  = fcl.CollisionRequest(num_max_contacts=100, enable_contact=True)
col_data = fcl.CollisionData(request=request)

# 干渉物の干渉判定
manager1.collide(manager2, col_data, fcl.defaultCollisionCallback)
print(col_data.result.is_collision)
おわりに
本記事では,Pythonを使用して,下記内容を実装しました.
・干渉判定用ライブラリである python-fcl の使用方法を説明
次記事では,下記内容を実装していきます.
・経路生成手法である RRT に python-fcl を組み込む