はじめに
Dockerのインストールを行う。単にコマンドを羅列するのではなく、それぞれのコマンドを実行する理由についても説明していく。本書が、今後のパッケージ導入の助けとなることを願っている。
すぐにインストールを済ませたい場合は、他のサイトでコマンドを入力する方が手っ取り早いかもしれない。しかし、本書では比較的丁寧にパッケージインストールの方法を記載しているので、初心者や詳細な理解を求める方には有益な内容となっている。
すぐにインストールしたい場合は、他のサイトでコマンドを入力した方がいい。
本書は、比較的丁寧にパッケージインストールの方法を記載した。
参考にする文書とリポジトリ
主に参考にしたものは、以下の2点である。
Docker公式ドキュメント
Docker docs
Dockerリポジトリ
Dockerリポジトリ
それでは、Dockerのインストールの手順に入っていく。
リポジトリから自分のサーバに適したGPGキーを特定し、そのキーをサーバに登録する
Dockerをインストールする際、まずリポジトリからパッケージを直接取得することはできない。
パッケージを取得するためには、Dockerのパッケージに付与されているデジタル署名を自分のサーバに登録する必要があって、このデジタル署名はGPGキーと呼ばれてる。
GPGキーを探すためにリポジトリのURLにアクセス
GPGキーを探すためにリポジトリのURLにアクセス
「dists」があるディレクトリまで移動し、URLを控える
この後、aptコマンドでgpgキーの情報を登録したいので、gpgまで含めたURLを控える。
https://download.docker.com/linux/ubuntu/gpg
curlコマンドを用いて、GPGキーの情報を表示させる
今回は、Linuxサーバ上にGPGキーを登録する必要がある。
まずは、上記で控えたURL情報が正しいか検証する必要がある。
curlコマンドを用いて、GPGキーの情報を表示させる
[実行コマンド]
curl https://download.docker.com/linux/ubuntu/gpg

[結果]
-----BEGIN PGP PUBLIC KEY BLOCK-----

mQINBFit2ioBEADhWpZ8/wvZ6hUTiXOwQHXMAlaFHcPH9hAtr4F1y2+OYdbtMuth
lqqwp028AqyY+PRfVMtSYMbjuQuu5byyKR01BbqYhuS3jtqQmljZ/bJvXqnmiVXh
38UuLa+z077PxyxQhu5BbqntTPQMfiyqEiU+BKbq2WmANUKQf+1AmZY/IruOXbnq
(続く)
URLが正しければ、GPGキーのパブリックキーが表示されるはずである。
(もし表示されなければ、URLの指定が間違っているか、社内環境の場合はプロキシなどが未設定の場合が想定される。)
先ほどは、GPGキーを表示させただけなので、次はaptコマンドでキー登録を行う。
きちんと鍵登録されたか、前後確認をする必要がある。
GPGキーの登録情報は、apt-key listコマンドで確認することができる。
自分のサーバのキーを登録する
まずは、現在の自分のサーバの状態を表示し、DockerのGPGキーが登録されていないことを確認する。
apt listコマンドで、現在の自分のサーバのキー登録情報を表示
[実行コマンド]
sudo apt-key list

[結果]
Warning: apt-key is deprecated. Manage keyring files in trusted.gpg.d instead (see apt-key(8)).
/etc/apt/trusted.gpg.d/ubuntu-keyring-2012-cdimage.gpg
------------------------------------------------------
pub   rsa4096 2012-05-11 [SC]
      8439 38DF 228D 22F7 B374  2BC0 D94A A3F0 EFE2 1092
uid           [ unknown] Ubuntu CD Image Automatic Signing Key (2012) <cdimage@ubuntu.com>

/etc/apt/trusted.gpg.d/ubuntu-keyring-2018-archive.gpg
------------------------------------------------------
pub   rsa4096 2018-09-17 [SC]
      F6EC B376 2474 EDA9 D21B  7022 8719 20D1 991B C93C

(続く)
情報が多いが、「uid」の部分を見る。
例えば、uidの部分には、「Ubuntu CD Image Automatic Signing Key」とあるが、これはキーの名称である。Dockerの鍵を登録する際は、ここにDockerみたいな名前がついてると考えられる。
GPGキーを自分のサーバに登録する
[実行コマンド]
curl https://download.docker.com/linux/ubuntu/gpg  | sudo apt-key add -

[結果]
% Total    % Received % Xferd  Average Speed   Time    Time     Time  Current
                                 Dload  Upload   Total   Spent    Left  Speed
  0     0    0     0    0     0      0      0 --:--:-- --:--:-- --:--:--     0Warning: apt-key is deprecated. Manage keyring files in trusted.gpg.d instead (see apt-key(8)).
100  3817  100  3817    0     0  32214      0 --:--:-- --:--:-- --:--:-- 32347
OK
OKと出たので、おそらく登録は完了している。
しかし、確実に登録されたか確認したいので、再度apt-key listコマンドを用いて、今度はDockerの鍵が登録されている確認する。
GPGキーが自分のサーバに登録されているか確認
[実行コマンド]
sudo apt-key list

[結果]
Warning: apt-key is deprecated. Manage keyring files in trusted.gpg.d instead (see apt-key(8)).
/etc/apt/trusted.gpg
--------------------
pub   rsa4096 2017-02-22 [SCEA]
      9DC8 5822 9FC7 DD38 854A  E2D8 8D81 803C 0EBF CD88
uid           [ unknown] Docker Release (CE deb) <docker@docker.com>
sub   rsa4096 2017-02-22 [S]

/etc/apt/trusted.gpg.d/ubuntu-keyring-2012-cdimage.gpg
------------------------------------------------------
pub   rsa4096 2012-05-11 [SC]
      8439 38DF 228D 22F7 B374  2BC0 D94A A3F0 EFE2 1092
(続く)
Docker install
リポジトリ情報の登録
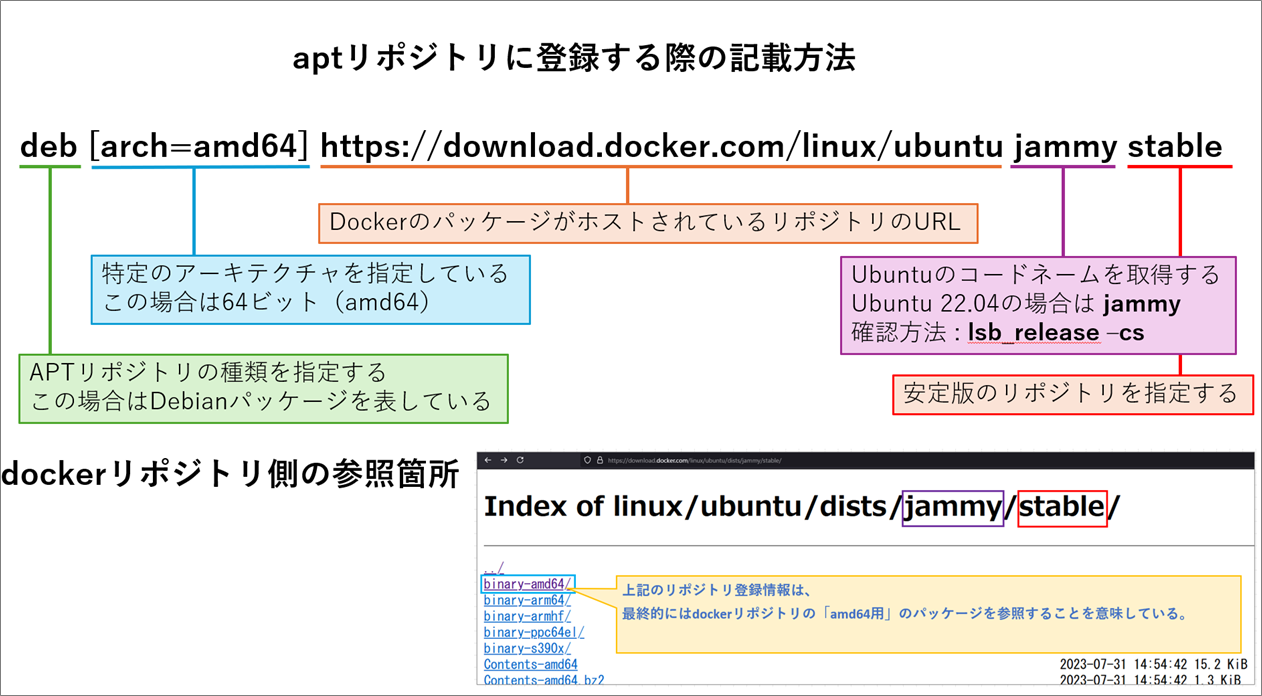
リポジトリ情報を登録する。
sudo add-apt-repository コマンドを利用する。
文法は
deb [arch=amd64] https://download.docker.com/linux/ubuntu jammy stable
である。
自分のサーバにdockerのリポジトリ情報を登録する
[実行コマンド]
sudo add-apt-repository "deb [arch=amd64] https://download.docker.com/linux/ubuntu jammy stable"

[結果]
Repository: 'deb [arch=amd64] https://download.docker.com/linux/ubuntu jammy stable'
Description:
Archive for codename: jammy components: stable
More info: https://download.docker.com/linux/ubuntu
Adding repository.
Press [ENTER] to continue or Ctrl-c to cancel.
Adding deb entry to /etc/apt/sources.list.d/archive_uri-https_download_docker_com_linux_ubuntu-jammy.list
Adding disabled deb-src entry to /etc/apt/sources.list.d/archive_uri-https_download_docker_com_linux_ubuntu-jammy.list
Get:1 file:/cdrom jammy InRelease
Ign:1 file:/cdrom jammy InRelease
Get:2 file:/cdrom jammy Release
Get:3 https://download.docker.com/linux/ubuntu jammy InRelease [48.8 kB]
Hit:4 http://jp.archive.ubuntu.com/ubuntu jammy InRelease
Ign:5 https://download.docker.com/linux/ubuntu $(lsb_release InRelease
Hit:6 http://jp.archive.ubuntu.com/ubuntu jammy-updates InRelease
Get:7 https://download.docker.com/linux/ubuntu jammy/stable amd64 Packages [35.6 kB]
Hit:8 http://jp.archive.ubuntu.com/ubuntu jammy-backports InRelease
N: Updating from such a repository can't be done securely, and is therefore disabled by default.
N: See apt-secure(8) manpage for repository creation and user configuration details.
W: https://download.docker.com/linux/ubuntu/dists/jammy/InRelease: Key is stored in legacy trusted.gpg keyring (/etc/apt/trusted.gpg), see the DEPRECATION section in apt-key(8) for details.
E: The repository 'https://download.docker.com/linux/ubuntu $(lsb_release Release' does not have a Release file.
N: Updating from such a repository can't be done securely, and is therefore disabled by default.
N: See apt-secure(8) manpage for repository creation and user configuration details.
(続く)
リポジトリ情報が登録されたか確認する。
aptでインストールする際、ubuntuは/etc/apt/sources.list及び/etc/apt/sources.list.d内のリストファイルを参照する。
そのため、ここを確認することで、きちんとdockerリポジトリを参照してくれるかを確認する。
dockerリポジトリが登録されているか確認
[実行コマンド]
ll /etc/apt/sources.list.d/

[結果]
total 20
drwxr-xr-x 2 root root 4096 Jul  6 06:10 ./
drwxr-xr-x 8 root root 4096 Jul  6 05:38 ../
-rw-r--r-- 1 root root  148 Jul  6 06:10 archive_uri-https_download_docker_com_linux_ubuntu-jammy.list
-rw-r--r-- 1 root root   84 Jul  6 06:10 docker.list
-rw-r--r-- 1 root root 2437 Jul  6 06:10 original.list
この中に、「rchive_uri-https_download_docker_com_linux_ubuntu-jammy.list」というファイルがあることが確認できた。一応中身も確認する。
[実行コマンド]
cat /etc/apt/sources.list.d/archive_uri-https_download_docker_com_linux_ubuntu-jammy.list

[結果]
deb [arch=amd64] https://download.docker.com/linux/ubuntu jammy stable
# deb-src [arch=amd64] https://download.docker.com/linux/ubuntu jammy stable
listファイルの中にリポジトリが登録されていることが分かった。
パッケージのインストール
apt updateとinstallを行う。
aptリポジトリの更新
[実行コマンド]
sudo apt update

[結果]
Get:1 file:/cdrom jammy InRelease
Ign:1 file:/cdrom jammy InRelease
Get:2 file:/cdrom jammy Release
Err:2 file:/cdrom jammy Release
  File not found - /cdrom/dists/jammy/Release (2: No such file or directory)
Hit:3 https://download.docker.com/linux/ubuntu jammy InRelease
Hit:4 http://jp.archive.ubuntu.com/ubuntu jammy InRelease
Hit:5 http://jp.archive.ubuntu.com/ubuntu jammy-updates InRelease
Hit:6 http://jp.archive.ubuntu.com/ubuntu jammy-backports InRelease
Hit:7 http://jp.archive.ubuntu.com/ubuntu jammy-security InRelease
Reading package lists... Done
E: The repository 'file:/cdrom jammy Release' no longer has a Release file.
N: Updating from such a repository can't be done securely, and is therefore disabled by default.
N: See apt-secure(8) manpage for repository creation and user configuration details.
W: https://download.docker.com/linux/ubuntu/dists/jammy/InRelease: Key is stored in legacy trusted.gpg keyring (/etc/apt/trusted.gpg), see the DEPRECATION section in apt-key(8) for details.
(続く)
次にdocker-ceをインストールする。
docker-ceのインストール
[実行コマンド]
sudo apt install docker-ce

[結果]
Reading package lists... Done
Building dependency tree... Done
Reading state information... Done
The following additional packages will be installed:
  containerd.io docker-buildx-plugin docker-ce-cli docker-ce-rootless-extras docker-compose-plugin libltdl7 libslirp0 pigz slirp4netns
Suggested packages:
  aufs-tools cgroupfs-mount | cgroup-lite
The following NEW packages will be installed:
  containerd.io docker-buildx-plugin docker-ce docker-ce-cli docker-ce-rootless-extras docker-compose-plugin libltdl7 libslirp0 pigz slirp4netns
0 upgraded, 10 newly installed, 0 to remove and 145 not upgraded.
Need to get 122 MB of archives.
After this operation, 437 MB of additional disk space will be used.
Do you want to continue? [Y/n] Y
Get:1 https://download.docker.com/linux/ubuntu jammy/stable amd64 containerd.io amd64 1.7.18-1 [30.5 MB]
Get:2 http://jp.archive.ubuntu.com/ubuntu jammy/universe amd64 pigz amd64 2.6-1 [63.6 kB]
Get:3 http://jp.archive.ubuntu.com/ubuntu jammy/main amd64 libltdl7 amd64 2.4.6-15build2 [39.6 kB]
Get:4 http://jp.archive.ubuntu.com/ubuntu jammy/main amd64 libslirp0 amd64 4.6.1-1build1 [61.5 kB]
Get:5 http://jp.archive.ubuntu.com/ubuntu jammy/universe amd64 slirp4netns amd64 1.0.1-2 [28.2 kB]
dockerパッケージが正常にインストールされているか確認
[実行コマンド]
apt list --installed | grep docker

[結果]
WARNING: apt does not have a stable CLI interface. Use with caution in scripts.

docker-buildx-plugin/jammy,now 0.15.1-1~ubuntu.22.04~jammy amd64 [installed,automatic]
docker-ce-cli/jammy,now 5:27.0.3-1~ubuntu.22.04~jammy amd64 [installed,automatic]
docker-ce-rootless-extras/jammy,now 5:27.0.3-1~ubuntu.22.04~jammy amd64 [installed,automatic]
docker-ce/jammy,now 5:27.0.3-1~ubuntu.22.04~jammy amd64 [installed]
docker-compose-plugin/jammy,now 2.28.1-1~ubuntu.22.04~jammy amd64 [installed,automatic]
1回インストールのコマンドで、複数のパッケージがインストールされているのが分かる
- docker-buildx-plugin
- docker-ce-cli
- docker-ce-rootless-extras
- docker-ce
- docker-compose-plugin
dockerのバージョンを確認
docker version
Client: Docker Engine - Community
 Version:           27.0.3
 API version:       1.46
 Go version:        go1.21.11
 Git commit:        7d4bcd8
 Built:             Sat Jun 29 00:02:33 2024
 OS/Arch:           linux/amd64
 Context:           default
Cannot connect to the Docker daemon at unix:///var/run/docker.sock. Is the docker daemon running?
sudo実行時にパスワードを要求しないようにする
ユーザーのNOPASSWD設定を行う。
ファイルが開いたら、次のような行を追加して、パスワード入力を無効化したいユーザー(例: username)に対してNOPASSWDオプションを設定する。
[実行コマンド]
sudo visudo

[入力内容]
username ALL=(ALL) NOPASSWD: ALL
dockerコマンド実行時にsudoを要求しないようにする
[実行コマンド]
sudo usermod -aG docker $USER
Docker Network のIPをカスタム設定する
デーモン設定ファイルの編集する。
Dockerの設定ファイル(通常 /etc/docker/daemon.json)を開く。
設定ファイルが存在しない場合は、新たに作成する。
その後、"bip"オプションでカスタムIPアドレス範囲を指定する。
以下のようにファイルに設定を追加する。
[実行コマンド]
sudo vi /etc/docker/daemon.json

[入力内容]
{
  "bip": "182.18.0.1/16"
}
この例では、182.18.0.1/16 の範囲を使用しているが、必要に応じて任意のIP範囲に調整できる。
設定を反映するために、Dockerデーモンを再起動し、設定が適用されたかどうか、以下のコマンドでブリッジネットワークの設定を確認する。
[実行コマンド]
sudo systemctl restart docker

[確認コマンド]
docker network inspect bridge
トラブルシューティング
[実行コマンド]
sudo apt install docker-ce

[結果]
E: dpkg was interrupted, you must manually run 'sudo dpkg --configure -a' to correct the problem.
このエラーメッセージは、dpkgの処理が中断されたために発生している。
これを修正するには、以下のコマンドを実行して、dpkgの設定を完了させる必要がある。
[実行コマンド]
sudo dpkg --configure -a


