はじめに
HORIさんから発売された「初音ミクProject DIVA Future Tone DX専用ゲームコントローラー」を同ゲームの任天堂Switch版でもある「MEGA39's」でも使う場合、市販のコントローラー変換機だと入力トラブルがある様なので、Arduino LeonardoとUSBホストシールドで自作してみました。
用意するもの
・Arduino Leonardo (以下、Leonardo。互換機では試していません。ATmega32u4チップが乗っていれば大丈夫なはず?)※Arduino UNOだと、このやり方では動きません。
・USBホストシールド2.0 for Arduino
※安い互換品はハンダ付けの必要あり。サインマート製は少々高いですが、ハンダ付けの必要がないので
ハンダごてを持っていない・ハンダ付け作業が不安な方にはオススメです。
・PC(Arduino IDEが動作するもの)
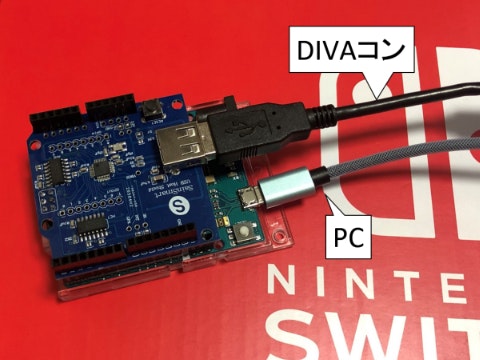
・USBケーブル type A - micro (PC・任天堂スイッチと Leonardo の接続用。データ転送出来る物)
・「初音ミク Project DIVA Future Tone DX」専用コントローラー(以下、DIVAコン。)
Arduino IDEのインストール
※PCはWindows10、Arduino IDEはインストーラー版を元に書いています。
Arduinoの公式サイトの SOFTWARE > DOWNLOADS から、自分の環境にあったIDEをインストールします。
※Arduino IDEは1.8.12を使用して下さい。1.8.13ではArduinoSTLでコンパイルエラーが発生し、ネットに上がっているボード情報のダウングレードで対処しても正しく動作しません。1.8.12のダウンロードは、DownloadページのPrevious Releasesから出来ます。
※寄付はお好みで。ダウンロードだけしたい場合は、JUST DOWNLOAD を押してください。
Switch Control Library と USB Host Library Rev.2.0、ArduinoSTL のインストール
Switch Control Libraryのダウンロード
有志の方が製作した、ATmega32u4チップの乗ったArduinoを任天堂Switch用コントローラー化するライブラリを使わさせて貰います。
GitHubの公開ページでclone or download(ページ右側、緑色のプルダウン)からDownload ZIPを選び、ダウンロードします。
(ファイル名:SwitchControlLibrary-master.zip )※Singn in,Sign upは無視して可。
USB Host Library Rev.2.0のダウンロード
同様に、GitHubからUSBホストシールド用のライブラリをダウンロードします。
(ファイル名:USB_Host_Shield_2.0-master.zip )
Switch Control Library と USB Host Library Rev.2.0 のインストール
Arduino IDEを起動し、メニューバーから**[スケッチ]-[ライブラリをインクルード]-[.ZIP形式のライブラリをインストール...]**を選び、先ほどダウンロードした2つのファイルをインストールします。
Arduino STL のインストール
次に、メニューバーから**[スケッチ]-[ライブラリをインクルード]-[ライブラリを管理...]**を選び、ライブラリマネージャで「ArduinoSTL」を検索してインストールします。終わったら、またメニューバーから[スケッチ]-[ライブラリをインクルード]を選び、インストールした3つが表示されているか確認し、良ければ IDE を終了します。
Switch Control Libraryの変更
Switch Control Library を使いやすくします。
「\Users\ ユーザー名 \Documents\Arduino\libraries\SwitchControlLibrary-master\src」内にある SwitchControlLibrary.h を編集で開き、下から4行目のvoid MoveRightStick(uint8_t rx, uint8_t ry);の下に、以下のコードを追加します。
void Mega39s(uint16_t button, uint8_t hat, uint8_t lx, uint8_t ly, uint8_t rx, uint8_t ry);
追加後の SwitchControlLibrary.h 全コード
# include <ArduinoSTL.h>
# include <list>

# include "CustomHID.h"

enum class Button : uint16_t
{
	Y = 0x0001,
	B = 0x0002,
	A = 0x0004,
	X = 0x0008,
	L = 0x0010,
	R = 0x0020,
	ZL = 0x0040,
	ZR = 0x0080,
	MINUS = 0x0100,
	PLUS = 0x0200,
	LCLICK = 0x0400,
	RCLICK = 0x0800,
	HOME = 0x1000,
	CAPTURE = 0x2000
};

enum class Hat : uint8_t
{
	TOP = 0x00,
	TOP_RIGHT = 0x01,
	RIGHT = 0x02,
	BOTTOM_RIGHT = 0x03,
	BOTTOM = 0x04,
	BOTTOM_LEFT = 0x05,
	LEFT = 0x06,
	TOP_LEFT = 0x07,
	CENTER = 0x08
};

enum class Stick : uint8_t
{
	MIN = 0,
	CENTER = 128,
	MAX = 255
};

typedef struct
{
	uint16_t Button;
	uint8_t Hat;
	uint8_t LX;
	uint8_t LY;
	uint8_t RX;
	uint8_t RY;
	uint8_t VendorSpec;
} USB_JoystickReport_Input_t;

class SwitchControlLibrary_
{
  private:
	USB_JoystickReport_Input_t _joystickInputData;
	void SendReport();

  public:
	SwitchControlLibrary_();

	void PressButtonY();
	void ReleaseButtonY();
	void PressButtonB();
	void ReleaseButtonB();
	void PressButtonA();
	void ReleaseButtonA();
	void PressButtonX();
	void ReleaseButtonX();
	void PressButtonL();
	void ReleaseButtonL();
	void PressButtonR();
	void ReleaseButtonR();
	void PressButtonZL();
	void ReleaseButtonZL();
	void PressButtonZR();
	void ReleaseButtonZR();
	void PressButtonMinus();
	void ReleaseButtonMinus();
	void PressButtonPlus();
	void ReleaseButtonPlus();
	void PressButtonLClick();
	void ReleaseButtonLClick();
	void PressButtonRClick();
	void ReleaseButtonRClick();
	void PressButtonHome();
	void ReleaseButtonHome();
	void PressButtonCapture();
	void ReleaseButtonCapture();
	void MoveHat(uint8_t hat);
	void MoveLeftStick(uint8_t lx, uint8_t ly);
	void MoveRightStick(uint8_t rx, uint8_t ry);
	void Mega39s(uint16_t button, uint8_t hat, uint8_t lx, uint8_t ly, uint8_t rx, uint8_t ry);
};

SwitchControlLibrary_ &SwitchControlLibrary();
また、同フォルダ内にある SwitchControlLibrary.cpp の最後の#endifの上に、以下のコードを追加します。
void SwitchControlLibrary_::Mega39s(uint16_t button, uint8_t hat, uint8_t lx, uint8_t ly, uint8_t rx, uint8_t ry)
{
    _joystickInputData.Button = button;
	_joystickInputData.Hat = hat;
	_joystickInputData.LX = lx;
    _joystickInputData.LY = ly;
	_joystickInputData.RX = rx;
    _joystickInputData.RY = ry;
    SendReport();
}
追加後の SwitchControlLibrary.cpp 全コード
# include "SwitchControlLibrary.h"

# if defined(_USING_HID)

static const uint8_t _hidReportDescriptor[] PROGMEM = {
    0x05, 0x01,       //   USAGE_PAGE (Generic Desktop)
    0x09, 0x05,       //   USAGE (Game Pad)
    0xa1, 0x01,       //   COLLECTION (Application)
    0x15, 0x00,       //   LOGICAL_MINIMUM (0)
    0x25, 0x01,       //   LOGICAL_MAXIMUM (1)
    0x35, 0x00,       //   PHYSICAL_MINIMUM (0)
    0x45, 0x01,       //   PHYSICAL_MAXIMUM (1)
    0x75, 0x01,       //   REPORT_SIZE (1)
    0x95, 0x10,       //   REPORT_COUNT (16)
    0x05, 0x09,       //   USAGE_PAGE (Button)
    0x19, 0x01,       //   USAGE_MINIMUM (1)
    0x29, 0x10,       //   USAGE_MAXIMUM (16)
    0x81, 0x02,       //   INPUT (Data,Var,Abs)
    0x05, 0x01,       //   USAGE_PAGE (Generic Desktop)
    0x25, 0x07,       //   LOGICAL_MAXIMUM (7)
    0x46, 0x3b, 0x01, //   PHYSICAL_MAXIMUM (315)
    0x75, 0x04,       //   REPORT_SIZE (4)
    0x95, 0x01,       //   REPORT_COUNT (1)
    0x65, 0x14,       //   UNIT (20)
    0x09, 0x39,       //   USAGE (Hat Switch)
    0x81, 0x42,       //   INPUT (Data,Var,Abs)
    0x65, 0x00,       //   UNIT (0)
    0x95, 0x01,       //   REPORT_COUNT (1)
    0x81, 0x01,       //   INPUT (Cnst,Arr,Abs)
    0x26, 0xff, 0x00, //   LOGICAL_MAXIMUM (255)
    0x46, 0xff, 0x00, //   PHYSICAL_MAXIMUM (255)
    0x09, 0x30,       //   USAGE (X)
    0x09, 0x31,       //   USAGE (Y)
    0x09, 0x32,       //   USAGE (Z)
    0x09, 0x35,       //   USAGE (Rz)
    0x75, 0x08,       //   REPORT_SIZE (8)
    0x95, 0x04,       //   REPORT_COUNT (4)
    0x81, 0x02,       //   INPUT (Data,Var,Abs)
    0x06, 0x00, 0xff, //   USAGE_PAGE (Vendor Defined 65280)
    0x09, 0x20,       //   USAGE (32)
    0x95, 0x01,       //   REPORT_COUNT (1)
    0x81, 0x02,       //   INPUT (Data,Var,Abs)
    0x0a, 0x21, 0x26, //   USAGE (9761)
    0x95, 0x08,       //   REPORT_COUNT (8)
    0x91, 0x02,       //   OUTPUT (Data,Var,Abs)
    0xc0              // END_COLLECTION
};

SwitchControlLibrary_::SwitchControlLibrary_()
{
    static HIDSubDescriptor node(_hidReportDescriptor, sizeof(_hidReportDescriptor));
    CustomHID().AppendDescriptor(&node);

    memset(&_joystickInputData, 0, sizeof(USB_JoystickReport_Input_t));
    _joystickInputData.LX = (uint8_t)Stick::CENTER;
    _joystickInputData.LY = (uint16_t)Stick::CENTER;
    _joystickInputData.RX = (uint16_t)Stick::CENTER;
    _joystickInputData.RY = (uint16_t)Stick::CENTER;
    _joystickInputData.Hat = (uint16_t)Hat::CENTER;
}

void SwitchControlLibrary_::SendReport()
{
    CustomHID().SendReport(&_joystickInputData, sizeof(USB_JoystickReport_Input_t));
}

void SwitchControlLibrary_::PressButtonY()
{
    _joystickInputData.Button |= (uint16_t)Button::Y;
    SendReport();
}

void SwitchControlLibrary_::ReleaseButtonY()
{
    _joystickInputData.Button &= ((uint16_t)Button::Y ^ 0xffff);
    SendReport();
}

void SwitchControlLibrary_::PressButtonB()
{
    _joystickInputData.Button |= (uint16_t)Button::B;
    SendReport();
}

void SwitchControlLibrary_::ReleaseButtonB()
{
    _joystickInputData.Button &= ((uint16_t)Button::B ^ 0xffff);
    SendReport();
}

void SwitchControlLibrary_::PressButtonA()
{
    _joystickInputData.Button |= (uint16_t)Button::A;
    SendReport();
}

void SwitchControlLibrary_::ReleaseButtonA()
{
    _joystickInputData.Button &= ((uint16_t)Button::A ^ 0xffff);
    SendReport();
}

void SwitchControlLibrary_::PressButtonX()
{
    _joystickInputData.Button |= (uint16_t)Button::X;
    SendReport();
}

void SwitchControlLibrary_::ReleaseButtonX()
{
    _joystickInputData.Button &= ((uint16_t)Button::X ^ 0xffff);
    SendReport();
}

void SwitchControlLibrary_::PressButtonL()
{
    _joystickInputData.Button |= (uint16_t)Button::L;
    SendReport();
}

void SwitchControlLibrary_::ReleaseButtonL()
{
    _joystickInputData.Button &= ((uint16_t)Button::L ^ 0xffff);
    SendReport();
}

void SwitchControlLibrary_::PressButtonR()
{
    _joystickInputData.Button |= (uint16_t)Button::R;
    SendReport();
}

void SwitchControlLibrary_::ReleaseButtonR()
{
    _joystickInputData.Button &= ((uint16_t)Button::R ^ 0xffff);
    SendReport();
}

void SwitchControlLibrary_::PressButtonZL()
{
    _joystickInputData.Button |= (uint16_t)Button::ZL;
    SendReport();
}

void SwitchControlLibrary_::ReleaseButtonZL()
{
    _joystickInputData.Button &= ((uint16_t)Button::ZL ^ 0xffff);
    SendReport();
}

void SwitchControlLibrary_::PressButtonZR()
{
    _joystickInputData.Button |= (uint16_t)Button::ZR;
    SendReport();
}

void SwitchControlLibrary_::ReleaseButtonZR()
{
    _joystickInputData.Button &= ((uint16_t)Button::ZR ^ 0xffff);
    SendReport();
}

void SwitchControlLibrary_::PressButtonMinus()
{
    _joystickInputData.Button |= (uint16_t)Button::MINUS;
    SendReport();
}

void SwitchControlLibrary_::ReleaseButtonMinus()
{
    _joystickInputData.Button &= ((uint16_t)Button::MINUS ^ 0xffff);
    SendReport();
}

void SwitchControlLibrary_::PressButtonPlus()
{
    _joystickInputData.Button |= (uint16_t)Button::PLUS;
    SendReport();
}

void SwitchControlLibrary_::ReleaseButtonPlus()
{
    _joystickInputData.Button &= ((uint16_t)Button::PLUS ^ 0xffff);
    SendReport();
}

void SwitchControlLibrary_::PressButtonLClick()
{
    _joystickInputData.Button |= (uint16_t)Button::LCLICK;
    SendReport();
}

void SwitchControlLibrary_::ReleaseButtonLClick()
{
    _joystickInputData.Button &= ((uint16_t)Button::LCLICK ^ 0xffff);
    SendReport();
}

void SwitchControlLibrary_::PressButtonRClick()
{
    _joystickInputData.Button |= (uint16_t)Button::RCLICK;
    SendReport();
}

void SwitchControlLibrary_::ReleaseButtonRClick()
{
    _joystickInputData.Button &= ((uint16_t)Button::RCLICK ^ 0xffff);
    SendReport();
}

void SwitchControlLibrary_::PressButtonHome()
{
    _joystickInputData.Button |= (uint16_t)Button::HOME;
    SendReport();
}

void SwitchControlLibrary_::ReleaseButtonHome()
{
    _joystickInputData.Button &= ((uint16_t)Button::HOME ^ 0xffff);
    SendReport();
}

void SwitchControlLibrary_::PressButtonCapture()
{
    _joystickInputData.Button |= (uint16_t)Button::CAPTURE;
    SendReport();
}

void SwitchControlLibrary_::ReleaseButtonCapture()
{
    _joystickInputData.Button &= ((uint16_t)Button::CAPTURE ^ 0xffff);
    SendReport();
}

void SwitchControlLibrary_::MoveHat(uint8_t hat)
{
    _joystickInputData.Hat = hat;
    SendReport();
}

void SwitchControlLibrary_::MoveLeftStick(uint8_t lx, uint8_t ly)
{
    _joystickInputData.LX = lx;
    _joystickInputData.LY = ly;
    SendReport();
}

void SwitchControlLibrary_::MoveRightStick(uint8_t rx, uint8_t ry)
{
    _joystickInputData.RX = rx;
    _joystickInputData.RY = ry;
    SendReport();
}

SwitchControlLibrary_ &SwitchControlLibrary()
{
    static SwitchControlLibrary_ obj;
    return obj;
}
void SwitchControlLibrary_::Mega39s(uint16_t button, uint8_t hat, uint8_t lx, uint8_t ly, uint8_t rx, uint8_t ry)
{
    _joystickInputData.Button = button;
    _joystickInputData.Hat = hat;
    _joystickInputData.LX = lx;
    _joystickInputData.LY = ly;
    _joystickInputData.RX = rx;
    _joystickInputData.RY = ry;
    SendReport();
}
# endif
USB Host Library Rev.2.0の変更
そのままではUSBホストシールドがDIVAコンを認識出来ないので、出来るようにします。
「\Users\ ユーザー名 \Documents\Arduino\libraries\USB_Host_Shield_2.0-master」内のPS4USB.hをデスクトップなどにコピーし、PS4DIVA.hにリネームして編集で開き
# define PS4_VID         0x054C // Sony Corporation
# define PS4_PID         0x05C4 // PS4 Controller
の部分を
# define PS4_VID         0x0f0d // Sony Corporation
# define PS4_PID         0x013c // PS4 Controller
に書き換えます。 また、**”PS4USB”となっている部分を全て”PS4DIVA”**に書き換えて保存し、ファイルを元のフォルダに移動させます。
PS4DIVA.h全コード
/* Copyright (C) 2014 Kristian Lauszus, TKJ Electronics. All rights reserved.

 This software may be distributed and modified under the terms of the GNU
 General Public License version 2 (GPL2) as published by the Free Software
 Foundation and appearing in the file GPL2.TXT included in the packaging of
 this file. Please note that GPL2 Section 2[b] requires that all works based
 on this software must also be made publicly available under the terms of
 the GPL2 ("Copyleft").

 Contact information
 -------------------

 Kristian Lauszus, TKJ Electronics
 Web      :  http://www.tkjelectronics.com
 e-mail   :  kristianl@tkjelectronics.com
 */

# ifndef _ps4usb_h_
# define _ps4usb_h_

# include "hiduniversal.h"
# include "PS4Parser.h"

# define PS4_VID         0x0f0d // Sony Corporation
# define PS4_PID         0x013c // PS4 Controller
# define PS4_PID_SLIM    0x09CC // PS4 Slim Controller

/**
 * This class implements support for the PS4 controller via USB.
 * It uses the HIDUniversal class for all the USB communication.
 */
class PS4DIVA : public HIDUniversal, public PS4Parser {
public:
        /**
         * Constructor for the PS4USB class.
         * @param  p   Pointer to the USB class instance.
         */
        PS4DIVA(USB *p) :
        HIDUniversal(p) {
                PS4Parser::Reset();
        };

        /**
         * Used to check if a PS4 controller is connected.
         * @return Returns true if it is connected.
         */
        bool connected() {
                return HIDUniversal::isReady() && HIDUniversal::VID == PS4_VID && (HIDUniversal::PID == PS4_PID || HIDUniversal::PID == PS4_PID_SLIM);
        };

        /**
         * Used to call your own function when the device is successfully initialized.
         * @param funcOnInit Function to call.
         */
        void attachOnInit(void (*funcOnInit)(void)) {
                pFuncOnInit = funcOnInit;
        };

protected:
        /** @name HIDUniversal implementation */
        /**
         * Used to parse USB HID data.
         * @param hid       Pointer to the HID class.
         * @param is_rpt_id Only used for Hubs.
         * @param len       The length of the incoming data.
         * @param buf       Pointer to the data buffer.
         */
        virtual void ParseHIDData(USBHID *hid, bool is_rpt_id, uint8_t len, uint8_t *buf) {
                if (HIDUniversal::VID == PS4_VID && (HIDUniversal::PID == PS4_PID || HIDUniversal::PID == PS4_PID_SLIM))
                        PS4Parser::Parse(len, buf);
        };

        /**
         * Called when a device is successfully initialized.
         * Use attachOnInit(void (*funcOnInit)(void)) to call your own function.
         * This is useful for instance if you want to set the LEDs in a specific way.
         */
        virtual uint8_t OnInitSuccessful() {
                if (HIDUniversal::VID == PS4_VID && (HIDUniversal::PID == PS4_PID || HIDUniversal::PID == PS4_PID_SLIM)) {
                        PS4Parser::Reset();
                        if (pFuncOnInit)
                                pFuncOnInit(); // Call the user function
                        else
                                setLed(Blue);
                };
                return 0;
        };
        /**@}*/

        /** @name PS4Parser implementation */
        virtual void sendOutputReport(PS4Output *output) { // Source: https://github.com/chrippa/ds4drv
                uint8_t buf[32];
                memset(buf, 0, sizeof(buf));

                buf[0] = 0x05; // Report ID
                buf[1]= 0xFF;

                buf[4] = output->smallRumble; // Small Rumble
                buf[5] = output->bigRumble; // Big rumble

                buf[6] = output->r; // Red
                buf[7] = output->g; // Green
                buf[8] = output->b; // Blue

                buf[9] = output->flashOn; // Time to flash bright (255 = 2.5 seconds)
                buf[10] = output->flashOff; // Time to flash dark (255 = 2.5 seconds)

                output->reportChanged = false;

                // The PS4 console actually set the four last bytes to a CRC32 checksum, but it seems like it is actually not needed

                pUsb->outTransfer(bAddress, epInfo[epInterruptOutIndex].epAddr, sizeof(buf), buf);
        };
        /**@}*/

        /** @name USBDeviceConfig implementation */
        /**
         * Used by the USB core to check what this driver support.
         * @param  vid The device's VID.
         * @param  pid The device's PID.
         * @return     Returns true if the device's VID and PID matches this driver.
         */
        virtual bool VIDPIDOK(uint16_t vid, uint16_t pid) {
                return (vid == PS4_VID && (pid == PS4_PID || HIDUniversal::PID == PS4_PID_SLIM));
        };
        /**@}*/

private:
        void (*pFuncOnInit)(void); // Pointer to function called in onInit()
};
# endif
boards.txtの編集
任天堂 Switch が、Leonardo をコントローラーとして認識出来るようにします。
「Arduino IDE のインストールフォルダ\hardware\arduino\avr\」内のboards.txt編集で開き
leonardo.vid.1=0x2341
leonardo.pid.1=0x8036

(中略)

leonardo.build.vid=0x2341
leonardo.build.pid=0x8036
を
leonardo.vid.1=0x0f0d
leonardo.pid.1=0x0092

(中略)

leonardo.build.vid=0x0f0d
leonardo.build.pid=0x0092
に変更します。保存できない場合、ファイルをデスクトップなどに移動後、編集して元のフォルダに戻してください。
これで下準備は終わりました。
Leonardoへのプログラムの書き込み
まず、LeonardoにUSBホストシールドを取り付けます。次に、DIVAコンをUSBホストシールド接続し、LeonardoとPCをUSBケーブルtypeA - micro を使って繋ぎます。DIVAコンは、「ARCADE MODE」にしておきます。
Arduino IDEを起動し、メニューバーから**[ファイル]-[新規ファイル]**を選びます。
空のスケッチが別ウィンドウで開くので、書かれているコードを全て消し、以下のコードをコピペします。
# include <PS4DIVA.h>
# include <SwitchControlLibrary.h>

# ifdef dobogusinclude
# include <spi4teensy3.h>
# endif
# include <SPI.h>

USB Usb;
PS4DIVA PS4(&Usb);

uint16_t Current_Input_Button = 0;
uint8_t Current_Input_Hat = 0x08;
byte Lx = 0x80;
byte Ly = 0x80;
byte Rx = 0x80;
byte Ry = 0x80;

void setup() {
  SwitchControlLibrary();
  if (Usb.Init() == -1) {
    while (1); // Halt
  }
}

void loop() {
  while (1) {
    Current_Input_Hat = 0x08;
    Current_Input_Button = 0x00;

    Usb.Task();
    if (PS4.connected()) {

      /* Analog Stick */
      Lx = PS4.getAnalogHat(LeftHatX);
      Ly = PS4.getAnalogHat(LeftHatY);
      Rx = PS4.getAnalogHat(RightHatX);
      Ry = PS4.getAnalogHat(RightHatY);

      /* Hat */
      if (PS4.getButtonPress(UP) && PS4.getButtonPress(RIGHT)) {
        Current_Input_Hat = 0x01;
      }
      else if (PS4.getButtonPress(RIGHT) && PS4.getButtonPress(DOWN)) {
        Current_Input_Hat = 0x03;
      }
      else if (PS4.getButtonPress(DOWN) && PS4.getButtonPress(LEFT)) {
        Current_Input_Hat = 0x05;
      }
      else if (PS4.getButtonPress(LEFT) && PS4.getButtonPress(UP)) {
        Current_Input_Hat = 0x07;
      }
      else if (PS4.getButtonPress(UP)) {
        Current_Input_Hat = 0x00;
      }
      else if (PS4.getButtonPress(RIGHT)) {
        Current_Input_Hat = 0x02;
      }
      else if (PS4.getButtonPress(DOWN)) {
        Current_Input_Hat = 0x04;
      }
      else if (PS4.getButtonPress(LEFT)) {
        Current_Input_Hat = 0x06;
      }

      /* Buttons */
      if (PS4.getButtonPress(PS)) {
        bitSet(Current_Input_Button, 12);
      }
      if (PS4.getButtonPress(TRIANGLE)) {
        bitSet(Current_Input_Button, 3);
      }
      if (PS4.getButtonPress(CIRCLE)) {
        bitSet(Current_Input_Button, 2);
      }
      if (PS4.getButtonPress(CROSS)) {
        bitSet(Current_Input_Button, 1);
      }
      if (PS4.getButtonPress(SQUARE)) {
        bitSet(Current_Input_Button, 0);
      }
      if (PS4.getButtonPress(L1)) {
        bitSet(Current_Input_Button, 4);
      }
      if (PS4.getButtonPress(L2)) {
        bitSet(Current_Input_Button, 6);
      }
      if (PS4.getButtonPress(L3)) {
        bitSet(Current_Input_Button, 10);
      }
      if (PS4.getButtonPress(R1)) {
        bitSet(Current_Input_Button, 5);
      }
      if (PS4.getButtonPress(R2)) {
        bitSet(Current_Input_Button, 7);
      }
      if (PS4.getButtonPress(R3)) {
        bitSet(Current_Input_Button, 11);
      }
      if (PS4.getButtonPress(SHARE)) {
        bitSet(Current_Input_Button, 13);
      }
      if (PS4.getButtonPress(OPTIONS)) {
        bitSet(Current_Input_Button, 9);
      }
      if (PS4.getButtonPress(TOUCHPAD)) {
        bitSet(Current_Input_Button, 8);
      }
    }
    SwitchControlLibrary().Mega39s(Current_Input_Button, Current_Input_Hat, Lx, Ly, Rx, Ry);
  }
}
コピペしたら、メニューバーの**[ツール]-[ボード]で、「Arduino Leonardo」を選び、同じくメニューバーの[ツール]-[シリアルポート]で、「COMxx(Arduino Leonardo)」**を選びます。(xxは環境により異なる数字が入ります)
次に、ツールバーの ➡ アイコンを押します。スケッチの保存を促されるので、適当な名前で保存します。
スケッチのコンパイルと書き込みが完了するまで待ちます。
無事に完了したら、ここなどで動作確認を行います(「 No gamepad detected.」と表示させる場合は、1度LeonardoをPCに繋ぎなおしてください。それでもダメな場合はどこか間違えています)。DIVAコンのボタンを押したりタッチスライダーを触ったりして反応がある様なら、PCからLeonardoを外して任天堂Switchに繋ぎます。
実際に遊んでみる
数日間遊んでみましたが、特に入力不具合や遅延を感じること無く快適に使えています。これで一つのDIVAコンでPS4、任天堂Switch両方で遊べるようになりました。
最後に
有志の方がライブラリを公開して下さっているおかげで、かなり簡単に作ることが出来ました。この場を借りて感謝いたします。