はじめに
突然ですが、皆さんは歌川国芳という浮世絵師をご存じでしょうか?
「国芳? 広重ではなくて?」と思われる方もいらっしゃるかも知れません。
歌川広重は「東海道五十三次」などの作品で名が知られた、歌川派を代表する江戸時代の浮世絵師です。
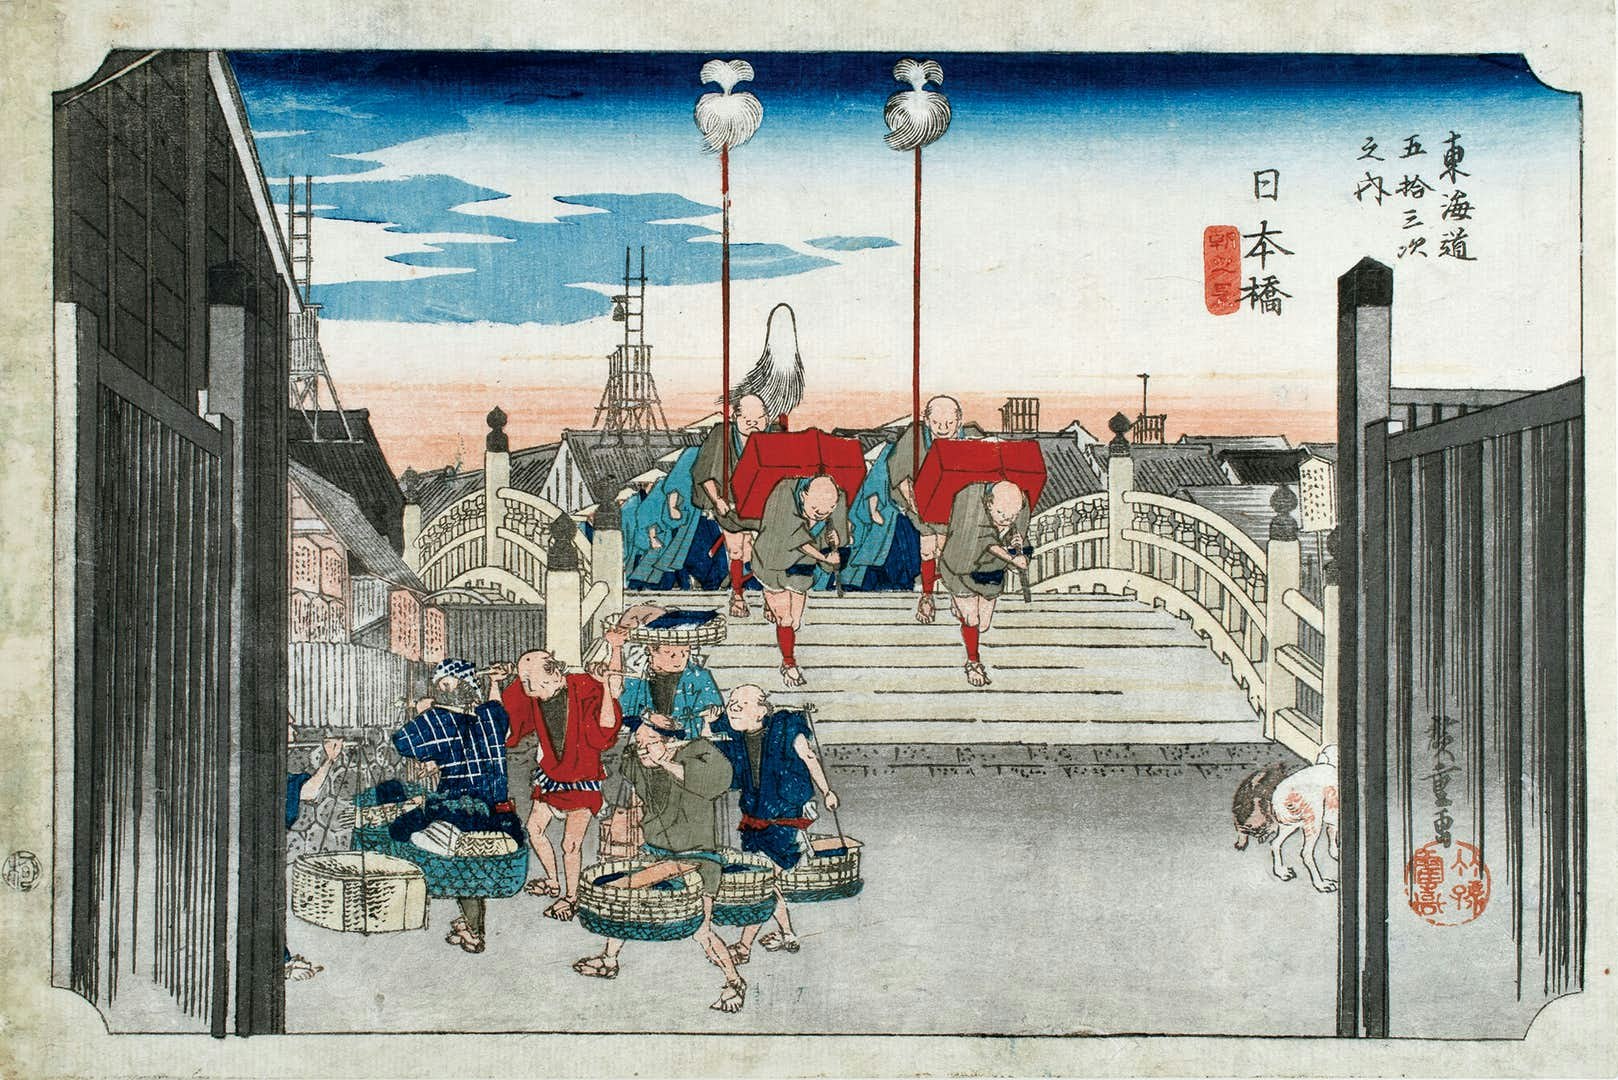
『東海道五十三次』より「日本橋」(本画像を含め、浮世絵は全てwikiより拝借しました。)
一方の歌川国芳は、あまり世間に知られた名前ではないかも知れません。
国芳は、寛政9年(1797)に江戸日本橋で生まれ、文久元年(1861)に没した浮世絵師で、広重とはほぼ同時代に活躍しました。歌川派の初代、歌川豊国のもとに入門し、初期のころは一勇斎を名乗って「武者絵」の国芳として地位を固めたそうです。水野忠邦の改革を風刺する判じ絵を描いて幕府の取り締まりにあうなど、反骨精神にあふれた人でもあったそうですが、諧謔と風刺に富んだ奇想を動勢のある大胆な構図と卓抜な筆力で画面に定着させるところに、その本領は認められています。他にも、西洋画に深い関心を持つなど研究熱心な方でもあったそうです。彼のことを書くにあたり、図書館でその作品をパラパラと見てきましたが、どれも素晴らしい作品ばかりでした。
ただ、現代においてはパッと彼の作品名を挙げられる人は、多くはないでしょう。
ただ、作品の名前こそ知らずとも、こちらの絵をご覧になったことがある方は多いのではないでしょうか。私自身とても好きな浮世絵です。
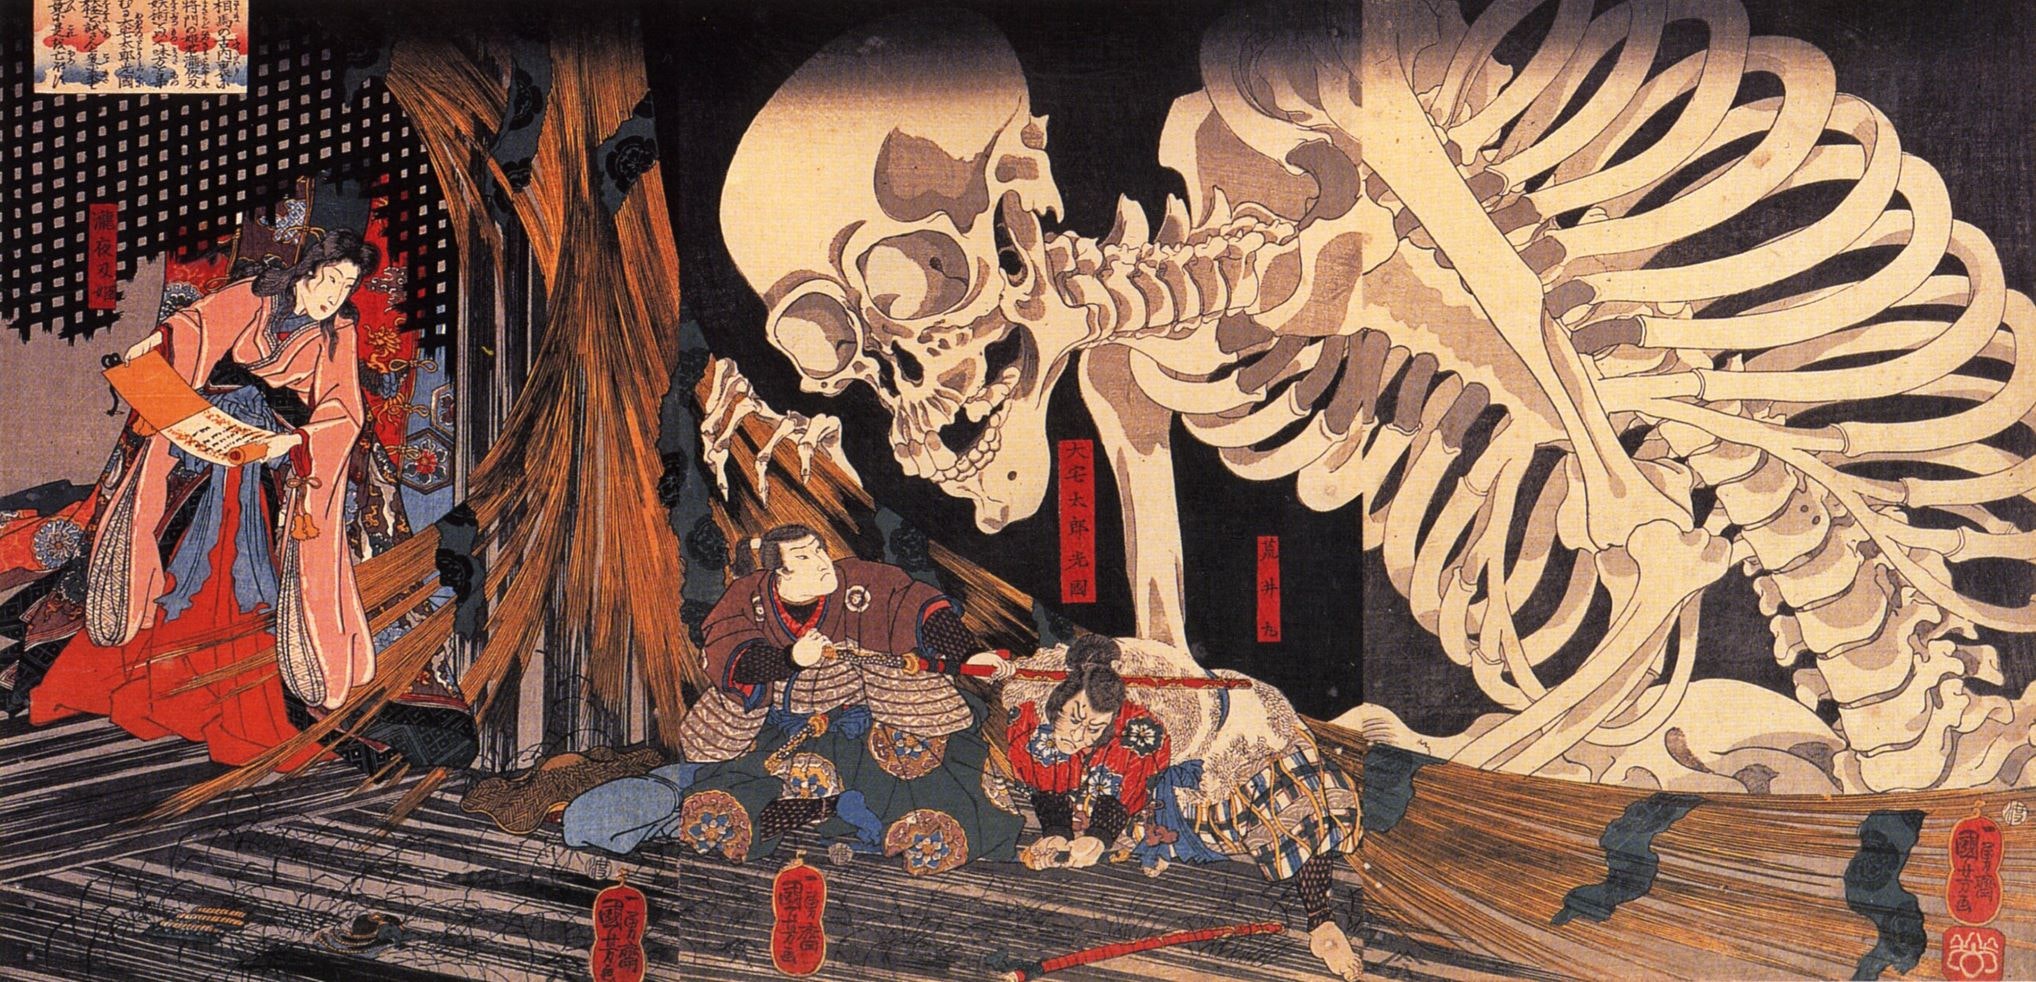 『相馬の古内裏』
駅に貼ってある美術館や展覧会のポスターで、目にしたことはありませんか? 骸骨の印象が激烈ですし、「ああ、この人か」と、思っていただければ。
まさに奇想天外、自由で勢いのある画風が魅力的な浮世絵師です。
そしてもう一つ、彼を語る上では欠かせない作品がこちらです。

『猫の当字 なまず』
所謂寄せ絵と呼ばれるものですね。これは特に当て字絵とも呼ばれます。猫が文字を為しているからです。こういった遊び心のある浮世絵師、それが歌川国芳という人物になります。
AHC001
話は打って変わって現代、2021年3月6日、競プロのサイトAtCoderにてAHC001というコンテストが開催されました。ご存じない方にも極めてざっくり説明すると、「長方形の広告100個ほどを、正方形の広告設置スペースに条件を満たしながら出来る限り隙間なく配置しましょう」という内容のコンテストでした。
 公式ビジュアライザの写真。条件を満たしいる度合い(面積)に応じて色が振られています。
そしてコンテスト後に書かれた多くの解説記事を見て、「マラソン系コンテストってこういう風にやるのか、凄いな―」と思いながら、「なんかやっていること国芳みたいだなー」とも感じていました。そんな感想が、本記事執筆の動機になります。
大まかな流れ
先程見て頂いた国芳の絵からも分かる通り、国芳は大の猫好きでも知られていて、猫にまつわる作品が多いです。
そのうちの一つに、『其まま地口猫飼好五十三疋(みゃうかいこうごじゅうさんびき)』というのがあります。名前からも推察できるように、東海道五十三次×猫といった感じの作品です。
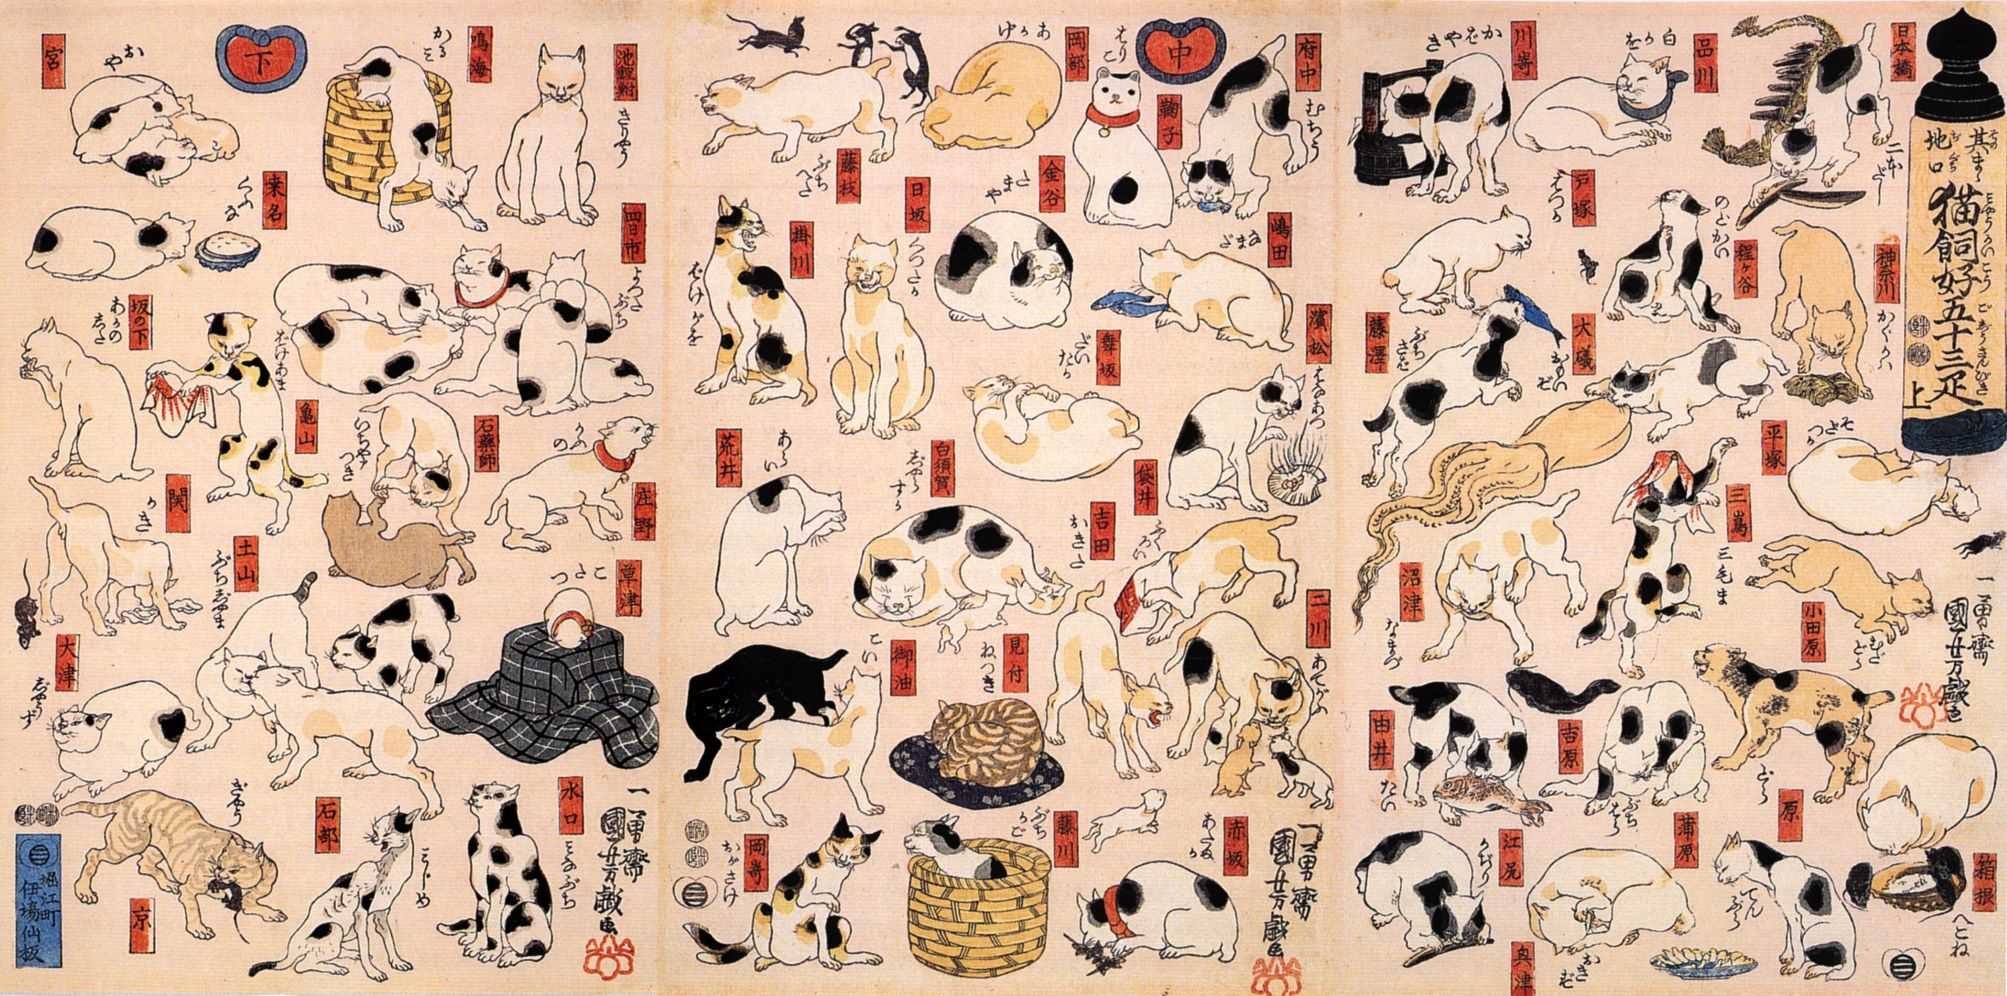 『其まま地口猫飼好五十三疋』
この絵の猫たちで、別の猫(下図)を構成することが出来れば、「国芳の絵を再現できた」ということにします。

これはネットからのフリー素材です。
次に、AHC001の方の解き方について。基本的には参考文献に挙げさせていただいたリンク等を見て頂きたいのですが、大雑把に流れを説明すると、
- STEP1 初期状態の作成

-
STEP2 (問題の条件を満たす範疇で)少しだけ状態を変える
-
STEP3 スコアを計算し、スコアが上がっていれば採用、下がっていても、実行時間に応じた割合で採用

- STEP4 STEP2,3を時間いっぱい繰り返す

という流れを踏まえた解答が主流のようです。
今回の寄せ絵制作でも同様の流れを汲みました。
具体的内容
では、実際に作っていきます。
下準備
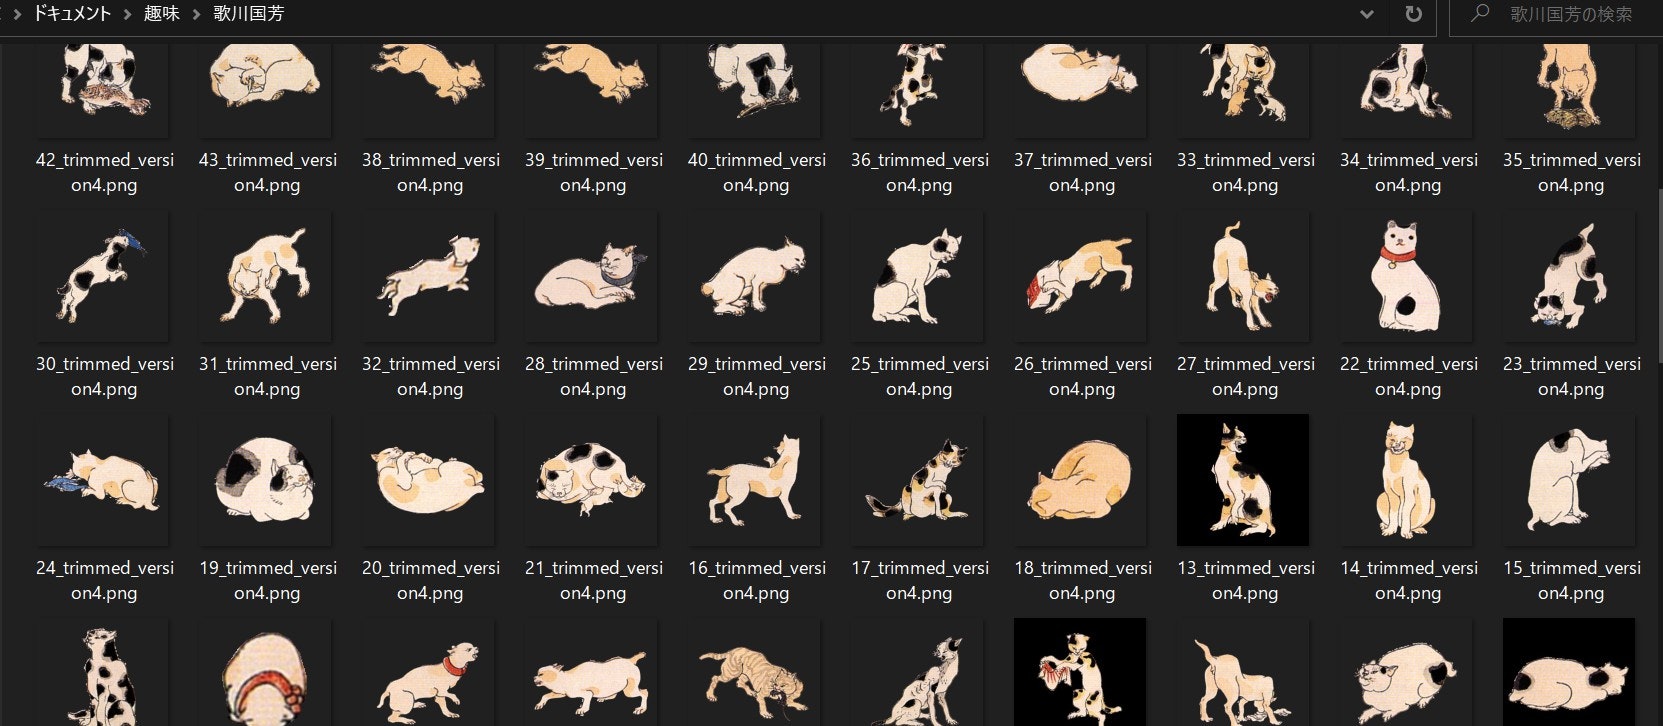
まず初めに、CLIP STUDIO PAINTというイラスト制作ソフトで猫を切り出し、Pythonで軽くデータを整えておきます。
データ整形用コード
import cv2
import math
import numpy as np

def convert_tf_to_bw(img: np.array([], dtype=bool)):
    img = img.astype(np.uint8)
    img = img[:, :, np.newaxis]
    img = np.tile(img, reps=(1, 1, 3))
    img *= 255
    return img

def convert_png_to_tf(img: np.array([], dtype=np.uint8)):
    img = (img[:, :, 3] == 255)
    return img

def trim(name: int):
    img = cv2.imread(f"{name}_trimmed_version3.png",
                     cv2.IMREAD_UNCHANGED)  # α付きで読み込む
    contours, hierarchy = cv2.findContours(img[:, :, 3], cv2.RETR_EXTERNAL,
                                           cv2.CHAIN_APPROX_SIMPLE)  # 境界抽出
    max_area = 0
    for cnt in contours:  # 手作業での切り出しではゴミが含まれてしまっているので、一番面積の多い部分を選択する。
        x, y, w, h = cv2.boundingRect(cnt)
        if h*w > max_area:
            max_area = h*w
            X, Y, W, H = x, y, w, h
    img = img[Y:Y+H, X:X+W]
    for i, row in enumerate(img):
        for j, pixel in enumerate(row):
            if not pixel[3] in (0, 255):
                img[i][j][3] = 0 if pixel[3] < 128 else 255
            if np.array_equal(pixel, [255, 255, 255, 0]):
                img[i][j] = np.array([0, 0, 0, 0])
    return img

def add_margin(img: np.array([], dtype=np.uint8)):  # 回転しても切れない様に余白追加
    h, w, _ = img.shape
    r = math.ceil(math.sqrt(h**2+w**2))
    ret = np.zeros((r, r, 4), dtype=np.uint8)
    ret[(r-h)//2:(r-h)//2+h, (r-w)//2:(r-w)//2+w] += img
    return ret

for i in range(47):
    print(f"{i/47:.0%}")
    image = trim(i+1)
    image = add_margin(image)
    cv2.imwrite(f"{i+1}_trimmed_version4.png", image)
else:
    print("finished")
ちなみにこの子が私の推し猫です。かわいい。

コード
以下が使用したコードです。
コード
import cv2
import math
import time
import random
import datetime
import numpy as np
import matplotlib.pyplot as plt
from scipy import ndimage
from PIL import Image, ImageFont, ImageDraw
is_test = True
is_for_visualize = True
margin = 600 # >=component_imgs_maxhw
def convert_rgba_to_tf(img: np.array([], dtype=np.uint8)): # α(不透明度)でtf判定
img = (img[:, :, 3] >= 128)
return img
def convert_bw_to_tf(img: np.array([], dtype=np.uint8),
is_white_background=True):
img = (img <= 128) if is_white_background else (img >= 128)
return img
def convert_tf_to_bw(img: np.array([], dtype=np.bool)):
img = img.astype(np.uint8)
img *= 255
return img
def show_image(img: np.array([], dtype=np.uint8), title="image"):
cv2.namedWindow(title, cv2.WINDOW_NORMAL)
cv2.imshow(title, img)
cv2.waitKey(0)
cv2.destroyAllWindows()
return None
def calc_area(img):
return np.count_nonzero(img)
def calc_score(img: np.array([], dtype=np.bool), co_h, co_w):
# input_imgの内側1点、外側-10点 internal_border上は追加で100点ボーナス
h, w = img.shape
assert h != 0 and w != 0
inner = np.count_nonzero(
img & input_img_with_margin[co_h:co_h+h, co_w:co_w+w])
outter = np.count_nonzero(
img & (~input_img_with_margin[co_h:co_h+h, co_w:co_w+w]))
internal_border = np.count_nonzero(
img & input_img_internal_border[co_h:co_h+h, co_w:co_w+w])
assert not (inner == 0 and outter == 0 and internal_border == 0)
score = inner*1+outter*(-10)+internal_border*100
return score
def is_overlapping(img, co_h, co_w):
h, w = img.shape
try:
ret = np.any(my_table[co_h:co_h+h, co_w:co_w+w] & img)
return ret
except ValueError:
raise(ValueError(f"{h=},{w=},{co_h=},{co_w=}"))
def modify_move(img, img_num, co_h, co_w, angle, scale, pre_score,
move_delta):
h, w = img.shape
pre_co_h = co_h
pre_co_w = co_w
# my_tableの移動前の部分を全てFに変換
my_table[co_h:co_h+h, co_w:co_w+w] =\
~img & my_table[co_h:co_h+h, co_w:co_w+w]
which_direction = random.random()
if 0.0 <= which_direction < 0.25:
co_h += move_delta
elif 0.25 <= which_direction < 0.5:
co_h -= move_delta
elif 0.5 <= which_direction < 0.75:
co_w += move_delta
else:
co_w -= move_delta
if is_overlapping(img, co_h, co_w):
co_h = pre_co_h
co_w = pre_co_w
my_table[co_h:co_h+h, co_w:co_w + w] =\
img | my_table[co_h:co_h+h, co_w:co_w + w]
return (None, None)
else: # 衝突が起きない
my_table[co_h:co_h+h, co_w:co_w + w] =\
img | my_table[co_h:co_h+h, co_w:co_w + w]
# スコア計算
new_score = calc_score(img, co_h, co_w)
delta_score = new_score-pre_score
return ([img, img_num, co_h, co_w, angle, scale, new_score],
delta_score)
def modify_rotate(img, img_num, co_h, co_w, pre_angle, scale, pre_score,
new_angle):
# wrapAffineはTFのnp.arrayに対しては働かないため、np.uint8を用いている
# もう少し効率の良い方法もあるかも知れない。
h, w = img.shape
# my_tableの移動前の部分を全てFに変換
my_table[co_h:co_h+h, co_w:co_w + w] =\
~img & my_table[co_h:co_h+h, co_w:co_w+w]
# 変換後の画像を生成
scaled_img = cv2.resize(
component_imgs_bw[img_num], None, fx=scale, fy=scale)
new_h, new_w = scaled_img.shape
affine = cv2.getRotationMatrix2D(
(new_w/2, new_h/2), angle=new_angle, scale=1)
affine_img = convert_bw_to_tf(cv2.warpAffine(
scaled_img, affine, (new_w, new_h)), is_white_background=False)
if is_overlapping(affine_img, co_h, co_w):
# 回すと他と衝突してしまう
my_table[co_h:co_h+new_h, co_w:co_w + new_w] =\
img | my_table[co_h:co_h+new_h, co_w:co_w + new_w]
return (None, None)
else:
# 衝突が起きない
my_table[co_h:co_h+new_h, co_w:co_w + new_w] =\
affine_img | my_table[co_h:co_h+new_h, co_w:co_w + new_w]
# スコア計算
new_score = calc_score(affine_img, co_h, co_w)
delta_score = new_score-pre_score
return ([affine_img, img_num, co_h, co_w, new_angle, scale, new_score],
delta_score)
def modify_scale(img, img_num, co_h, co_w, angle, pre_scale, pre_score,
new_scale):
# resizeはTFのnp.arrayに対しては働かないため、np.uint8を用いている
# もう少し効率の良い方法もあるかも知れない。
h, w = img.shape
# my_tableの移動前の部分を全てFに変換
my_table[co_h:co_h+h, co_w:co_w + w] =\
~img & my_table[co_h:co_h+h, co_w:co_w+w]
# 変換後の画像を生成 変換を何度も繰り返すとジャギーなどが著しくなるので、
# 毎回component_imgsから生成している もう少し効率の良い方法もあるかも知れない。
scaled_img = cv2.resize(
component_imgs_bw[img_num], None, fx=new_scale, fy=new_scale)
new_h, new_w = scaled_img.shape
affine = cv2.getRotationMatrix2D((new_w/2, new_h/2), angle=angle, scale=1)
affine_img = convert_bw_to_tf(cv2.warpAffine(
scaled_img, affine, (new_w, new_h)), is_white_background=False)
if is_overlapping(affine_img, co_h, co_w):
my_table[co_h:co_h+h, co_w:co_w + w] =\
img | my_table[co_h:co_h+h, co_w:co_w + w]
return (None, None)
else:
# 衝突が起きない
new_co_h = co_h+(h-new_h)//2
new_co_w = co_w+(w-new_w)//2
my_table[new_co_h:new_co_h+new_h, new_co_w:new_co_w + new_w] =\
affine_img | my_table[new_co_h:new_co_h +
new_h, new_co_w:new_co_w + new_w]
# スコア計算
new_score = calc_score(affine_img, new_co_h, new_co_w)
delta_score = new_score-pre_score
return ([affine_img, img_num, new_co_h, new_co_w, angle,
new_scale, new_score], delta_score)
def make_final_img(answers, is_for_fixing_bug=False): # 全てリスト
if not is_for_fixing_bug:
ret = np.zeros((input_img_H+2*margin, input_img_W +
2*margin, 4), dtype=np.uint8)
else:
ret = np.zeros((input_img_H+2*margin, input_img_W +
2*margin), dtype=np.bool)
sum_of_score = 0
for img, img_num, co_h, co_w, angle, scale, score in answers:
if not is_for_fixing_bug:
raw_img = component_imgs_raw[img_num]
else:
raw_img = component_imgs_bw[img_num]
raw_img = cv2.resize(raw_img, None, fx=scale, fy=scale)
h, w = raw_img.shape[:2]
assert h == w
affine = cv2.getRotationMatrix2D((w/2, h/2), angle=angle, scale=1)
raw_img = cv2.warpAffine(raw_img, affine, (w, h))
if is_for_fixing_bug:
raw_img = convert_bw_to_tf(raw_img, is_white_background=False)
ret[co_h:co_h+h, co_w:co_w+w] += raw_img
sum_of_score += score
# if is_test:
# 以下がFalseならば桁あふれを起こしている可能性がある
# assert np.all(ret[co_h:co_h+h, co_w:co_w+w] >= raw_img)
if not is_for_fixing_bug:
ret = ret[margin:input_img_H+margin, margin:input_img_W+margin]
return ret, sum_of_score
def img_add_msg(img, message, position, color, fontsize=20):
fontpath = 'C:\\Windows\\Fonts\\msmincho.ttc' # Windowsのフォントファイルへのパス
font = ImageFont.truetype(fontpath, fontsize) # PILでフォントを定義
# cv2(NumPy)型の画像をPIL型に変換
img = Image.fromarray(img)
draw = ImageDraw.Draw(img) # 描画用のDraw関数を用意
# テキストを描画(位置、文章、フォント、文字色(BGR+α)を指定)
draw.text(position, message, font=font, fill=(color,)*4)
# PIL型の画像をcv2(NumPy)型に変換
img = np.array(img)
return img # 文字入りの画像をリターン
def make_movie(filename: str or int, fps: float, total_frames: int):
print("now making movie...")
fourcc = cv2.VideoWriter_fourcc(*'mp4v') # コーデックを定める
shape = (round(input_img_H*(1024/input_img_W)), 1024)
video = cv2.VideoWriter(f'MOVIE_{filename}.mp4', fourcc, fps, shape)
for i, img_with_score in enumerate(imgs_for_movie):
img = img_with_score[0]
img = img[:, :, :3] # αチャンネルを取り除く
img = cv2.resize(img, dsize=shape)
img = img_add_msg(
img, f"{time_limit*i/total_frames:.2f}s", (50, 50),
color=255, fontsize=50)
video.write(img)
video.release()
print("finished")
# input
input_img_name = "input_img_test.jpeg"
input_img_raw = cv2.imread(input_img_name, cv2.IMREAD_GRAYSCALE)
expansion_rate = 2048/min(input_img_raw.shape) # 辺が最低でも2048pixelはあるようにする
input_img_raw = cv2.resize(input_img_raw, None,
fx=expansion_rate, fy=expansion_rate)
input_img = convert_bw_to_tf(input_img_raw, is_white_background=True)
input_img_H, input_img_W = input_img.shape
input_img_area = calc_area(input_img)
input_img_with_margin = np.zeros(
(input_img_H+2*margin, input_img_W+2*margin), dtype=np.bool)
input_img_with_margin[margin:input_img_H+margin,
margin:input_img_W+margin] = input_img
kernel = np.ones((10, 10), np.bool)
input_img_erosion = ndimage.binary_erosion(
input_img_with_margin, structure=kernel)
input_img_internal_border = input_img_with_margin ^ input_img_erosion # XOR
my_table = np.zeros(input_img_with_margin.shape, dtype=np.bool)
# component
component_imgs_raw = [cv2.imread(f"{i+1}_trimmed_version4.png",
cv2.IMREAD_UNCHANGED)for i in range(47)]
# component_imgs_tf = [convert_rgba_to_tf(img) for img in component_imgs_raw]
component_imgs_tf = [ndimage.binary_dilation(convert_rgba_to_tf(img), kernel)
for img in component_imgs_raw]
component_imgs_bw = [convert_tf_to_bw(img) for img in component_imgs_tf]
component_imgs_area = [calc_area(img) for img in component_imgs_tf]
# component_imgs_maxhw = 0
# for img in component_imgs_tf:
# h, w = img.shape
# component_imgs_maxhw = max(component_imgs_maxhw, h, w)
# print(f"{component_imgs_maxhw=}")
# answer
answers = []
# answers=[[img,img_num,co_h,co_w,angle,scale,score]]
# co_h,co_wはmargin付きの値
sum_of_components_area = 0
first_step_timelimit = 1
first_step_start_time = time.perf_counter()
while sum_of_components_area < input_img_area*1.1: # 隙間を考慮して、総面積は元画像を超過させる
if time.perf_counter()-first_step_start_time > first_step_timelimit:
errmsg = "Taking too long time to find first points\n"
errmsg += "please confirm the input image or so are setup correctly"
raise AssertionError(errmsg)
img_num = random.randint(0, len(component_imgs_tf)-1)
co_h, co_w = (random.randint(margin, margin+input_img_H-1),
random.randint(margin, margin+input_img_W-1))
angle = 0
scale = 0.3 # 初期配置の段階で、既に多少の面積を持たせ、効率化を図る
img = convert_bw_to_tf(
cv2.resize(component_imgs_bw[img_num], None, fx=scale, fy=scale),
is_white_background=False)
score = calc_score(img, co_h, co_w)
if (not input_img_with_margin[co_h, co_w]) or score <= 0\
or is_overlapping(img, co_h, co_w):
continue
else:
answer = [img, img_num, co_h, co_w, angle, scale, score]
answers.append(answer)
sum_of_components_area += component_imgs_area[img_num]
h, w = img.shape
my_table[co_h:co_h+h, co_w:co_w + w] =\
img | my_table[co_h:co_h+h, co_w:co_w+w]
show_image(convert_tf_to_bw(my_table), title="final_my_table")
final_img, first_score = make_final_img(answers)
show_image(final_img, title="final_img")
# 焼きなまし
start_time = time.perf_counter()
time_limit = 60 # 単位は秒
start_temp = 10000
end_temp = 10
loop_counter = 0
time_for_plt = start_time
time_for_movie = start_time
interval_for_plt = 0.01
interval_for_movie = 0.1
plt_data_time = []
plt_data_score = []
plt_data_prob = []
answers_for_movie = []
while True:
loop_counter += 1
now = time.perf_counter()
if now-time_for_plt > interval_for_plt:
plt_data_time.append(now-start_time)
plt_data_score.append(sum([answer[-1] for answer in answers]))
time_for_plt += interval_for_plt
if now-time_for_movie > interval_for_movie:
answer_for_movie = [[None]+answer[1:] for answer in answers]
answers_for_movie.append(answer_for_movie)
time_for_movie += interval_for_movie
if now-start_time >= time_limit:
break # 上のappendを最後のタイミングでも行ってほしいが為にこのタイミング
answer_num = random.randint(0, len(answers)-1)
answer = answers[answer_num]
which_modify = random.random()
if 0 <= which_modify < 0.5: # 移動
move_delta = round(30*(1-(now-start_time)/time_limit))
new_answer, delta_score = modify_move(*answer, move_delta)
elif 0.5 <= which_modify < 0.75: # 回転
pre_angle = answer[4]
prob_which_direction_to_rotate = random.random()
if prob_which_direction_to_rotate < 0.5:
if pre_angle == 60: # 60度以上は回転させない
continue
else:
new_angle = pre_angle+1
else:
if pre_angle == -60:
continue
else:
new_angle = pre_angle - 1
new_answer, delta_score = modify_rotate(*answer, 45)
else: # 拡大縮小
pre_scale = round(answer[5]*10) # 誤差
prob_expand_or_reduce = random.random()
if prob_expand_or_reduce < 0.75: # expand
if pre_scale == 10:
continue
else:
new_scale = (pre_scale+1)/10
else:
if pre_scale == 1:
continue
else:
new_scale = (pre_scale-1)/10
new_answer, delta_score = modify_scale(*answer, new_scale)
if new_answer is None:
continue
else:
temp = start_temp + (end_temp-start_temp) * \
(now-start_time) / time_limit # 温度関数
if delta_score >= -30: # 誤差レベルのマイナスまでは無視
prob = 1
elif delta_score/temp <= -10:
prob = 0
else:
prob = math.exp((delta_score)/temp) # 遷移確率関数
if prob > random.random(): # 確率probで遷移する
answers[answer_num] = new_answer
if loop_counter % 100 == 0: # 時々、原因不明のバグに対する対処策を講じる
try:
reliable_table = make_final_img(answers, is_for_fixing_bug=True)[0]
assert np.all(reliable_table == my_table)
except AssertionError:
# print(f"loop_count:{loop_counter} Unexplained bug has occurred.")
# 本当にこのバグだけは全然理由がわかりませんでした。猫が突然増殖します。
# それこそassert文200行ぐらい書いて丸三日ぐらい潰したんですが。。。
# 以下の処理で直るので、それで対処しています。
my_table = reliable_table
final_my_table = my_table # ~input_img_with_margin | my_table
# 最後
final_img, final_score = make_final_img(answers)
show_image(final_img, title="final_img")
show_image(convert_tf_to_bw(final_my_table), title="final_my_table")
if is_test:
print(f"{final_score=}")
print(f"{loop_counter=}")
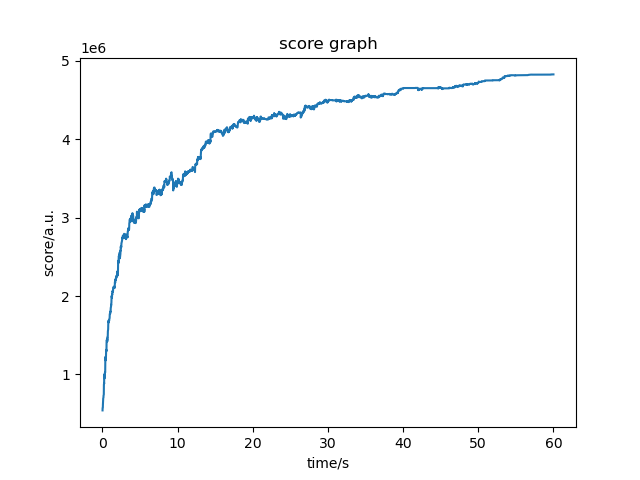
plt.plot(plt_data_time, plt_data_score)
plt.title("score graph")
plt.xlabel("time/s")
plt.ylabel("score/a.u.")
plt.show()
if is_for_visualize:
imgs_for_movie = [make_final_img(answers) for answers in answers_for_movie]
filename = datetime.datetime.now().strftime("%H%M%S") +\
" "+f"final_score={final_score}"
fps = 7.5
total_frames = round(time_limit/interval_for_movie)
make_movie(filename=filename, fps=fps,
total_frames=total_frames)
cv2.imwrite(filename+".jpeg", final_img)
出力結果がこちら。

ということでCLIP STUDIO PAINTでいじって完成です。(和紙のテクスチャとかもCLIP STUDIO PAINTの素材使いました。ありがたい!)
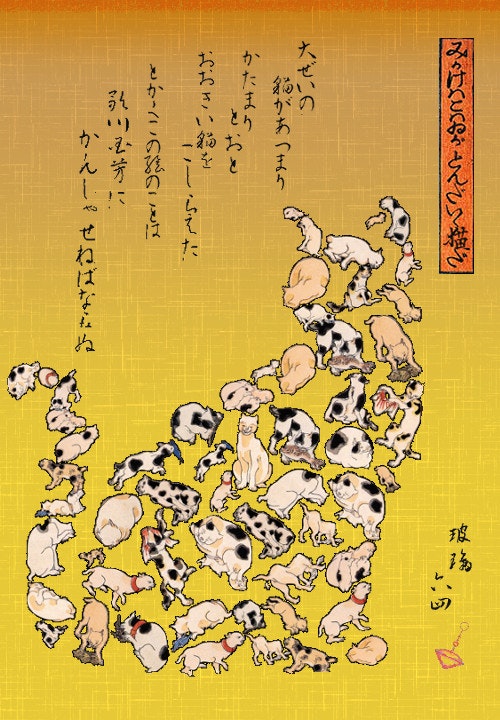
玻璃作『みかけハこハゐが とんだいゝ猫だ』
おまけ
他の出力結果

試行錯誤の様子

考察
以下、本記事の後半に入ります。私がやったこととしては基本的に以上で全部なのですが、制作している途中に色々と考えたり見つけたりしたことがありました。それをいくつか紹介していこうと思います。
技術的内容
ボロノイ図
これは何回か試行していて気付いたことなのですが、どうにもこのコードだと初期配置への依存性が高い気がします。特に猫の尻尾部分のように狭くて細い場所では、スコア関数の悪さもあるのでしょうが、どうにも局所解に陥りやすいやすいようでした。(適切な状態評価がマラソンでは大事と言う事がよく分かります。)
そこで思ったのは、ボロノイ図なんかを活用して、ざっくりとした面積を求めてからやるとよかったのかなということです。
ボロノイ図とは、
ある距離空間上の任意の位置に配置された複数個の点(母点)に対して、同一距離空間上の他の点がどの母点に近いかによって領域分けされた図
のことで(wikiより)、定義からも想像できるように勢力図、縄張り図とも呼ばれています。
「配置する点を決める→ボロノイ図で大体の占有できる面積を計算→面積に偏りがあれば再試行→算出した面積を基にどの猫を配置するか決める」
という流れなんかを採用するとよいのかも知れません。(あくまで予想ですが)
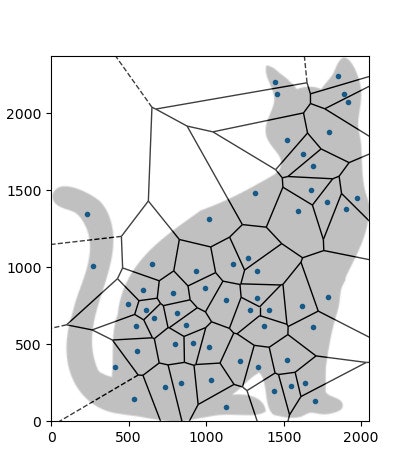
(イメージ図 scipyを使って作成した図に、CLIP STUDIO PAINTで猫を重ね合わせました。なので、実は正確なボロノイ図ではないです。正確なのは実装辛そうで諦めました。ただ、尻尾と胸のあたりがガラガラなのに比して、腰や首には点がたまりすぎという感は伝わるかと。)
3次元への拡張
国芳の絵などを見ていて特に感心するのは、各要素ごとが、今回のような平面的な関係性を持つのみならず、立体的に絡み合って一枚の絵を為しているという点です。次の絵が特に分かりやすいでしょうか。

『みかけハこハゐが とんだいゝ人だ』
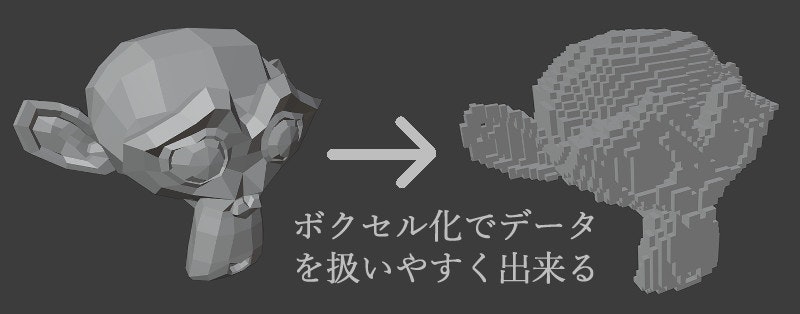
こういうものを再現しようとしたときには、恐らくピクセルの世界でやろうとすると厳しそうですが、ボクセルの世界でやれば出来ないことはないでしょう。ボクセル化とは下の写真のようなことを言っていて、画像にも書いた通りデータとして扱いやすい形だと思います。
原理的には今回のコード(二次元配列)を発展させるだけで、3D(三次元配列)でも出来る事には出来そうです。
その他
最後に、「寄せ絵」「だまし絵」の観点から、「こんな技術があるらしいよ」という紹介します。制作途中で調べていくうちに見つけたもので、私は非常に面白いと感じました。
アルチンボルド
アルチンボルドはイタリア出身の画家で、野菜や果物、動物などを寄せ集めて肖像画を描くことで知られています。そして、歌川国芳のwikiによると、国芳の寄せ絵にはこのアルチンボルドの作品などを含む舶来画からの影響がしばしば指摘されているようです。(個人的にはとても意外でした。私はアルチンボルドも非常に好きです)

『春』
そんな訳で、彼の絵にもある意味似たような(と言っても私のより何倍も凄いです)技術が生み出されています。
2017年の国立西洋美術館におけるアルチンボルド展向けに開発されたようです。
動画を見てもらえれば分かると思いますが、顔の形に沿って野菜などがリアルタイムに配置されています。凄いですね。
エッシャー
画像敷き詰めと言えば、この方のほうが有名かも知れません。オランダの画家です。『相対性』などの不可能物体的な作品が有名で、私も以前Blenderで再現していていましたが、平面充填の分野でも活躍されています。以下がその一例です。
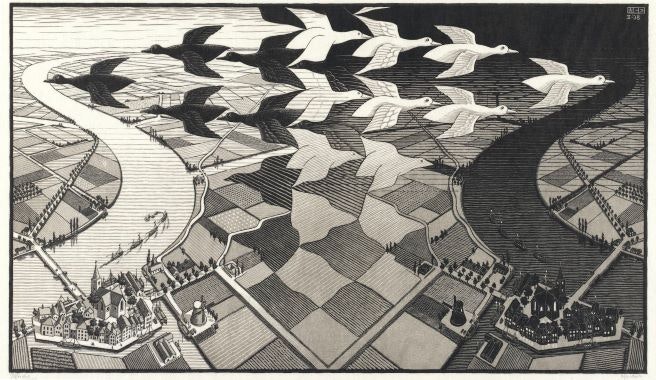
エッシャー『昼と夜』
ここで具体的に列挙することはしませんが、このような平面充填に関しても、エッシャーの名前と共にググると多くの論文を読むことが出来ます。そしてそれらのアプローチも、これまた全くの別物でとても面白かったです。
最後に
以上で終了となります。最後まで読んで頂きありがとうございました。
参考文献
- 画家関連
大久保純一 広重と浮世絵風景画 東京大学出版会 2007年
柏木智雄/内山淳子/片多祐子 はじめりは国芳ー江戸スピリットのゆくえ 大修館書店 2012年
- AHC関連
- その他