概要
DB周りについて勉強しているときに「B-tree」「B+tree」というデータ構造について知り、どのようにデータの追加・削除がされているか気になったので、実装例のコードを読んで理解しようと思った。
実行環境
C++17
デバッガ: LLDB
B-treeとは
木構造の1つ。二分探索木やAVL木とは異なり、1つのノードに複数のキーを格納できる。
ノードの容量を次数kとしておくと
- 根は1以上2k個以下のキーをもつ
- 根以外の節はk以上2k個以下のキーをもつ
- 根から全ての葉までの深さが同じである
の3条件を満たすのが特徴です。
バランスよく各データを振り分けることでO(log N)の計算量を実現し、データの読み取り回数を少なく抑えられるデータ構造です。
実験方法
C++でのB-tree実装コードがGeeksforGeeksというサイトで公開されていたので、こちらを手元で実行して確認してみます。
https://www.geeksforgeeks.org/insert-operation-in-b-tree/?ref=lbp
また、こちらのサイトでB-treeのビジュアライザが公開されているので、コードで実行した内容をその都度可視化して確認します。
https://www.cs.usfca.edu/~galles/visualization/BTree.html
※ C++のコードとビジュアライザとで挙動を揃えるために、ビジュアライザのPreemtive Split / Merge (Even max degree only)にチェックを入れておきましょう。
試してみた
早速コードを動かして見ます。
今回はサンプルコードに沿って
int main()
{
  BTree t(3); // A B-Tree with minium degree 3
  t.insert(10);
  t.insert(20);
  t.insert(5);
  t.insert(6);
  t.insert(12);
  t.insert(30);
  t.insert(40);
  t.insert(50);
  t.insert(60);
  ...
}
という具合でテストしていきます。
①まずは次数3のBTreeクラスを定義して、10,20,5,6をinsertします。
insert関数はこのような実装になっています。
// The main function that inserts a new key in this B-Tree
void BTree::insert(int k)
{
  // If tree is empty
  if (root == NULL)
  {
    // Allocate memory for root
    root = new BTreeNode(t, true);
    root->keys[0] = k; // Insert key
    root->n = 1;       // Update number of keys in root
  }
  else // If tree is not empty
  {
    // If root is full, then tree grows in height
    if (root->n == 2 * t - 1)
    {
      // Allocate memory for new root
      BTreeNode *s = new BTreeNode(t, false);

      // Make old root as child of new root
      s->C[0] = root;

      // Split the old root and move 1 key to the new root
      s->splitChild(0, root);

      // New root has two children now.  Decide which of the
      // two children is going to have new key
      int i = 0;
      if (s->keys[0] < k)
        i++;
      s->C[i]->insertNonFull(k);

      // Change root
      root = s;
    }
    else // If root is not full, call insertNonFull for root
      root->insertNonFull(k);
  }
}
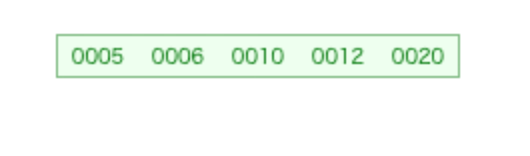
最初にtreeが空なのでBTreeNodeを作成し、これに10,20,5,6,12を挿入しているのが分かりますね。
ちなみに関数insertNonFullで、Node内の配列は挿入時にソートされるようになっています。
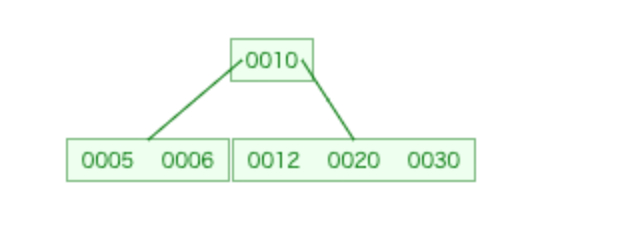
②次に30をinsertします。
ノードの格納数の上限は次数t * 2 - 1の5個なので、今までのBTreeNodeには入りきりません。そこで、splitChildが呼び出されてノードが分割されます。
// A utility function to split the child y of this node
// Note that y must be full when this function is called
void BTreeNode::splitChild(int i, BTreeNode *y)
{
  // Create a new node which is going to store (t-1) keys
  // of y
  BTreeNode *z = new BTreeNode(y->t, y->leaf);
  z->n = t - 1;

  // Copy the last (t-1) keys of y to z
  for (int j = 0; j < t - 1; j++)
    z->keys[j] = y->keys[j + t];

  // Copy the last t children of y to z
  if (y->leaf == false)
  {
    for (int j = 0; j < t; j++)
      z->C[j] = y->C[j + t];
  }

  // Reduce the number of keys in y
  y->n = t - 1;

  // Since this node is going to have a new child,
  // create space of new child
  for (int j = n; j >= i + 1; j--)
    C[j + 1] = C[j];

  // Link the new child to this node
  C[i + 1] = z;

  // A key of y will move to this node. Find the location of
  // new key and move all greater keys one space ahead
  for (int j = n - 1; j >= i; j--)
    keys[j + 1] = keys[j];

  // Copy the middle key of y to this node
  keys[i] = y->keys[t - 1];

  // Increment count of keys in this node
  n = n + 1;
}
こちらのコードを追うと
①中央値10よりも大きいデータ[12,20]がBTreeNode *zに格納される
②中央値10がBTreeNode *sに格納され、新しいルートノードになる
③親ノード[10]
子ノード[5,6][12,20] という木構造が出来上がる
④子ノード[12,20]に30が追加される
という様子が確認できます。
ビジュアライザはこんな感じです。
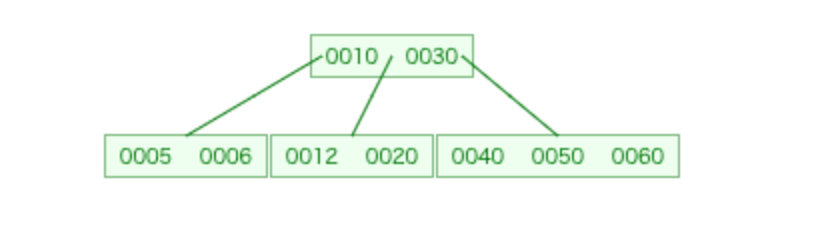
③次に、40,50,60...と大きな値をinsertして右側の子ノードを太らせていきます。
右側の子ノードは[12,20,30,40,50]となります。
60を入れようとしたた時点でsplitChildを行い、
・親ノードに中央値30を渡す
・子ノード[12,20][40,50]に分裂
を経て以下のような構造になります。
④まだまだ右側を太らせていきます。
  t.insert(61);
  t.insert(62);
  t.insert(63);
  t.insert(64);
  t.insert(65);
  t.insert(66);
  t.insert(67);
  t.insert(68);
  t.insert(69);

ルートノードが満杯になってしまいました。
⑤次に70を挿入します。
すると、
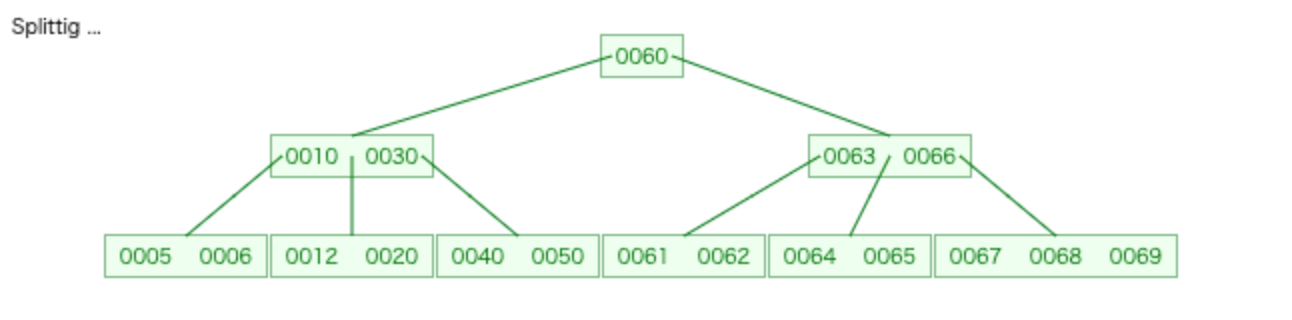
ルートノードが[60]と[10,30][63,66]に分割され、
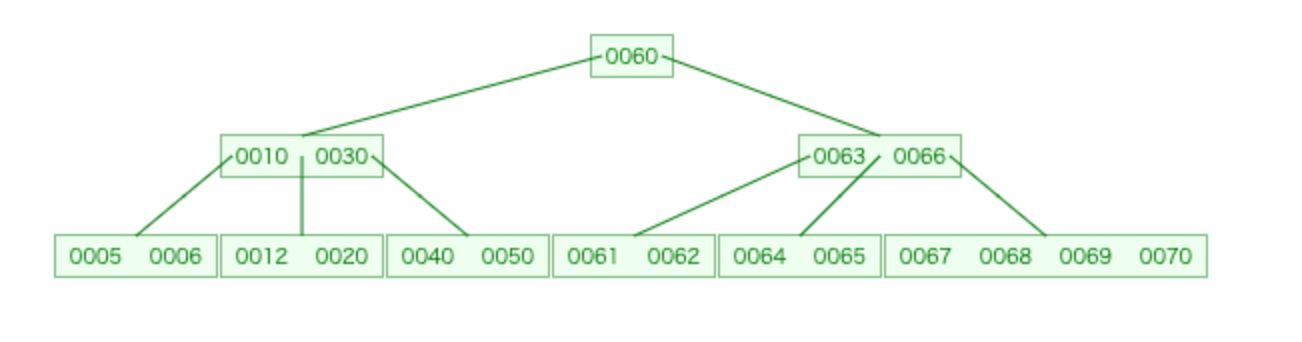
その後右端に70が挿入されました。
このように、左右どちらかに偏った値を入れ続けても適切に分割・挿入を行って、木のバランスが保たれているのが確認できます。
最後に確認のため、traverse()関数でBTreeに入っている数字を確認します。
traverseは再帰で子ノードと親ノードの出力を繰り返し、木に入っているデータ全てを小さい順に出力する関数です。
// Function to traverse all nodes in a subtree rooted with this node
void BTreeNode::traverse()
{
  // There are n keys and n+1 children, traverse through n keys
  // and first n children
  int i;
  for (i = 0; i < n; i++)
  {
    // If this is not leaf, then before printing key[i],
    // traverse the subtree rooted with child C[i].
    if (leaf == false)
      C[i]->traverse();
    cout << " " << keys[i];
  }

  // Print the subtree rooted with last child
  if (leaf == false)
    C[i]->traverse();
}
Traversal of the constucted tree is 5 6 10 12 20 30 40 50 60 61 62 63 64 65 66 67 68 69 70
insertした全部のデータがちゃんと入っているのを確認できました。
まとめ
・B-treeは二分探索木と違って複数keyを持つことができる
・データが追加されてバケットが一杯になるとルートにデータを渡して分割を行う
・C++の実装例を追うことでより感覚的にデータ構造が理解できる
補足:B+treeについて
今回はB-treeについて紹介しましたが、MySQLなどのデータソースではB-treeを応用したB+treeというデータ構造が使われています。
B-treeは各ノードにデータが格納されているのに対し、B+treeはリーフノード(一番下のノード)にのみデータが格納されるという特徴があります。
B-treeは木の途中で探索を追えられるので等価検索に強い、B+treeはリーフノード同士がポインタで繋がっているので範囲検索に強い…という具合で、それぞれのデータ構造に強みがあります。