マテリアルデザインをライブラリ不使用で利用できるものがどこにも記載がなかったのでまとめました。
MaterialDesignのライブラリを利用すると、既存のアプリの改修の際、継承関係が難しくなると思います。
理由は@IBOutletと@IBActionの2つをを接続して、@IBActionでマテリアルデザインの動きの部分を担当させるからです。
なんとか、デフォルトの機能で実装する必要があり、これを紹介したいと思います。
なお、この説明は、初学者にわかりやすく説明したため、説明がくどいと感じるかもしれません。あらかじめご了承ください。
まず完成形の確認から
入力すると、そのプレースホルダが上部に移動して、枠線の色が変わり、
入力状態で有ることがわかりやすくなります。
まずxibファイルを作成します。
コントローラーは今回作成した下記を指定します。
iPhone8など、カメラのために画面上部が、曲面になっていない長方形の機種を選択します。
そしてサイズをここでは320*56pxに指定しています。
高さの56pxは、マテリアルデザインの基準です。
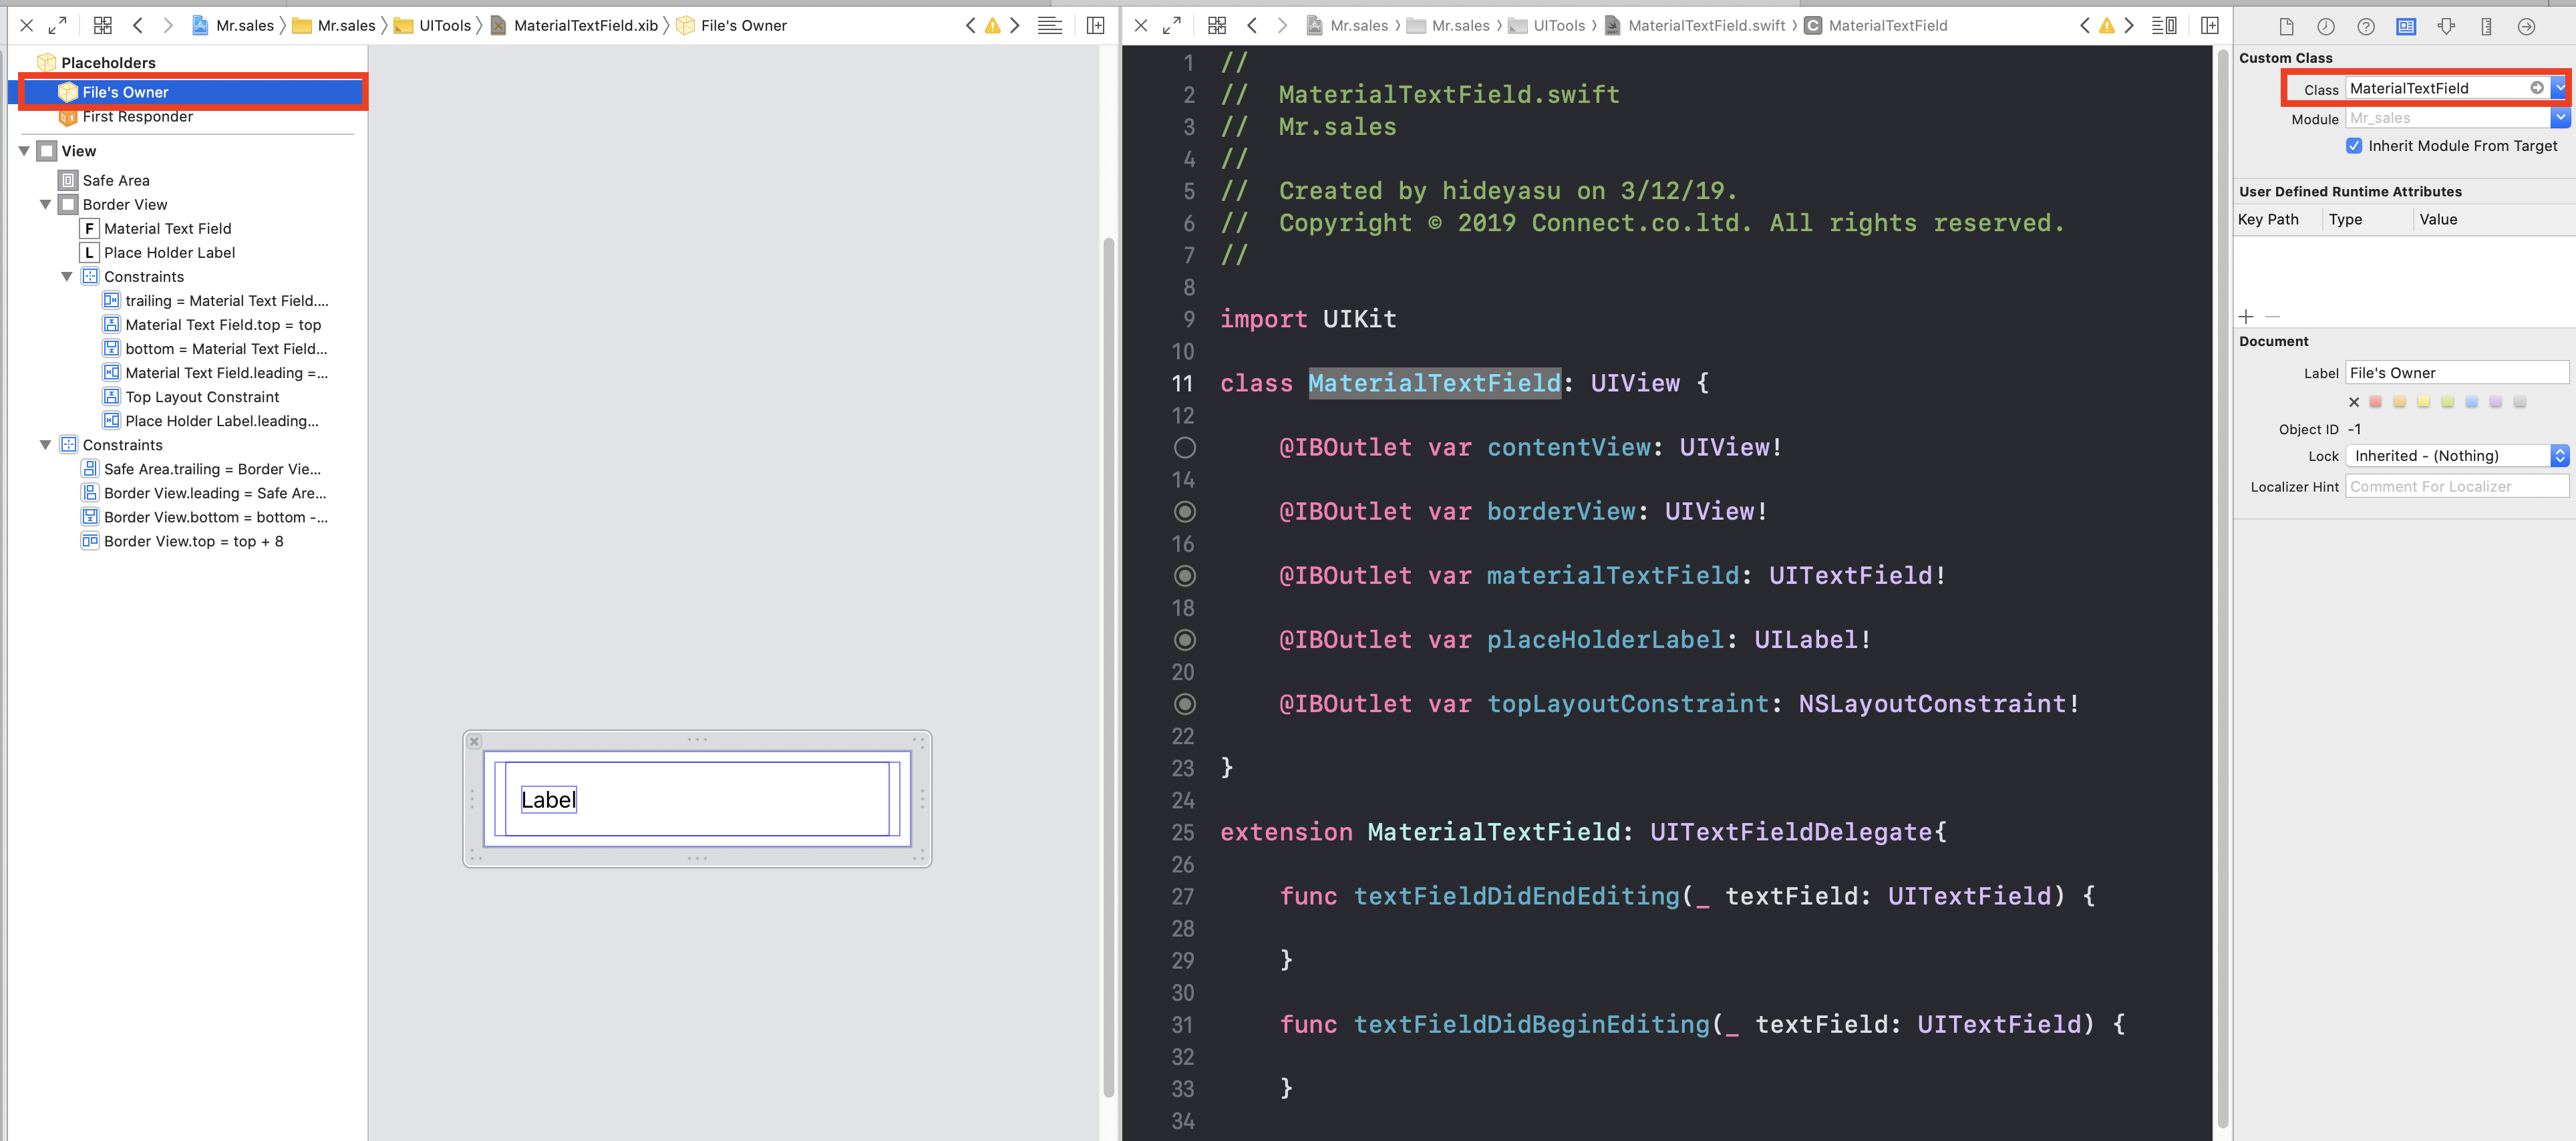
FilesOwnerに今回作成するクラスを指定します。

その後,StoryBoardと接続できるようにします。
import UIKit

class MaterialTextField: UIView {

    //これを最下部のViewに接続(すべてが乗っているView)
    @IBOutlet var contentView: UIView!

    //viewを配置する、これが外枠線となる
    @IBOutlet var borderView: UIView!

    //通常のテキストフィールド、イベントをgetするために配置する
    @IBOutlet var textField: UITextField!

    //プレースホルダのラベル
    @IBOutlet var placeholderLabel: UILabel!

    //プレースホルダの位置を変更するために接続、この値を変更すると位置が変更される
    @IBOutlet var placeholderLabelTopLayout: NSLayoutConstraint!


    //xibファイルを読み込むときには必ず必要
    override class func awakeFromNib() {
        super.awakeFromNib()
    }

    //メモリとのやり取り等
    required init?(coder: NSCoder) {
        super.init(coder: coder)
        initSubViews()
       }

    //ここのframeにオブジェクトが配置されていく。
    override init(frame: CGRect) {
        super.init(frame: frame)
         //今回の設定を呼び出す
        initSubViews()
    }

    //今回の設定
    private func initSubViews(){
        Bundle.main.loadNibNamed("MaterialTextField", owner: self, options: nil)
        contentView.frame = bounds
        contentView.autoresizingMask = [.flexibleWidth, .flexibleHeight]
        addSubview(contentView)
        textField.delegate = self
        addBorderTextField()
    }

    func addBorderTextField(){

        //viewのlayerは外枠線のプロパティを持っている
        borderView.layer.borderColor = UIColor.gray.cgColor
        borderView.layer.borderWidth = 1
        borderView.layer.cornerRadius = 3

        //labelのテキスト等の設定
        placeholderLabel.textColor = UIColor.gray
        placeholderLabel.backgroundColor = .white

    }
xibファイルのオブジェクトを接続していきます。
xibファイルの構造はこんな感じ
順番は
1. viewを配置する (外枠の線を描画するため)
2. その中にtextFieldを配置する。(textFieldのイベントを取得するため)
3.更にプレースホルダ用の文字のlabelを配置する(この文字が移動する)

ポイントが、labelの上部との距離
ここを@IBoutletで接続して,コードの方で値を変化させます。
ちょっとイメージがわかないといけないので、動画を添付しますね。
この動画では、@IBoutletは先に、コードの方に記載してあるので、xib画面にて接続できます。
Material Designの動きの部分
 func addBorderTextField(){

        //viewのlayerは外枠線のプロパティを持っている
        borderView.layer.borderColor = UIColor.gray.cgColor
        borderView.layer.borderWidth = 1
        borderView.layer.cornerRadius = 3

        //labelのテキスト等の設定
        placeholderLabel.textColor = UIColor.gray
        placeholderLabel.backgroundColor = .white

    }


    func movePlaceholderToTop(){
        placeholderLabel.isHidden = false
        //クロージャー内でselfを使うときに循環参照が起きる可能性があるので[weak self]を利用
        UIView.animate(withDuration: 0.3, animations: {[unowned self] in
            //constraintの値を0へ
            self.placeholderLabelTopLayout.constant = 0.0
            //即座にレイアウトをupdateするメソッド
            self.contentView.layoutIfNeeded()

            }){ [unowned self] (completed) in
                self.borderView.layer.borderColor = UIColor.systemIndigo.cgColor
                self.placeholderLabel.textColor = UIColor.systemIndigo
        }
    }

    func movePlaceholderToCenter(){
        placeholderLabel.isHidden = textField.text != ""
        UIView.animate(withDuration: 0.3, animations: {[unowned self] in
            self.placeholderLabelTopLayout.constant = 20.0
            self.contentView.layoutIfNeeded()
            }){ [unowned self] (completed) in
                self.borderView.layer.borderColor = UIColor.gray.cgColor
                self.placeholderLabel.textColor = UIColor.gray
        }
    }
TextFieldのイベント処理の実装
個人的な好みでクラスは分けています。読みやすいので
extension MaterialTextField: UITextFieldDelegate {

//TextFieldの編集が始まったときに呼ばれるメソッド
    func textFieldDidBeginEditing(_ textField: UITextField) {

//編集が始まると、labelを上に動かす
        movePlaceholderToTop()
    }

//TextFieldの編集が終わったときに呼ばれるメソッド
    func textFieldDidEndEditing(_ textField: UITextField) {

//編集が終わると元に戻す
        movePlaceholderToCenter()
    }


//TextFieldでリターンキーがクリックされたときに呼ばれるメソッド
    func textFieldShouldReturn(_ textField: UITextField) -> Bool {
        textField.resignFirstResponder()
        return true
    }
}
StoryBoardにて実装
ポイントは
1- viewを配置する(TextFieldではない)
2- クラスを指定しておく(MaterialTextField)
3- 接続時にクラスを指定。(IBOutlet)

コードはこんなイメージ
import UIKit

//UITextFieldDelegateを継承しておく
class ViewController: UIViewController , UITextFieldDelegate{

//上記で接続したview クラスの指定は MaterialTextField
    @IBOutlet weak var materialTextField: MaterialTextField!

    override func viewDidLoad() {
        super.viewDidLoad()

//初期値の文字を設定
        materialTextField.placeholderLabel.text = "Address"

    }
}
間違っている点や、修正点がありましたら、教えていただけますか。
わかりにくい点もありましたら、修正依頼お願いします。

