今回行うこと
JavaScriptでDOM操作をしてwebアプリを作る
Reactを使用して同じwebアプリを作る
フロントエンド用語一覧
- DOM
Document Object Model の略
HTML,XML を取り扱うための API
<!DOCTYPE html>
<html>
  <head>
    <title>散歩</title>
  </head>
  <body>
    <p id="xxx">今日は<strong>「イラスト入門」</strong>を購入</p>
  </body>
</html>
DOM では画像のようになる

引用[1]https://www.javadrive.jp/javascript/dom/index1.html
この DOM を操作して Web ページを書き換えるのが JavaScript の役割
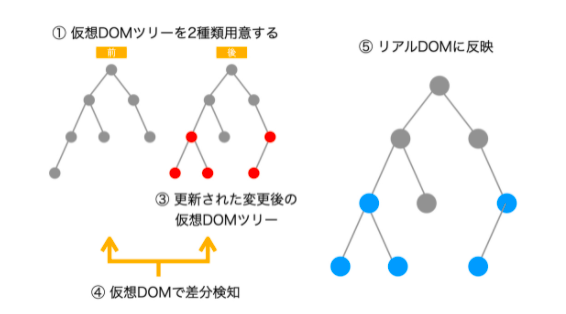
仮想 DOM
JavaScript オブジェクトによって作られた DOM
操作前仮想 DOM を操作後仮想 DOM を比較してその差分のみ DOM に反映させることで従来の DOM 操作のように全て書き換える必要がなくなった
React,Vue ではこの技術が使用されている
引用[2]https://yako3.hatenablog.com/entry/2020/05/07/135041
DOM 操作
要素の取得
-
getElementById
Id から DOM 要素を取得 -
getElementsByClassName
Class から DOM 要素を取得。複数ある場合 HTML コレクションとして返す -
querySelector
各種セレクターを入力することで初めに一致するセレクターを返す -
querySelectorAll
<!DOCTYPE html>
<html lang="en">
  <head>
    <meta charset="UTF-8" />
    <meta http-equiv="X-UA-Compatible" content="IE=edge" />
    <meta name="viewport" content="width=device-width, initial-scale=1.0" />
    <link rel="stylesheet" href="./src/style.css" />
    <title>Document</title>
  </head>
  <body>
    <h1 id="title">HelloWorld</h1>
    <div class="container">
      <p>エリア1です</p>
    </div>
    <div class="container">
      <p>エリア2です</p>
    </div>
    <script src="./src/index.js"></script>
  </body>
</html>
const title1 = document.getElementById("title");
//    <h1 id="title">HelloWorld</h1>
console.log(title1);

const containers1 = document.getElementsByClassName("container");

for (let index = 0; index < containers1.length; index++) {
  const element = containers1[index];

  // <div class="container">
  //     <p>エリア1です</p>
  // </div>
  // <div class="container">
  //   <p>エリア2です</p>
  // </div>
  console.log(element);
}

const title2 = document.querySelector("#title");
//    <h1 id="title">HelloWorld</h1>
console.log(title2);

const containers2 = document.querySelector(".container");

// <div class="container">
//     <p>エリア1です</p>
//   </div>
console.log(containers2);
メモアプリを作る
バニラ JS
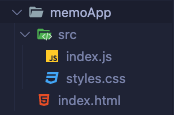
ディレクトリ構成
index.html
<!DOCTYPE html>
<html lang="en">
  <head>
    <meta charset="UTF-8" />
    <meta http-equiv="X-UA-Compatible" content="IE=edge" />
    <meta name="viewport" content="width=device-width, initial-scale=1.0" />
    <title>Document</title>
    <link rel="stylesheet" href="./src/styles.css" />
  </head>
  <body>
    <h1 id="title">簡単メモアプリ</h1>
    <input type="text" id="add-text" />
    <button id="add-button">追加</button>
    <div class="container">
      <p>メモ一覧</p>
      <ul id="memo-list"></ul>
    </div>
    <script src="src/index.js"></script>
  </body>
</html>
index.js
const onClickAdd = () => {
  //テキストボックスのエレメントを取得
  const textEl = document.getElementById("add-text");

  //テキストボックスの値を取得
  const text = textEl.value;
  textEl.value = ""; //タグの生成

  //<p></p>
  const p = document.createElement("p");
  //<p>text</p>
  p.textContent = text;

  //<li></li>
  const li = document.createElement("li");
  //<div></div>
  const div = document.createElement("div");

  //<button></button>
  const button = document.createElement("button");
  //<button>削除</button>
  button.textContent = "削除";

  //削除ボタンを押した時の処理
  button.addEventListener("click", () => {
    const deleteTarget = button.closest("li");
    document.getElementById("memo-list").removeChild(deleteTarget);
  });

  div.appendChild(p);
  //<div>
  //    <p>text</p>
  //</div>

  div.appendChild(button);
  //<div>
  //    <p>text</p>
  //    <button>削除</button>
  //</div>
  li.appendChild(div);
  //<li>
  //    <div>
  //        <p>text</p>
  //        <button>削除</button>
  //    </div>
  //</li>

  document.getElementById("memo-list").appendChild(li);
};

document
  .getElementById("add-button")
  .addEventListener("click", () => onClickAdd());
styles.css
.container {
  border: solid 1px #ccc;
  padding: 16px;
  margin: 8px;
}
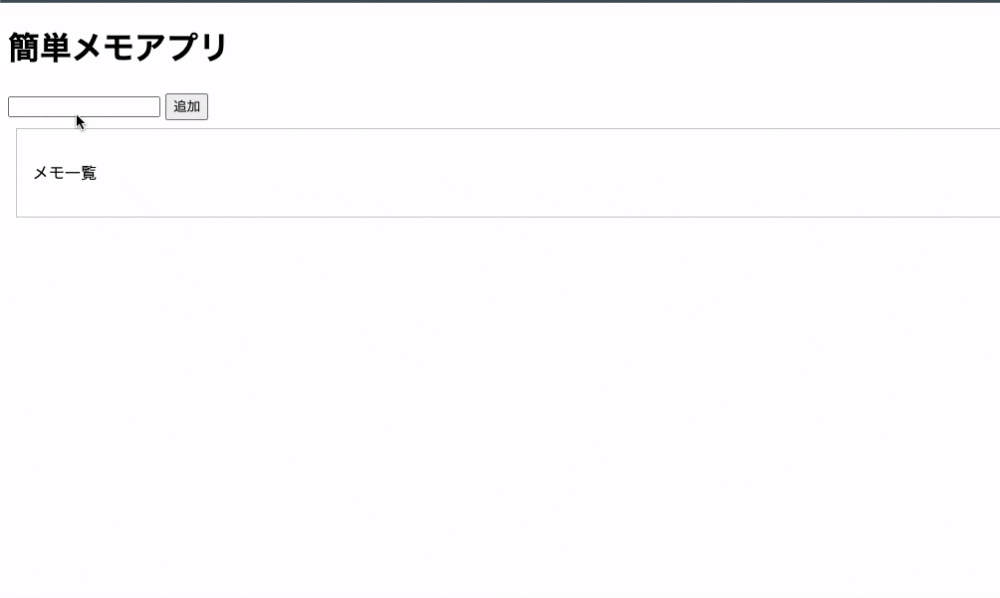
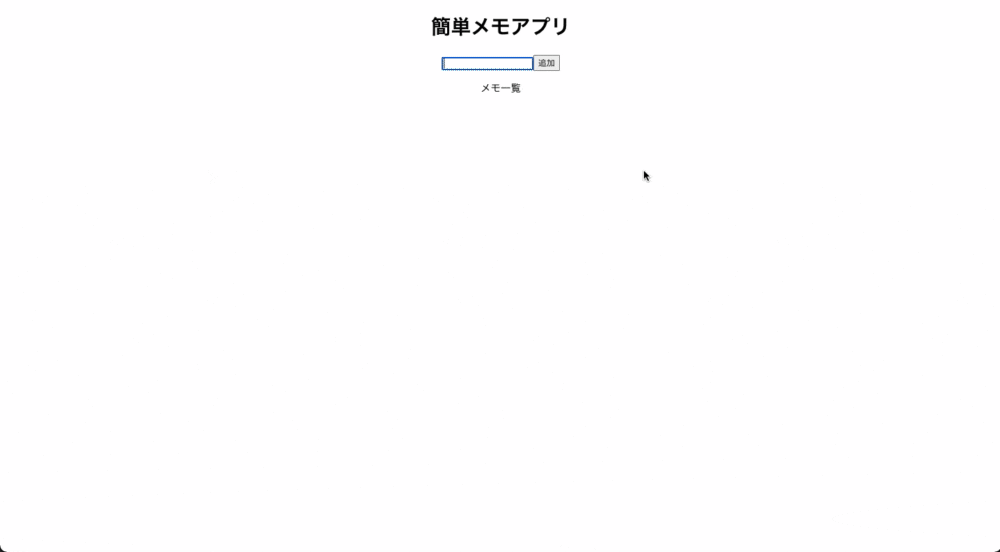
実際の動作
ES2015(ES6)で導入された記法をおさらい
let,const による変数宣言
古い教科書では var が使われているが再代入、再宣言可能であり、変数の巻き上げ、スコープが関数など意図しないバグを生み出しやすい
let
再宣言不可、スコープがブロック
let test1 = "hoge";
//hoge
console.log(test1);

test1 = "hogehoge";
//hogehoge
console.log(test1);

//エラー
let test1 = "hogehogehoge";
const
再宣言不可、再代入不可、ただしオブジェクト、配列の変更は可能
const test ="hoge";
//hoge
console.log(test)

//エラーが出る
cosnt test="hoge"
テンプレート文字列
const hoge = "hogeです";
//hogeの値はhogeです
console.log(`hogeの値は${hoge}`);
アロー関数
より簡潔に関数式を記述できる
//関数宣言
function func1() {
  console.log("func1");
}

//関数式
const func2 = function () {
  console.log("func2");
};

//アロー関数による関数式
const func3 = () => {
  console.log("func3");
};

//func1
func1();
//func2
func2();
//func3
func3();
スプレッド構文
配列に対して...三つ繋げることで内部の要素を展開することができる。
const foo = [1, 2];

// 配列のクローン
const bar = [...foo]; // => [1, 2]

// 要素を追加して新しい配列を生成
const baz = [...foo, 3, 4]; // => [1, 2, 3, 4]

// 配列をマージ
const hoge = [...foo, ...bar]; // => [1, 2, 1, 2]
=を使用してはいけない理由
配列の参照値もコピーしてしまうため元の配列に予期せぬ変更が起こる可能性がある。コピー後の配列を変更するとコピー前の配列も変更される
const foo = [1, 2];
const foo1 = foo;
foo1[0] = 5;

//[ 5, 2 ]
console.log(foo1);
//[ 5, 2 ]
console.log(foo);
スプレッド構文を使う場合
const foo = [1, 2];
//配列を展開して新しい配列を生成
const foo1 = [...foo];
foo1[0] = 5;

//[ 5, 2 ]
console.log(foo1);
//[ 1, 2 ]
console.log(foo);
react 編
react は JavaScript ライブラリ
便利な関数やAPI等を提供してくれる
1から環境を構築するのは大変なので create-react-app で雛形を作る。
npx create-react-app memo-app-react
エラーが出た
Need to install the following packages:
  create-react-app
Ok to proceed? (y) y

You are running `create-react-app` 4.0.3, which is behind the latest release (5.0.0).

We no longer support global installation of Create React App.

Please remove any global installs with one of the following commands:
- npm uninstall -g create-react-app
- yarn global remove create-react-app

The latest instructions for creating a new app can be found here:
https://create-react-app.dev/docs/getting-started/
同じエラーが出た人はアンインストールしてキャッシュクリアで解決
npm uninstall -g create-react-app
npx clear-npx-cache
サーバーを起動する
  cd memo-app-react
  npm start

以下コマンドで拡張子 js を jsx に変更する。これをすると vscode の jsx 補完が効きやすい
find src -name "*.js" -exec sh -c 'mv "$0" "${0%.js}.jsx"' {} \;
jsx
簡単に言うと html に{}で JavaScript を埋め込むことができる
return の中にレンダリングするものを記述する
JavaScript で記述した hello を{hello}で h1 に埋め込むことができる
function App() {
  const hello = "Hello";

  return (
    <div className="App">
      <h1>{hello}</h1>
    </div>
  );
}
❌ return の中は一つの親要素である必要があるため以下はエラーになる
function App() {
  const hello = "Hello";

  return (
    <div className="App">
      <h1>{hello}</h1>
    </div>
    <div>
      <h1>{hello}</h1>
    </div>
  );
}
これなら動く
function App() {
  const hello = "Hello";

  return (
    <div>
      <div className="App">
        <h1>{hello}</h1>
      </div>
      <div>
        <h1>{hello}</h1>
      </div>
    </div>
  );
}
src/App.jsx を変更
header タグの中身を削除する
import "./App.css";

function App() {
  return <div className="App"></div>;
}

export default App;
コンポーネント
日本語にすると部品
状態とライフサイクルを持ち使いまわすことが可能
書き方がクラスコンポーネントと関数コンポーネント 2 つある
現在主流の書き方は関数コンポーネント
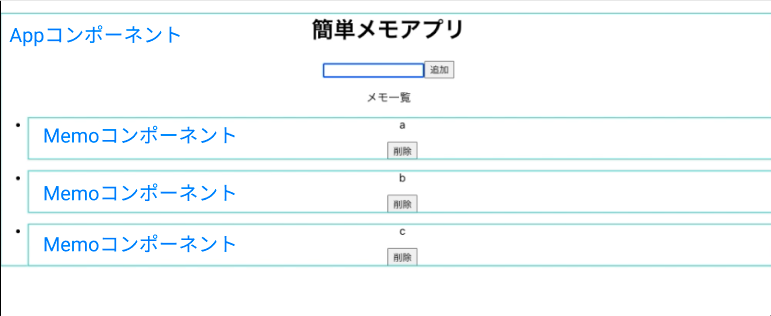
上で作った memo アプリをコンポーネントに分けると下の図になる
src/App.jsx を変更
前に作った index.html と同じだが id やクラスを書く必要はない
function App() {
  const hello = "Hello";

  return (
    <div className="App">
      <h1>簡単メモアプリ</h1>
      <input type="text" />
      <button>追加</button>
      <div>
        <p>メモ一覧</p>
        <ul></ul>
      </div>
    </div>
  );
}
state
コンポーネントが保持する値
コンポーネントが持つstateが変化するとそのコンポーネントとその子コンポーネントが再描画される
input の value 値を useState で取得する
useState は react hook の機能の一つ
状態の管理が可能
今回は input の値が変わった時に State の値を書き換える
src/App.jsx
import "./App.css";

//追記 useRefを使用するにはuseStateモジュールのインポートが必要
import React, { useState } from "react";

function App() {
  //追記
  const [memoText, setMemoText] = useState("");

  return (
    <div className="App">
      <h1>簡単メモアプリ</h1>
      {/* 追記 */}
      <input type="text" onChange={(e) => setMemoText(e.target.value)} />
      <button>追加</button>
      <div>
        <p>メモ一覧</p>
        <ul></ul>
      </div>
    </div>
  );
}

export default App;
メモコンポーネントの作成
/src に Memo.jsx を作成
const Memo = () => {
  return (
    <>
      <li>
        <p>text</p>
        <button>削除</button>
      </li>
    </>
  );
};

export default Memo;
これを親コンポーネント App.jsx でメモコンポーネントをインポートして呼び出す
import "./App.css";
import React, { useState } from "react";
//追記
import Memo from "./Memo";

function App() {
  const [memoText, setMemoText] = useState("");

  return (
    <div className="App">
      <h1>簡単メモアプリ</h1>
      <input type="text" onChange={(e) => setMemoText(e.target.value)} />
      <button>追加</button>
      <div>
        <p>メモ一覧</p>
        <ul>
          {/* 追記 */}
          <Memo></Memo>
        </ul>
      </div>
    </div>
  );
}

export default App;
以下の画像のようになる
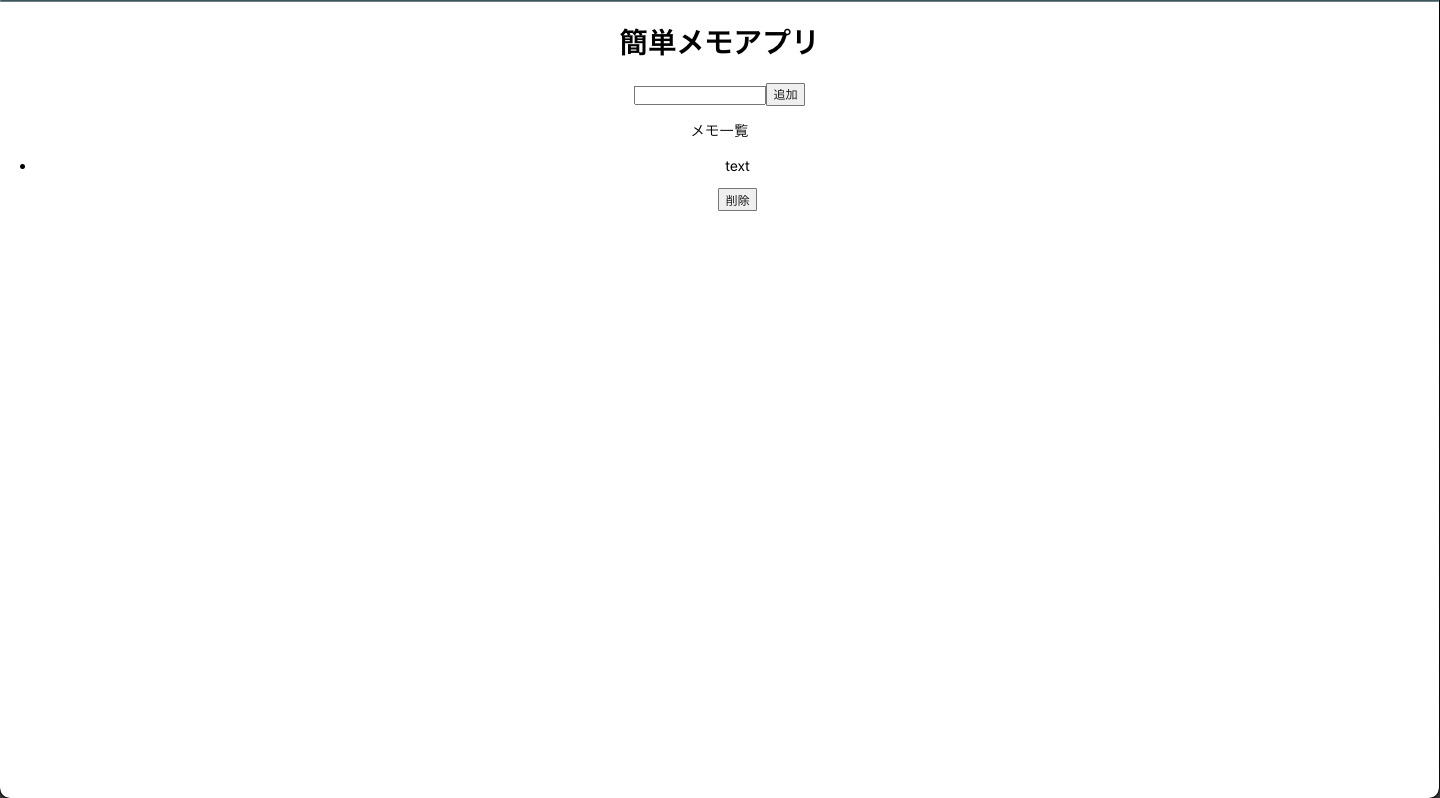
現状メモの中身が text の表示になっているが実際は input の value にする必要がある
親コンポーネントの App から子コンポーネントのメモコンポーネントに value を渡す必要がある
親 → 子のデータの受け渡しには props というものを使用する
App.jsx
import "./App.css";
import React, { useState } from "react";
//追記
import Memo from "./Memo";

function App() {
  const [memoText, setMemoText] = useState("");

  return (
    <div className="App">
      <h1>簡単メモアプリ</h1>
      <input type="text" onChange={(e) => setMemoText(e.target.value)} />
      <button>追加</button>
      <div>
        <p>メモ一覧</p>
        <ul>
          {/* 変更 */}
          <Memo memoText={memoText}></Memo>
        </ul>
      </div>
    </div>
  );
}

export default App;
Memo.jsx
const Memo = (props) => {
  return (
    <>
      <li>
        <p>{props.memoText}</p>
        <button>削除</button>
      </li>
    </>
  );
};

export default Memo;
本来の動作は追加ボタンを押したときにメモ一覧が増えていく。リストでメモ一覧を保持してそれを表示、追加ボタンを押したときにリストにメモを追加するような動作にする
import "./App.css";
import React, { useState } from "react";
import Memo from "./Memo";

function App() {
  //追記
  const [memoTextList, setmemoTextList] = useState([]);
  const [memoText, setMemoText] = useState("");

  return (
    <div className="App">
      <h1>簡単メモアプリ</h1>
      <input type="text" onChange={(e) => setMemoText(e.target.value)} />
      <button>追加</button>
      <div>
        <p>メモ一覧</p>
        <ul>
          {/* 変更 */}
          {memoTextList.map((memoText, index) => {
            return <Memo memoText={memoText} key={index}></Memo>;
          })}
        </ul>
      </div>
    </div>
  );
}

export default App;
追加ボタンを押した時にリストにメモを追加する処理を書く。また追加ボタンを押したとき memoText を初期化して input の value を初期状態にする
import "./App.css";
import React, { useState } from "react";
import Memo from "./Memo";

function App() {
  //追記
  const [memoTextList, setmemoTextList] = useState([]);
  const [memoText, setMemoText] = useState("");

  //追記
  const addClick = () => {
    setmemoTextList([...memoTextList, memoText]);
    //memoTextの初期化
    setMemoText("");
  };

  return (
    <div className="App">
      <h1>簡単メモアプリ</h1>
      <input
        type="text"
        onChange={(e) => setMemoText(e.target.value)}
        //追記
        value={memoText}
      />
      {/* 変更*/}
      <button onClick={addClick}>追加</button>
      <div>
        <p>メモ一覧</p>
        <ul>
          {memoTextList.map((memoText, index) => {
            return <Memo memoText={memoText} key={index}></Memo>;
          })}
        </ul>
      </div>
    </div>
  );
}

export default App;
メモをメモリストに追加することができた。メモの削除ができないのでその処理を書く
親コンポーネントの memoTextList を子コンポーネントから変更するには親コンポーネントが削除関数を子に渡す必要がある。
App.jsx
import "./App.css";
import React, { useState } from "react";
import Memo from "./Memo";

function App() {
  const [memoTextList, setmemoTextList] = useState([]);
  const [memoText, setMemoText] = useState("");
  const addClick = () => {
    setmemoTextList([...memoTextList, memoText]);
    setMemoText("");
  };

  //追記
  const removeMemo = (index) => {
    const newMemoTextList = [...memoTextList];
    newMemoTextList.splice(index, 1);
    setmemoTextList(newMemoTextList);
  };

  return (
    <div className="App">
      <h1>簡単メモアプリ</h1>
      <input
        type="text"
        onChange={(e) => setMemoText(e.target.value)}
        value={memoText}
      />
      <button onClick={addClick}>追加</button>
      <div>
        <p>メモ一覧</p>
        <ul>
          {memoTextList.map((memoText, index) => {
            return (
              <Memo
                memoText={memoText}
                key={index}
                //追記
                removeMemo={() => {
                  removeMemo(index);
                }}
              ></Memo>
            );
          })}
        </ul>
      </div>
    </div>
  );
}

export default App;
memo.jsx
const Memo = (props) => {
  return (
    <>
      <li>
        <p>{props.memoText}</p>
        {/* //追記 */}
        <button onClick={props.removeMemo}>削除</button>
      </li>
    </>
  );
};

export default Memo;
参考にした書籍
モダンJavaScriptの基本から始めるReact実践の教科書