はじめに
PythonでCloud Storageの署名付きURL(一定期間だけ有効なURL)を発行する方法をまとめています。
手順
1. サービスアカウントとキーの作成
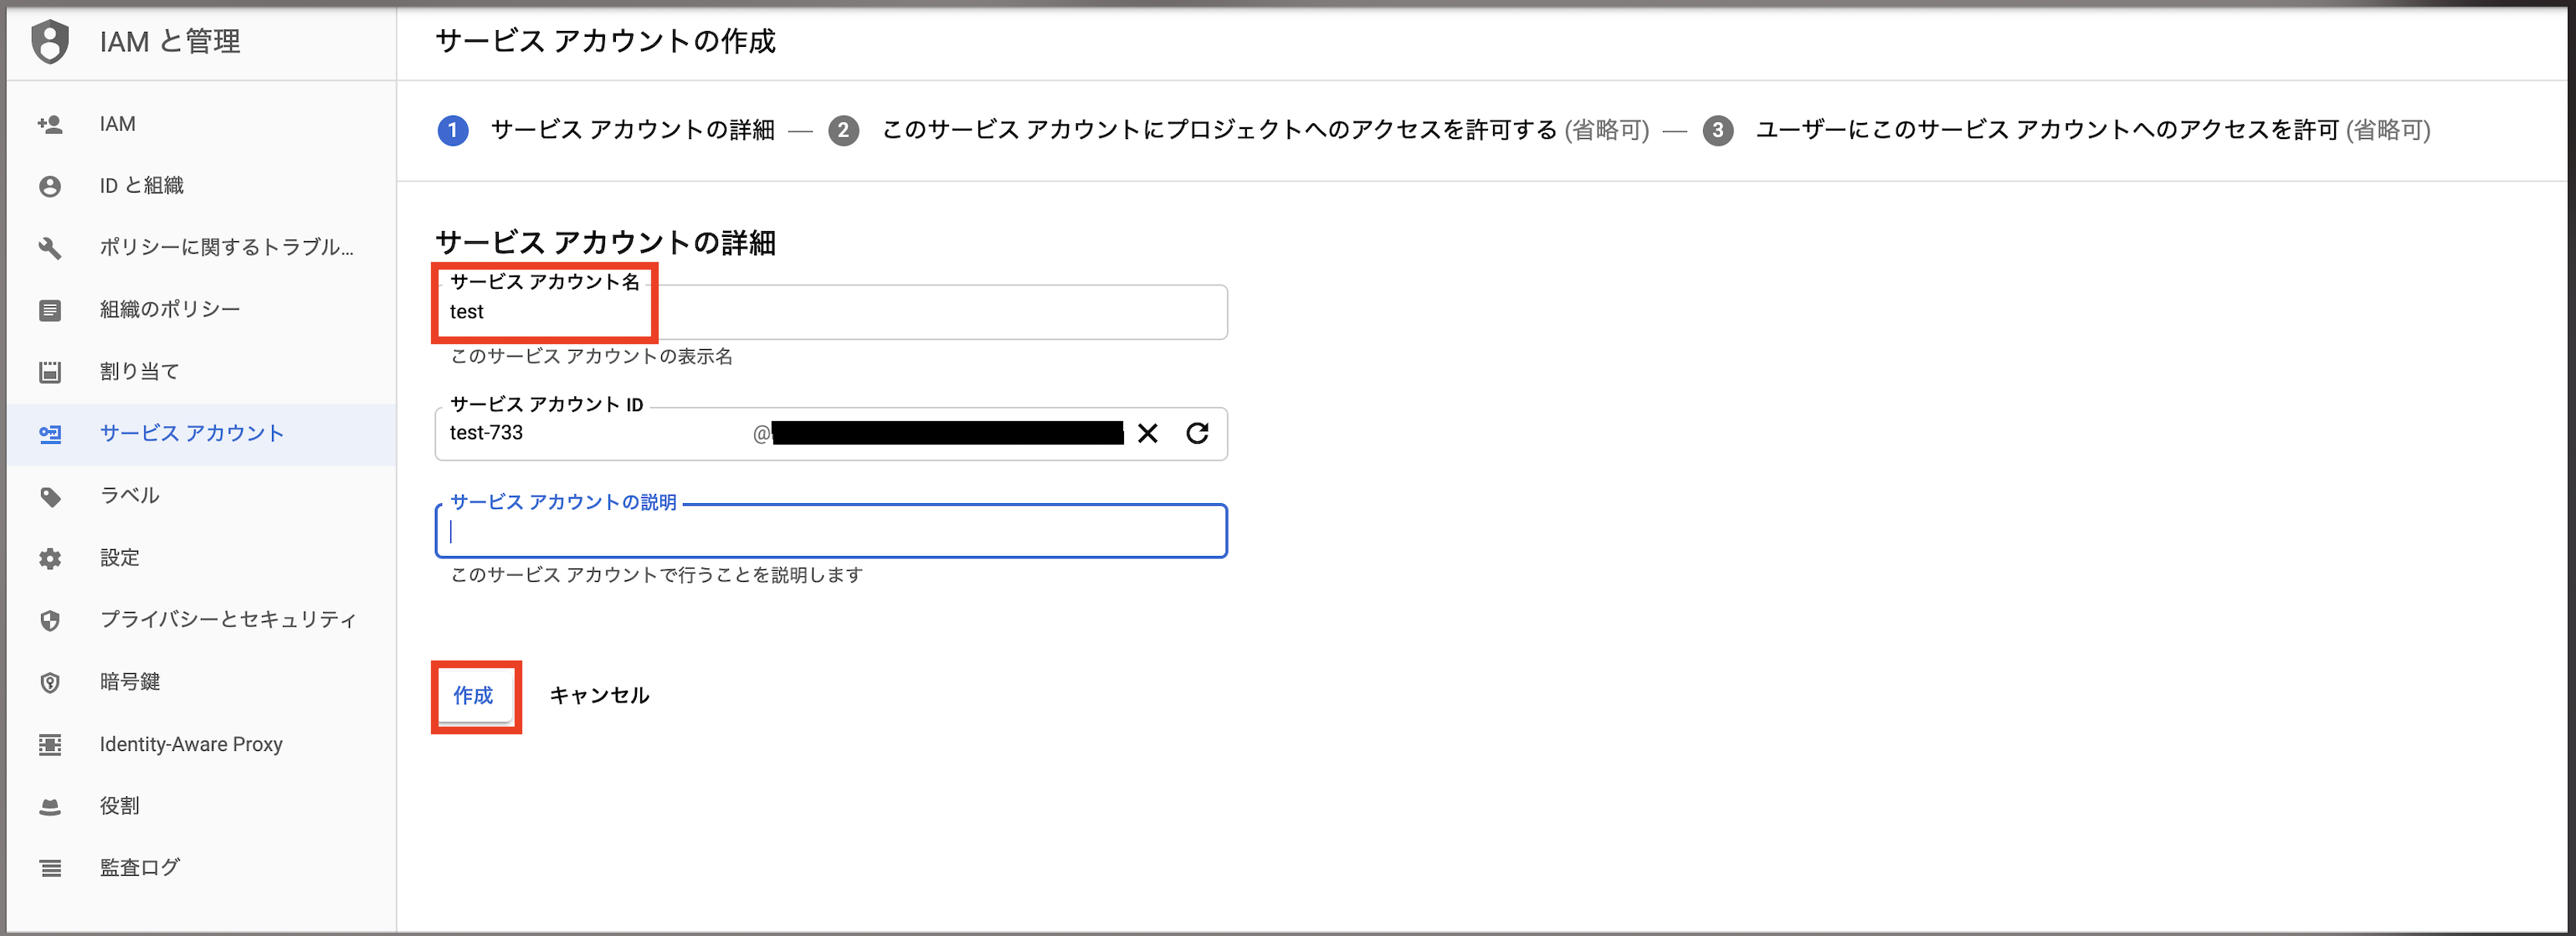
IAMと管理 -> サービスアカウント -> サービスアカウント を開き、[サービスアカウントを作成]を選択します。
次にサービスアカウント名を入力し、[作成]を選択します。
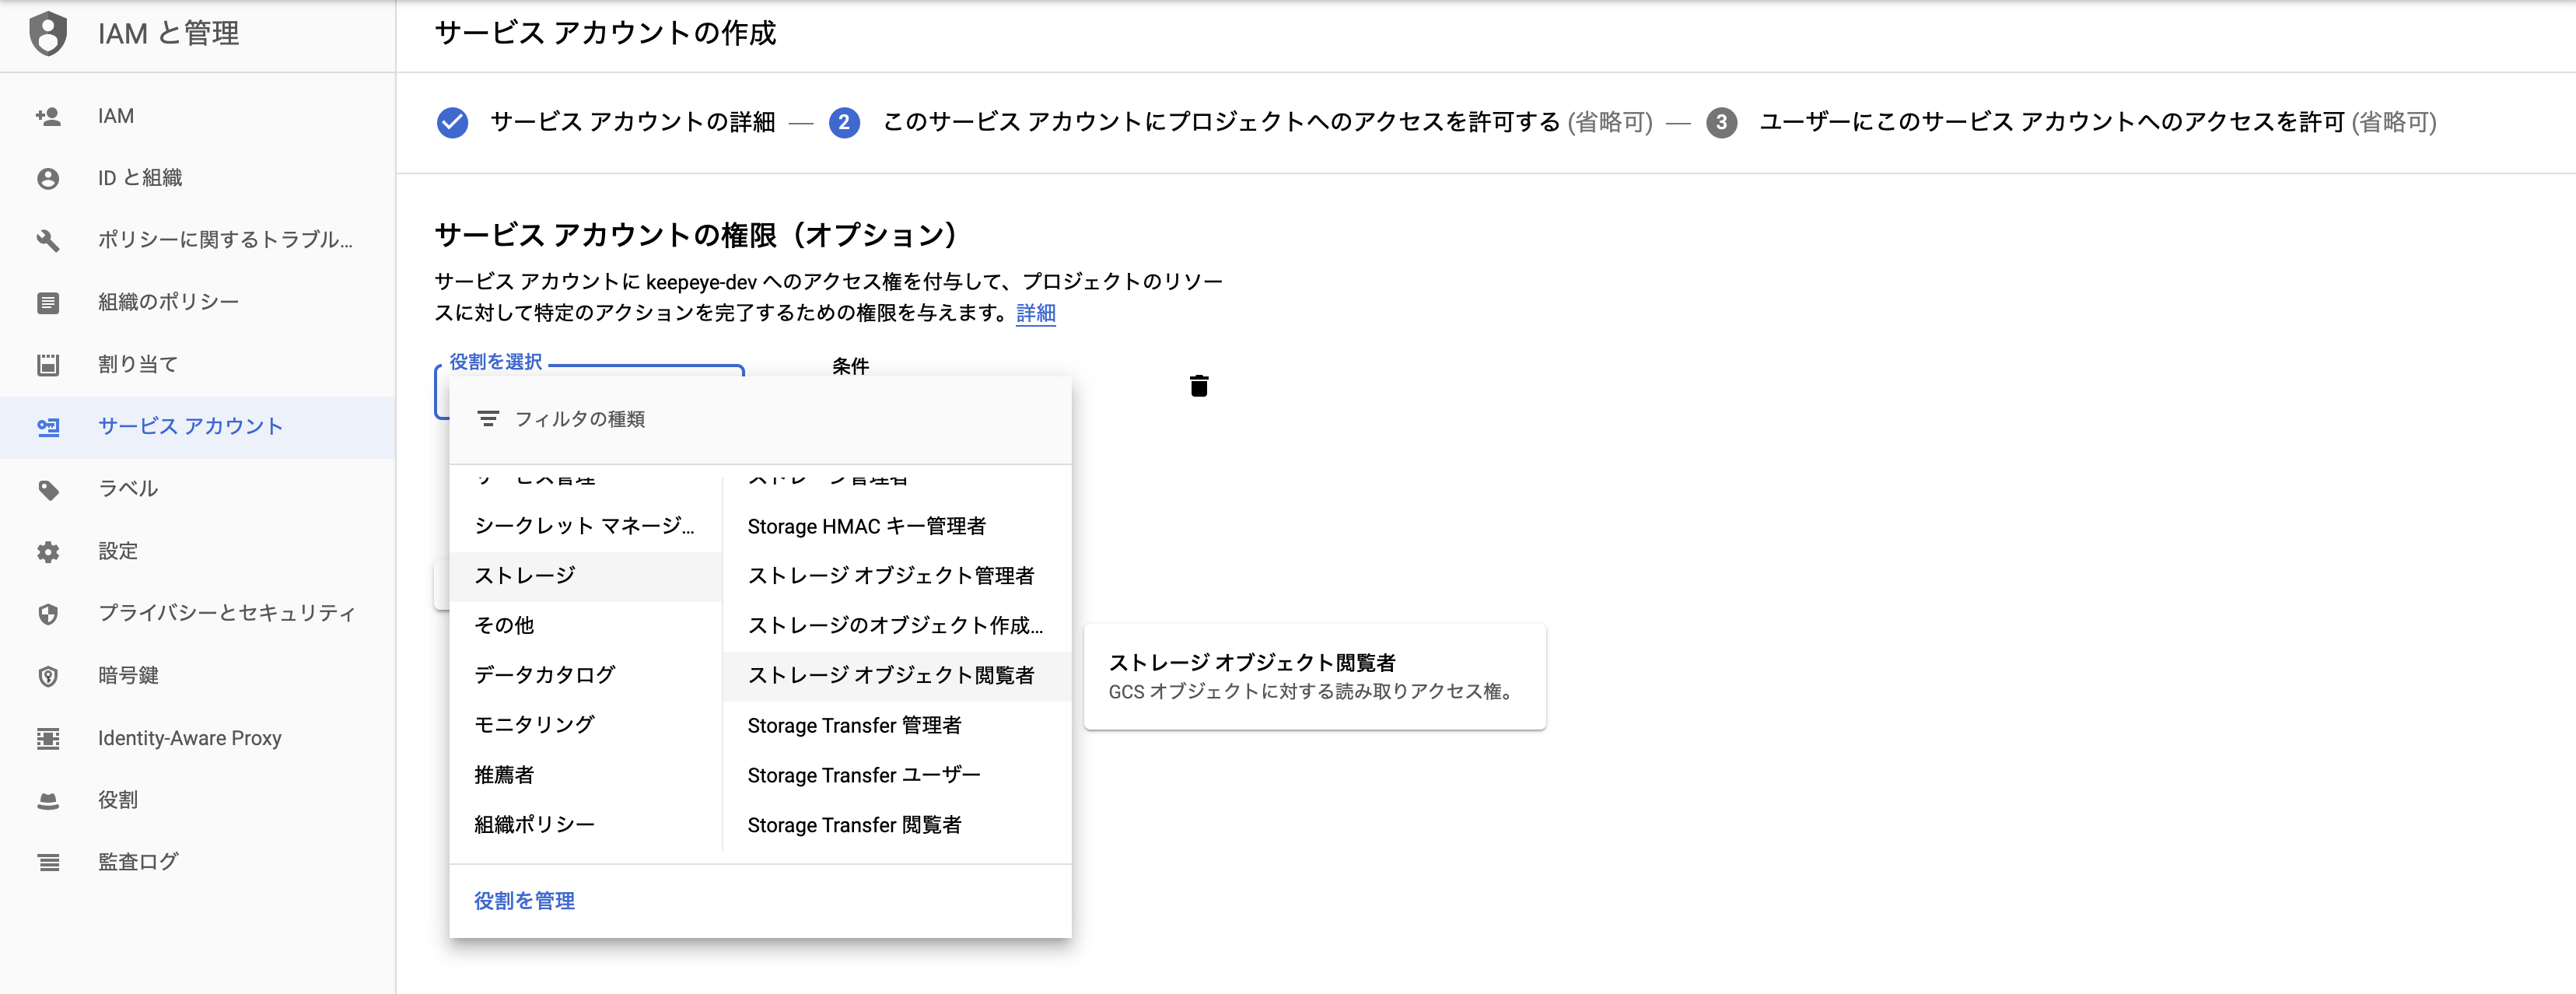
次に[役割を選択]から、ストレージ -> ストレージオブジェクト閲覧者 を選択し、[続行]を選択します。
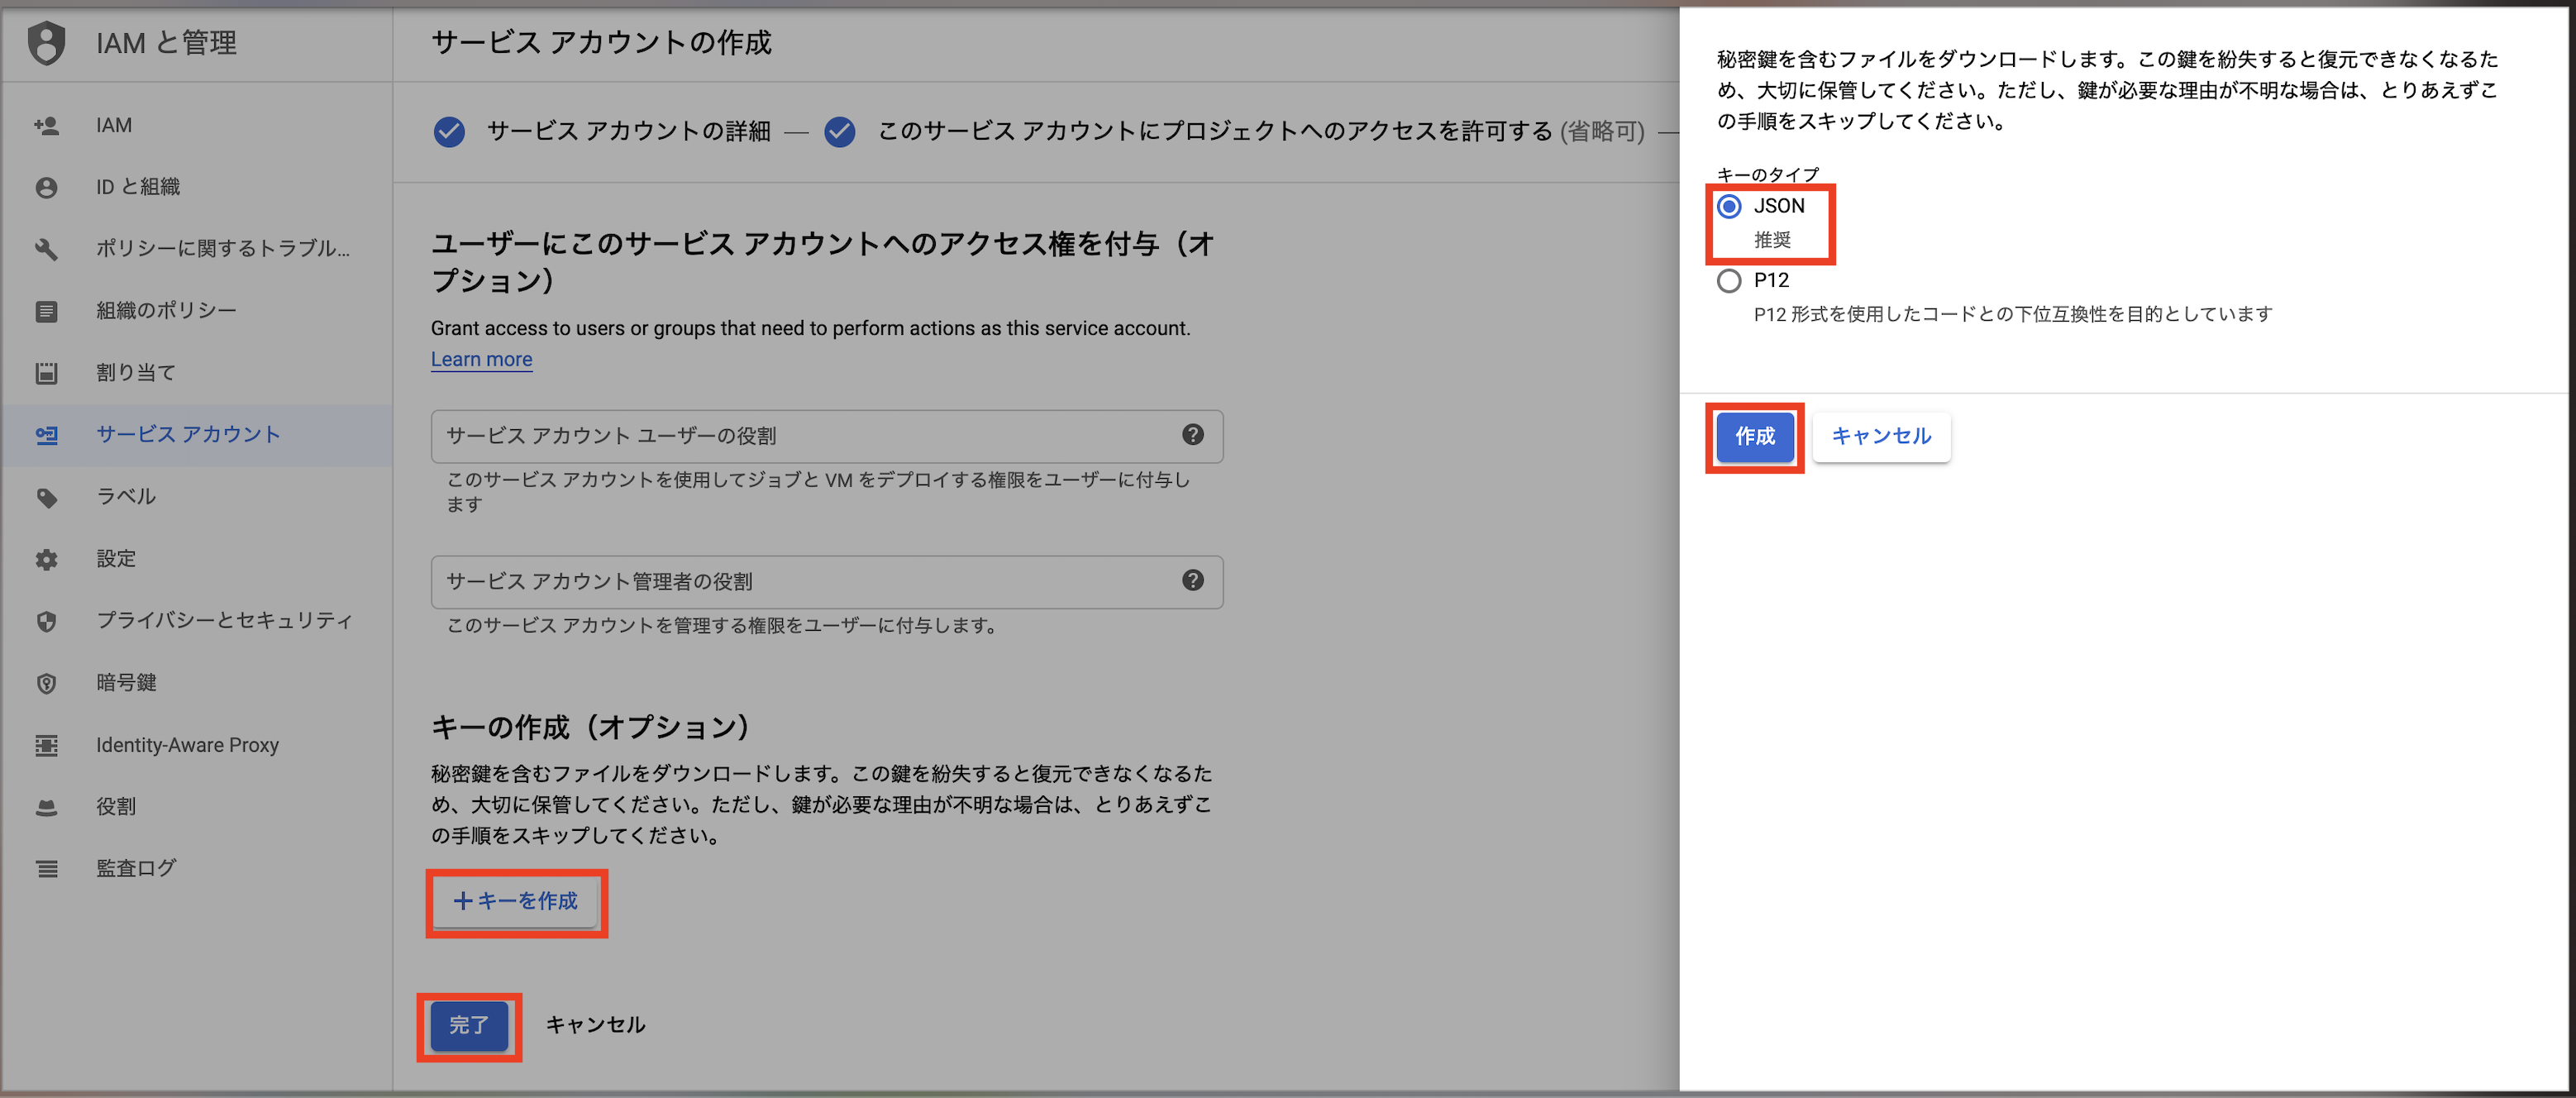
次に[キーを作成]を選択し、[JSON]を選択し、[作成]を選択します。
するとJSONファイルがローカルPCにダウンロードされますので、その後[完了]を選択してください。
2. プログラムの作成
Google Cloudのドキュメントには断片的にしか情報がなかったので、自分で情報を組み合わせる必要があります。
まず以下のサイトのpythonプログラムを確認します。
V4 signing process with Cloud Storage tools(LanguageをEnglishにして開いてください)
https://cloud.google.com/storage/docs/access-control/signing-urls-with-helpers
from google.cloud import storage
import datetime


def generate_download_signed_url_v4(bucket_name, blob_name):
    """Generates a v4 signed URL for downloading a blob.

    Note that this method requires a service account key file. You can not use
    this if you are using Application Default Credentials from Google Compute
    Engine or from the Google Cloud SDK.
    """
    # bucket_name = 'your-bucket-name'
    # blob_name = 'your-object-name'

    storage_client = storage.Client()
    bucket = storage_client.bucket(bucket_name)
    blob = bucket.blob(blob_name)

    url = blob.generate_signed_url(
        version="v4",
        # This URL is valid for 15 minutes
        expiration=datetime.timedelta(minutes=15),
        # Allow GET requests using this URL.
        method="GET",
    )

    print("Generated GET signed URL:")
    print(url)
    print("You can use this URL with any user agent, for example:")
    print("curl '{}'".format(url))
    return url
試しに上記のプログラム(storage_generate_signed_url_v4.py)を実行するとyou need a private keyとエラーになります。
プログラム中に「Note that this method requires a service account key file.」と書かれていますので、サービスアカウントキーファイルが必要であることがわかります。
サービスアカウントキーファイルは前の手順で作成したJSONファイルのことですが、どのように指定すればよいか記載がありません。
そこで次に以下のpythonプログラムを確認します。
サービス アカウント キーファイルを使用した認証
https://cloud.google.com/bigquery/docs/authentication/service-account-file?hl=ja
from google.cloud import bigquery
from google.oauth2 import service_account

# TODO(developer): Set key_path to the path to the service account key
#                  file.
# key_path = "path/to/service_account.json"

credentials = service_account.Credentials.from_service_account_file(
    key_path,
    scopes=["https://www.googleapis.com/auth/cloud-platform"],
)

client = bigquery.Client(
    credentials=credentials,
    project=credentials.project_id,
)
上記のプログラムはBigQuery向けのサービスアカウントキーファイルを使用した認証方法ですが、これをCloud Storage用に作り替えてみます。
変更内容は以下3点です。
- import対象をbigqueryからstorageに変更
- bigquery.Clientをstorage.Clientに変更
- key_pathのコメントアウトを外し、先ほど作成したJSONファイルの保存場所を指定
from google.cloud import storage
from google.oauth2 import service_account

# TODO(developer): Set key_path to the path to the service account key
#                  file.
key_path = "path/to/service_account.json"

credentials = service_account.Credentials.from_service_account_file(
    key_path,
    scopes=["https://www.googleapis.com/auth/cloud-platform"],
)

client = storage.Client(
    credentials=credentials,
    project=credentials.project_id,
)
試しに上記のプログラム(load_service_account.py)を実行したところエラーはでませんでした。
そこで、load_service_account.pyとstorage_generate_signed_url_v4.pyを合体させて、一部修正を加えます。
修正内容は以下です。
- 重複したimportの削除
-
client = storage.Client()をstorage_client = storage.Client()に変更 - 最終行に署名付きURLを取得したいバケット名とオブジェクト名を入力して関数呼び出し
- 署名付きURLの有効期限を変更したい場合は
minutes=15の部分を変更
import datetime
from google.cloud import storage
from google.oauth2 import service_account

# TODO(developer): Set key_path to the path to the service account key
#                  file.
key_path = "path/to/service_account.json"

credentials = service_account.Credentials.from_service_account_file(
    key_path,
    scopes=["https://www.googleapis.com/auth/cloud-platform"],
)

storage_client = storage.Client(
    credentials=credentials,
    project=credentials.project_id,
)

def generate_download_signed_url_v4(bucket_name, blob_name):
    """Generates a v4 signed URL for downloading a blob.

    Note that this method requires a service account key file. You can not use
    this if you are using Application Default Credentials from Google Compute
    Engine or from the Google Cloud SDK.
    """
    # bucket_name = 'your-bucket-name'
    # blob_name = 'your-object-name'

    storage_client = storage.Client()
    bucket = storage_client.bucket(bucket_name)
    blob = bucket.blob(blob_name)

    url = blob.generate_signed_url(
        version="v4",
        # This URL is valid for 15 minutes
        expiration=datetime.timedelta(minutes=15),
        # Allow GET requests using this URL.
        method="GET",
    )

    print("Generated GET signed URL:")
    print(url)
    print("You can use this URL with any user agent, for example:")
    print("curl '{}'".format(url))
    return url

generate_download_signed_url_v4('test_bucket', 'test_blob')
上記を実行してもyou need a private keyとエラーになります。
以下のドキュメントを読むと「環境変数 GOOGLE_APPLICATION_CREDENTIALS を設定して、アプリケーションコードに認証情報を指定」する必要があるようです。
https://cloud.google.com/storage/docs/reference/libraries#linux-or-macos
設定方法は以下のコマンドです。
export GOOGLE_APPLICATION_CREDENTIALS="[PATH]"

# 例:
export GOOGLE_APPLICATION_CREDENTIALS="/home/user/Downloads/[FILE_NAME].json"
ただ、セッションが変わるたびに上記のコマンドを実行してからプログラムを実行するのは面倒なので、以下を組み込むことにします。
import os
os.environ['GOOGLE_APPLICATION_CREDENTIALS'] = './[FILE_NAME].json'
完成したプログラムは以下です。
import datetime
from google.cloud import storage
from google.oauth2 import service_account
import os
os.environ['GOOGLE_APPLICATION_CREDENTIALS'] = 'path/to/service_account.json'

# TODO(developer): Set key_path to the path to the service account key
#                  file.
key_path = "path/to/service_account.json"

credentials = service_account.Credentials.from_service_account_file(
    key_path,
    scopes=["https://www.googleapis.com/auth/cloud-platform"],
)

storage_client = storage.Client(
    credentials=credentials,
    project=credentials.project_id,
)

def generate_download_signed_url_v4(bucket_name, blob_name):
    """Generates a v4 signed URL for downloading a blob.

    Note that this method requires a service account key file. You can not use
    this if you are using Application Default Credentials from Google Compute
    Engine or from the Google Cloud SDK.
    """
    # bucket_name = 'your-bucket-name'
    # blob_name = 'your-object-name'

    storage_client = storage.Client()
    bucket = storage_client.bucket(bucket_name)
    blob = bucket.blob(blob_name)

    url = blob.generate_signed_url(
        version="v4",
        # This URL is valid for 15 minutes
        expiration=datetime.timedelta(minutes=15),
        # Allow GET requests using this URL.
        method="GET",
    )

    print("Generated GET signed URL:")
    print(url)
    print("You can use this URL with any user agent, for example:")
    print("curl '{}'".format(url))
    return url

generate_download_signed_url_v4('test_bucket', 'test_blob')
4. 実行
pythonを実行します。
python3 storage_generate_signed_url_v4_auth.py
以下のような結果が得られます。
これが署名付きURLです。
Generated GET signed URL:
https://storage.googleapis.com/test_bucket/test_blob/略
You can use this URL with any user agent, for example:
curl 'https://storage.googleapis.com/test_bucket/test_blob/略
参考URL
署名付き URL
https://cloud.google.com/storage/docs/access-control/signed-urls?hl=ja
V4 signing process with Cloud Storage tools(LanguageをEnglish)
https://cloud.google.com/storage/docs/access-control/signing-urls-with-helpers
サービス アカウント キーファイルを使用した認証
https://cloud.google.com/bigquery/docs/authentication/service-account-file?hl=ja