はじめに
文書においてある単語が出現したとき、その文章中に別の限られた単語が頻繁に出現する事を共起と言います。
文章中からその文章を特徴付ける単語を抽出し、特徴語同士の共起関係をネットワーク図にしたものを、共起ネットワークと言います。
networkXで共起ネットワークを書くことがあったので、基本的な描画方法や調整の仕方を残しておきます。
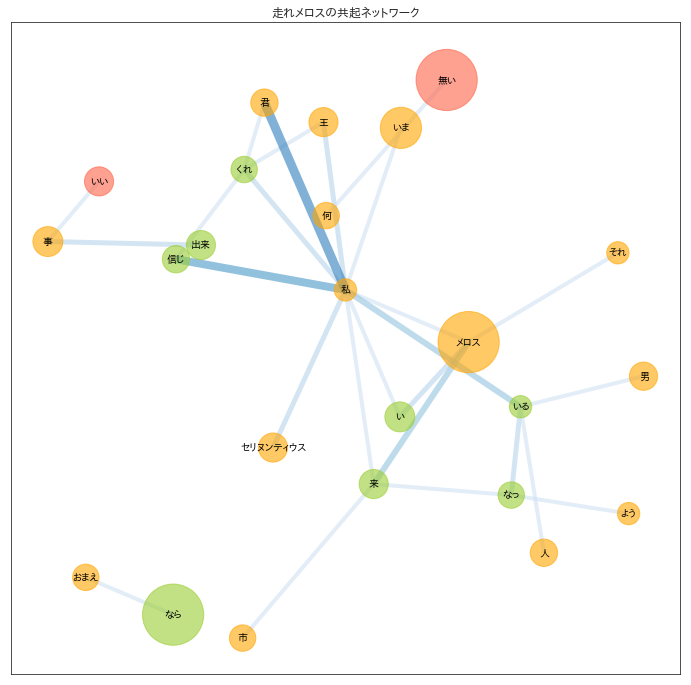
こんな感じでNodeを色分けしたり、線の太さを変えたりしました。
書いたこと
MeCabという形態素解析ツールとnetworkXという描画モジュールを用いてテキストから共起ネットワークを描画するコードを書きました。
描画結果を色々調整したので、そこら辺の部分は何か参考になるかもしれません。
書かなかったこと
ライブラリのインストールや詳細については触れません。この手の記事はもっといい記事が他に色々あるので、そちらを参考にしてください。
注意
書き捨てのコードなので汚いです。
コード
「走れメロス」の日本語ファイルから共起ネットワークを書くまでのコードです。
import numpy as np
import matplotlib.pyplot as plt
import matplotlib

matplotlib.rcParams['font.family'] = 'IPAPGothic'
np.random.seed(1234)

%matplotlib inline

import networkx as nx
import MeCab
from collections import defaultdict, Counter
from copy import copy, deepcopy

# MeCabの準備
mecab = MeCab.Tagger('-d /usr/local/lib/mecab/dic/mecab-ipadic-neologd')
mecab.parse('')

# 文章の読み込みとNode, Edgeの切りだし
node_name = defaultdict(str)
node_idx = defaultdict(int)
node_type = defaultdict(list)
node_count = defaultdict(int)
edge_list = []

with open("../input/meros.txt", mode="r") as f:
    lines = f.readlines()
stopwords = ["の", "し", "れ", "さ"]

# 文章を一行ずつ読み込み、Nodeとedgeを格納
cnt = 0
for line in lines:
    node = mecab.parseToNode(line)
    node_prev = None
    while node:
        w = node.surface
        w_type = node.feature.split(',')[0]
        if (w_type in ["名詞", "動詞", "形容詞"]) & (w not in stopwords):
            # Nodeの処理
            if w not in node_name.values():
                node_name[cnt] = w
                node_idx[w] = cnt
                node_count[cnt] = 1
                node_type[w_type].append(node_idx[w])
                cnt += 1
            else:
                node_count[node_idx[w]] += 1
            # edgeの処理
            if (node_prev is not None) & (node_prev != node_idx[w]): # 循環グラフを回避
                # 有向グラフを回避
                edge = (min(node_prev, node_idx[w]), max(node_prev, node_idx[w]))
                edge_list.append(edge)
            node_prev = node_idx[w]
        node = node.next
        if node is None:
            break

edge_count = Counter(edge_list)

# Networkxに格納
G= nx.Graph()
G.add_nodes_from([(idx, {'cnt': node_count[idx]}) for idx in node_name])
G.number_of_nodes(), len(node_name)
G.add_edges_from([(a, b, {'cnt': edge_count[(a, b)]}) for a, b in edge_list])

# Node, Edgeを剪定
G2 = deepcopy(G)
# Node: cnt >= 3で剪定
# 破壊的操作なので、予め破壊用のグラフ(G2)と検索用グラフ(G)を分けておく
for n, attr in G.nodes().items():
    if (attr['cnt'] < 10):
        G2.remove_edges_from(list(G.edges(n)))
        G2.remove_node(n)

G3 = deepcopy(G2)
# Edge: cnt >= 2で剪定
# Edgeが無くなったNodeは、一旦そのまま
for e, attr in G2.edges().items():
    if attr['cnt'] < 2:
        G3.remove_edge(*e)

G4 = deepcopy(G3)
# Edgeが無くなったNodeを削除
for n in list(G3.nodes()):
    if len(G3[n]) == 0:
        G4.remove_node(n)

G_result = deepcopy(G4) # 描画に使う剪定後のグラフを確定

pos = nx.layout.spring_layout(G_result, k=0.7, seed=10) # 2次元平面状の座標を計算
labels = {n: node_name[n] for n in pos.keys()} # Nodeに日本語を描画するための辞書
# node_size = [np.log(node_count[n])*400 for n in pos.keys()] # 対数スケール
node_size = [node_count[n]*50 for n in pos.keys()]

edge_alpha = [edge_count[e] for e in G_result.edges()]
edge_colors = [edge_count[e] for e in G_result.edges()]
edge_width = [edge_count[e] + 2 for e in G_result.edges()]

# 描画
fig, ax = plt.subplots(figsize=(12,12))
# 名詞のNodeを描画
# Nodeを色分けしたいときは、nodelistを使ってNodeのグループ毎に描画関数を繰り返し実行する
# nodelistはグループ毎のNode番号を指定するが、それ以外の引数(posやnode_sizeなど)は全てのNodeについての値を入れる
# 指定出来る色はmatplotlibのcolor exampleを参照
# https://matplotlib.org/examples/color/named_colors.html
nx.draw_networkx_nodes(G_result, pos,
                       nodelist=[n for n in G_result.nodes() if n in node_type["名詞"]],
                       node_size=node_size, node_color="orange", alpha=0.6, ax=ax)
nx.draw_networkx_nodes(G_result, pos,
                       nodelist=[n for n in G_result.nodes() if n in node_type["動詞"]],
                       node_size=node_size, node_color="yellowgreen", alpha=0.6, ax=ax)
nx.draw_networkx_nodes(G_result, pos,
                       nodelist=[n for n in G_result.nodes() if n in node_type["形容詞"]],
                       node_size=node_size, node_color="tomato", alpha=0.6, ax=ax)
# edgeの色に濃淡をつけたいときは、edge_colorに数値のlistを代入してedge_cmapを使用
# Sequentialなカラーマップから好きなやつを選ぶ
# https://matplotlib.org/examples/color/colormaps_reference.html
# 色の濃淡の具合はedge_vmin, edge_vmaxで調整
nx.draw_networkx_edges(G_result, pos, alpha=0.6,
                       width=edge_width, edge_color=edge_colors,
                       edge_vmin=0, edge_vmax=10,
                       edge_cmap=plt.cm.Blues,ax=ax)
# Nodeにラベルをつけたいときは、以下の関数を使う
# font_familyにPCに入っている日本語フォントを指定してあげると、日本語を描画してくれる
nx.draw_networkx_labels(G_result, pos, labels, font_size=10, font_family="IPAPGothic", ax=ax)

plt.show()
黄色が名詞、緑が動詞、赤が形容詞です。
目につく関係
- 私-君: メロス→セリヌンティウスの会話文、「君は私を~」, 「私も君を~」など
- 私-信じ: 「私を信じてくれ~」など
所感
2-gramで分割すると、単語を跨いだ関係が取れない。
単純な出現頻度、共起頻度だと、なかなか綺麗にクラスターは分かれてくれない。
→何となくの凄さは出るけど、クラスタリングをバチっと決めて意味抽出するにはそれなりに頑張ってチューニングする必要がある。