はじめに
普段自身のAWS検証環境へのデプロイはTerraform Cloudを利用して行っているのですが、今回Azure検証環境へのデプロイも必要になったので、Terraform CloudとAzureとの紐づけ設定をやってみました。
備忘として残しておきます。
尚、手順は以下の記事を参考にしました。
前提
- Terraform Cloudアカウントは開設済み
- Azure環境も準備済み
- Terraform CloudとGitリポジトリとの紐づけなし
- AWS検証環境は既にTerraform Cloudと紐づけ済み(CLIでのデプロイも可能)
- Terraform Cloudと紐づける用のフォルダは作成済み
作業内容
①Terraform Cloud設定
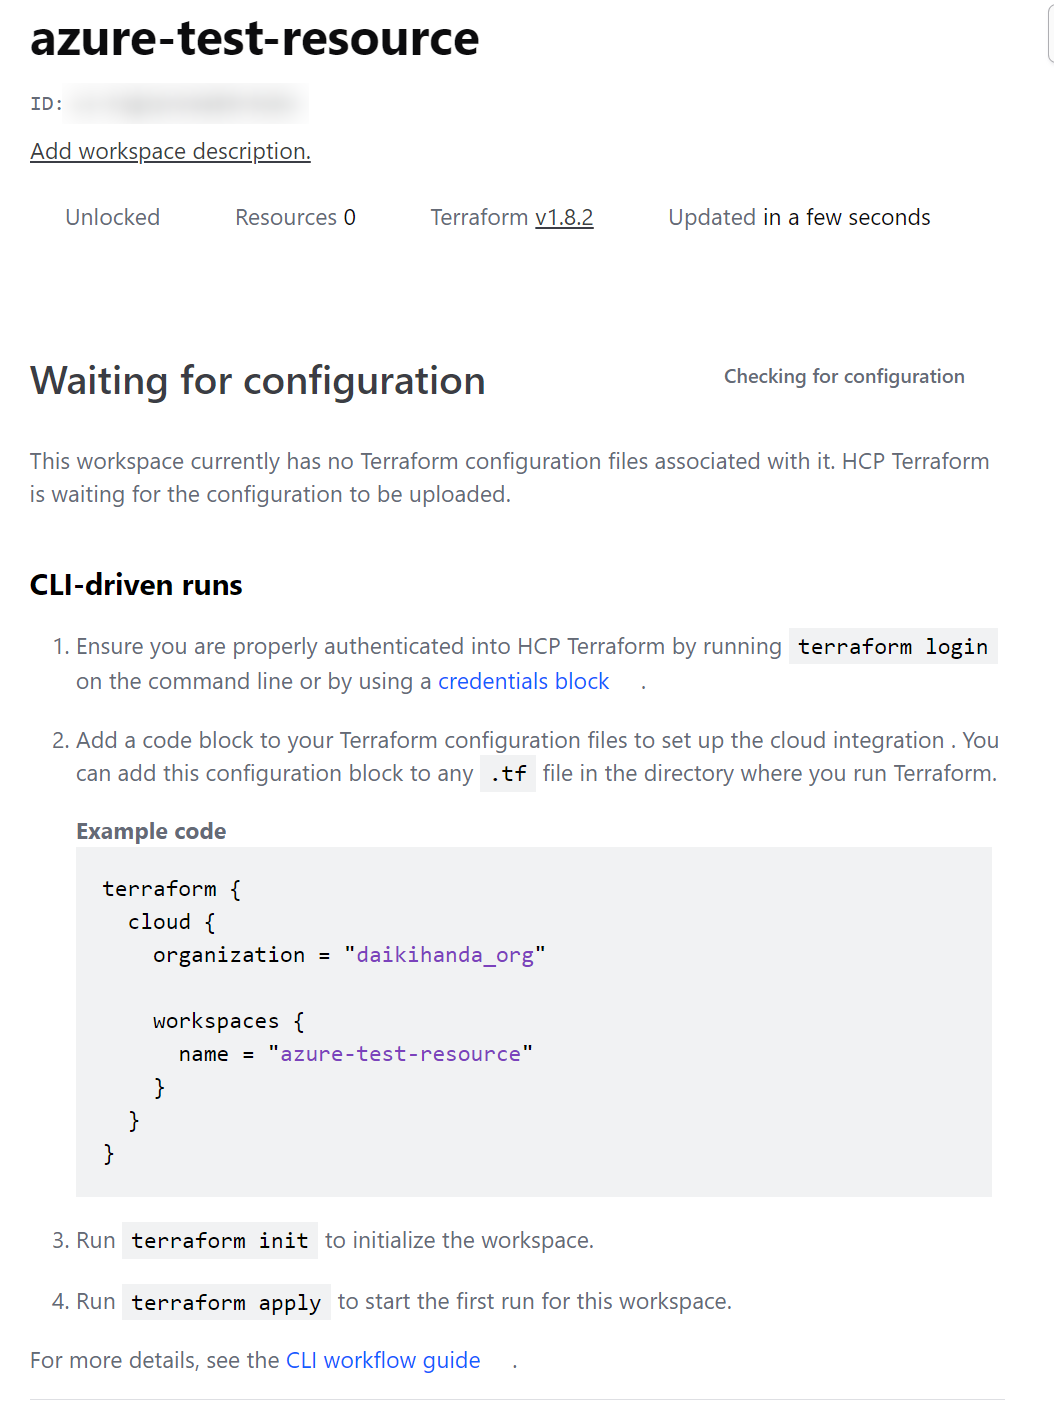
最初に紐づけるためのWorkspaceをTerraform Cloud上で作成します。
Workflowは「CLI-Driven Workflow」を選択します。
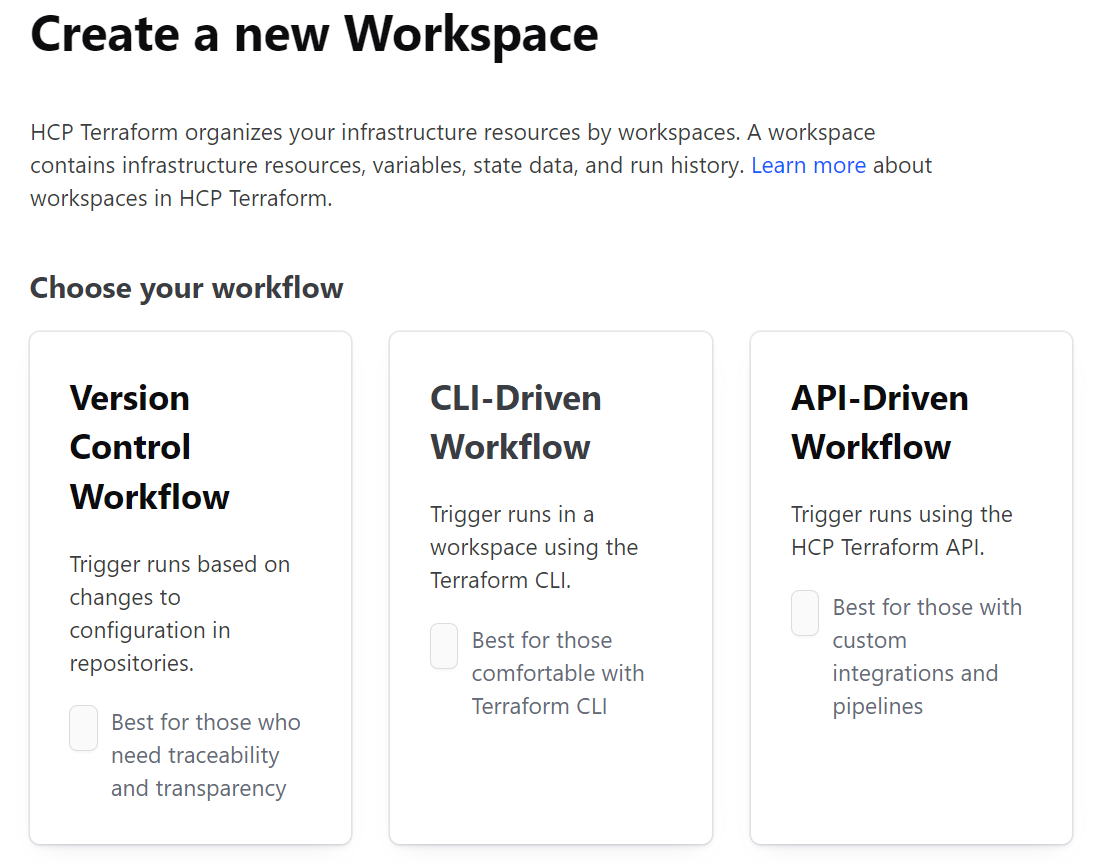
Workspace名は適当で構いません。
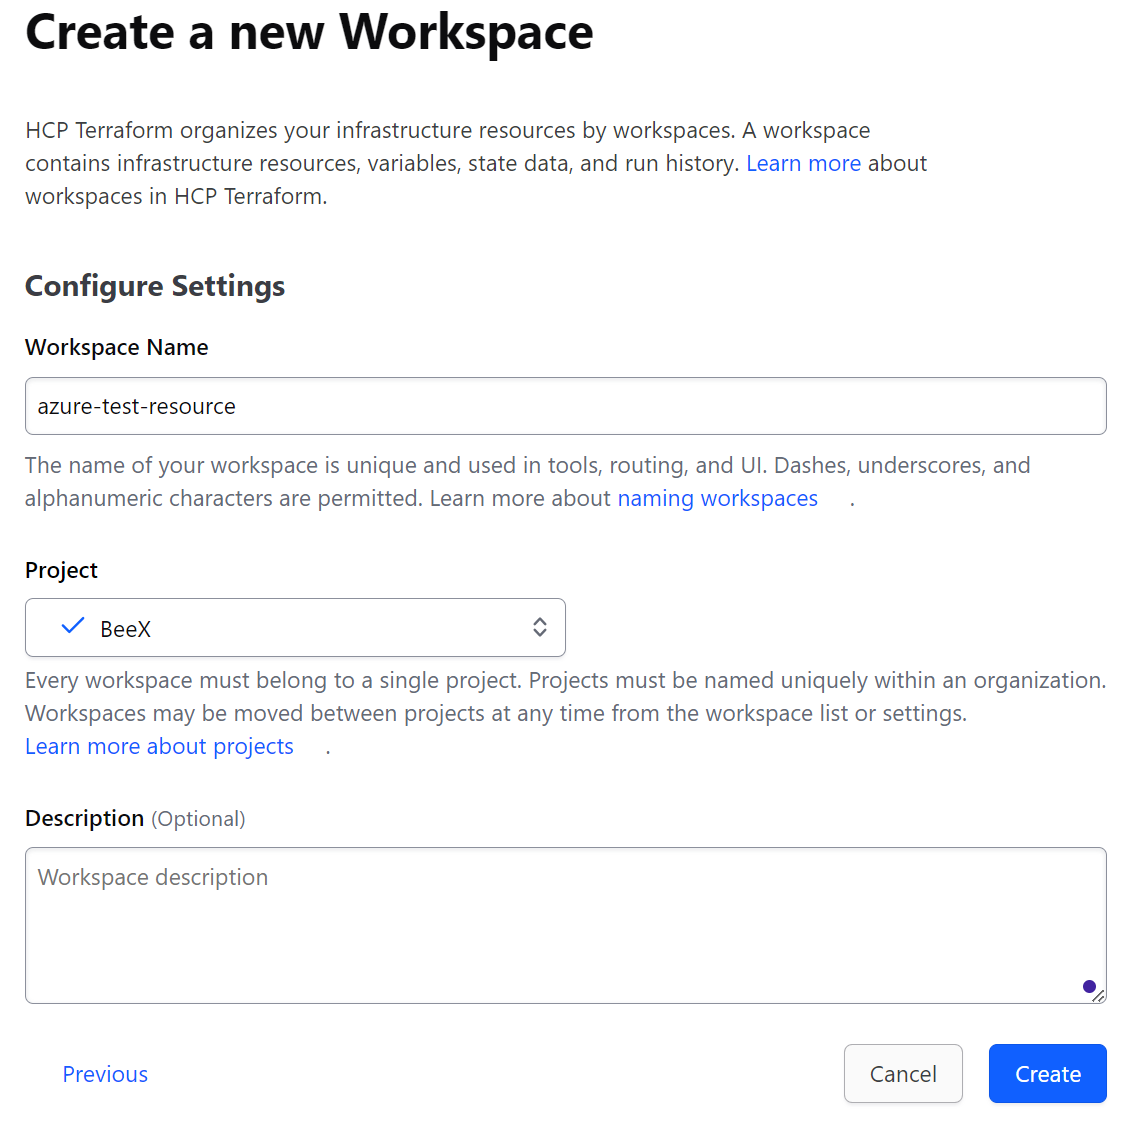
「Create」ボタンを押下するとWorkspaceが作成されます。
②Microsoft Azure設定(認証情報設定)
Azureではサービスプリンシパルを使って認証を行います。
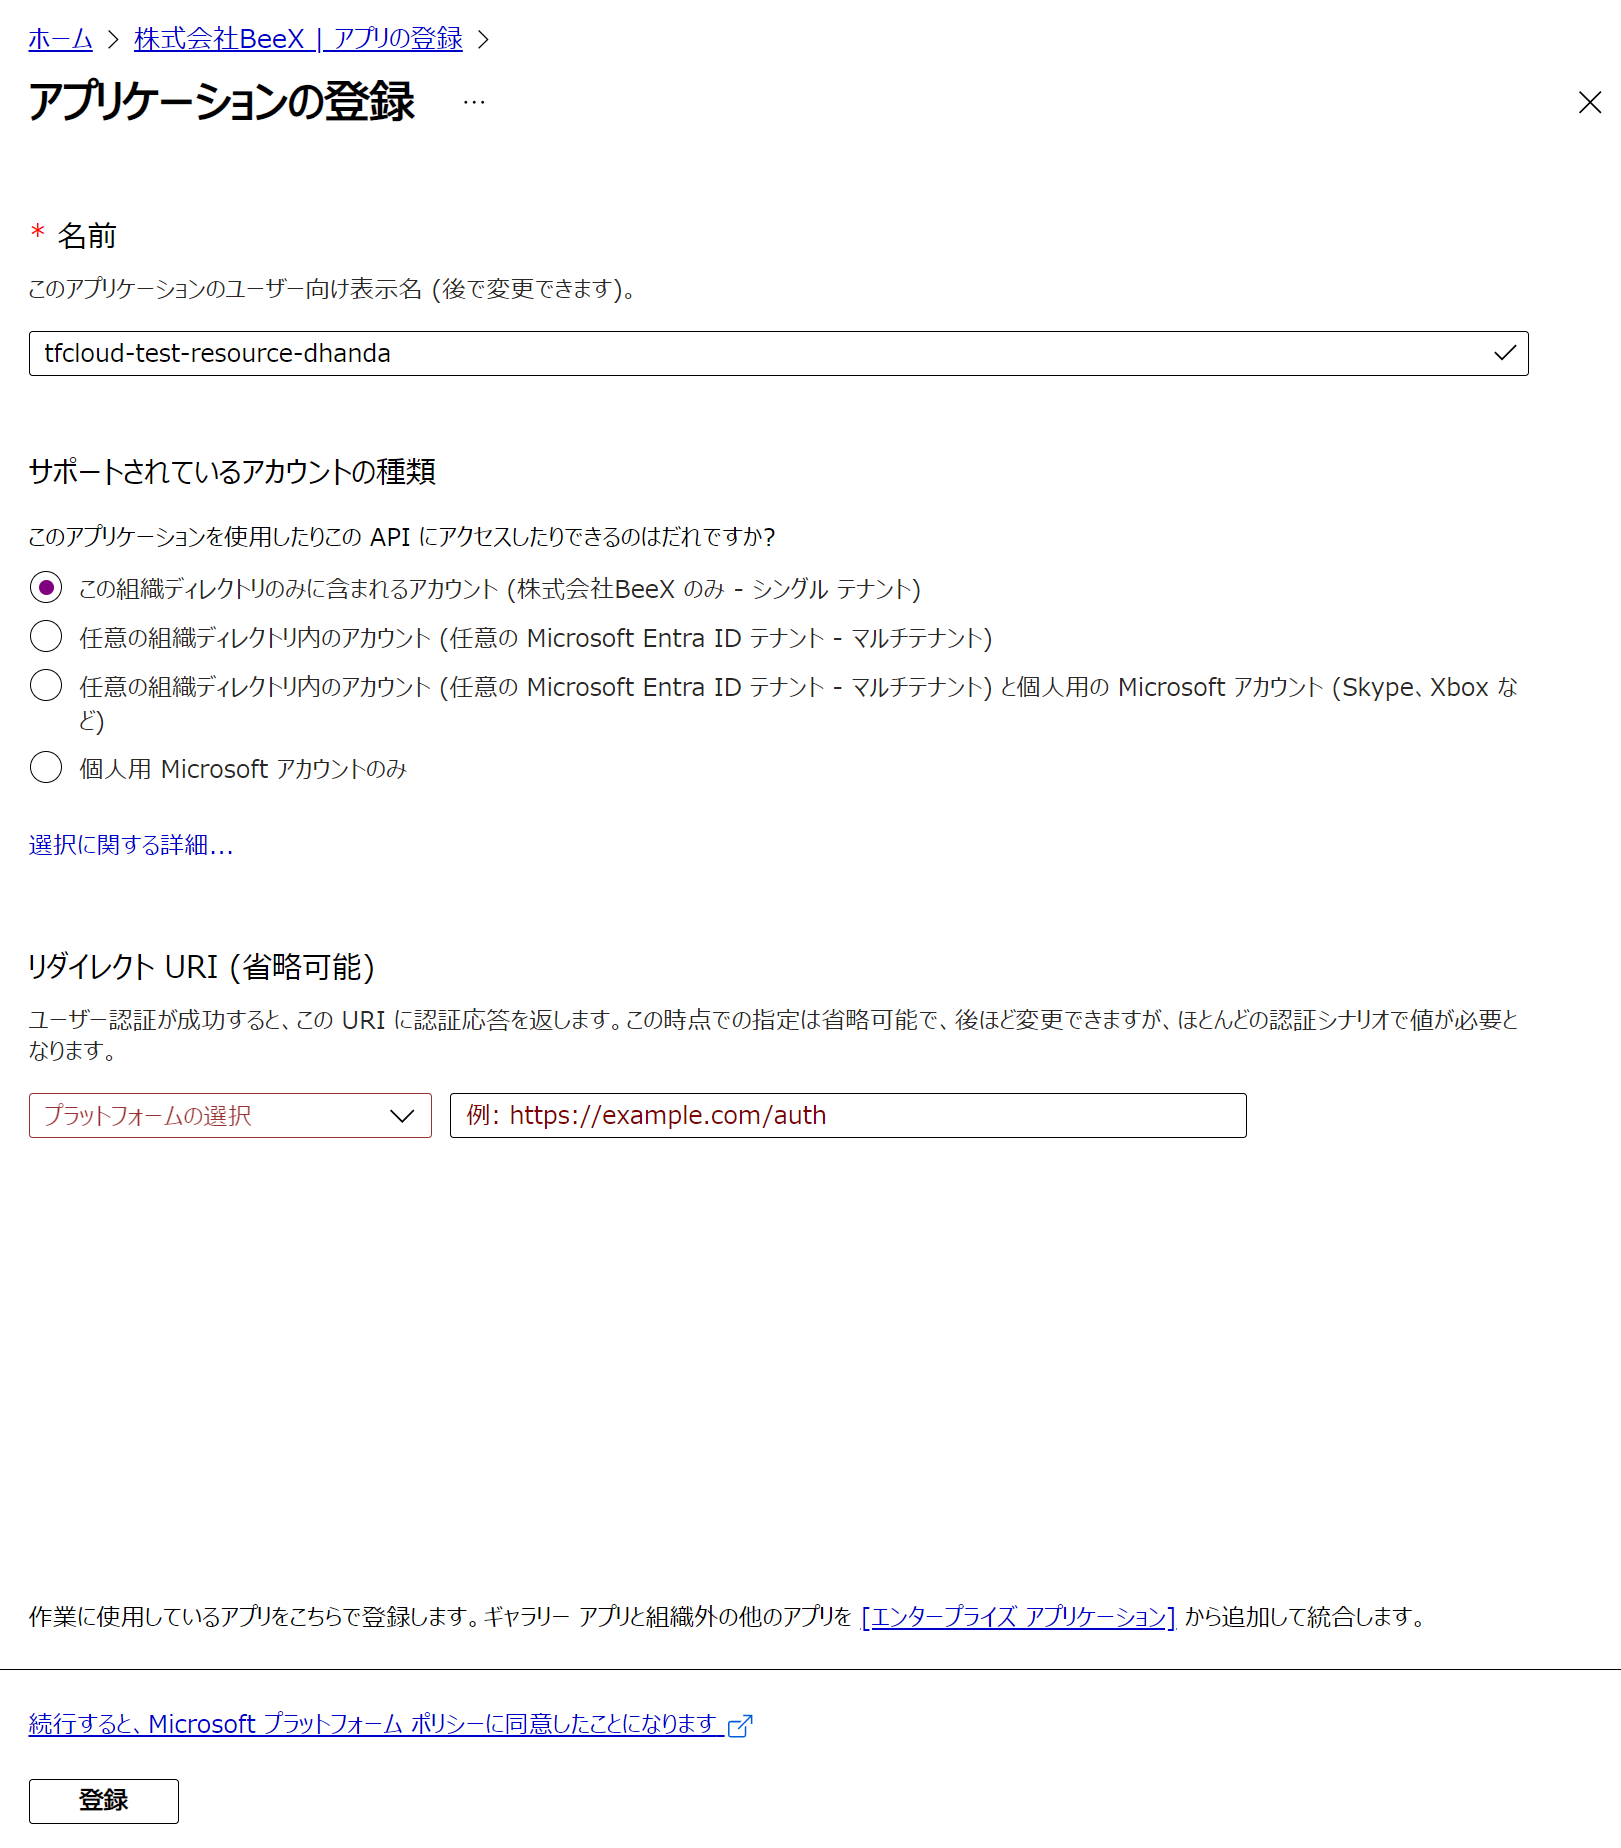
[Microsoft Entra ID]のコンソールから[アプリの登録]メニューを表示して、「新規登録」ボタンを押下します。
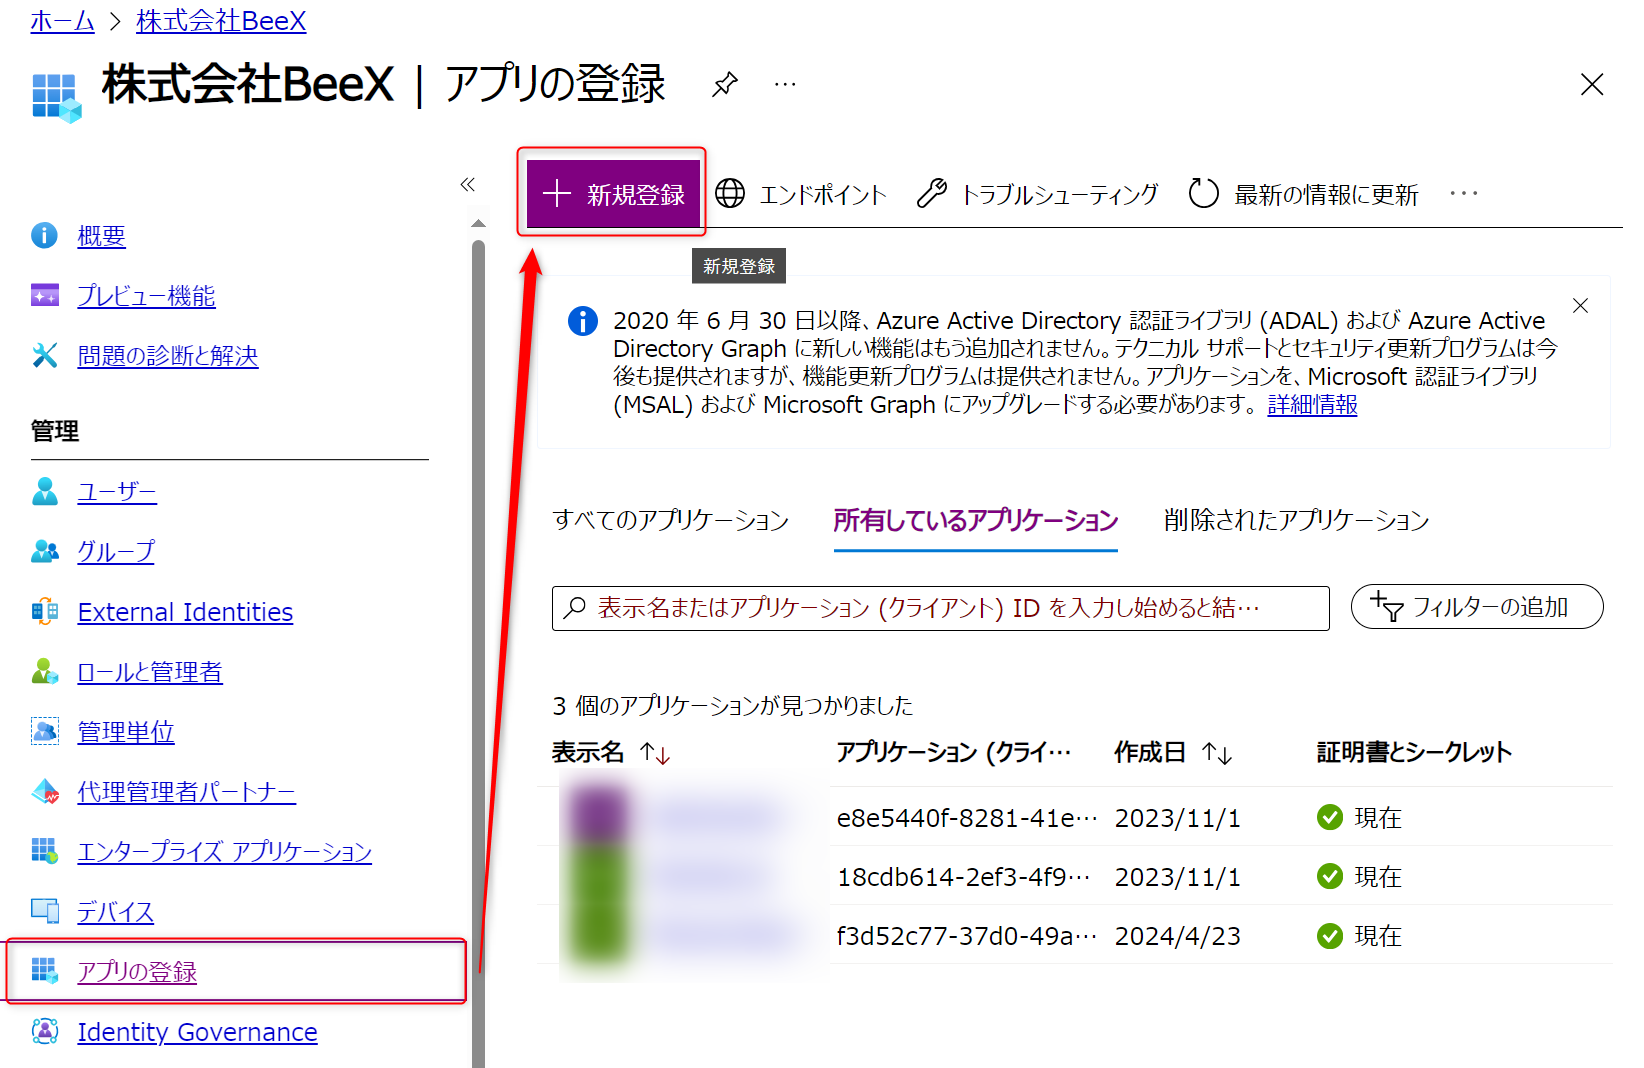
アプリケーション名を適当に設定して、アカウントの種類が「この組織ディレクトリのみに含まれるアカウント」になっていることを確認して、下部の「登録」ボタンを押下します。
※ここは自環境に合わせて適切なものを選択してください
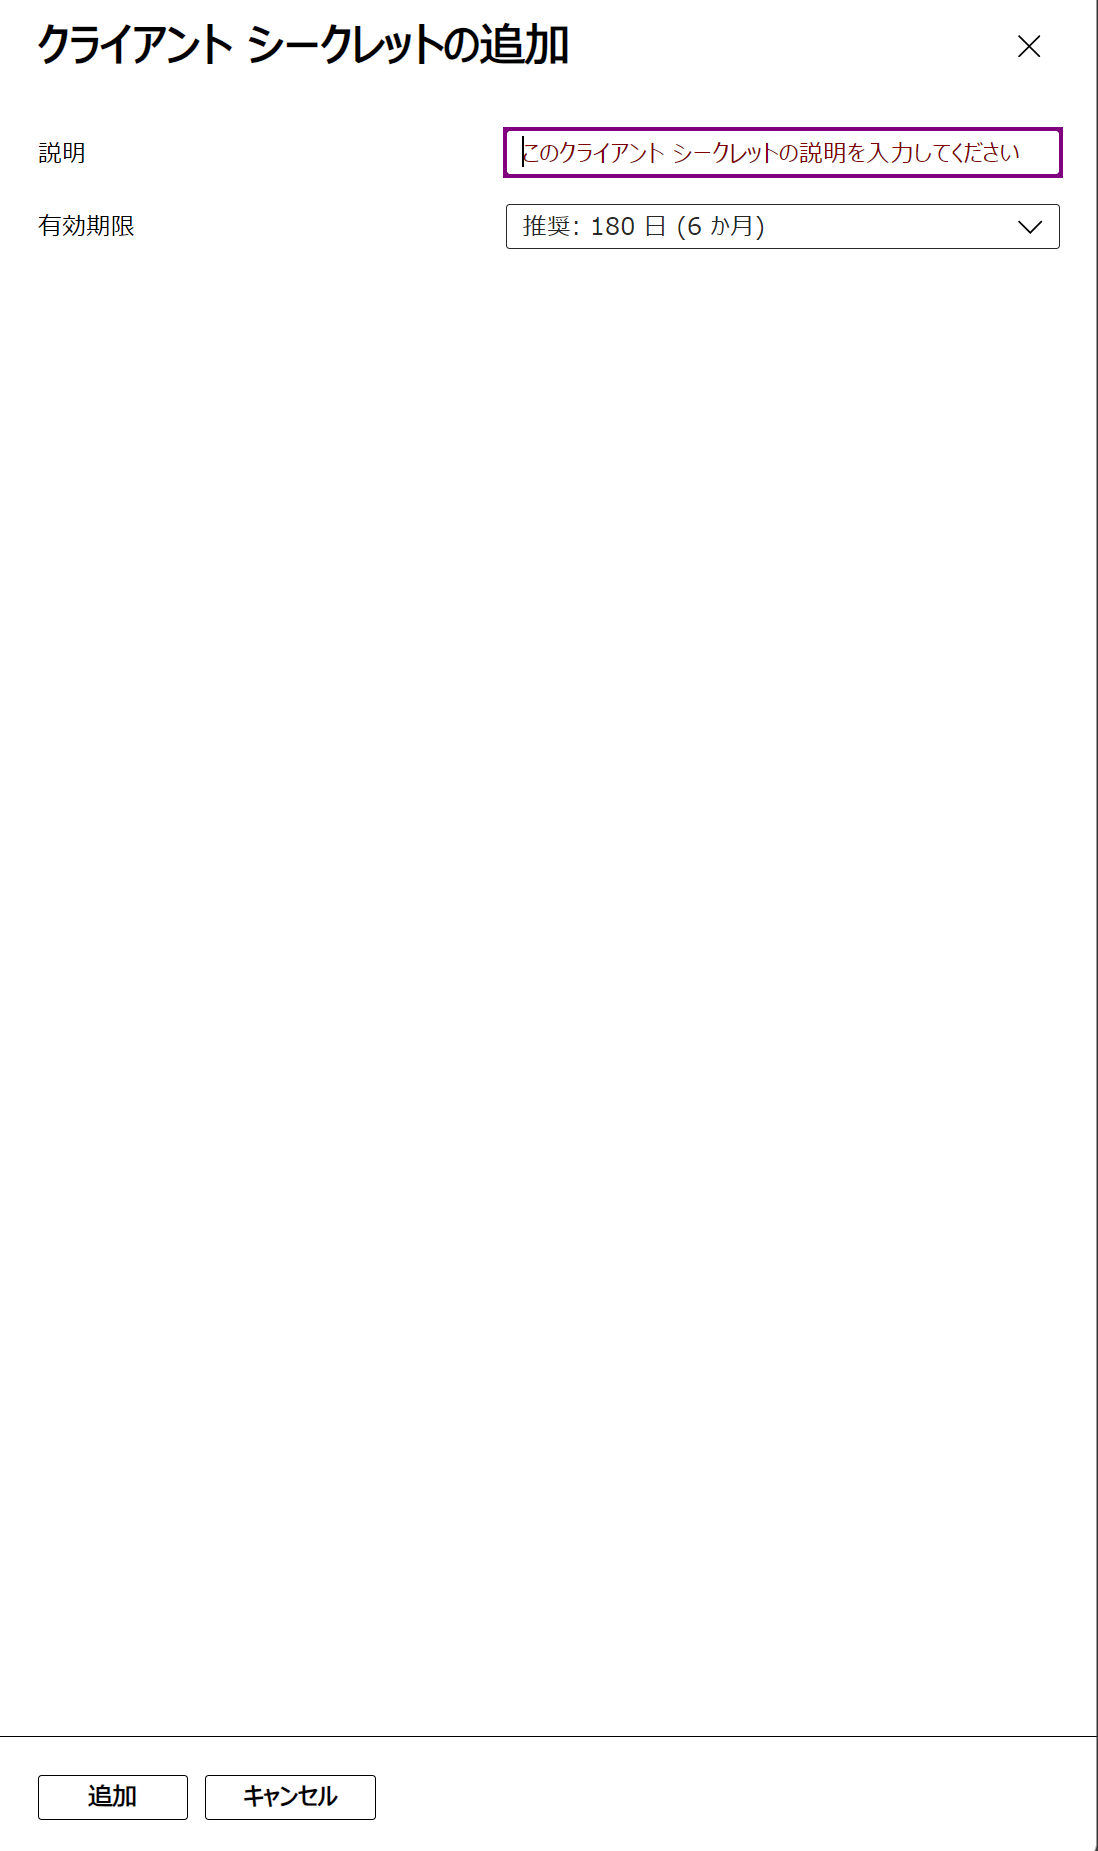
アプリケーションが作成されたら、アプリケーション詳細画面の[証明書とシークレット]メニューを表示して、「新しいクライアントシークレット」を押下します。

必要に応じて説明欄を入力して有効期限を設定し、「追加」ボタンを押下します。
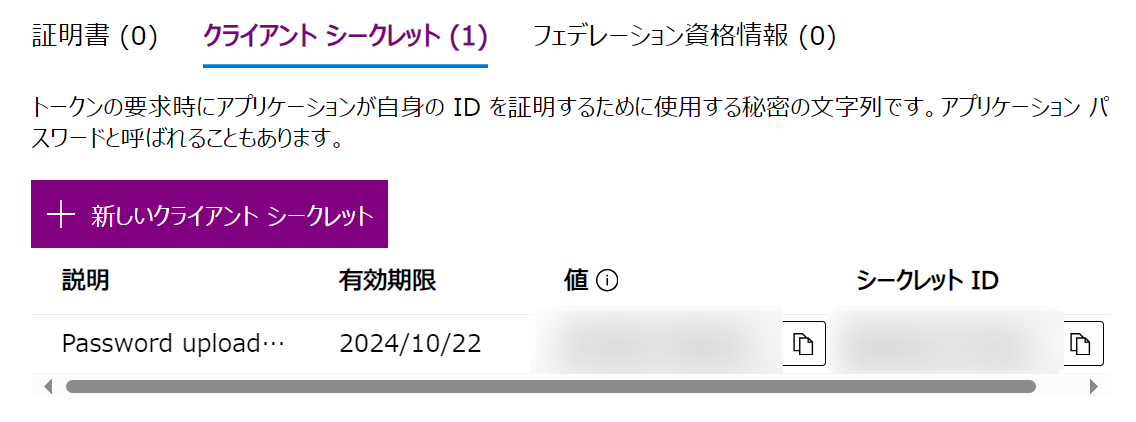
クライアントシークレットが作成されたことが確認できます。
ここの[値]は後ほど使うので、ローカルのメモ帳などにコピーしておいてください。
※紛らわしいですが[シークレットID]ではないのでご注意ください
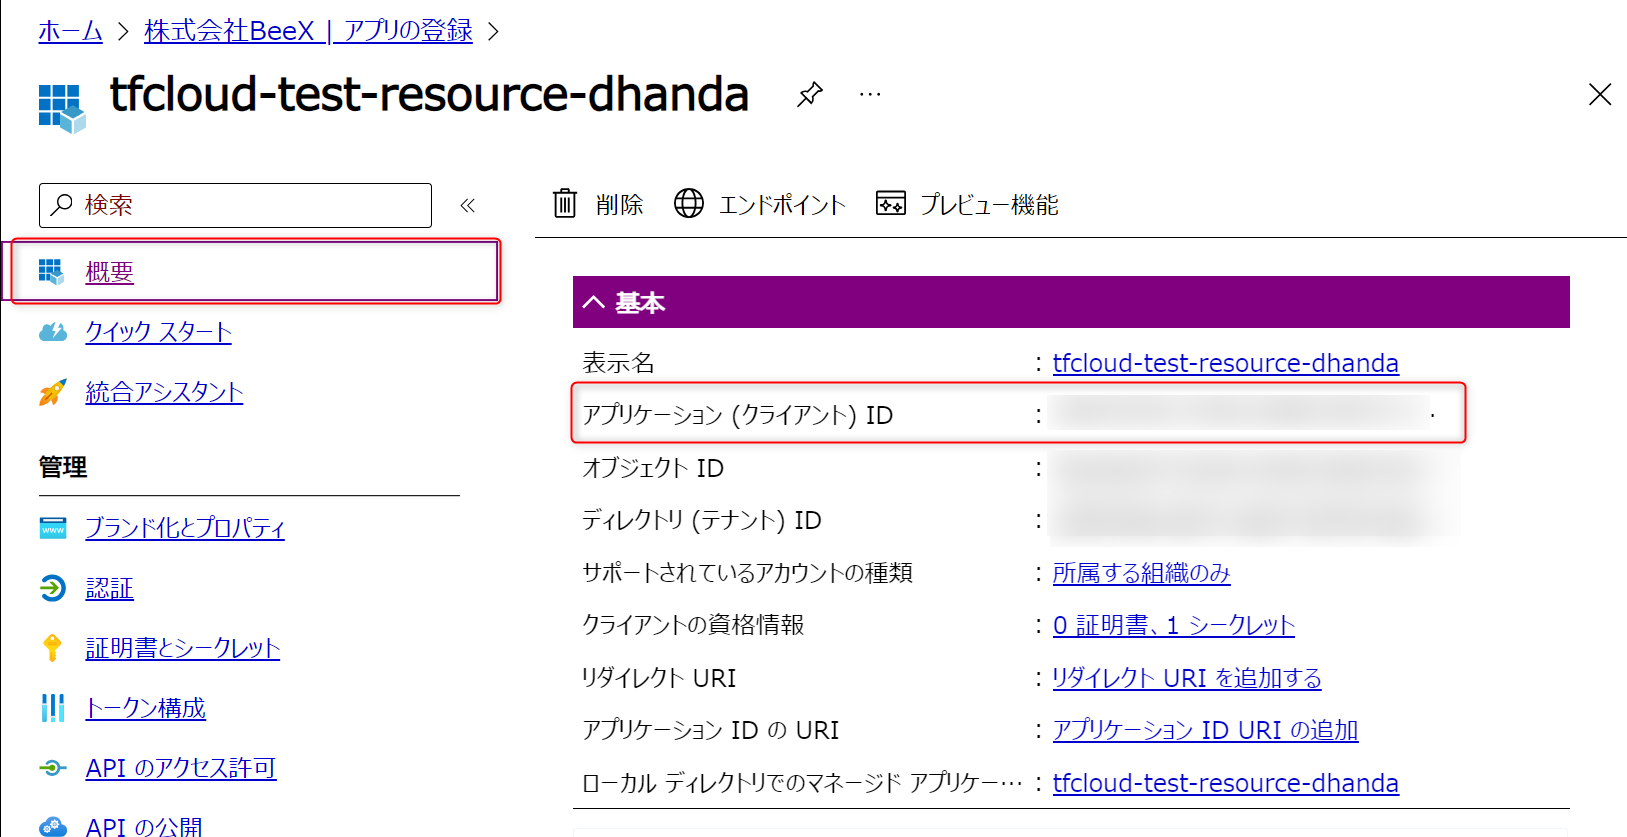
あと、[概要]メニューを表示して、アプリケーション(クライアント)IDの値もローカルのメモ帳にコピーしておいてください。
こちらも後ほど使用します。
③Microsoft Azure設定(リソースグループ作成)
今回Terraform CloudからはAzureのリソースグループを指定して、リソースをデプロイするようにします。
そのため、事前にリソースグループを作成しておきます。
※キャプチャを取り忘れました。。
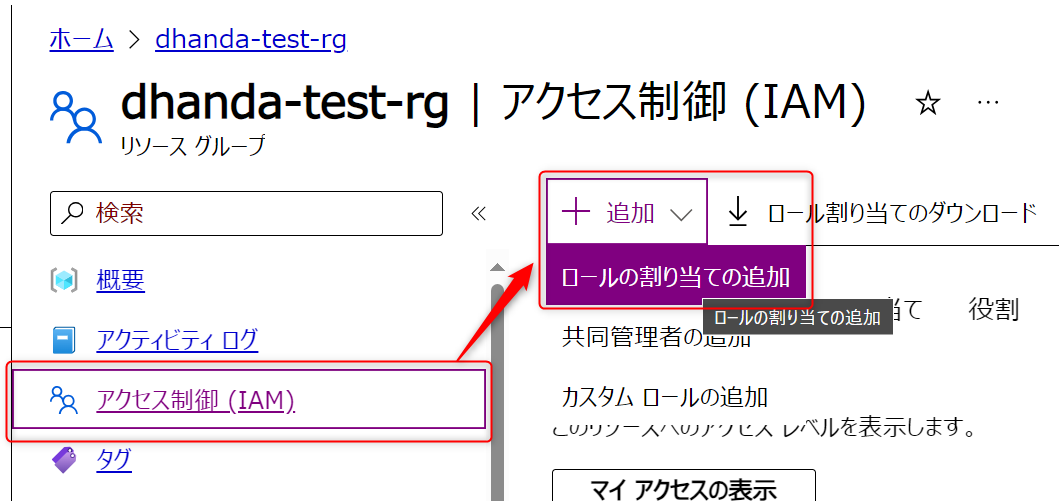
リソースグループが作成できたら、詳細画面から[アクセス制御(IAM)]メニューを表示し、「+追加」ボタンから「ロールの割り当ての追加」を押下します。
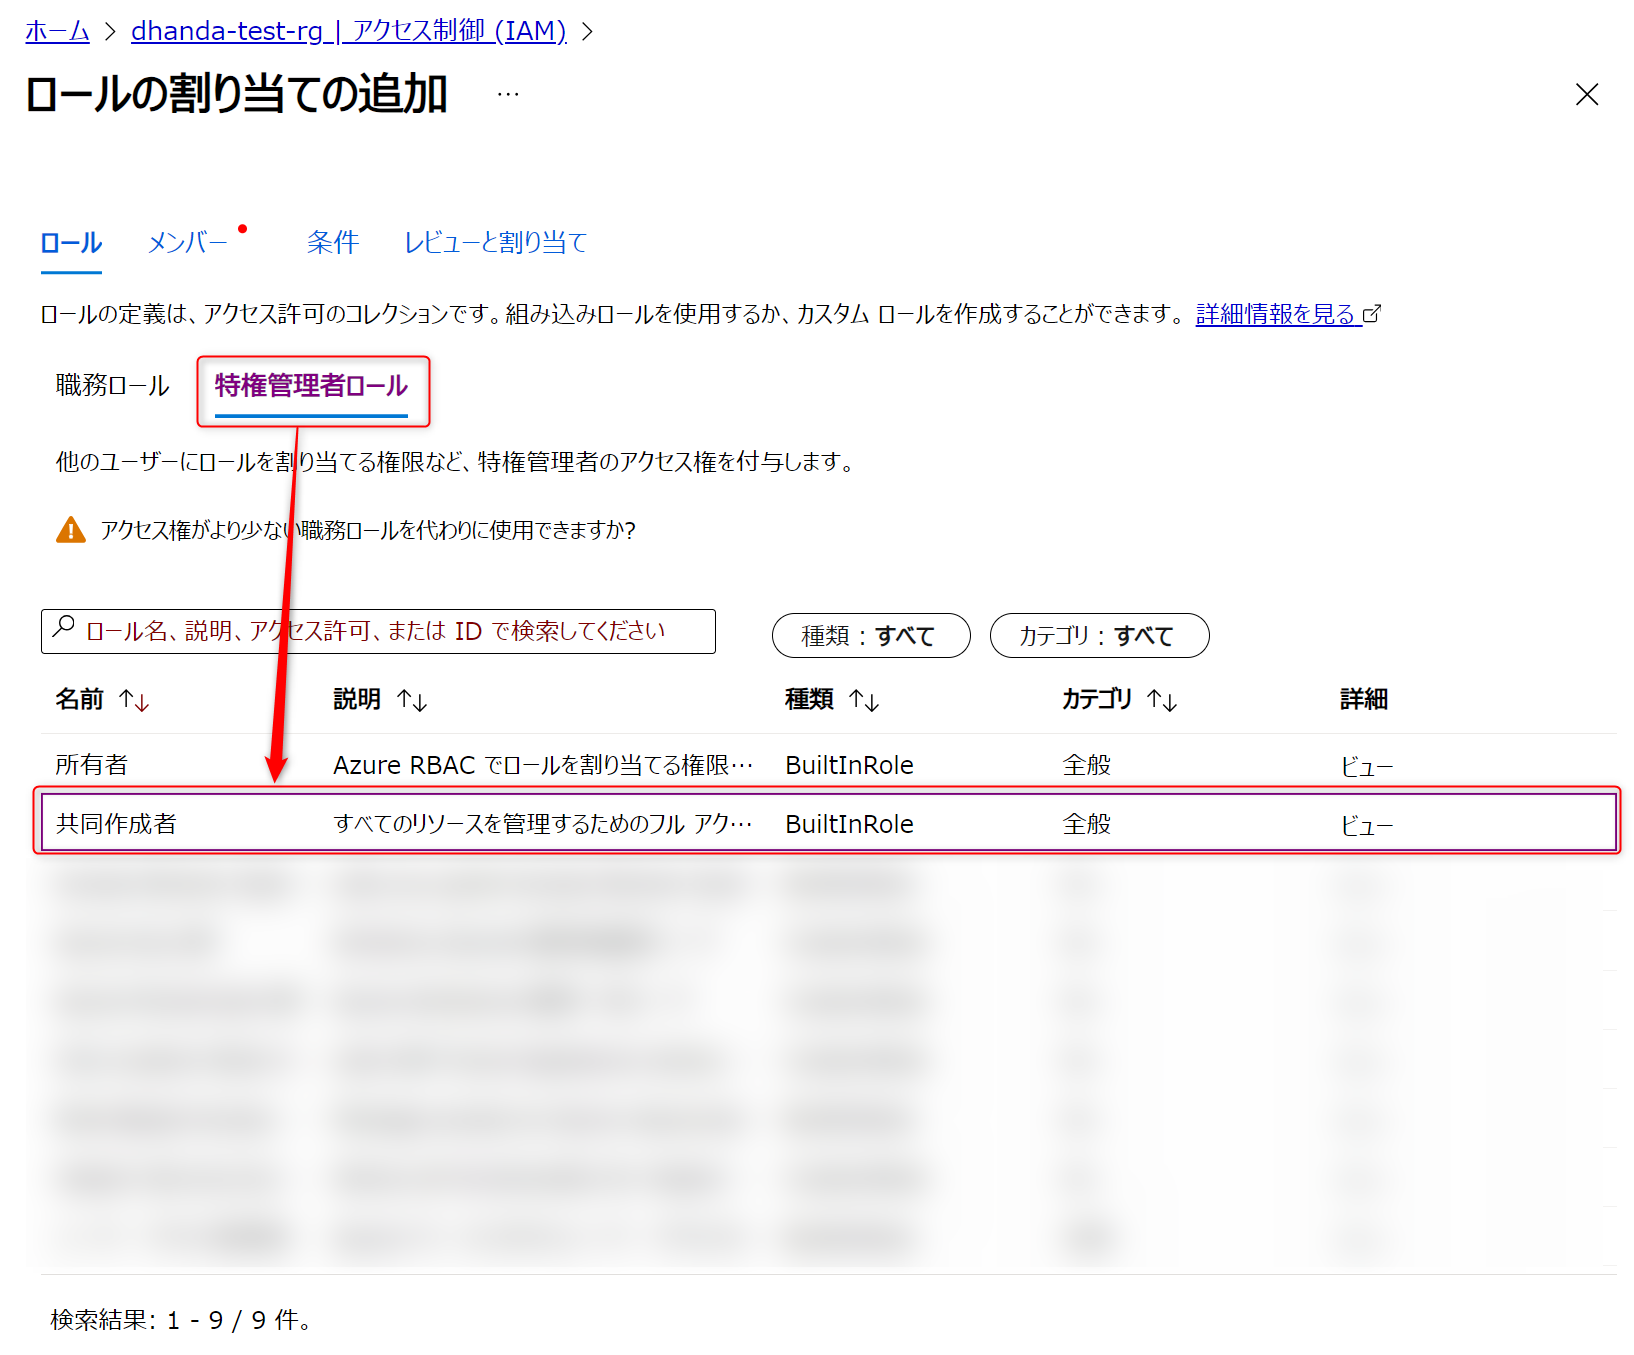
今回は検証用なので、共同作成者ロールを割り当てます。
※ここは必要に応じて適切なロールを割り当ててください。
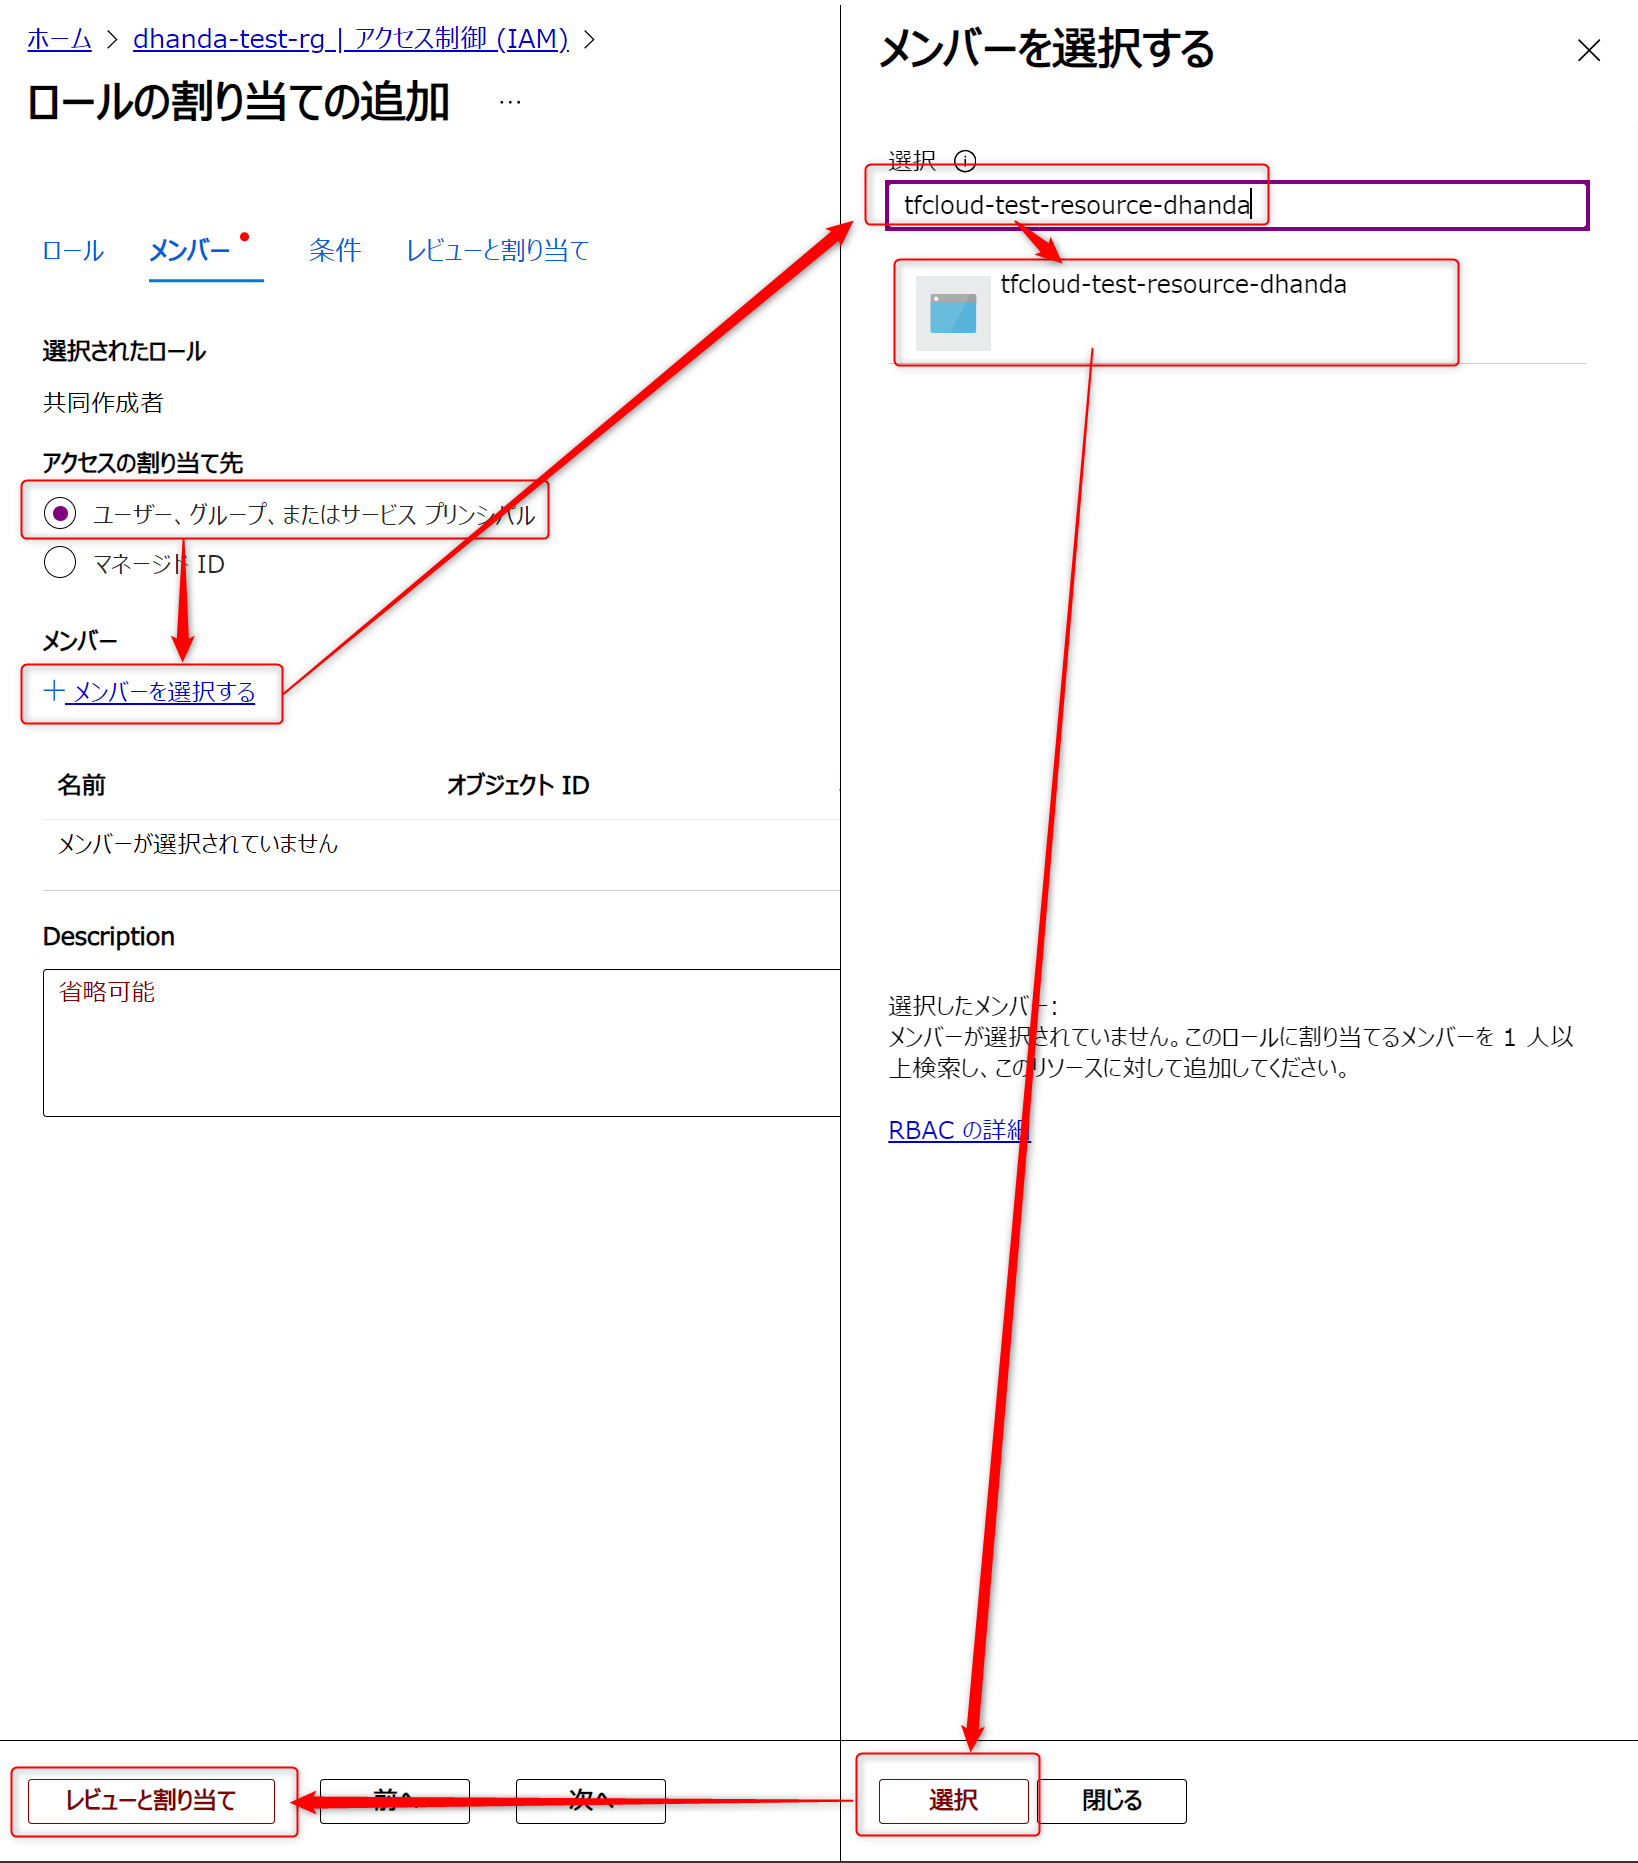
[メンバーを選択する]から先ほど作成したサービスプリンシパルのアプリケーションを選択し、「レビューと割り当て」からロールの割り当てを追加します。
④Terraform Cloud設定
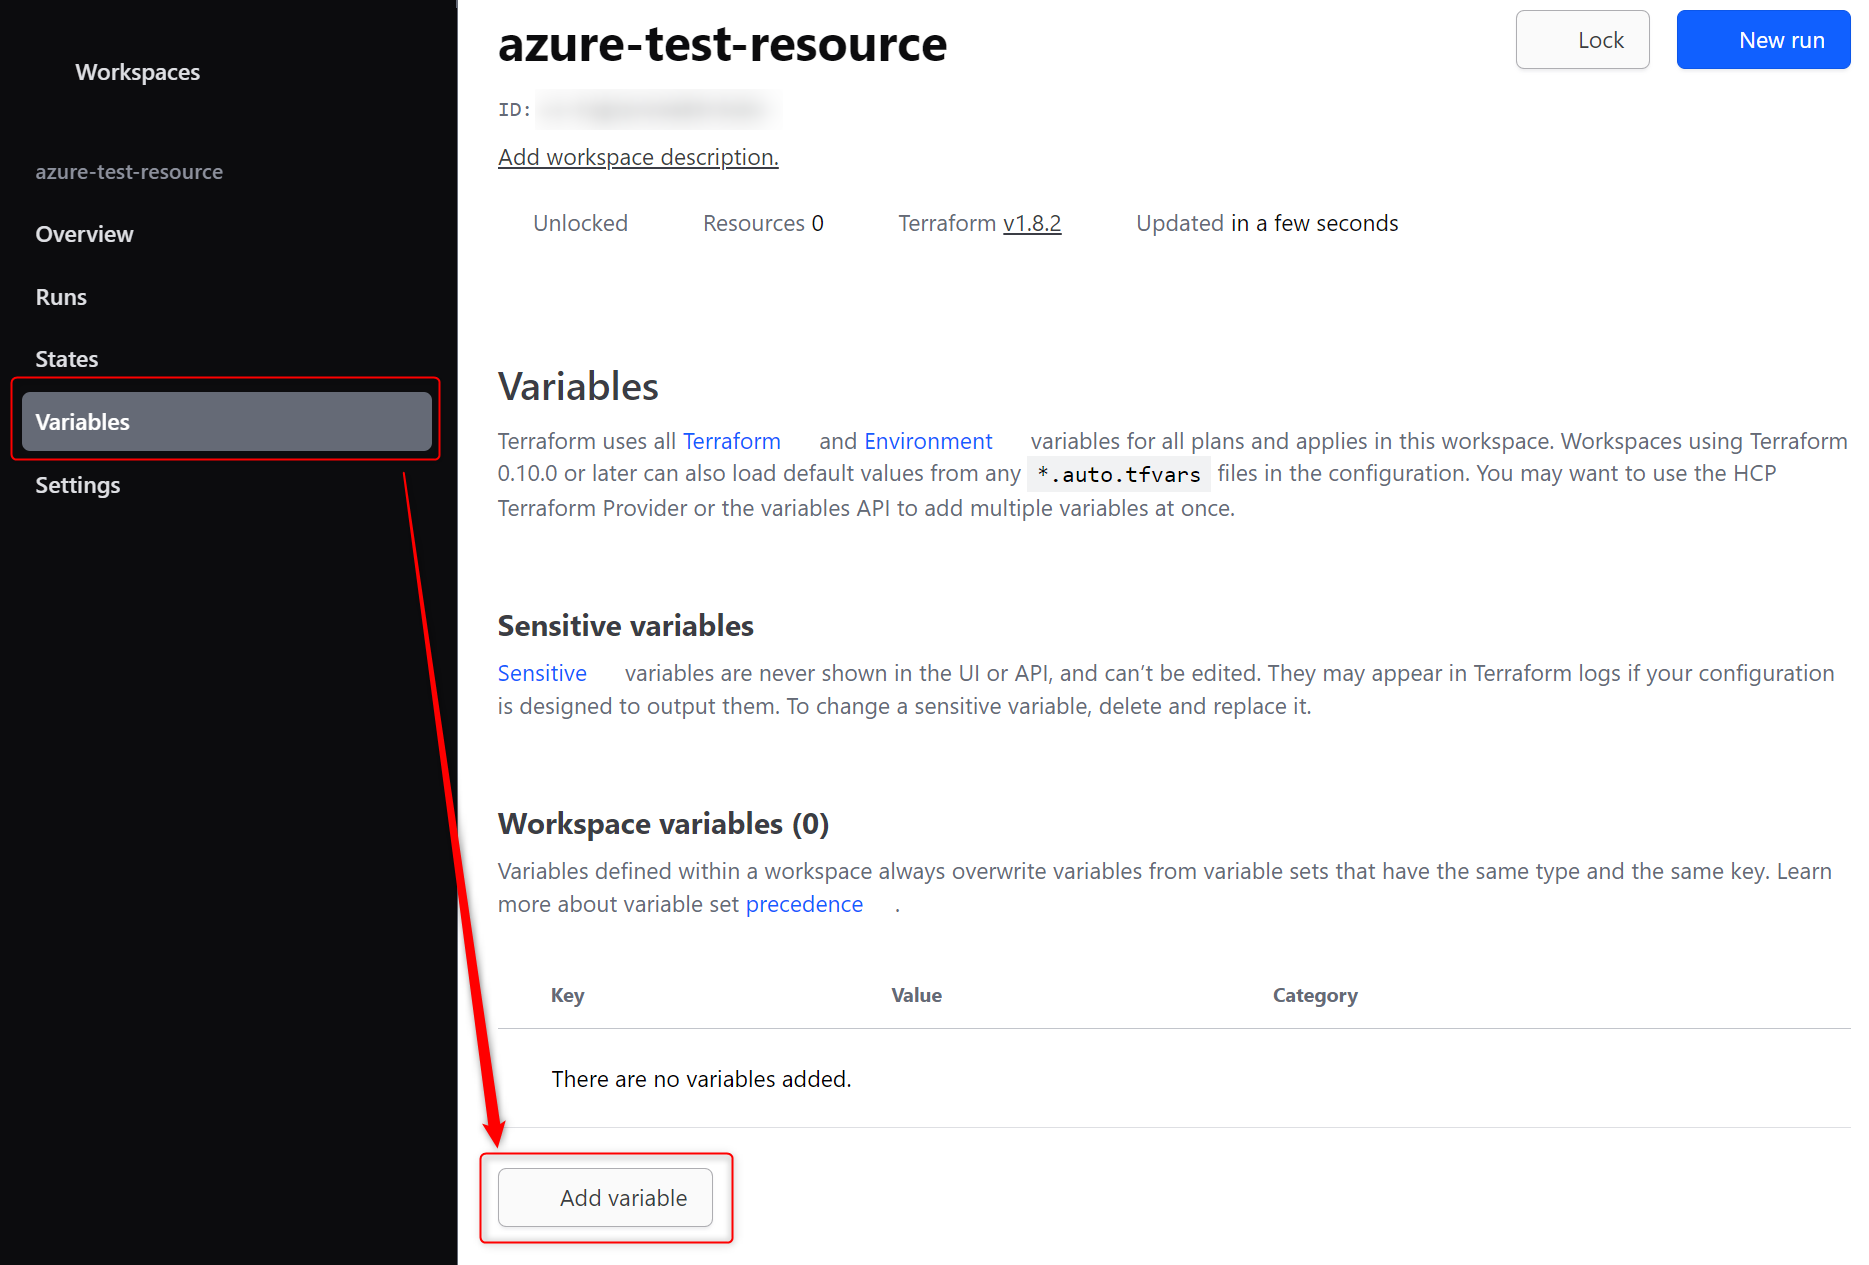
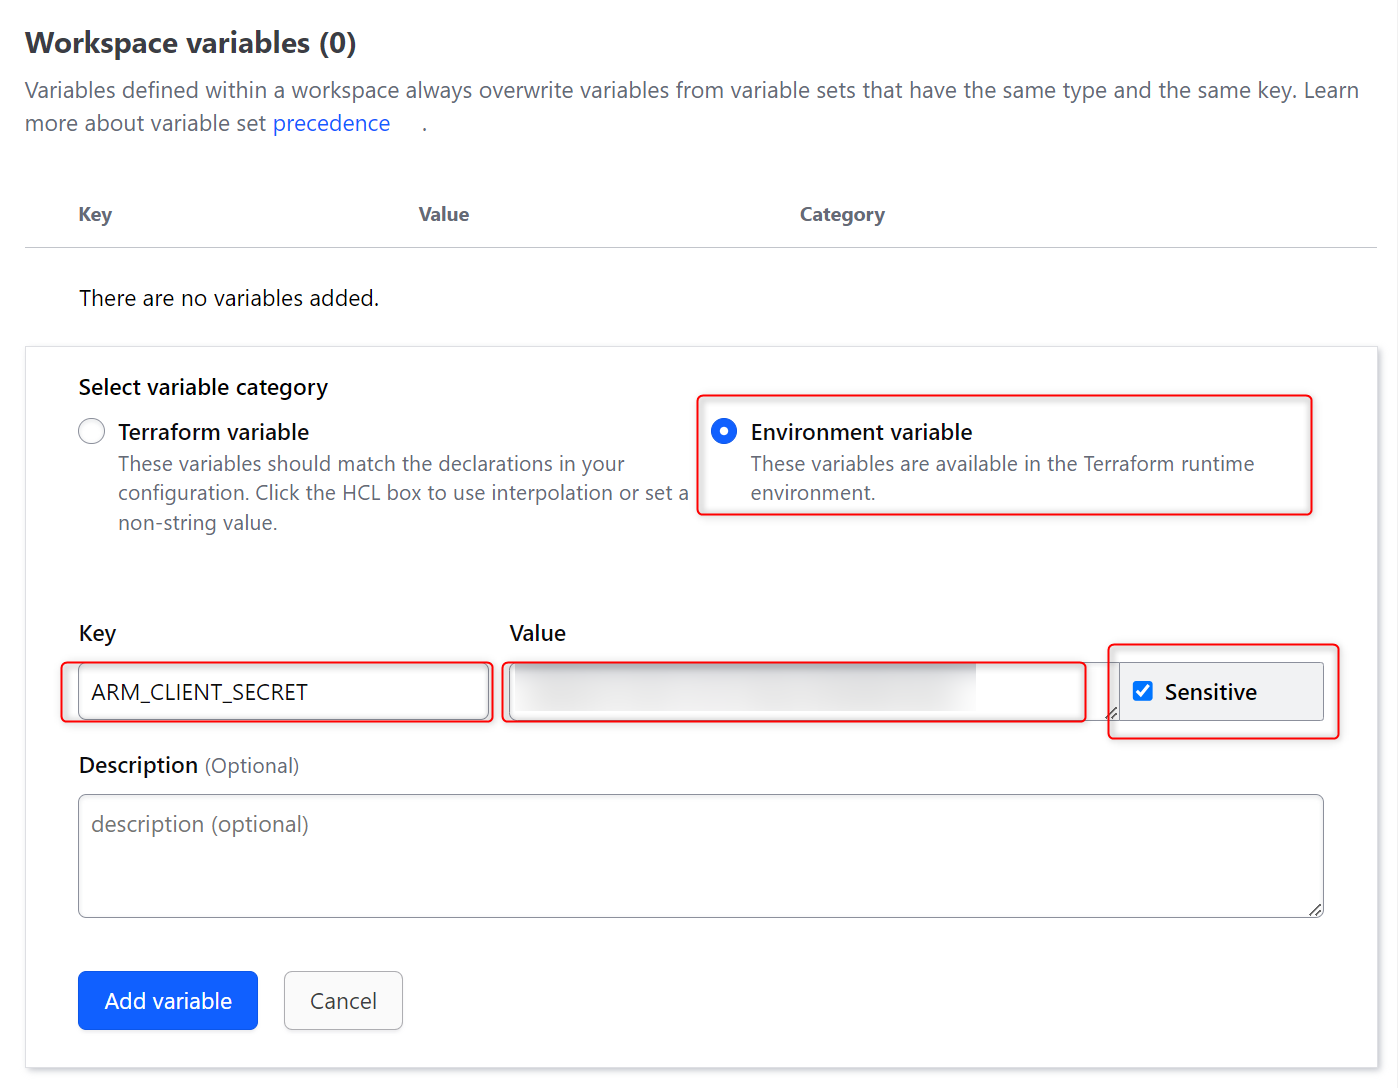
ここからTerraform Cloudに戻って、先ほど作成したWorkspaceの詳細画面から、[Variables]メニューを表示し、[Add variable]ボタンを押下します。
以下の2つの変数を設定します。
- ARM_CLIENT_ID
- ARM_CLIENT_SECRET
最初にARM_CLIENT_SECRETを設定します。
カテゴリを[Environment variable]に変更し、Keyに[ARM_CLIENT_SECRET]、Valueに先ほど確認したクライアントシークレットの値を入力します。
また、[Sensitive]チェックボックスにチェックを入れることで、変数追加後にTerraform Cloud画面上からシークレットIDが見えなくなります。
次にARM_CLIENT_IDを設定します。
ARM_CLIENT_SECRETと同じ設定を行い、Valueには先ほど確認したアプリケーション(クライアント)IDを入力します。
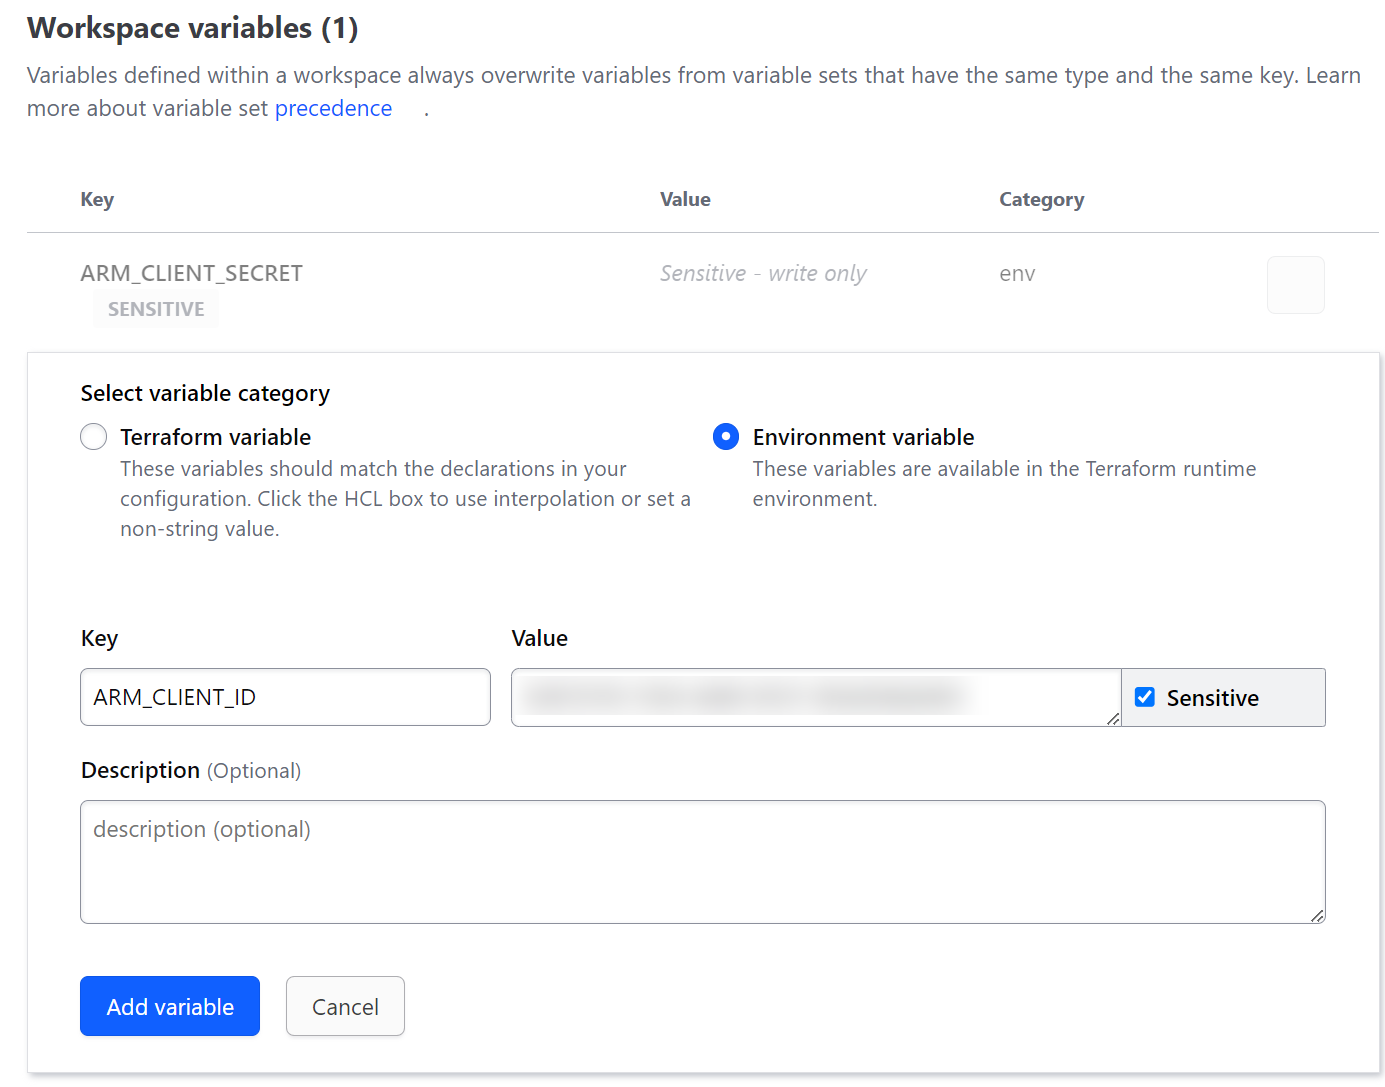
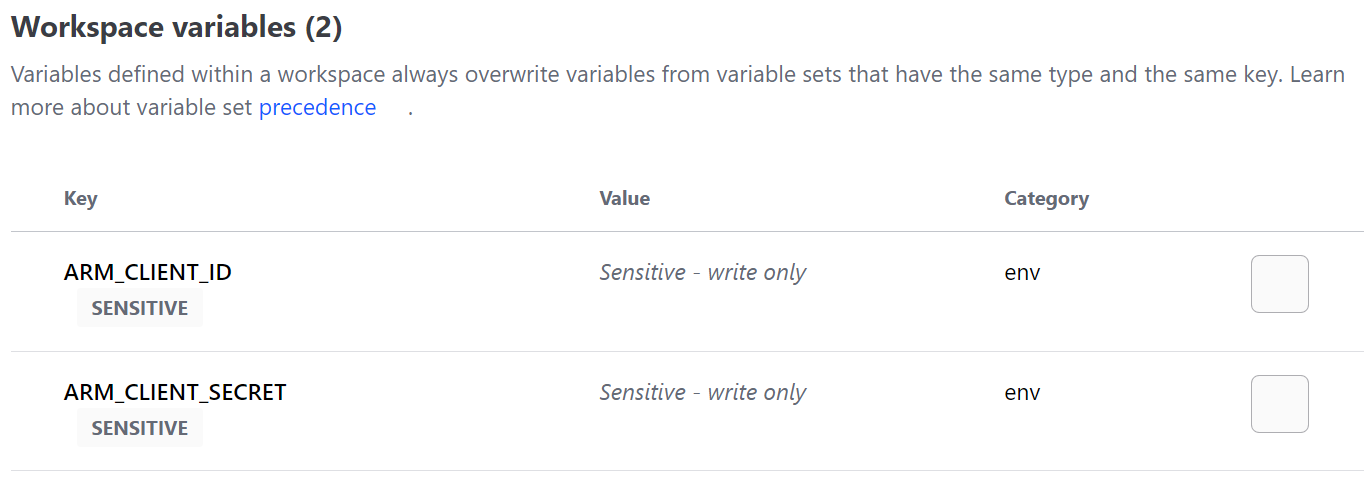
どちらも入力できると、以下のように表示されます。
⑤PC設定
ローカルPC上のターミナル(terraformコマンドが実行できるもの)でTerraform Cloudと紐づける用のフォルダに移動し、以下の3ファイルを作成します。
今回はdataリソースを使用して、既存のリソースグループの情報を取得して、outputリソースを使用してリソースグループ名を出力するシンプルなtfファイルを用意します。
※organization項目やworkspaces項目、subscription_id項目やtenant_id項目は自身の環境のものをそれぞれ入力してください
terraform {
  required_version = ">= 0.14"
  required_providers {
    azurerm = {
      source  = "hashicorp/azurerm"
      version = "~> 3.100"
    }
  }
  backend "remote" {
    organization = "example_org"

    workspaces {
      name = "azure-test-resource"
    }
  }
}

provider "azurerm" {
  features {}
  subscription_id = "xxxxxxxxxxxxxxxxxxxxxxxxxxxxxxxxxxxx"
  tenant_id       = "xxxxxxxxxxxxxxxxxxxxxxxxxxxxxxxxxxxx"
}
data "azurerm_resource_group" "example" {
  name = "dhanda-test-rg"
}
output "rg_name" {
  value = data.azurerm_resource_group.example.name
}
ローカルPCからTerraform Cloudへのデプロイを行う場合、まずはTerraform Cloudでの認証をしなければいけません。
その方法として、Terraform CloudにはAPI Tokenを払い出す機能が提供されています。
以下の手順を参考に、Tokenを払い出して、ローカルPC上にTokenを設定します。
⑥Terraformコマンド実行
ここまで設定できたら、実際にTerraformコマンドを実行してみて、Applyまでエラーなく実行されるかを確認します。
$ terraform init

Initializing the backend...

Successfully configured the backend "remote"! Terraform will automatically
use this backend unless the backend configuration changes.

Initializing provider plugins...
- Finding hashicorp/azurerm versions matching "~> 3.100"...
- Installing hashicorp/azurerm v3.100.0...
- Installed hashicorp/azurerm v3.100.0 (signed by HashiCorp)

Terraform has created a lock file .terraform.lock.hcl to record the provider
selections it made above. Include this file in your version control repository
so that Terraform can guarantee to make the same selections by default when
you run "terraform init" in the future.

Terraform has been successfully initialized!

You may now begin working with Terraform. Try running "terraform plan" to see
any changes that are required for your infrastructure. All Terraform commands
should now work.

If you ever set or change modules or backend configuration for Terraform,
rerun this command to reinitialize your working directory. If you forget, other
commands will detect it and remind you to do so if necessary.
$ terraform plan
Running plan in the remote backend. Output will stream here. Pressing Ctrl-C
will stop streaming the logs, but will not stop the plan running remotely.

Preparing the remote plan...

To view this run in a browser, visit:
https://app.terraform.io/app/example_org/azure-test-resource/runs/run-xxxxxxxxxxx

Waiting for the plan to start...

Terraform v1.8.2
on linux_amd64
Initializing plugins and modules...
data.azurerm_resource_group.example: Reading...
data.azurerm_resource_group.example: Read complete after 0s [id=/subscriptions/xxxxxxxxxxxxxxxxxxxxxxxxxxxxx/resourceGroups/dhanda-test-rg]

No changes. Your infrastructure matches the configuration.

Terraform has compared your real infrastructure against your configuration
and found no differences, so no changes are needed.

------------------------------------------------------------------------

Cost estimation:

Resources: 0 of 0 estimated
           $0.0/mo +$0.0
$ terraform apply
Running apply in the remote backend. Output will stream here. Pressing Ctrl-C
will cancel the remote apply if it's still pending. If the apply started it
will stop streaming the logs, but will not stop the apply running remotely.

Preparing the remote apply...

To view this run in a browser, visit:
https://app.terraform.io/app/example_org/azure-test-resource/runs/run-xxxxxxxxxxx

Waiting for the plan to start...

Terraform v1.8.2
on linux_amd64
Initializing plugins and modules...
data.azurerm_resource_group.example: Reading...
data.azurerm_resource_group.example: Read complete after 0s [id=/subscriptions/xxxxxxxxxxxxxxxxxxxxxxxxxxxxx/resourceGroups/dhanda-test-rg]

Changes to Outputs:
  + rg_name = "dhanda-test-rg"

You can apply this plan to save these new output values to the Terraform
state, without changing any real infrastructure.

------------------------------------------------------------------------

Cost estimation:

Resources: 0 of 0 estimated
           $0.0/mo +$0.0

------------------------------------------------------------------------

Do you want to perform these actions in workspace "azure-test-resource"?
  Terraform will perform the actions described above.
  Only 'yes' will be accepted to approve.

  Enter a value: yes


Apply complete! Resources: 0 added, 0 changed, 0 destroyed.

Outputs:

rg_name = "dhanda-test-rg"
おわりに
Terraform CloudとAzureを紐づける方法がわからなかったので試してみました。
ここまでできれば後はtfファイルを実装すればデプロイまで正常に動くと思います。
この記事がどなたかの参考になれば幸いです。