はじめに
Android Automotive14をWindowsのWSL2上でビルドして起動するまでの備忘録です。
環境
PCの環境
| 項目 | 内容 |
|---|---|
| OS | Windows 11 Pro (24H2) |
| CPU | i7-12700 2.10 GHz |
| メモリ | 32GB |
WSL2の環境
| 項目 | 内容 |
|---|---|
| OS | Ubuntu 18.04 |
| メモリ | 24GB |
| ストレージ | 1TB |
WSL2でUbuntuをセットアップする
Ubuntuのインストール
PowerShell上のwslコマンドで簡単に導入できる
wsl --install --name Ubuntu-18.04 --location <install_path>
- 9.0以降は公式が定期的に18.04で動作確認しているようなので
18.04を推奨Android15だと18.04だとビルドでコケる。24.04だといけた…動作確認…とは?Google本当にお前そう云うところだぞ。やってないことをやったっていうな
- 容量を400G近く使うのでCドライブ以外にインストールしたいときは
--locationオプションを使う -
wslコマンドの使い方は下記を参照すること
WSL2のディスク/メモリ設定
ユーザーフォルダに.wslconfigを記載し、WSL2に割り当てるメモリサイズを変更する
[wsl2]
memory=24GB
-
.wslconfigを更新したらwsl --terminate Ubuntu-18.04を実行してWSL2を再起動する - デフォルト値は50%になっており、その場合は16GBと少し足りなくなるので24GBに設定した
-
.wslconfigの詳細は下記を参照すること
emulator起動のための設定
パッケージの追加
WSL2のデフォルトでは不足しているパッケージがあるので追加
sudo apt install libpulse0
kvmの設定
kvm自体は最初から設定されているがユーザーが使用できるようになっていないのでグループに追加する
sudo groupadd -r kvm
sudo gpasswd -a $USER kvm
/dev/kvmがrootしか読めないようになっているので起動時に変更するように/etc/wsl.conf二設定を追加する
[boot]
command = /bin/bash -c 'chown root:kvm /dev/kvm && chmod 660 /dev/kvm'
この設定を行った後一度ターミナルを閉じてログインし直す。
参考
ビルド手順
ここからWSL2のUbuntu内の作業になります
ツールのセットアップ
なにはともあれ公式のマニュアルを確認する。Googleあんまり更新しないから鵜呑みできないけど…
パッケージの更新
インストール直後はパッケージが最新ではないので更新する
sudo apt update
sudo apt upgrade
ビルドに必要な追加パッケージのインストール
これは公式そのままでよい。
sudo apt-get install git-core gnupg flex bison build-essential zip curl zlib1g-dev libc6-dev-i386 x11proto-core-dev libx11-dev lib32z1-dev libgl1-mesa-dev libxml2-utils xsltproc unzip fontconfig
gitの設定
repo実行時にgitの設定が必須となるので設定する
$ git config --global user.email <メールアドレス>
$ git config --global user.name <ユーザ名>
repoのインストール
repoのバージョンは古い(2.35)ので新しい(2.4以上)をバージョンをcurlで取ってくる。
下記は~/binにrepoをインストールしてパスを通す手順
cd
mkdir ~/bin
PATH=~/bin:$PATH
curl https://storage.googleapis.com/git-repo-downloads/repo > ~/bin/repo
chmod a+x ~/bin/repo
ちなみにrepoのリファレンスも参照しておくとよい
ワーキングディレクトリの作成
好きな名前のワーキングディレクトリを作る。ここではaosp_14とした
mkdir aosp_14
cd aosp_14
ビルドするAndroidのバージョンを指定する
公式の手順はこちら
最初にrepo initでダウンロードしてくるAndroidのバージョンを指定する。
上記の「ソースコード タグとビルド」の表のうち、タグがバージョンを指定する文字列になっている。ここではandroid-14.0.0_r75を選ぶ
repo init --partial-clone -u https://android.googlesource.com/platform/manifest -b android-14.0.0_r75
指定したバージョンのソースコードを取得する
とても時間がかかるので注意する。高速かつ安定した通信回線とSSD推奨。
repo sync -c -j8
-j8は8スレッドでダウンロードするという意味でスレッド数を好きに指定できる。セッション数などで適切な数字を選ぶこと
💥途中で失敗した時
何かしらエラーが起きると一つずつ解決していく必要がある。
Try re-running with "-j1 --fail-fast" to exit at the first error.
================================================================================
Repo command failed due to the following `SyncError` errors:
メッセージにあるように下記のコマンドを使って一つ一つチェックしよう
repo sync -c -j1 --fail-fast
💥CASE1 : ダウンロードは出来たがgitのチェックアウトに失敗した
Checking out: 59% (615/1030) platform/frameworks/avfatal: Unable to create '/home/<user>/aosp_14/frameworks/base/.git/index.lock': File exists.

Another git process seems to be running in this repository, e.g.
an editor opened by 'git commit'. Please make sure all processes
are terminated then try again. If it still fails, a git process
may have crashed in this repository earlier:
remove the file manually to continue.
エラーメッセージを見るとframeworks/base/というリポジトリでチェックアウトに失敗したことがわかる。
ワーキングディレクトリから
rm frameworks/base/.git/index.lock
と打ってロックファイルを削除する。それでも上手くいかない場合はgit reset --hardコマンド等で前のコミットまで初期化する
💥CASE2 : 途中で通信に失敗した
Checking out: 96% (996/1030) tools/platform-compatfatal: unable to access 'https://android.googlesource.com/platform/tools/test/mobly_extensions/': gnutls_handshake() failed: The TLS connection was non-properly terminated.
fatal: could not fetch 9aaf7f0df2a877d12cbc2777d598e969eb166d1e from promisor remote
error.GitError: Cannot checkout platform/tools/test/mobly_extensions: Cannot initialize work tree for platform/tools/test/mobly_extensions
error: Cannot checkout platform/tools/test/mobly_extensions
このような場合platform/tools/test/mobly_extensionsという空ディレクトリだけ出来ていることがあるのでワーキングディレクトリから該当のディレクトリを削除することでだいたい解決する
rmdir platform/tools/test/mobly_extensions
💥CASE3 : 最初からやり直す
最悪.repoフォルダを削除することで最初からやり直すことができる。
スレッド数を減らすことで失敗しにくくなるが完了までの時間が長くなってしまう
ビルドするアーキテクチャを決定する
アーキテクチャの名前がわからない場合
source build/envsetup.sh
lunch
lunchコマンドを実行してしばらく待つとビルドできるアーキテクチャの一覧が表示される。
ここでビルドしたいアーキテクチャを指定する。ここではsdk_car_x86_64-trunk_staging-userdebugを選択した(Automotiveのemulator用ビルド)。
アーキテクチャの名前がわかっている場合
source build/envsetup.sh
lunch sdk_car_x86_64-trunk_staging-userdebug
上のコマンド続けて実行するとそのままビルド用の環境変数が設定される
メニュー一覧の解説
下記のページのSelect a Targetの項目がわかりやすかったです。
You're building on Linux

Lunch menu .. Here are the common combinations:
     1. aosp_akita-trunk_staging-userdebug
     2. aosp_arm-trunk_staging-eng
     3. aosp_arm64-trunk_staging-eng
     4. aosp_barbet-trunk_staging-userdebug
     5. aosp_bluejay-trunk_staging-userdebug
     6. aosp_bluejay_car-trunk_staging-userdebug
     7. aosp_bramble-trunk_staging-userdebug
     8. aosp_bramble_car-trunk_staging-userdebug
     9. aosp_cf_arm64_auto-trunk_staging-userdebug
     10. aosp_cf_arm64_phone-trunk_staging-userdebug
     11. aosp_cf_riscv64_phone-trunk_staging-userdebug
     12. aosp_cf_x86_64_auto-trunk_staging-userdebug
     13. aosp_cf_x86_64_auto_mdnd-trunk_staging-userdebug
     14. aosp_cf_x86_64_foldable-trunk_staging-userdebug
     15. aosp_cf_x86_64_only_phone_hsum-trunk_staging-userdebug
     16. aosp_cf_x86_64_pc-trunk_staging-userdebug
     17. aosp_cf_x86_64_phone-trunk_staging-userdebug
     18. aosp_cf_x86_64_tv-trunk_staging-userdebug
     19. aosp_cf_x86_phone-trunk_staging-userdebug
     20. aosp_cf_x86_tv-trunk_staging-userdebug
     21. aosp_cheetah-trunk_staging-userdebug
     22. aosp_cheetah_car-trunk_staging-userdebug
     23. aosp_cheetah_hwasan-trunk_staging-userdebug
     24. aosp_cloudripper-trunk_staging-userdebug
     25. aosp_coral-trunk_staging-userdebug
     26. aosp_felix-trunk_staging-userdebug
     27. aosp_flame-trunk_staging-userdebug
     28. aosp_husky-trunk_staging-userdebug
     29. aosp_lynx-trunk_staging-userdebug
     30. aosp_oriole-trunk_staging-userdebug
     31. aosp_oriole_car-trunk_staging-userdebug
     32. aosp_panther-trunk_staging-userdebug
     33. aosp_panther_car-trunk_staging-userdebug
     34. aosp_panther_hwasan-trunk_staging-userdebug
     35. aosp_raven-trunk_staging-userdebug
     36. aosp_raven_car-trunk_staging-userdebug
     37. aosp_ravenclaw-trunk_staging-userdebug
     38. aosp_redfin-trunk_staging-userdebug
     39. aosp_redfin_car-trunk_staging-userdebug
     40. aosp_redfin_vf-trunk_staging-userdebug
     41. aosp_ripcurrent-trunk_staging-userdebug
     42. aosp_shiba-trunk_staging-userdebug
     43. aosp_slider-trunk_staging-userdebug
     44. aosp_sunfish-trunk_staging-userdebug
     45. aosp_sunfish_car-trunk_staging-userdebug
     46. aosp_tangorpro-trunk_staging-userdebug
     47. aosp_tangorpro_car-trunk_staging-userdebug
     48. aosp_trout_arm64-trunk_staging-userdebug
     49. aosp_trout_x86_64-trunk_staging-userdebug
     50. aosp_whitefin-trunk_staging-userdebug
     51. aosp_x86-trunk_staging-eng
     52. aosp_x86_64-trunk_staging-eng
     53. arm_krait-trunk_staging-eng
     54. arm_v7_v8-trunk_staging-eng
     55. armv8-trunk_staging-eng
     56. armv8_cortex_a55-trunk_staging-eng
     57. armv8_kryo385-trunk_staging-eng
     58. db845c-trunk_staging-userdebug
     59. gsi_car_arm64-trunk_staging-userdebug
     60. gsi_car_x86_64-trunk_staging-userdebug
     61. hikey-trunk_staging-userdebug
     62. hikey64_only-trunk_staging-userdebug
     63. hikey960-trunk_staging-userdebug
     64. hikey960_tv-trunk_staging-userdebug
     65. hikey_tv-trunk_staging-userdebug
     66. poplar-trunk_staging-eng
     67. poplar-trunk_staging-user
     68. poplar-trunk_staging-userdebug
     69. qemu_trusty_arm64-trunk_staging-userdebug
     70. rb5-trunk_staging-userdebug
     71. riscv64-trunk_staging-eng
     72. sdk_car_arm64-trunk_staging-userdebug
     73. sdk_car_md_x86_64-trunk_staging-userdebug
     74. sdk_car_portrait_x86_64-trunk_staging-userdebug
     75. sdk_car_x86_64-trunk_staging-userdebug
     76. silvermont-trunk_staging-eng
     77. uml-trunk_staging-userdebug
     78. yukawa-trunk_staging-userdebug
     79. yukawa_sei510-trunk_staging-userdebug

Which would you like? [aosp_cf_x86_64_phone-trunk_staging-eng]
Pick from common choices above (e.g. 13) or specify your own (e.g. aosp_barbet-trunk_staging-eng):
💥メニューが表示されない場合
今回のビルドを実行する前にmanifestをanrdoid15.0.0_r23やmainに設定してソースコードをダウンロードしたが、lunchを実行してもメニューが表示されなかったケースがあった。
$ lunch
You're building on Linux

Warning: Cannot display lunch menu.

Note: You can invoke lunch with an explicit target:

  usage: lunch [target]

Which would you like? [aosp_cf_x86_64_phone-trunk_staging-eng]
バージョンによってメニューの出る、出ない等不安定な場合があるように見えたのでそのバージョンは避けてください。Googleはなんとかしろ
一応アーキテクチャは指定できる…が、その後のビルドはエラーが出て早々に失敗した。anrdoid15.0.0_r23はUbuntu18.04ではビルドできなかったが、Ubuntu24.04ならビルドできた。動作確認してねーじゃねーか!
ビルドする
m -j4
例によって-j4はスレッド数。指定しないと自動的に適切な数が指定される…とあるが後述するようにメモリ容量を無視して大量にスレッドを設定するので要注意。私の環境では22スレッドが設定されてメモリ不足でビルドが失敗しました。
ここまででビルドが完了です。お疲れ様でした。
💥ビルドに失敗した
💥CASE : OOM Killerにninjaが殺された
13:58:47 ninja may be stuck, check /home/<user>/aosp_14/out/soong.log for list of running processes.
13:58:48 ninja failed with: exit status 137

#### failed to build some targets (02:10:09 (hh:mm:ss)) ####
こんな感じで終了してsoong.logを見ると
2025/04/16 14:05:01.543747 build/soong/ui/logger/logger.go:283: Command Line:
2025/04/16 14:05:01.543792 build/soong/ui/logger/logger.go:290:   [0] /home/user/aosp_14/out/soong_ui
2025/04/16 14:05:01.543794 build/soong/ui/logger/logger.go:290:   [1] --build-mode
2025/04/16 14:05:01.543796 build/soong/ui/logger/logger.go:290:   [2] --all-modules
2025/04/16 14:05:01.543797 build/soong/ui/logger/logger.go:290:   [3] --dir=/home/user/aosp_14
2025/04/16 14:05:01.924524 build/soong/ui/logger/logger.go:290: Detected 23.5 GB total RAM
2025/04/16 14:05:01.968356 build/soong/ui/logger/logger.go:290: Parallelism (local/remote/highmem): 22/0/2
2025/04/16 14:05:01.968379 build/soong/ui/logger/logger.go:290: Current file limits: 1048576 soft, 1048576 hard
2025/04/16 14:05:01.968385 build/soong/ui/logger/logger.go:290: Took 3188ms to start up.
となっている
特に注目したいのは下記の2点
-
13:58:48 ninja failed with: exit status 137- エラーコード137はSIGKILLで終了している(大体メモリ不足)
-
2025/04/16 14:05:01.968356 build/soong/ui/logger/logger.go:290: Parallelism (local/remote/highmem): 22/0/2- 末尾の22/0/2の22はスレッド数
-
mコマンドを-jオプションなしで実行したときに自動設定されたもの(多すぎないか?)
スレッドが多すぎてメモリ不足になったことがわかるので自PCに適切なスレッド数に変更する
m -j<適切なスレッド数>
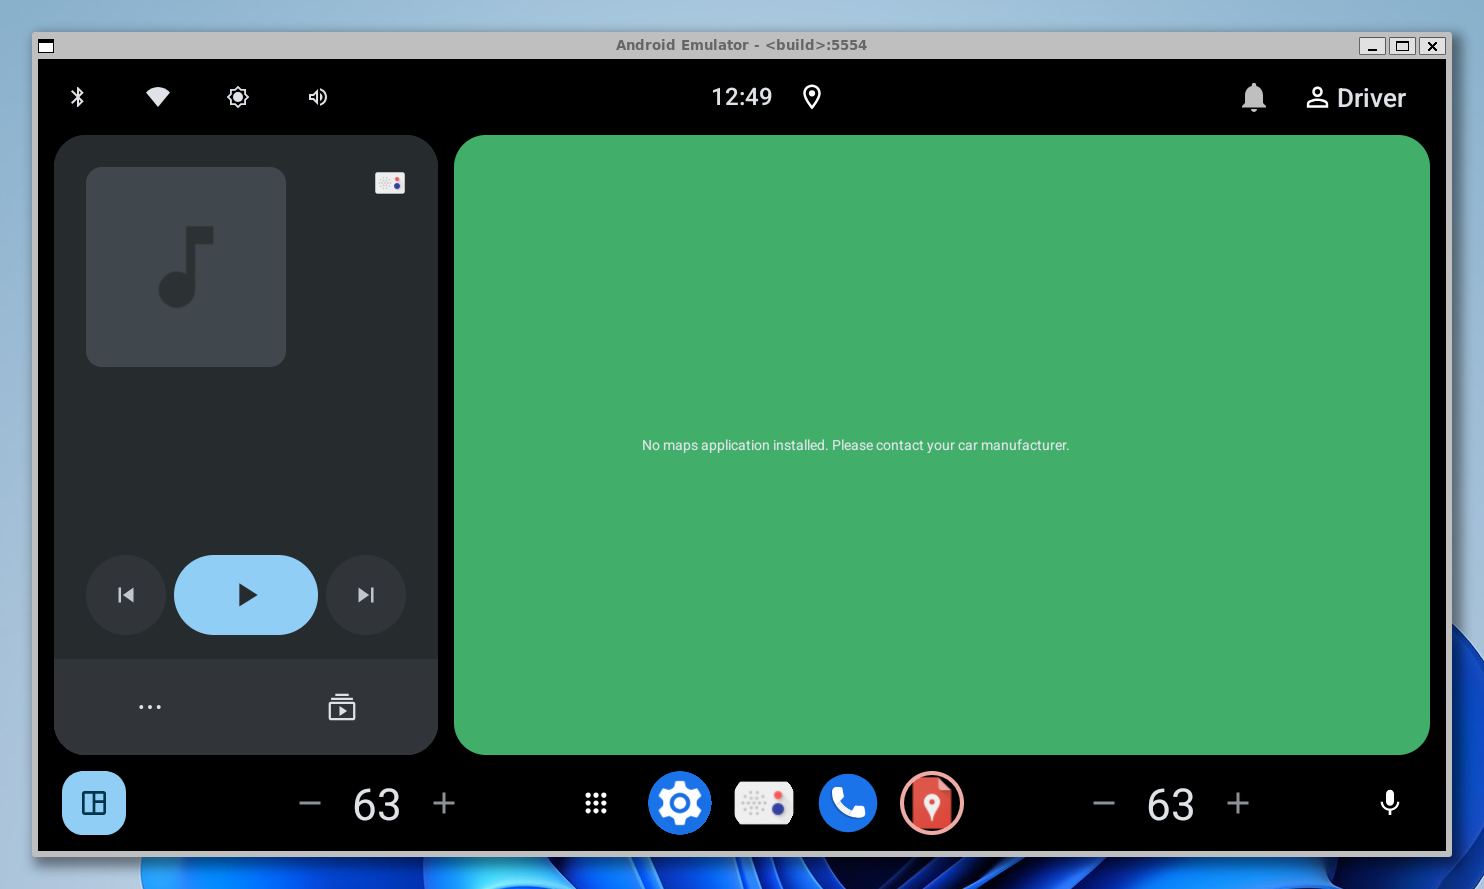
起動する
source build/envsetup.sh
lunch <ターゲット名>
が行われている状態で
emulator
でビルドしたAndroid OSが起動する。
まとめ
- ソースコードのダウンロードとビルドに時間がかかるのでスレッド数を適切に設定することが大切
- 特に公式推奨環境のメモリ64GBより少ない場合はビルド時は自分で設定した方が良い
- ビルド時にメモリ使用量のピークを見ておくと良いかも?
-j4だと20Gくらいがピークでした。
- Android15以降はUbuntu24.04の方がよいのかもしれない。14はUbuntu18.04でいけました。
- lunchでmenuがでないバージョンは避けたほうがいいかもしれない (マニュアル通りの挙動ではないので)
- syncやbuildに失敗してもめげない。エラーをよく読んでリトライすれば乗り越えられるかもしれない
情報がやたら少ないですが頑張ってください🦀