本記事は、Nutanix Advent Calendar 2019の2枚目の22日目、12月22日分としての投稿になります。
本記事の内容は、この日付時点の情報(Nutanix CSI Plugin 1.1.x系)に基づいています。そのため,今後新しいバージョンが提供された場合に,当該記載と矛盾が生じる場合がありますのでご注意ください。
はじめに
12/15日にこちらのAdvent CalendarではなくKubernetes Advent Calendar 2019の2枚目にNutanixのCSI Volume Pluginの裏側にあるストレージについてについて投稿をしました。
この記事ではNutanixの上に展開されるKarbonがビルトインのCSI Volume Pluginを利用してNutanix上のストレージをPersistent Volumesとして利用することについて書きました。しかし、このCSI Volume Pluginは実はNutanix上のKarbonだけでなく、Non-Nutanixの環境で動作しているKubernetesでも利用することが可能となっています。
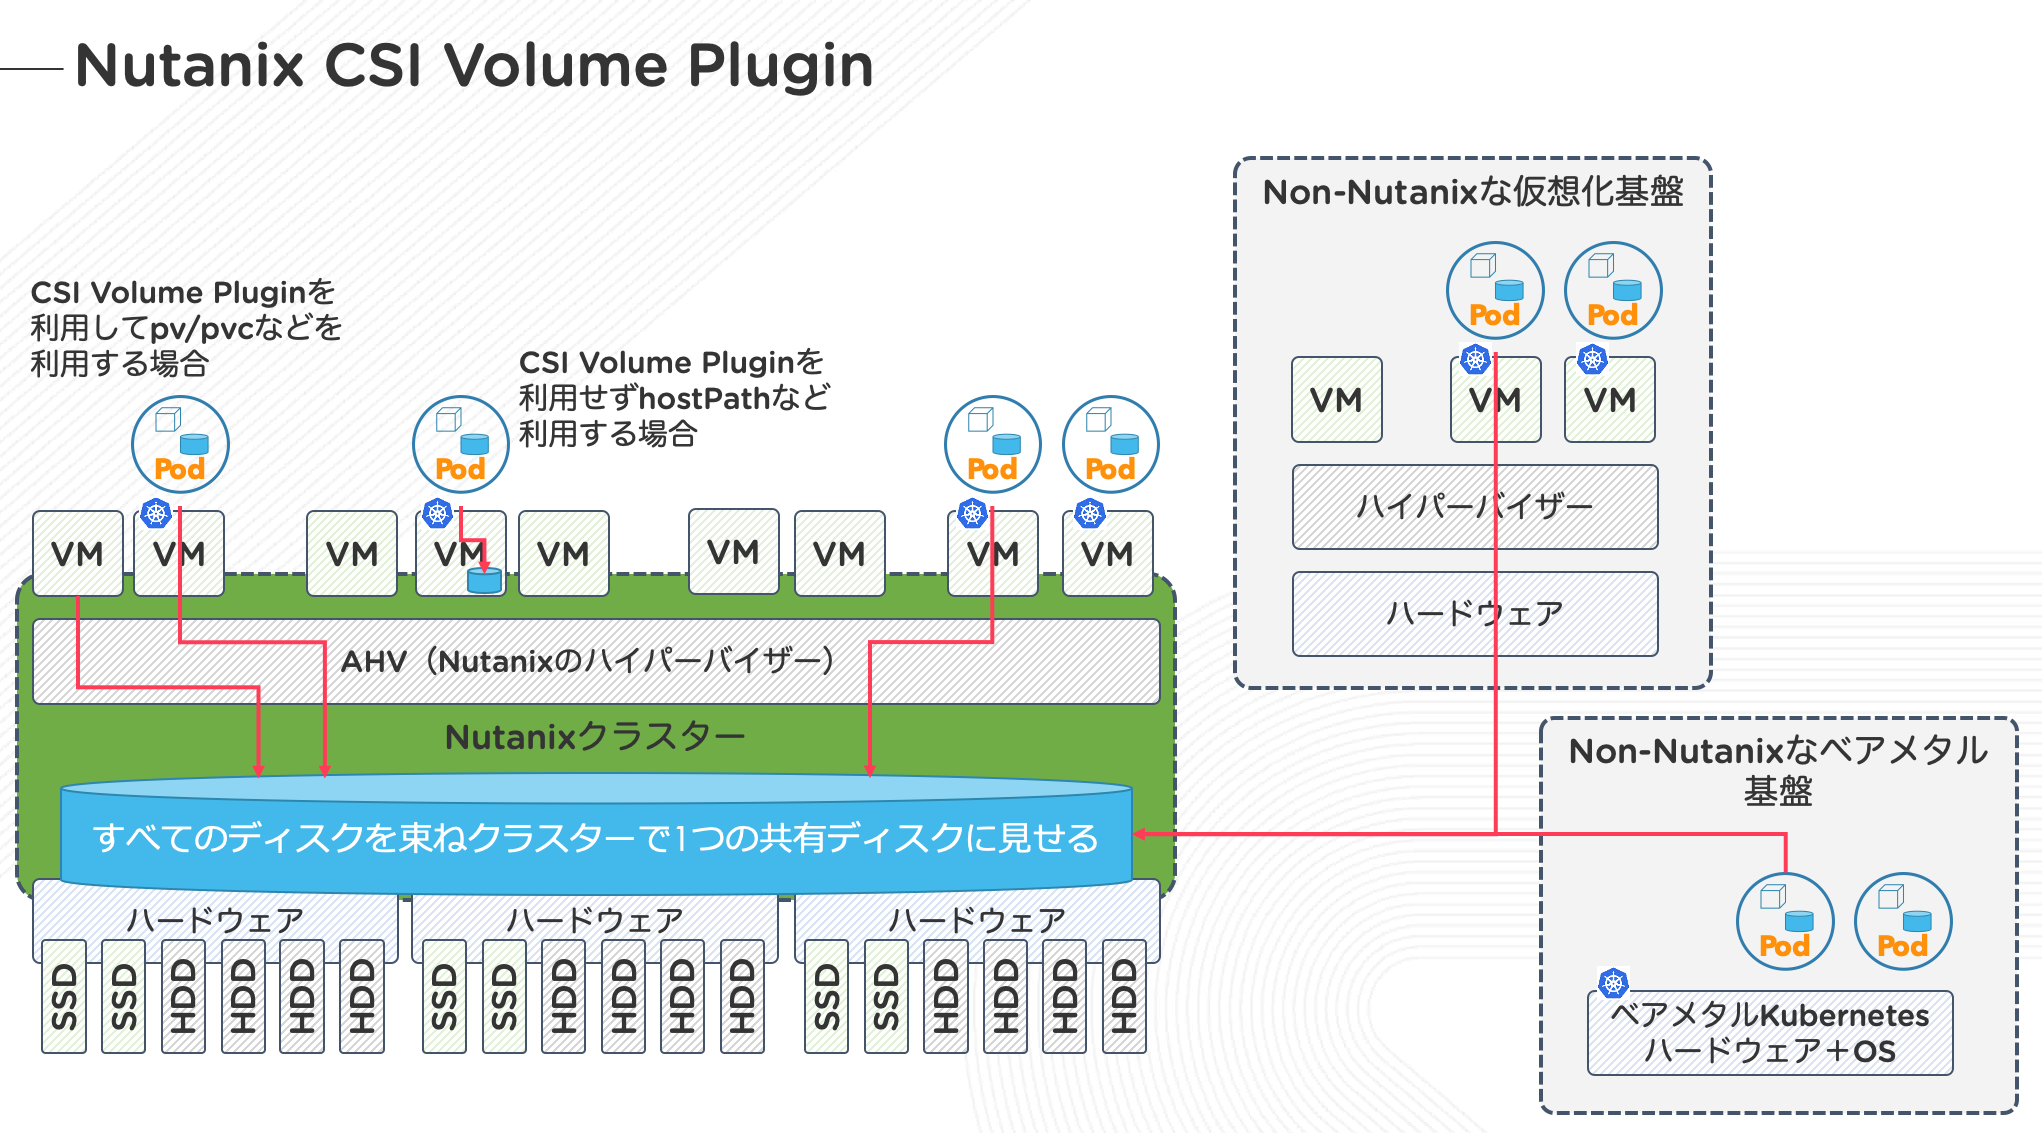
先のKubernetes Advent Calendarの投稿の際には時間がなく試せなかったのですが、今回、時間が少し取れたので、KarbonではないKubernetes環境からCSI Volume Pluginを使って、Nutanix上のストレージをPersistent Volumesとして利用することについて見ていきます。
なお、今回の投稿ではPersistent Volumesのブロックストレージを利用した例を紹介していきます。NutanixのFiles(Nutanixが提供するNutanix上に展開するマネージドなスケールアウト型のファイルサーバー機能)のファイルストレージを利用したPersistent Volumesについては、またの機会に紹介したいと思います。
CSI Volume Pluginを使ってをNutanixのストレージをPersistentVolumesとして利用する
今回の環境について先に触れておきます。CSI Volume Pluginを使ってPersistent Volumesを利用するKubernetesの環境は前述のとおりKarbonではなく、VMware ESXi上にkubeadmを使って手で立てているKubernetes環境になります。
今回は環境作成の手間の問題で、ESXi上に立てたkubeadmで立てたKubernetesクラスターもNutanix Community Editionの環境も、すべて同一セグメントのフラットな環境となっています。
| 項目 | IPアドレス | 備考 | 関連Manifest |
|---|---|---|---|
| Kubernetes Master Node IP | 172.16.0.50 | ESXi上にKubeadmnで構築 | |
| Kubernetes Worker Node IP | 172.16.0.50 | ESXi上にKubeadmnで構築 | |
| Nutanix CE(Primary) Clsuter IP | 172.16.0.30 | Primary扱いのNutanix CE | SecretsでCluster IPを利用する |
| Nutanix CE(Primary)iSCS Data Service IP | 172.16.0.30 | StorageClassの選択時に利用する | |
| Nutanix CE(DR) Clsuter IP | 172.16.0.35 | DR(Secondly)想定のNutanix CE | SecretsでCluster IPが利用する |
| Nutanix CE(DR)iSCS Data Service IP | 172.16.0.36 | StorageClassの選択時に利用する |
そして以下の項目がNutanixのリソースでCSI Volume Pluginを利用するために必要な関連項目となっています。
| 項目 | 概要 | 関連Manifest |
|---|---|---|
| NutanixのStorage Container | Storage ContainerはあくまでNutanixの用語でESXiなどでのデータストアに相当 | StorageClassの設定時に必要 |
| Nutanix PrismのCredential | Nutanixの管理コンソールPrismにログインする際のCredential | Secretsの設定に必要 |
CSI Volume Pluginのインストール
CSI Volume Plugin利用のための前提条件
Nutanixが提供しているCSI Volume Plugin利用のための前提条件は、現時点(Version 1.1.0)で以下のような前提条件があります。
- Kubernetesクラスターを構成するノードが以下のいずれかのOSであること
- CentOS
- Red hat Enterprise Linux
- Unbuntu
- CSI Volume Pluginを利用するKubernetesのバージョンが1.13以降であること※
- NutanixがAOS 5.6.2.x以上であること
※なお、Kubernetesのバージョンが1.10から1.12までの場合は、http://download.nutanix.com/csi/beta/csi.tar.gzからCSI Volume Plugin 0.8をご利用下さい。この場合も、OSの条件やNutanix AOSの条件は変わりありません
CSI Volume Plugin利用のための事前準備
iscsi及びnfsのクライアントパッケージのインストール
まず、事前準備としてCSI Volume Pluginを利用するKubernetesのノードすべてに、利用するPersistent Volumesのタイプに応じて以下のパッケージをインストールする必要があります。
-
ブロックストレージを利用したい場合:
- CentOS / Red hat Enterprise Linux:iscsi-initiator-utils
- Ubuntu:open-iscsi
-
ファイルストレージを利用したい場合:
- CentOS / Red hat Enterprise Linux:nfs-utils
- Ubuntu:nfs-common
CSI Volume Pluginの入手とインストール
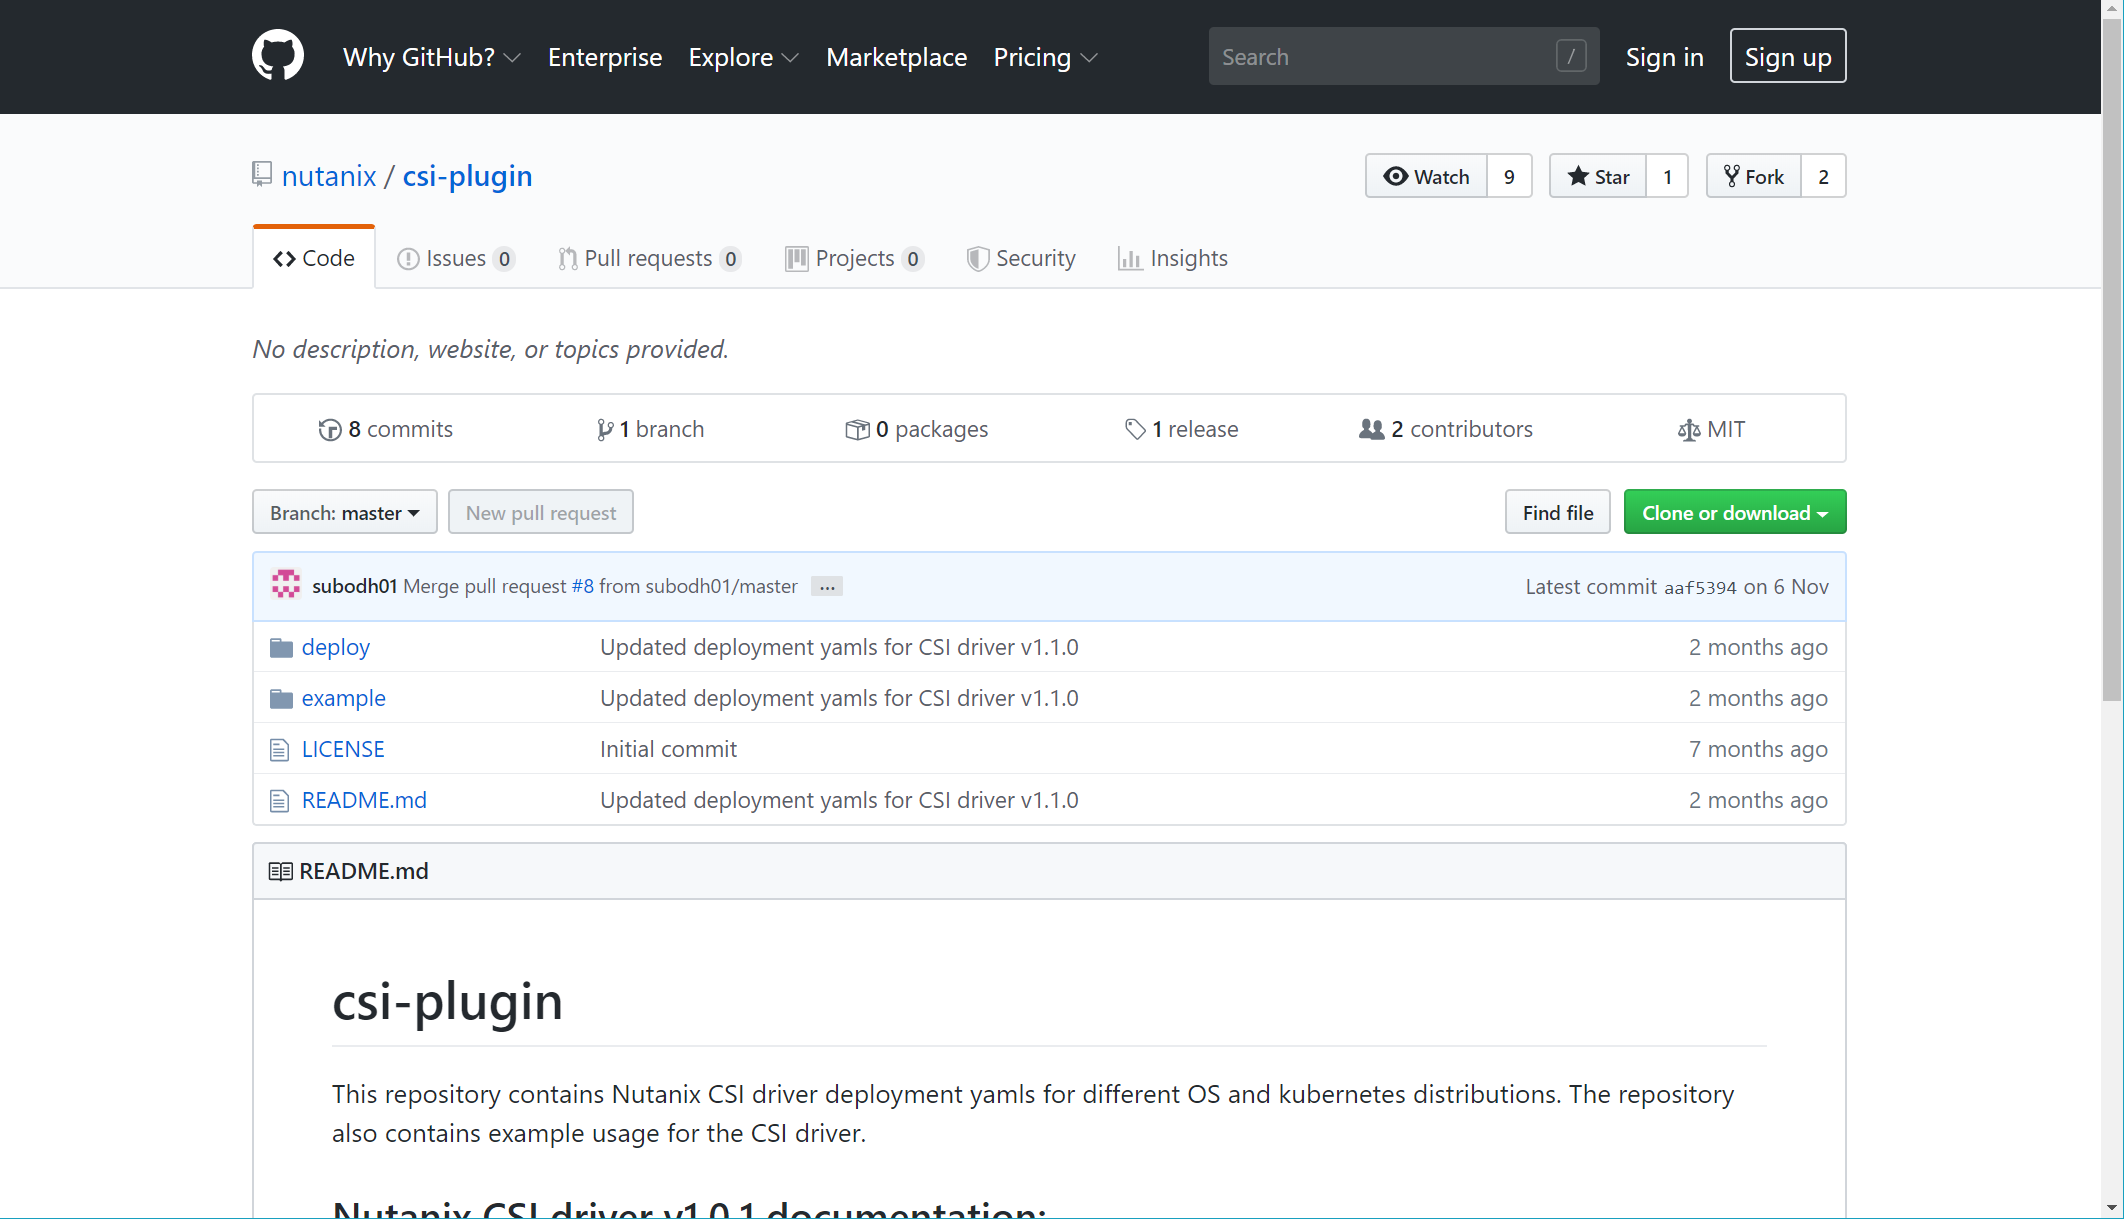
ESXi上に立てたKubernetesにCSI Volume Pluginをインストールします。CSI Volume Pluginの入手先は、https://github.com/nutanix/csi-pluginとなっており、Kubectlが入っている作業用端末上、もしkは(あまりよくはありませんが)ESXi上のKubernetesのMaster Nodeの/tmpなどの作業用ディレクトリにでも、git clone https://github.com/nutanix/csi-pluginとしてもどちらでも大丈夫です。
取得したCSI Volume Pluginは以下のような構成になっています。CSI Volume Pluginのインストールは、以下のツリーに見えるdeployにあるManifestファイルを利用します。こちらは特に手を入れる必要なく何も考えずにcreateまたはapplyしてあげれば良いです。
なお、exampleには、CSI Volume Pluginの利用を使ってPersistent Volumesを要求する上でのサンプルManifestファイルとなっており、実際にPersistent Storageを作る際に必要になるので後述します。
[root@localhost csi-plugin]# pwd;find . | sort | sed '1d;s/^\.//;s/\/\([^/]*\)$/|----\1/;s/\/[^/|]*/|    /g'
/tmp/csi-plugin
|----LICENSE
|----README.md
|----deploy
|    |----Centos
|    |    |----csi-driver.yaml
|    |    |----ntnx-csi-node.yaml
|    |    |----ntnx-csi-provisioner.yaml
|    |    |----ntnx-csi-rbac.yaml
|    |----Ubuntu1804
|    |    |----csi-driver.yaml
|    |    |----ntnx-csi-node.yaml
|    |    |----ntnx-csi-provisioner.yaml
|    |    |----ntnx-csi-rbac.yaml
|----example
|    |----ABS
|    |    |----claim1.yaml
|    |    |----ntnx-secret.yaml
|    |    |----rc-nginx.yaml
|    |    |----sc.yaml
|    |----AFS
|    |    |----claim2.yaml
|    |    |----rc-nginx.yaml
|    |    |----rc-nginx2.yaml
|    |    |----sc.yaml
展開されたディレクトリからcsi-plugin/deploy/[OS名]/ディレクトリまで移動して、中にあるManifestファイルをKubernetesに適用していきます。
ntnx-csi-rbac.yamlの適用
まずntnx-csi-rbac.yamlを最初に適用します。serviceaccountやclusterrolebindingなどRBACに関連するリソースを設定しています。適用が行われたら、念のためkubectl -n kube-system getなどで確認を行っておきます。
[root@localhost csi-test]#
[root@localhost csi-test]#
[root@localhost csi-test]# kubectl create -f ./ntnx-csi-rbac.yaml
serviceaccount/csi-provisioner created
clusterrole.rbac.authorization.k8s.io/external-provisioner-runner created
clusterrolebinding.rbac.authorization.k8s.io/csi-provisioner-role created
service/csi-provisioner-ntnx-plugin created
serviceaccount/csi-node-ntnx-plugin created
clusterrole.rbac.authorization.k8s.io/csi-node-runner created
clusterrolebinding.rbac.authorization.k8s.io/csi-node-role created
[root@localhost csi-test]#
[root@localhost csi-test]#
[root@localhost csi-test]# kubectl -n kube-system get serviceaccounts | grep csi
csi-node-ntnx-plugin                 1         75s
csi-provisioner                      1         75s
[root@localhost csi-test]#
[root@localhost csi-test]#
[root@localhost csi-test]# kubectl -n kube-system get clusterrole | grep -e csi -e runner
csi-node-runner                                                        7m15s
external-provisioner-runner                                            7m15s
[root@localhost csi-test]#
[root@localhost csi-test]#
[root@localhost csi-test]# kubectl -n kube-system get clusterrolebinding  | grep -e csi
csi-node-role                                          7m59s
csi-provisioner-role                                   7m59s
[root@localhost csi-test]#
[root@localhost csi-test]#
ntnx-csi-node.yaml及びntnx-csi-provisioner.yamlの適用
この2つのManifestファイルは、CSI Volume Pluginを利用する際にPersistent Volumesを適切にハンドリングするためのPodをDaemonSetとStatfulSetで定義したものです。
CSI Volume Pluginを利用する際にPersistent Volumesを適切にハンドリングするためのPodをStatfulSetで提供することで、Persistent Volumesのプロビジョニング制御を行うPodがクラッシュした場合でも、重複してプロビジョニングが発生してPersistent VolumesClaimとPersistent VolumesとPodの間に不整合が生じないよう制御が可能です。
また、DaemonSetで提供されるPodは、各Kubernetesノード上においてプロビジョニングされたPersistent Volumesを適切にマウントするための制御を行います。
ntnx-csi-node.yamlとntnx-csi-provisioner.yamlを適用します。適用が行われたら、念のためkubectl -n kube-system getなどでPodやDaemonSet、StatfulSetが正常にデプロイされているか確認を行っておきます。
[root@localhost csi-test]#
[root@localhost csi-test]#
[root@localhost csi-test]# kubectl create -f ./ntnx-csi-node.yaml
daemonset.apps/csi-node-ntnx-plugin created
[root@localhost csi-test]#
[root@localhost csi-test]#
[root@localhost csi-test]# kubectl create -f ./ntnx-csi-provisioner.yaml
statefulset.apps/csi-provisioner-ntnx-plugin created
[root@localhost csi-test]#
[root@localhost csi-test]#
[root@localhost csi-test]# kubectl get pods -n kube-system | grep csi
csi-node-ntnx-plugin-f7l8c                 3/3     Running   0          29s
csi-provisioner-ntnx-plugin-0              4/4     Running   0          18s
etcd-k8s-csi-m                             1/1     Running   0          19h
kube-apiserver-k8s-csi-m                   1/1     Running   0          19h
kube-controller-manager-k8s-csi-m          1/1     Running   0          19h
kube-scheduler-k8s-csi-m                   1/1     Running   0          19h
[root@localhost csi-test]#
[root@localhost csi-test]#
[root@localhost csi-test]# kubectl -n kube-system get ds,sts
NAME                                  DESIRED   CURRENT   READY   UP-TO-DATE   AVAILABLE   NODE SELECTOR                 AGE
daemonset.apps/calico-node            2         2         0       2            0           beta.kubernetes.io/os=linux   19h
daemonset.apps/csi-node-ntnx-plugin   1         1         1       1            1           <none>                        3m40s
daemonset.apps/kube-proxy             2         2         2       2            2           beta.kubernetes.io/os=linux   19h

NAME                                           READY   AGE
statefulset.apps/csi-provisioner-ntnx-plugin   1/1     3m29s
[root@localhost csi-test]#
[root@localhost csi-test]#
csi-driver.yamlの適用
最後に、csi-driver.yamlを適用します。csi-driver.yamlはkind: CSIDriverなCSI Driver Objectを作成するためのものです。ここでも適用が行われたら、念のためkubectl -n kube-system getなどで確認を行っておきます。
[root@localhost csi-test]#
[root@localhost csi-test]#
[root@localhost csi-test]# kubectl create -f ./04_csi-driver.yaml
csidriver.storage.k8s.io/com.nutanix.csi created
[root@localhost csi-test]#
[root@localhost csi-test]#
[root@localhost csi-test]# kubectl get csidrivers.storage
NAME              CREATED AT
com.nutanix.csi   2019-12-22T18:25:16Z
[root@localhost csi-test]#
[root@localhost csi-test]#
CSI Volume Pluginの利用設定
ここまで終わったら次からCSI Volume Pluginを利用していく上で必要な設定を各種行っていきます。ここからは、exampleにあるサンプルのテンプレートを利用して、CSI Volume Pluginを利用する環境に応じた設定が必要になりますので、ご自身の環境に合わせて読み替えを行って下さい。
Secretsの設定
最初にSecretsの設定を行います。Gitで取ってきた展開されたCSI Volume Pluginのディレクトリからcsi-plugin/example/ABS/ディレクトリ(ディレクトリ名についてるNutanixの機能名が古い!、ABS=旧:Acropolis Block Services=現:Nutanix Volumes)まで移動して、ntnx-secret.yamlを編集します。
apiVersion: v1
kind: Secret
metadata:
  name: ntnx-secret
  namespace: kube-system
data:
  # base64 encoded prism-ip:prism-port:admin:password.
  # E.g.: echo -n "10.6.47.155:9440:admin:mypassword" | base64
  key: MTAuNS52NS4xNTU6OTQ0MDphZG1pbjpOdXRhbml4LjEyMw==
こちらの最終行のkeyの中身をそれぞれの環境に合わせて編集します。と言っても、単純にNutanixのVIPであるPrismのIPとポート、それにPrismの管理者ユーザーのIDとCredentialをBase64でエンコードしてSecretsとして設定するだけです。
exampleに最初から入っているファイルの例では、PrismもIPとポートが10.6.47.155:9440、Prismの管理者ユーザーのIDがadmin、パスワードがmypasswordとなっている場合のものなので、こちらをそれぞれの環境に応じて書き換えます。
なお、echoしたものをbase64でエンコードするためのコマンドが例示されていますが、特殊記号等が入っているパスワード(NutanixのPrismのパスワードは要件として最低1文字以上の特殊文字が必要)は文字によってエスケープの必要があるのでご注意下さい。
今回試した環境の例でいくと以下のようになります(パスワード中の"!"はechoで展開されてしまうため、ここだけシングルクォートで囲っています)。
echo -n "172.16.0.30:9440:admin:Y0urP@ssw0rd"'!' | base64
MTcyLjE2LjAuMzA6OTQ0MDphZG1pbjpZMHVyUEBzc3cwcmQh
上記の結果が表示されるので、base64でエンコードされた文字列をKeyの値と置き換えます。1つのStorageClassと単一のNutanix CEクラスターで試す場合には、上記の変更のみで次のステップ「StorageClassの設定」に進めても大丈夫です。
実は今回は、2つのNutanix CE環境を準備して、それぞれ目的別(早いストレージと遅いストレージの想定)のStorageClassで利用できるように見立て、Fast-block用、Slow-block用と便宜的に名付けて設定しています。
| 項目 | 対応Nutanix CEクラスター | 対応するPrism IP | adminのUser ID | 対応するCredential | 対応するiSCSI Data Service IP+Port |
|---|---|---|---|---|---|
| 早いストレージ用 | Primary扱いのNutanix CE | 172.16.0.30 | admin | Y0urP@ssw0rd-1! | 172.16.0.31:3260 |
| 遅いストレージ用 | DR(Secondly)想定のNutanix CE | 172.16.0.35 | admin | Y0urP@ssw0rd-2! | 172.16.0.36:3260 |
そのため、それぞれのNutanix CEクラスターはIPアドレスやCredentialが異なることから、それぞれのStorageClass用にSecretsも異なるため、実際には以下のようにしています。
echo -n "172.16.0.30:9440:admin:Y0urP@ssw0rd-1"'!' | base64
MTcyLjE2LjAuMzA6OTQ0MDphZG1pbjpZMHVyUEBzc3cwcmQtMSE=
apiVersion: v1
kind: Secret
metadata:
  name: ntnx-secret-fast
  namespace: kube-system
data:
  # base64 encoded prism-ip:prism-port:admin:password.
  # E.g.: echo -n "10.6.47.155:9440:admin:mypassword" | base64
  #key: MTAuNS52NS4xNTU6OTQ0MDphZG1pbjpOdXRhbml4LjEyMw==
  key: MTcyLjE2LjAuMzA6OTQ0MDphZG1pbjpZMHVyUEBzc3cwcmQtMSE= #<--------変更1
echo -n "172.16.0.35:9440:admin:Y0urP@ssw0rd-2"'!' | base64
MTcyLjE2LjAuMzA6OTQ0MDphZG1pbjpZMHVyUEBzc3cwcmQtMSE=
apiVersion: v1
kind: Secret
metadata:
  name: ntnx-secret-slow
  namespace: kube-system
data:
  # base64 encoded prism-ip:prism-port:admin:password.
  # E.g.: echo -n "10.6.47.155:9440:admin:mypassword" | base64
  #key: MTAuNS52NS4xNTU6OTQ0MDphZG1pbjpOdXRhbml4LjEyMw==
  key: MTcyLjE2LjAuMzU6OTQ0MDphZG1pbjpZMHVyUEBzc3cwcmQtMiE= #<--------変更1
StorageClassの設定
次にStorageClassの設定を行います。同じくexampleディレクトリにあるsc.yamlを編集します。こちらのStorageClassのサンプルファイルはあデフォルトで以下のようになっています。
kind: StorageClass
apiVersion: storage.k8s.io/v1
metadata:
    name: acs-abs
provisioner: com.nutanix.csi
parameters:
    csi.storage.k8s.io/provisioner-secret-name: ntnx-secret
    csi.storage.k8s.io/provisioner-secret-namespace: kube-system
    csi.storage.k8s.io/node-publish-secret-name: ntnx-secret
    csi.storage.k8s.io/node-publish-secret-namespace: kube-system
    csi.storage.k8s.io/controller-expand-secret-name: ntnx-secret
    csi.storage.k8s.io/controller-expand-secret-namespace: kube-system
    csi.storage.k8s.io/fstype: ext4
    dataServiceEndPoint: 10.5.65.156:3260
    storageContainer: default-container-30293
    storageType: NutanixVolumes
allowVolumeExpansion: true
reclaimPolicy: Delete
StorageClassのmetadataで設定されるStorageClassの名前はacs-absとなっていますが、前述のとおり、今回は2つのNutanix CEクラスターでそれぞれ異なるタイプのストレージを提供する想定で環境を準備していますので、StorageClassにはそれぞれ早いストレージ用のStorageClassとして、fast-block、遅いストレージ用のStoragleClassとして、slow-blockと便宜上命名しています。
そのため、このStorageClassのManifestファイルも2つ準備して、以下のように設定します。また、このStorageClassのManifestファイルには、dataServiceEndPointとstorageContainerの設定も記載するため、それぞれのNutanix CE用の値も確認する必要があります。
1つのStorageClassと単一のNutanix CEクラスターで試す場合には、dataServiceEndPointとstorageContainerの修正のみで次ぎのステップ「StorageClassの適用とサンプルPersistentVolumesの作成」に進んでも大丈夫です。
fast-block用のStorageClassの設定
具体的に今回の環境に合わせた変更箇所を見てきます。Storagelassのfast-block用には、既にそれ用のSecretsを設定したことを述べていますが、そのSecrets名は、ntnx-secret.yamlのmetadata中でntnx-secret-fastとしています。そのため、exampleにあるsc.yamlの中で、もともとntnx-secretと記載されている部分をntnx-secret-fastに置き換えます。
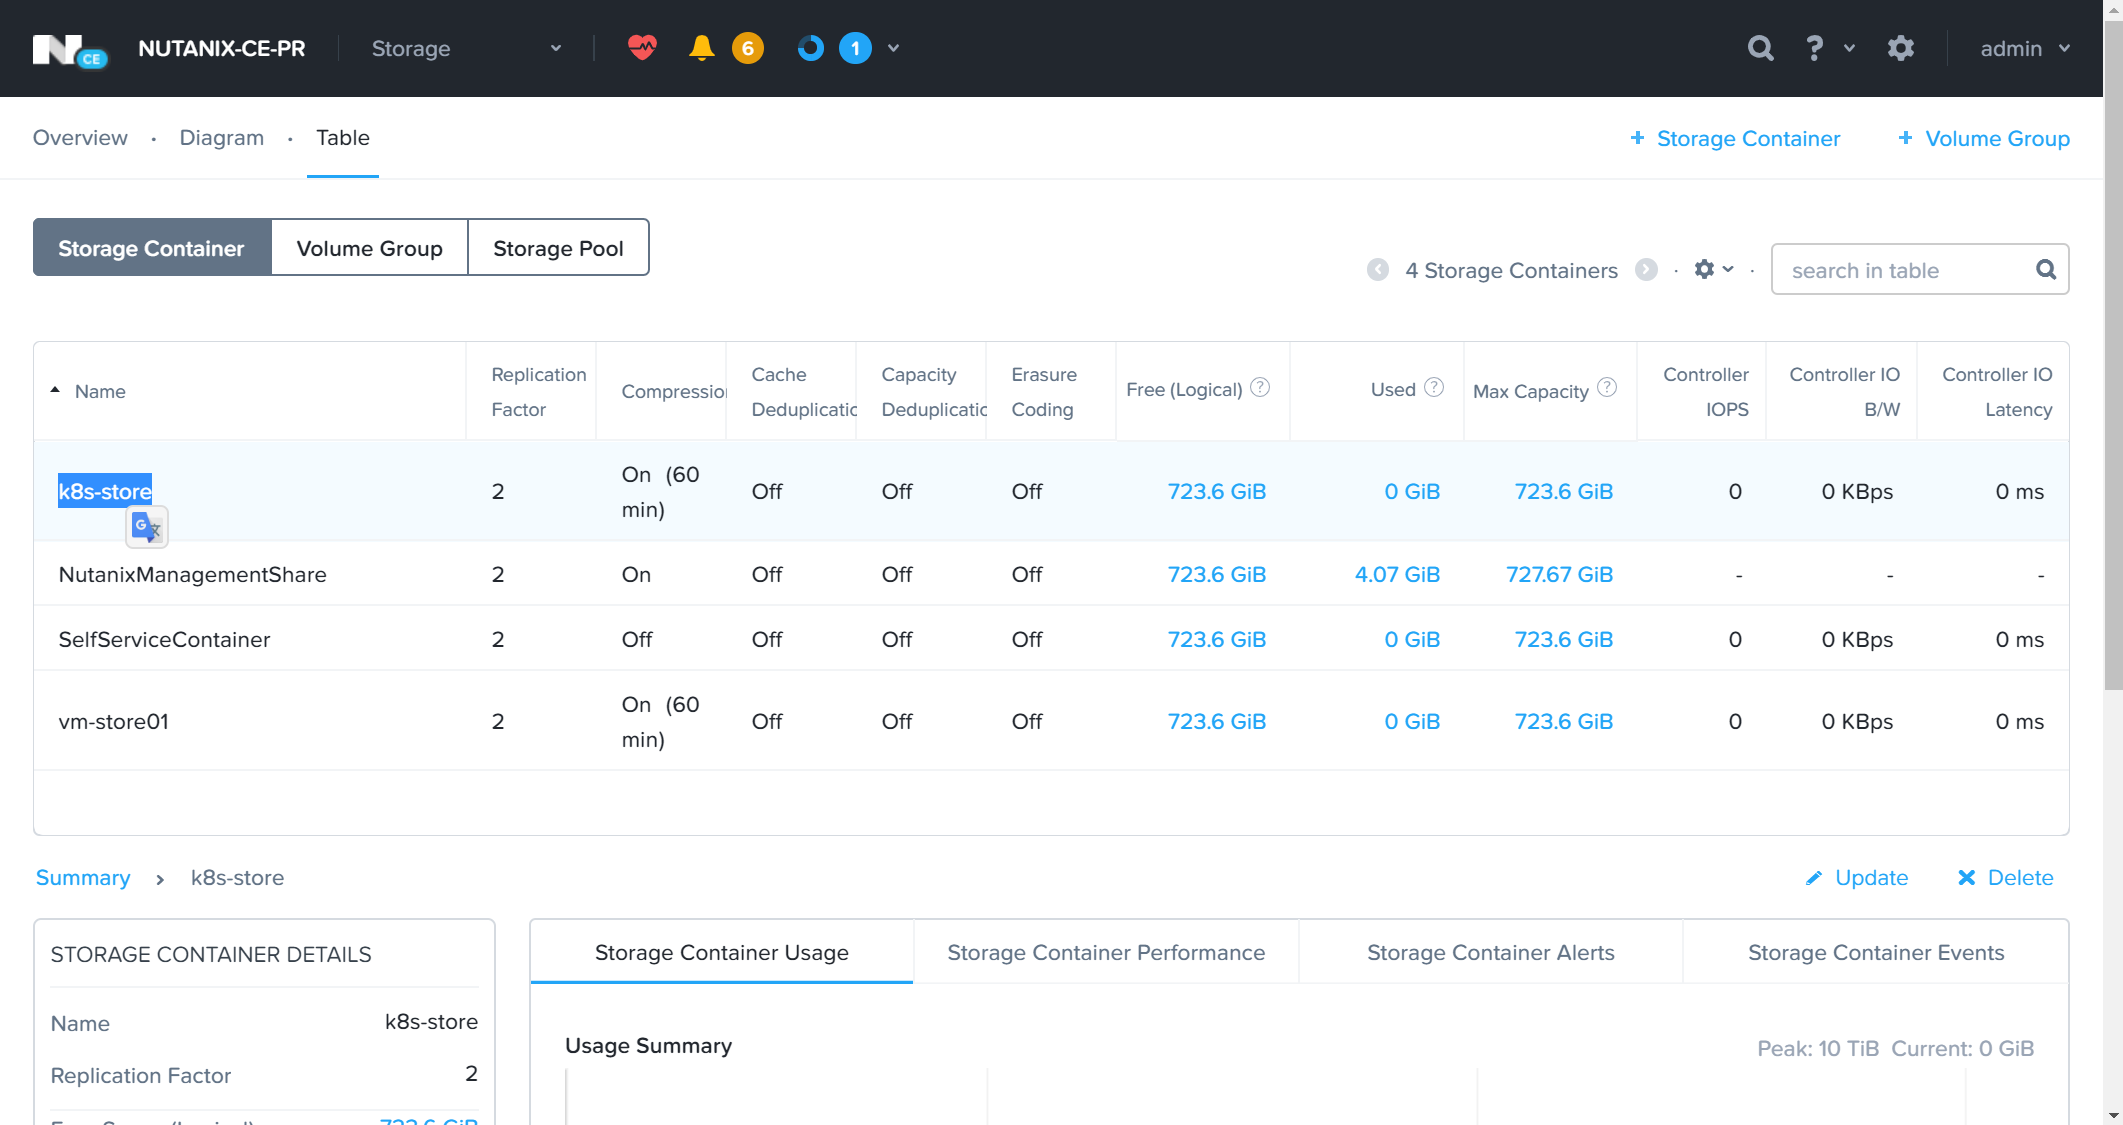
またdataServiceEndPointは今回の環境に合わせて、172.16.0.31:3260とし、storageContainerはk8s-storeとします。dataServiceEndPointとstorageContainerの情報はNutanix CEのPrismにログインするかsshでCVMにログインしてncliなどで情報を取得することが可能です。今回はPrismから情報を取得します。早いストレージに見立てたPersistent Volumesを提供するNutanix CEクラスターにログインするので、Webブラウザに172.16.0.30を設定してPrismにアクセスします。
dataServiceEndPointとstorageContainerの情報はNutanix CEのPrismでギアアイコンからCluster Detailesを選択するか左上のクラスター名(ここでの例では「NUTANIX-CE-PR」)をクリックして確認します。
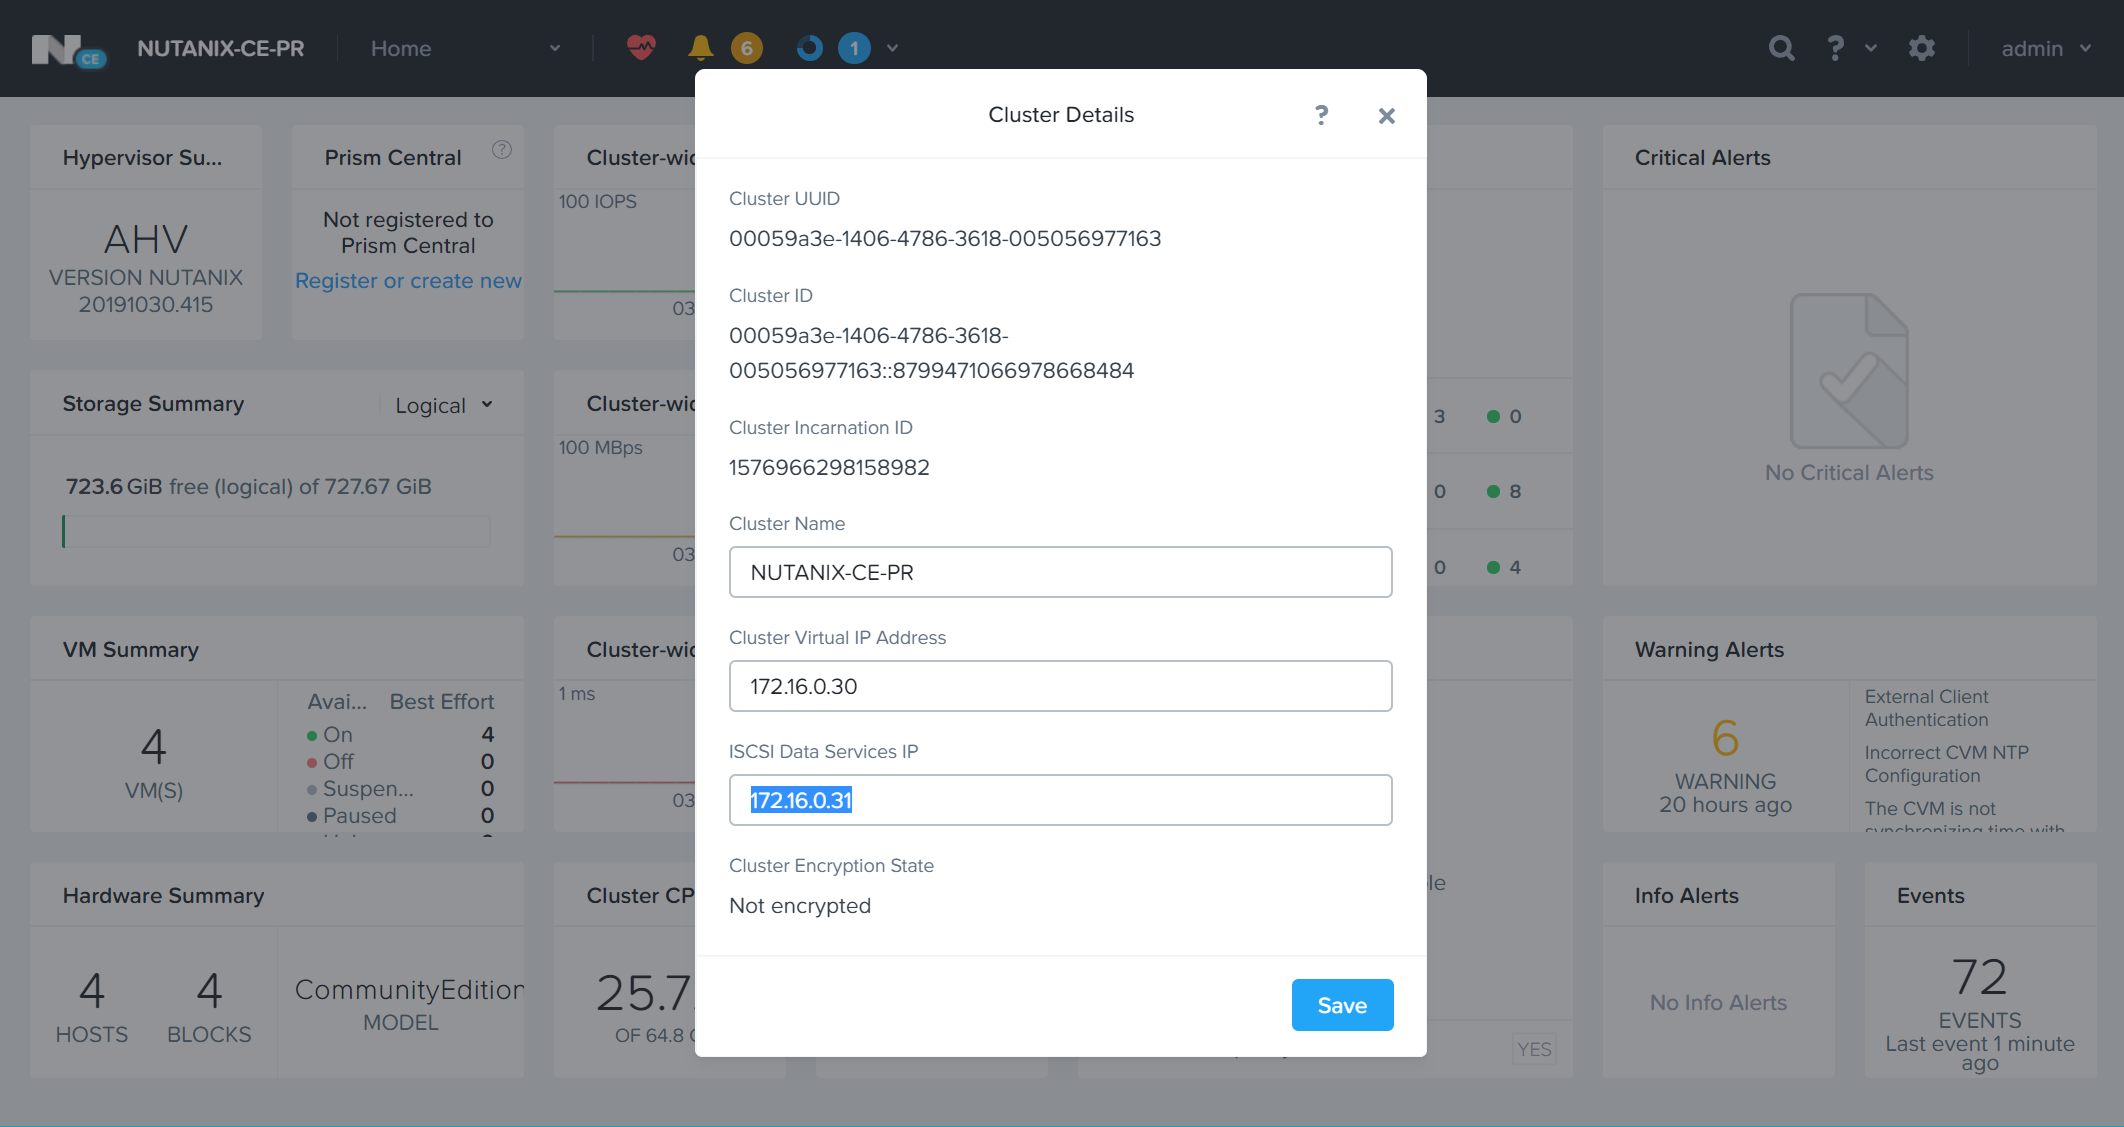
storageContainerはPrismのStorageダッシュボードのTableでstorageContainerのリストを表示させ、あらかじめ作成していおいたstorageContainerを利用します。通常だとNutanixクラスターの作成直後には、デフォルトでdefault-container-[99999999999]※1といったstorageContainerが作成されていますが、名前を覚えづらいので今回は、それを削除して「k8s-store」という名前でstorageContainerを作り直しています。
これで、必要な情報はすべて確認できたので、sc.yamlを編集すると以下のようになります。
kind: StorageClass
apiVersion: storage.k8s.io/v1
metadata:
    name: fast-block #<--------変更1
provisioner: com.nutanix.csi
parameters:
    csi.storage.k8s.io/provisioner-secret-name: ntnx-secret-fast #<--------変更2
    csi.storage.k8s.io/provisioner-secret-namespace: kube-system
    csi.storage.k8s.io/node-publish-secret-name: ntnx-secret-fast #<--------変更3
    csi.storage.k8s.io/node-publish-secret-namespace: kube-system
    csi.storage.k8s.io/controller-expand-secret-name: ntnx-secret-fast #<--------変更4
    csi.storage.k8s.io/controller-expand-secret-namespace: kube-system
    csi.storage.k8s.io/fstype: ext4
    dataServiceEndPoint: 172.16.0.31:3260 #<--------変更5
    storageContainer: k8s-store #<--------変更6
    storageType: NutanixVolumes
allowVolumeExpansion: true
reclaimPolicy: Delete
slow-block用のStorageClassの設定
続いて、遅いストレージに見立てたStorageClassがslow-block用のManifestファイルを設定します。今度は必要な情報をPrismのUIからではなくコマンドで取ってみます。今回は、遅いストレージに見立てたPersistent Volumesを提供するNutanix CEクラスターにログインするので、ssh nutanix@172.16.0.35としてCVMにログインし、まずdataServiceEndPointに設定する値を確認するため、iSCSI Data Service IPの情報を以下のコマンドで取得します。
なお、iSCSI Data Service IPは、ncliのコマンド実行結果ではExternal Data Servicesとして表示されます。
[root@localhost deploy-test]# ssh nutanix@172.16.0.35
The authenticity of host '172.16.0.35 (172.16.0.35)' can't be established.
ECDSA key fingerprint is SHA256:tiQQfx14jAHpidgnVEmqKeIioGHDonHCCLraXeTv8vM.
ECDSA key fingerprint is MD5:3c:84:e3:70:92:bd:2e:96:f1:71:0d:96:6a:89:76:6e.
Are you sure you want to continue connecting (yes/no)? yes
Warning: Permanently added '172.16.0.35' (ECDSA) to the list of known hosts.
Nutanix Controller VM
nutanix@172.16.0.35's password:
Last login: Sun Dec 22 20:17:29 2019 from 172.16.0.50
nutanix@NTNX-7a8a9f4f-A-CVM:172.16.0.25:~$
nutanix@NTNX-7a8a9f4f-A-CVM:172.16.0.25:~$
nutanix@NTNX-7a8a9f4f-A-CVM:172.16.0.25:~$ ncli cluster info

    Cluster Id                : 00059a3d-a61c-e429-4b6e-005056977bc2::5435282145332919234
    Cluster Uuid              : 00059a3d-a61c-e429-4b6e-005056977bc2
    Cluster Name              : NUTANIX-CE-DR
    Cluster Version           : 2019.11.22
    Cluster Full Version      : el7.3-release-ce-2019.11.22-stable-71e4b09532462bda07317f35f148aed9fbdc74b0
    External IP address       : 172.16.0.35
    Node Count                : 1
    Block Count               : 1
    Shadow Clones Status      : Enabled
    Has Self Encrypting Disk  : no
    Cluster Masquerading I... :
    Cluster Masquerading PORT :
    Is registered to PC       : false
    Is LTS                    : false
    External Data Services... : 172.16.0.36 # <--------コレ!
    Support Verbosity Level   : BASIC_COREDUMP
    Lock Down Status          : Disabled
    Password Remote Login ... : Enabled
    Timezone                  : UTC
    On-Disk Dedup             : Disabled
    NCC Version               : ncc-3.9.0
    Common Criteria Mode      : Disabled
    Degraded Node Monitoring  : Enabled
nutanix@NTNX-7a8a9f4f-A-CVM:172.16.0.25:~$
nutanix@NTNX-7a8a9f4f-A-CVM:172.16.0.25:~$
次にstorageContainerの情報を取得するため、続いて以下のコマンドを実行します。少し表示が長いですが、今回はdefault~と出ているstorageContainerを利用します。早いストレージを提供するNutanix CEクラスター側では、このDefaut~は削除して、分かりやすい名前のもので作り直していますが、遅いストレージ用のNutanix CEクラスターでは、違いが分かりやすいよう敢えてstorageContainerを作り直さずに、デフォルトのものをそのまま利用します。
nutanix@NTNX-7a8a9f4f-A-CVM:172.16.0.25:~$
nutanix@NTNX-7a8a9f4f-A-CVM:172.16.0.25:~$
nutanix@NTNX-7a8a9f4f-A-CVM:172.16.0.25:~$ ncli storage-container list

    Id                        : 00059a3d-a61c-e429-4b6e-005056977bc2::4
    Uuid                      : 0848e9e0-172b-4baf-baf2-04d68655e59f
    Name                      : default-container-85530000160199 # <--------コレ!
    Storage Pool Id           : 00059a3d-a61c-e429-4b6e-005056977bc2::3
    Storage Pool Uuid         : 10b38ce6-173b-4c3c-aa0c-66b879a317c4
    Free Space (Logical)      : 435.16 GiB (467,254,463,660 bytes)
    Used Space (Logical)      : 0 bytes
    Allowed Max Capacity      : 435.16 GiB (467,254,463,660 bytes)
    Used by other Containers  : 29.27 MiB (30,695,424 bytes)
    Explicit Reservation      : 0 bytes
    Thick Provisioned         : 0 bytes
    Replication Factor        : 1
    Oplog Replication Factor  : 1
    NFS Whitelist Inherited   : true
    Container NFS Whitelist   :
    VStore Name(s)            : default-container-85530000160199
    Random I/O Pri Order      : SSD-PCIe, SSD-SATA, DAS-SATA
    Sequential I/O Pri Order  : SSD-PCIe, SSD-SATA, DAS-SATA
    Compression               : off
    Fingerprint On Write      : off
    On-Disk Dedup             : off
    Erasure Code              : off
    Software Encryption       : off

    Id                        : 00059a3d-a61c-e429-4b6e-005056977bc2::5
    Uuid                      : 779c3d74-e178-4f23-bda0-414aaed88cb8
<------------------------------ 中 略 ----------------------------------->
    Erasure Code              : off
    Software Encryption       : off
nutanix@NTNX-7a8a9f4f-A-CVM:172.16.0.25:~$
nutanix@NTNX-7a8a9f4f-A-CVM:172.16.0.25:~$
これで、必要な情報はすべて確認できたので、sc.yamlを編集すると以下のようになります。slow-block用のSecretsはntnx-secret-slowとなっているため、以下のようにManifestファイルを変更します。また、同様にdataServiceEndPointは今回の環境に合わせて、172.16.0.36:3260とし、storageContainerはdefault-container-85530000160199とします。さらにもう1つ早いストレージ用のStorageClassとの違いを設定するため、reclaimPolicyをRetainとしています。
kind: StorageClass
apiVersion: storage.k8s.io/v1
metadata:
    name: fast-block #<--------変更1
provisioner: com.nutanix.csi
parameters:
    csi.storage.k8s.io/provisioner-secret-name: ntnx-secret-slow #<--------変更2
    csi.storage.k8s.io/provisioner-secret-namespace: kube-system
    csi.storage.k8s.io/node-publish-secret-name: ntnx-secret-slow #<--------変更3
    csi.storage.k8s.io/node-publish-secret-namespace: kube-system
    csi.storage.k8s.io/controller-expand-secret-name: ntnx-secret-slow #<--------変更4
    csi.storage.k8s.io/controller-expand-secret-namespace: kube-system
    csi.storage.k8s.io/fstype: ext4
    dataServiceEndPoint: 172.16.0.36:3260 #<--------変更5
    storageContainer: default-container-85530000160199 #<--------変更6
    storageType: NutanixVolumes
allowVolumeExpansion: true
# reclaimPolicy: Delete
reclaimPolicy: Retain #<--------変更7
StorageClassの適用とPersistentVolumesClaimによるサンプルPersistentVolumesの作成
これでStorageClassの設定が可能になりましたので、以下のコマンドを実行してStorageClassを定義します。今回は、敢えて2つのStorageClassを利用していますが、単一のStorageClassで試したい場合は、exampleに入っているsc.yamlの中のdataServiceEndPointとstorageContainerのみの変更で問題ありません。
[root@localhost deploy-test]#
[root@localhost deploy-test]#
[root@localhost deploy-test]# kubectl create -f 06_sc-fast.yaml
storageclass.storage.k8s.io/fast-block created
[root@localhost deploy-test]#
[root@localhost deploy-test]#
[root@localhost deploy-test]# kubectl create -f 06_sc-slow.yaml
storageclass.storage.k8s.io/slow-block created
[root@localhost deploy-test]#
[root@localhost deploy-test]#
[root@localhost deploy-test]# kubectl get sc
NAME         PROVISIONER       RECLAIMPOLICY   VOLUMEBINDINGMODE   ALLOWVOLUMEEXPANSION   AGE
fast-block   com.nutanix.csi   Delete          Immediate           true                   16s
slow-block   com.nutanix.csi   Retain          Immediate           true                   7s
[root@localhost deploy-test]#
[root@localhost deploy-test]#
続いてPersistentVolumeClaimを使ってブロックストレージの動的プロビジョニングが正常に動作するかを確認してみます。ここでも、exampleに入っていたサンプルのPersistentVolumeClaimのManifestファイルを元に、早いストレージ用途として設定したStorageClassのfast-blokcと早いストレージ用途として設定したStorageClassのslow-blokc、それぞれのPersistentVolumeClaimを設定し適用していきます。
exampleに入っていたPersistentVolumeClaimのサンプルManifestファイルは以下のようになっています。
kind: PersistentVolumeClaim
apiVersion: v1
metadata:
   name: claim1
spec:
   accessModes:
      - ReadWriteOnce
   resources:
      requests:
         storage: 3Gi
   storageClassName: acs-abs
これを早いストレージ用途と遅いストレージ用途のStorageClassに合わせて以下のように修正します。早いストレージ用途のStorageClassを利用するPersistentVolumeClaimは、後でPrismからNutanixのVolumesの画面を見た際に分かりやすいように敢えて動的プロビジョニングで要求するPersistentVolumeの容量を変更しています。
また、PersistentVolumeClaim名についても、分かりやすいようにそれぞれpv-claim-fastとpv-claim-slowに変更しています。元々のファイルではclaim1になっているハズなので、1つのStorageClassと単一のNutanix CEクラスターで単純に試す場合には、特に変更する必要はありません。
kind: PersistentVolumeClaim
apiVersion: v1
metadata:
   name: pv-claim-fast #<--------変更1
spec:
   accessModes:
      - ReadWriteOnce
   resources:
      requests:
         storage: 5Gi #<--------変更2
   storageClassName: fast-block #<--------変更3
kind: PersistentVolumeClaim
apiVersion: v1
metadata:
   name: pv-claim-slow #<--------変更1
spec:
   accessModes:
      - ReadWriteOnce
   resources:
      requests:
         storage: 3Gi
   storageClassName: slow-block #<--------変更2
こちらの修正が完了したら、PersistentVolumeClaimを適用していきます。以下のようにコマンドを実行し、適用が行われたら、念のためkubectl getなどで正しくPersistentVolumeが割り当てられたかを確認します。
[root@localhost deploy-test]#
[root@localhost deploy-test]#
[root@localhost deploy-test]# kubectl get pvc,pv
No resources found in default namespace.
[root@localhost deploy-test]#
[root@localhost deploy-test]#
[root@localhost deploy-test]# kubectl create -f ./07_pv-claim-fast.yaml
persistentvolumeclaim/pv-claim-fast created
[root@localhost deploy-test]#
[root@localhost deploy-test]#
[root@localhost deploy-test]# kubectl create -f ./07_pv-claim-slow.yaml
persistentvolumeclaim/pv-claim-slow created
[root@localhost deploy-test]#
[root@localhost deploy-test]#
[root@localhost deploy-test]# kubectl get pvc,pv
NAME                                  STATUS   VOLUME                                     CAPACITY   ACCESS MODES   STORAGECLASS   AGE
persistentvolumeclaim/pv-claim-fast   Bound    pvc-af8691e5-d989-4839-b2ff-f87e0a26a1e0   5Gi        RWO            fast-block     14s
persistentvolumeclaim/pv-claim-slow   Bound    pvc-081b8992-7913-4a95-bdb9-82bee29f4adc   3Gi        RWO            slow-block     9s

NAME                                                        CAPACITY   ACCESS MODES   RECLAIM POLICY   STATUS   CLAIM                   STORAGECLASS   REASON   AGE
persistentvolume/pvc-081b8992-7913-4a95-bdb9-82bee29f4adc   3Gi        RWO            Retain           Bound    default/pv-claim-slow   slow-block              5s
persistentvolume/pvc-af8691e5-d989-4839-b2ff-f87e0a26a1e0   5Gi        RWO            Delete           Bound    default/pv-claim-fast   fast-block              10s
[root@localhost deploy-test]#
[root@localhost deploy-test]#
問題なくPersistentVolumeClaimの要求に従ってPersistentVolumeが作成されたようです。Prismのほうでもどのような様子か見ていきます。
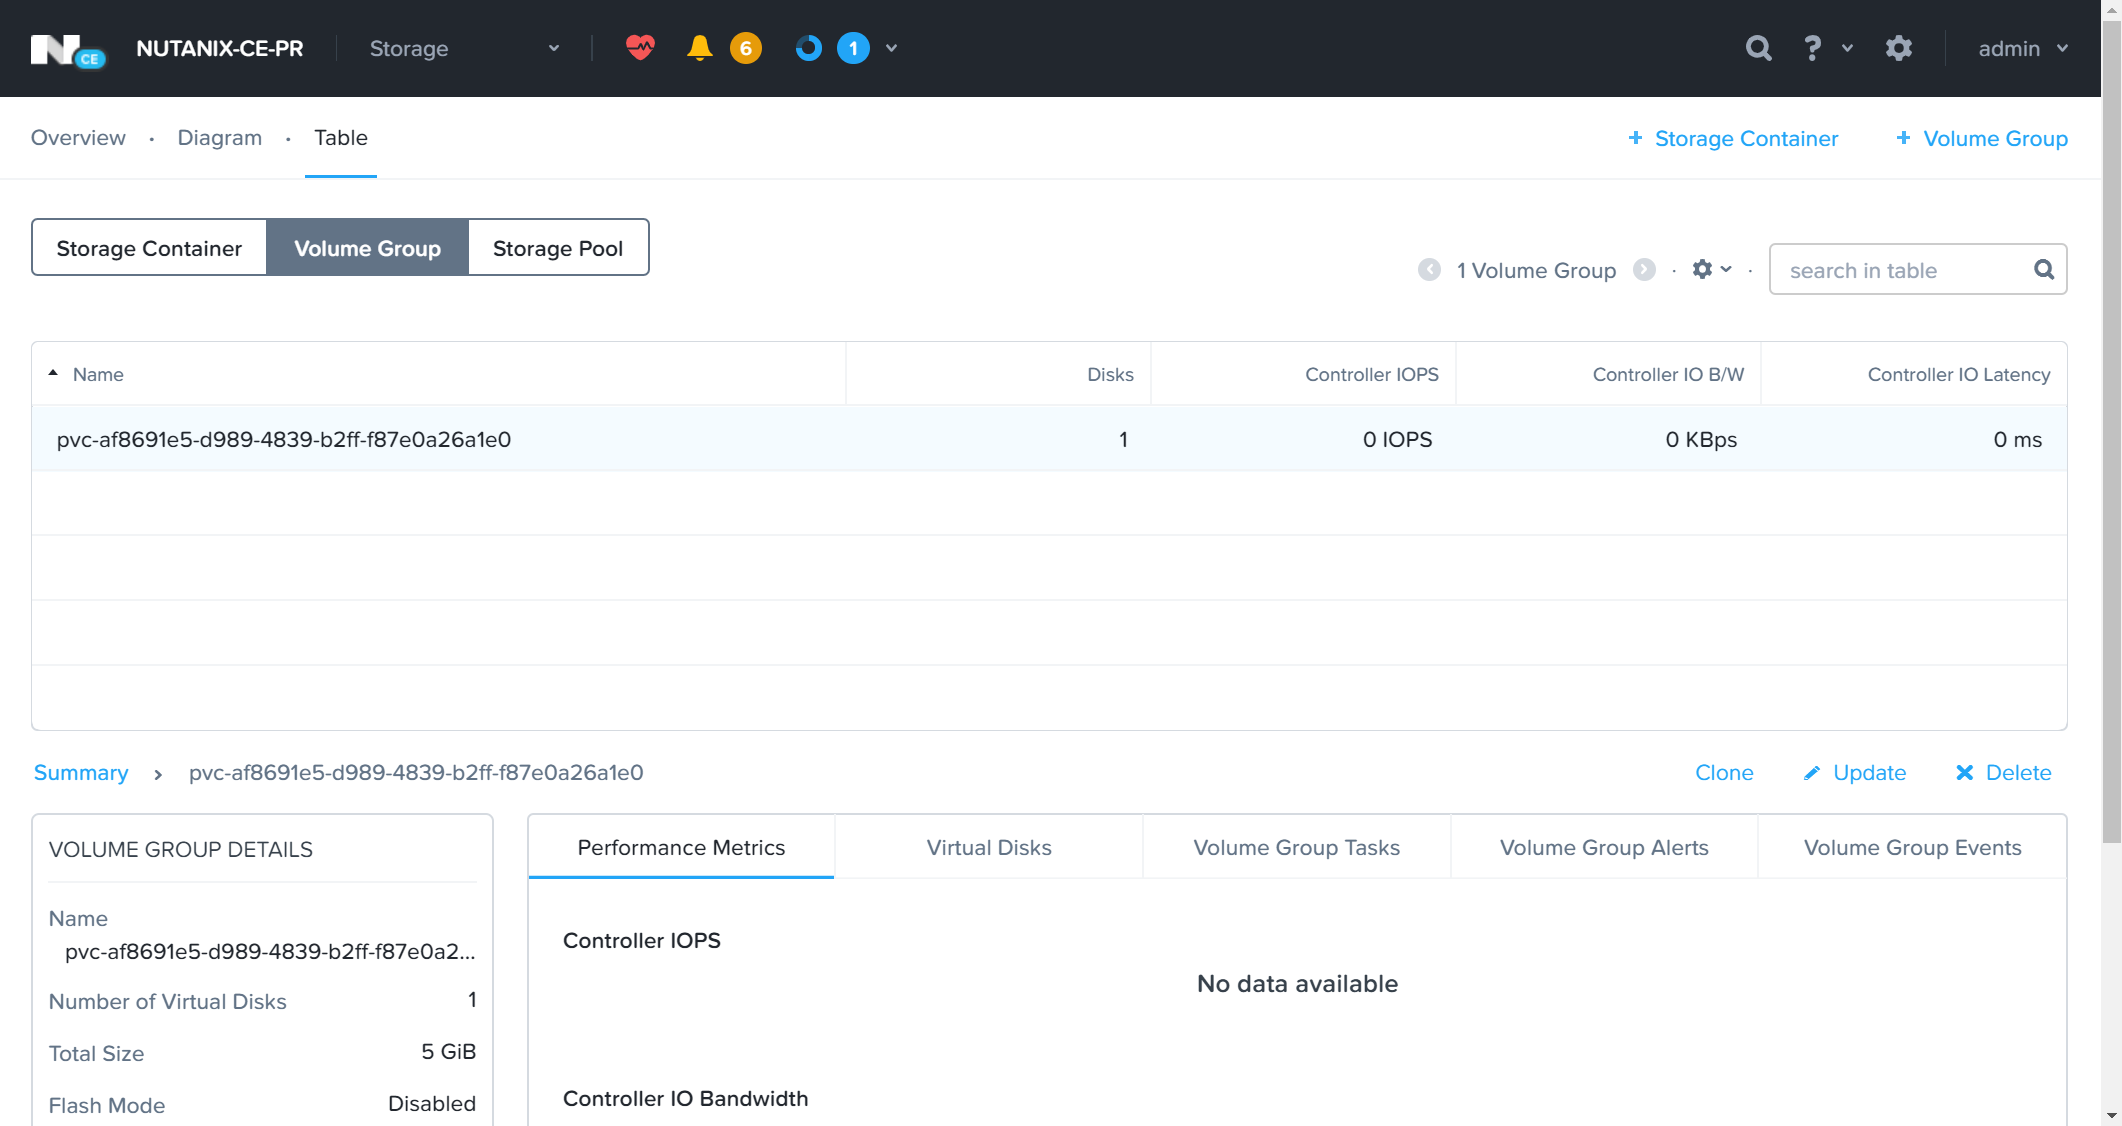
まずは、早いストレージ用のStorageClassで利用する設定を行ったPrimary扱いのNutanix CEクラスターのPrism(172.16.0.30)をWebブラウザで開いてログインし、StorageのダッシュボードからTableのVolume Groupを参照します。PersistentVolumeClaimの要求どおり、Nutanix上でも5GiBのストレージが作成されています。
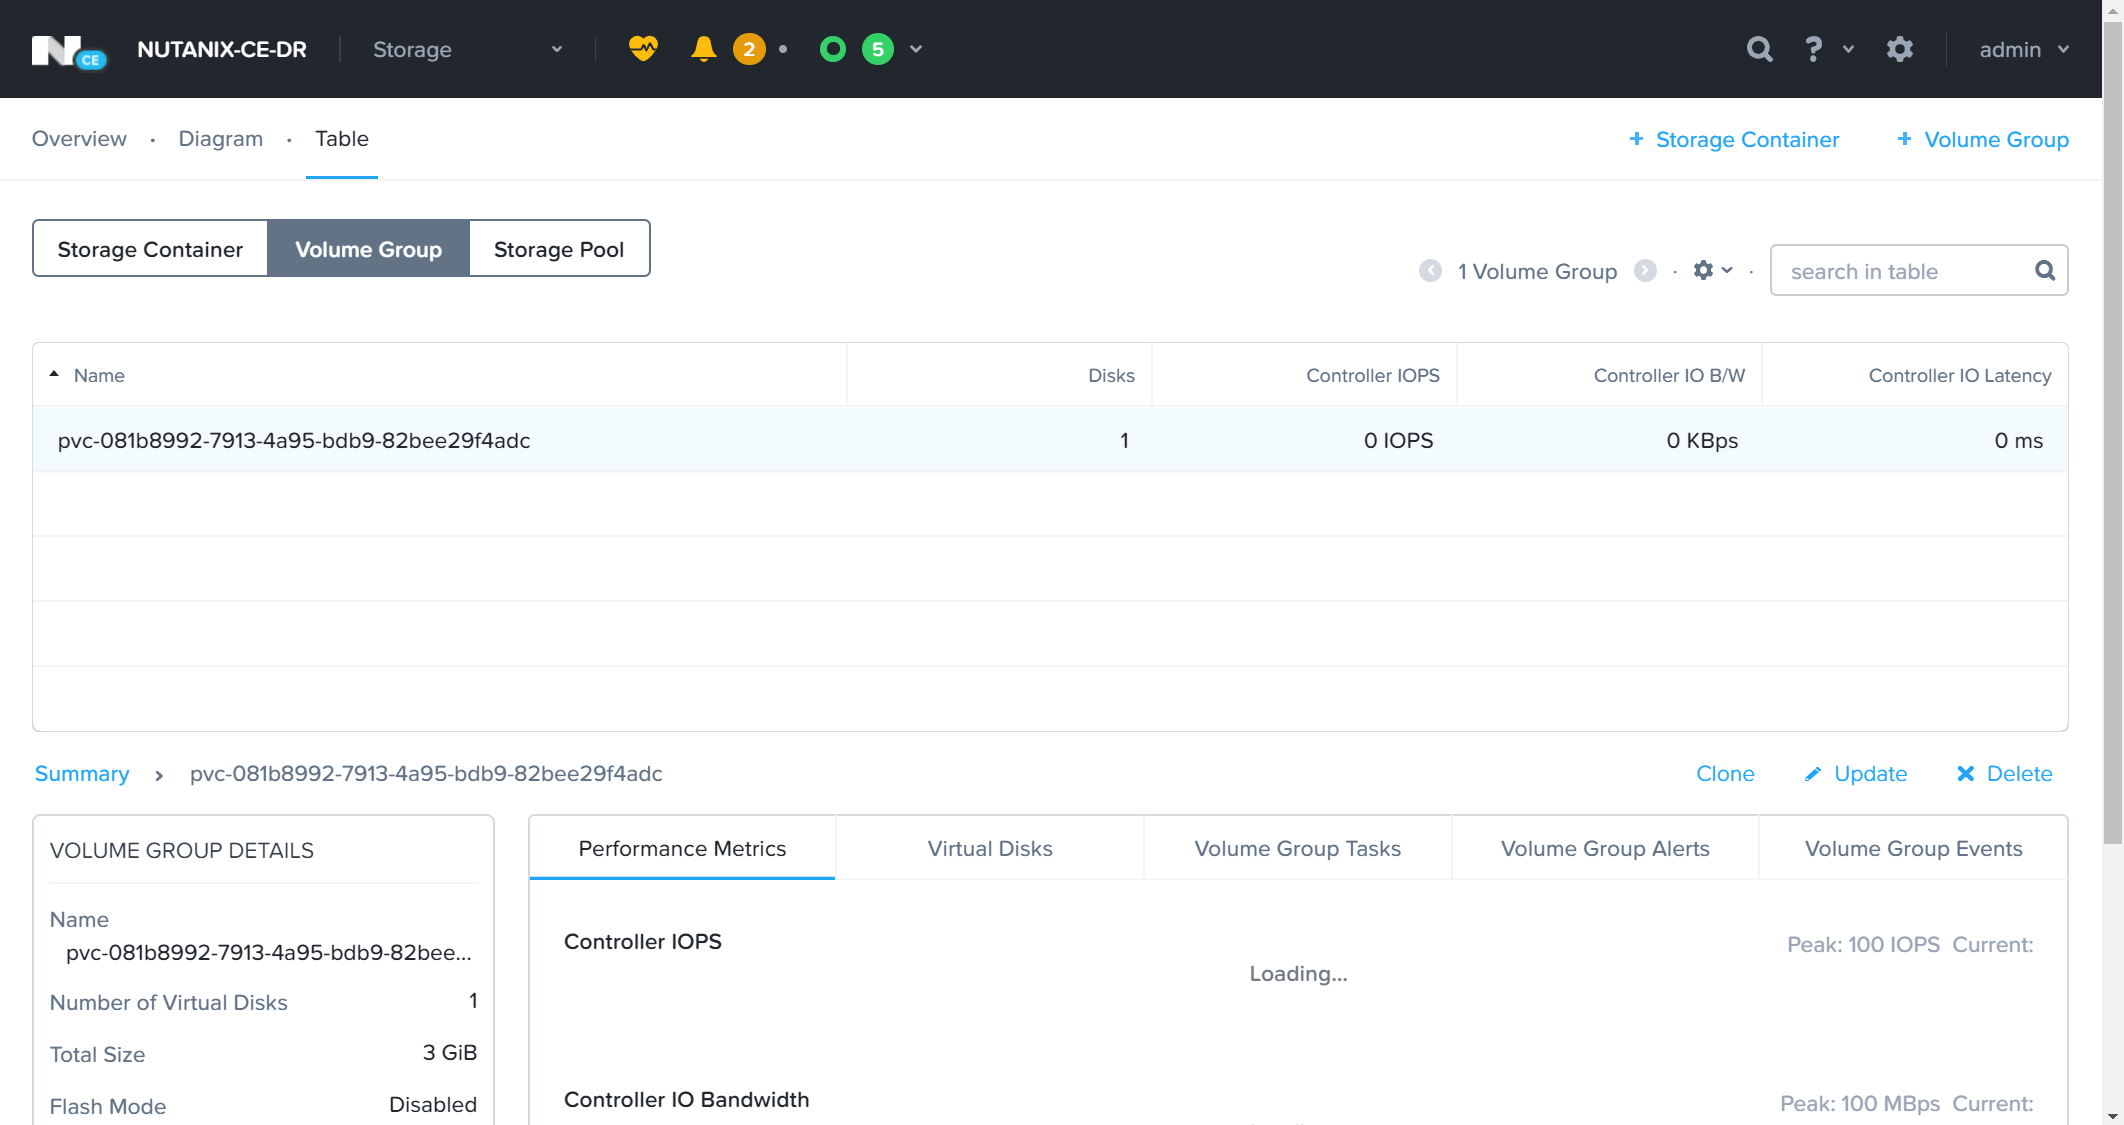
次に遅いストレージ用のStorageClassで利用する設定を行ったDR(Secondly)扱いのNutanix CEクラスターのPrism(172.16.0.35)をWebブラウザで開いてログインし、StorageのダッシュボードからTableのVolume Groupを参照します。PersistentVolumeClaimの要求どおり、Nutanix上でも3GiBのストレージが作成されています。
実際にアプリケーションから利用する場合は、deploymentなどのspec、containersのvolumesにclaimNameで先ほど作成したPersistentVolumeClaimのmetadataで設定した名前を指定することで利用が可能です。
PersistentVolumesClaimの削除とサンプルで作成したPersistentVolumesの削除
正しく、PersistentVolumesがPersistentVolumesClaimによって動的プロビジョニングされたのが確認できたので、最後にこのサンプルをいったん削除します。
kubectl deleteを実行した直後の様子です。persistentvolume/pvc-081b8992-7913-4a95-bdb9-82bee29f4adcが残ったままになっています。slow-block用のStorageClassの設定で行った、reclaimPolicyがRetainとなっているためで、期待したとおりの振る舞いになっています。
[root@localhost deploy-test]#
[root@localhost deploy-test]#
[root@localhost deploy-test]# kubectl delete -f ./07_pv-claim-fast.yaml
persistentvolumeclaim "pv-claim-fast" deleted
[root@localhost deploy-test]#
[root@localhost deploy-test]#
[root@localhost deploy-test]# kubectl delete -f ./07_pv-claim-slow.yaml
persistentvolumeclaim "pv-claim-slow" deleted
[root@localhost deploy-test]#
[root@localhost deploy-test]#
[root@localhost deploy-test]# kubectl get pvc,pv
NAME                                                        CAPACITY   ACCESS MODES   RECLAIM POLICY   STATUS     CLAIM                   STORAGECLASS   REASON   AGE
persistentvolume/pvc-081b8992-7913-4a95-bdb9-82bee29f4adc   3Gi        RWO            Retain           Released   default/pv-claim-slow   slow-block              17m
[root@localhost deploy-test]#
[root@localhost deploy-test]#
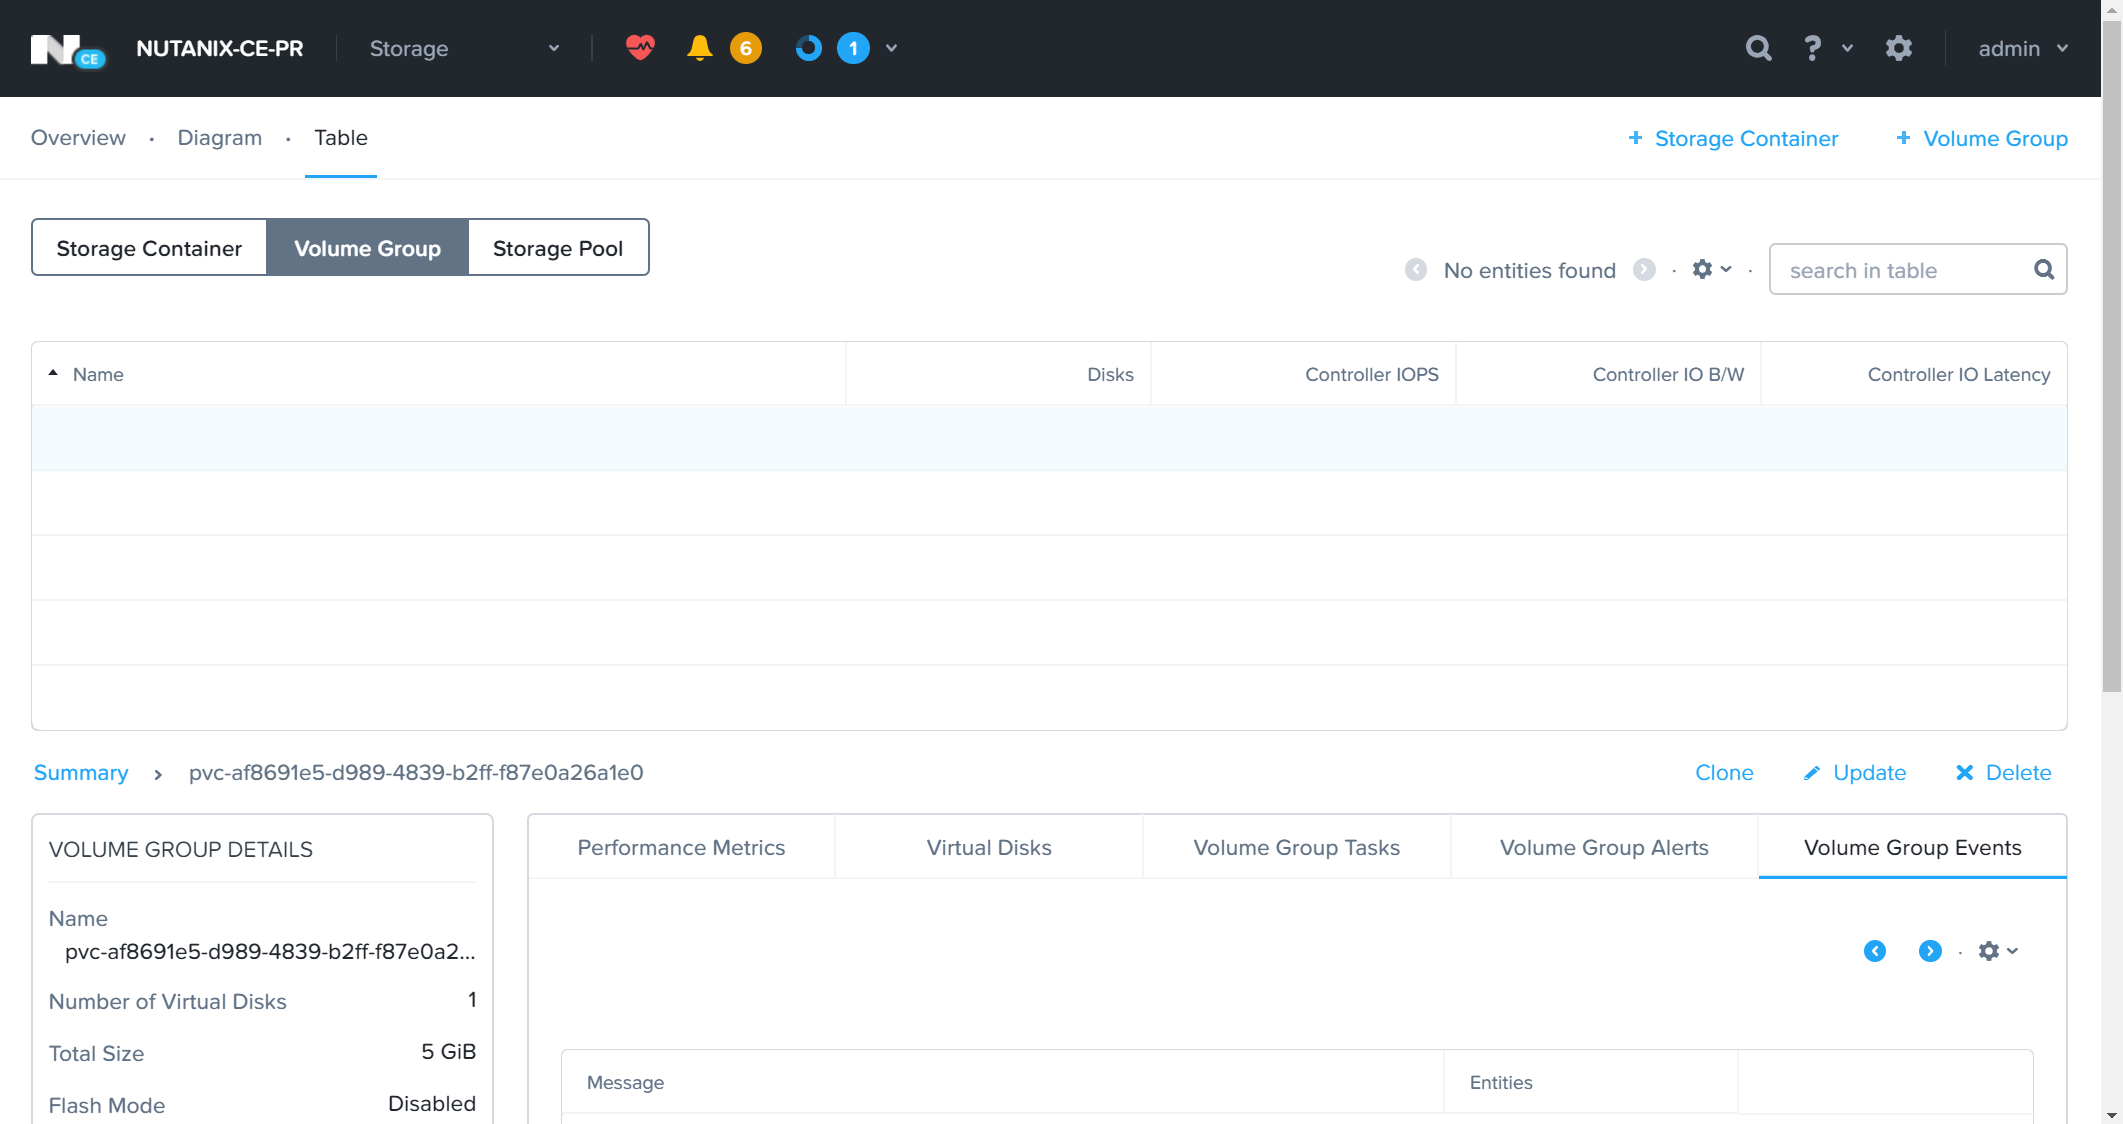
Nutanix側のPrismからも確認しておきます。まずは、早いストレージ用のStorageClassで利用する設定を行ったPrimary扱いのNutanix CEクラスターのPrism(172.16.0.30)をWebブラウザで開いてログインし、StorageのダッシュボードからTableのVolume Groupを参照します。
以下のように、NutanixのVolume Groupからは消えています。こちらのreclaimPolicyがDeleteとなっているためです。
一方で、reclaimPolicyがRetainとした遅いストレージ用のStorageClassで利用する設定を行ったDR(Secondly)扱いのNutanix CEクラスターのPrism(172.16.0.35)をWebブラウザで開いてログインし、StorageのダッシュボードからTableのVolume Groupを参照します。こちらはreclaimPolicyどおり、NutanixのVolume Group上で引き続きKubernetesに対して切り出されたストレージ領域が残ったままとなっています。
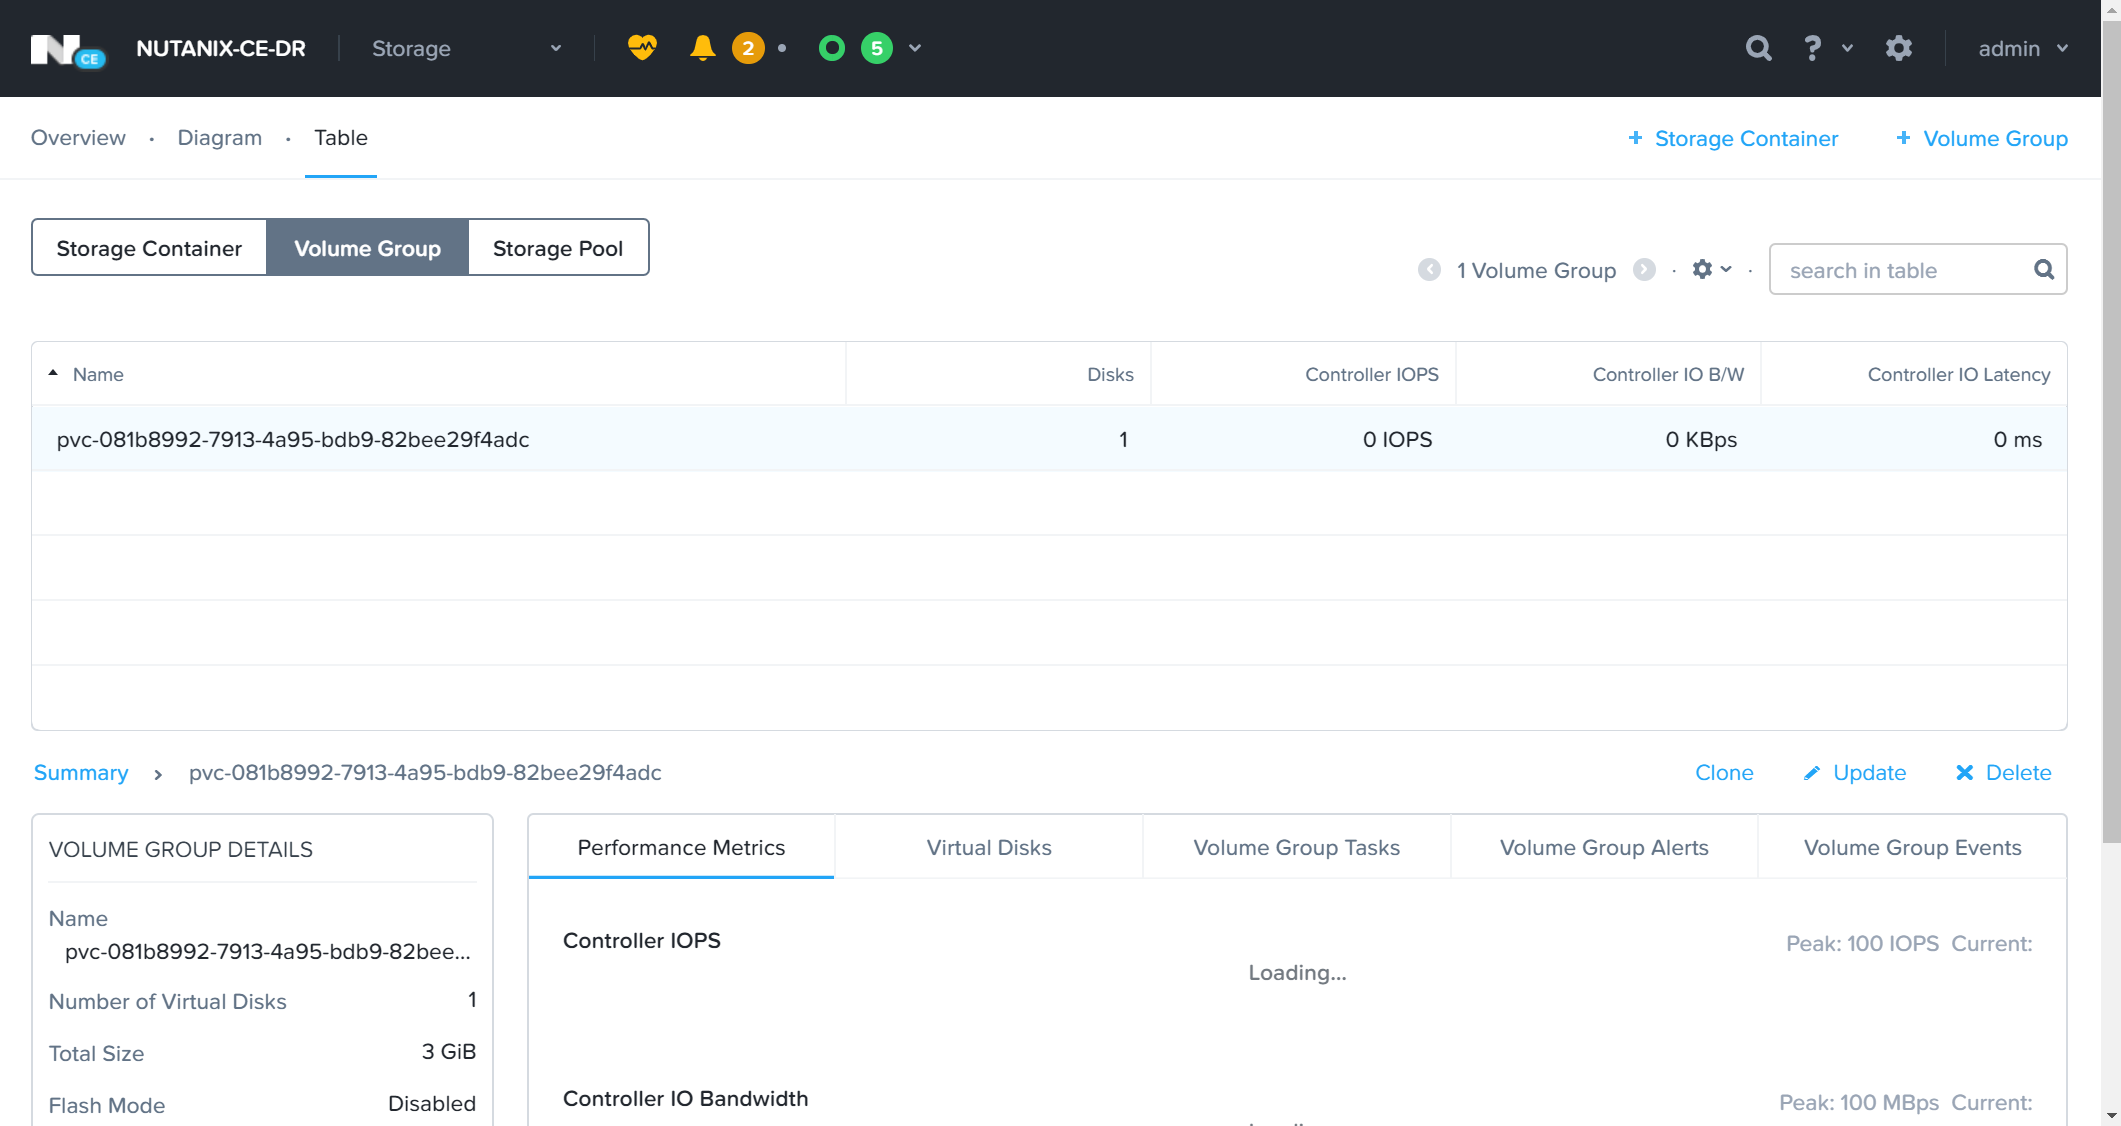
Kubernetes上に残っている、PersistentVolumesを削除します。これでKubernetesクラスター側からは登録されていたPersistentVolumesが消えました。
[root@localhost deploy-test]#
[root@localhost deploy-test]#
[root@localhost deploy-test]# kubectl get pvc,pv
NAME                                                        CAPACITY   ACCESS MODES   RECLAIM POLICY   STATUS     CLAIM                   STORAGECLASS   REASON   AGE
persistentvolume/pvc-081b8992-7913-4a95-bdb9-82bee29f4adc   3Gi        RWO            Retain           Released   default/pv-claim-slow   slow-block              25m
[root@localhost deploy-test]#
[root@localhost deploy-test]#
[root@localhost deploy-test]#
[root@localhost deploy-test]# kubectl delete persistentvolume pvc-081b8992-7913-4a95-bdb9-82bee29f4adc
persistentvolume "pvc-081b8992-7913-4a95-bdb9-82bee29f4adc" deleted
[root@localhost deploy-test]#
[root@localhost deploy-test]#
[root@localhost deploy-test]# kubectl get pvc,pv
No resources found in default namespace.
[root@localhost deploy-test]#
[root@localhost deploy-test]#
なぜ「Kubernetesクラスター側からは」と強調したかは、あくまでPersistentVolumesはKubernetesクラスターに利用できるストレージの領域を登録することが役割であるため、ストレージ側、つまり今回で言うところのNutanix CEのVolume Groupの状態を気にはしません(そこを便利によしなにするためのCSI Pluginですが、今回はreclaimPolicyに従って、何もしていません)。
そもそもreclaimPolicyがRetainと言うことは、再度、そのストレージ領域を利用する可能性があると言った場合やストレージの状態を何かのために保存しておくことが目的のポリシーで、Kubernetes上でのPersistentVolumesとしての登録が消えた場合でも、ストレージ側には残しておく必要があるためです。
そのため、reclaimPolicyがRetainで作成したPersistentVolumesは、PersistentVolumesの動的なプロビジョニング要求を行うPersistentVolumesClaimを削除したとしても、reclaimPolicyによってKubernetes上に登録されたPersistentVolumesが残り続け=Nutanix CE側にあるVolume Groupも残ったままとなります。
実際に、先ほどのコマンドの実行のとおり、Kubernetes上でPersistentVolumesを削除した後でも、reclaimPolicyがRetainとした遅いストレージ用のStorageClassで利用する設定を行ったDR(Secondly)扱いのNutanix CEクラスターのPrism(172.16.0.35)をWebブラウザで開いてログインし、StorageのダッシュボードからTableのVolume Groupを参照すると、以下のようにVolume Groupが残ったままとなっています。
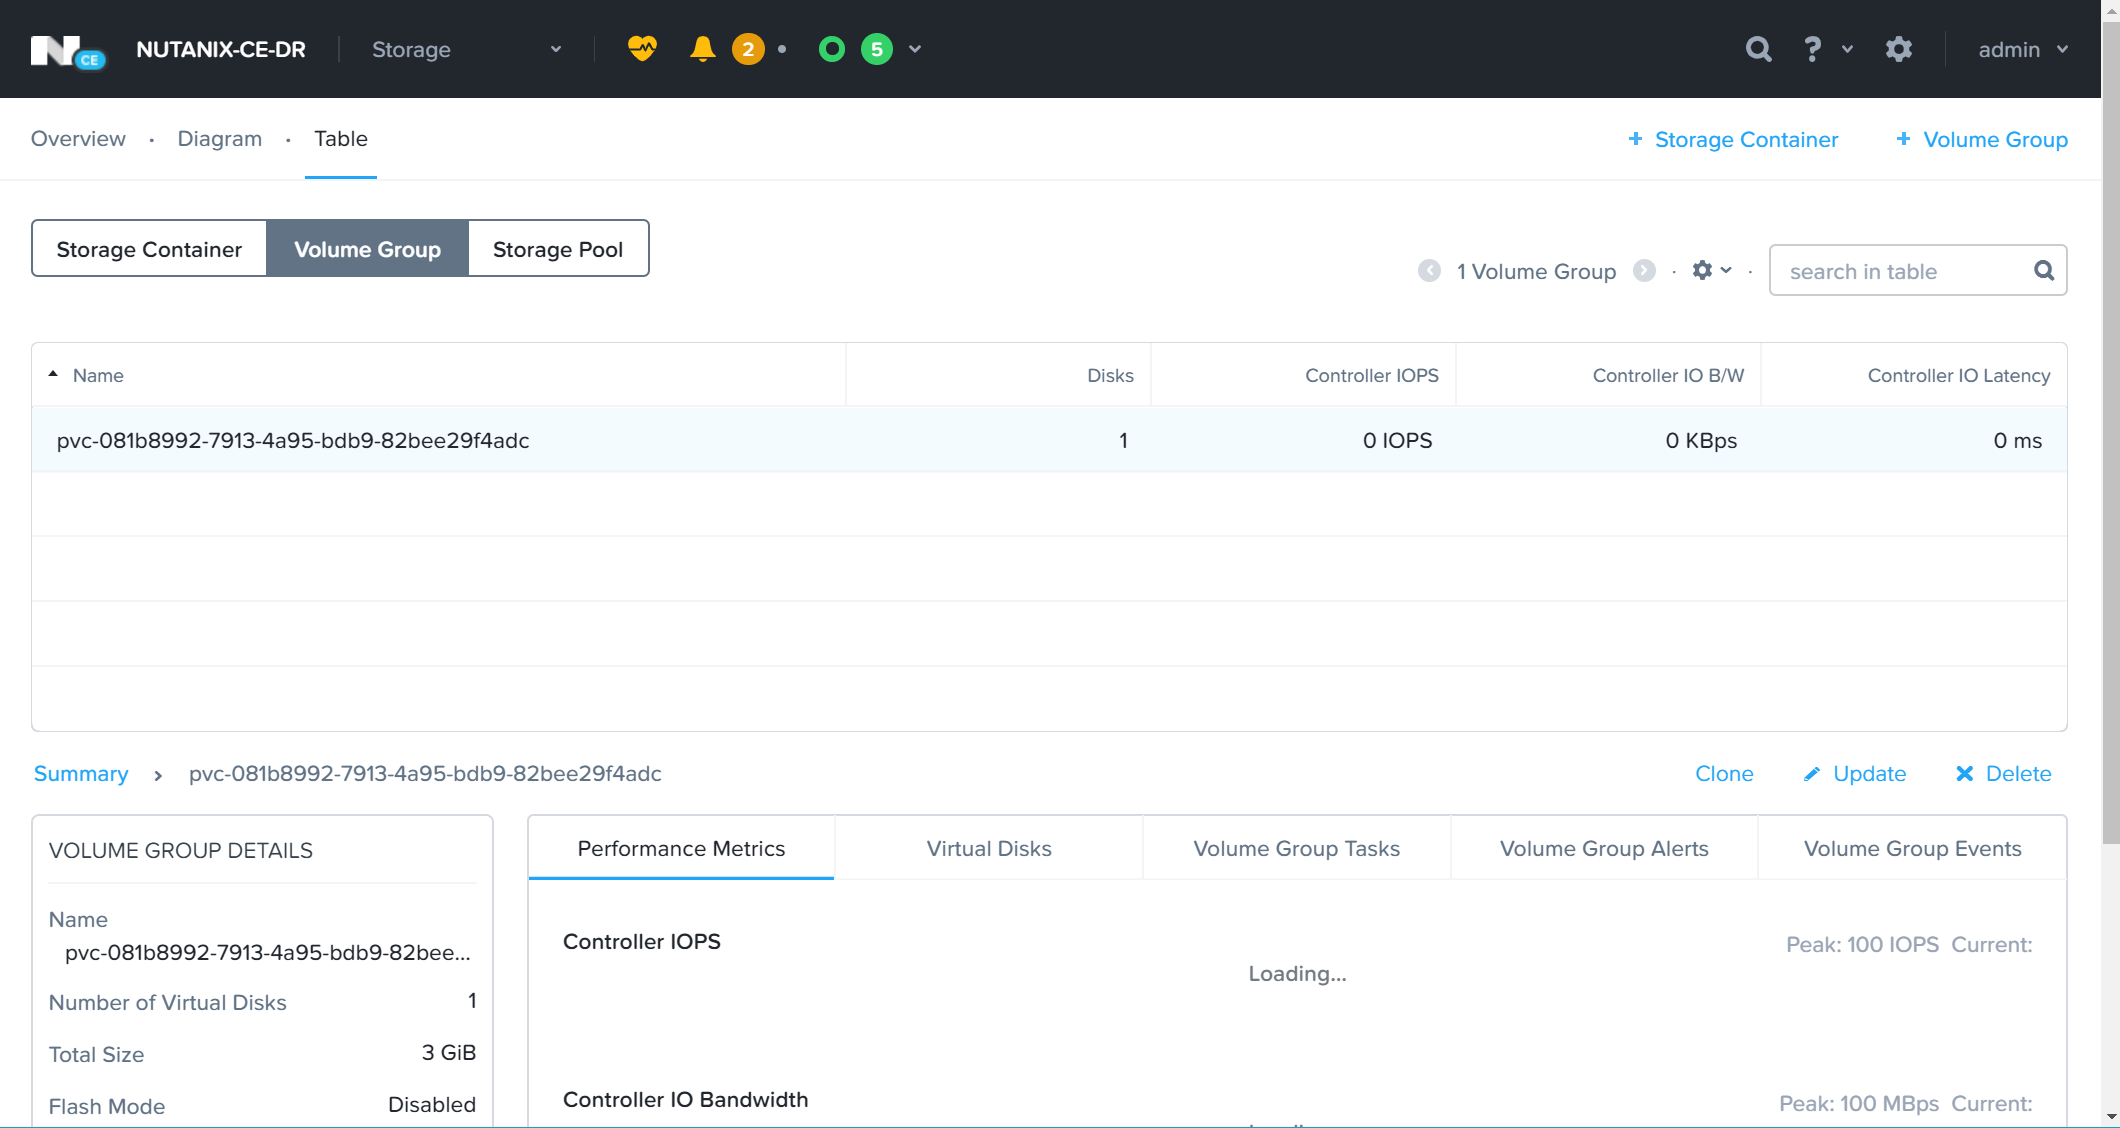
reclaimPolicyがRetainで利用したストレージを削除する場合は、前述のとおりPersistentVolumesを個別に削除してもKubernetesに登録された利用可能だったストレージの情報が抹消されただけとなり、ストレージを提供する側で個別に削除をする必要があります。
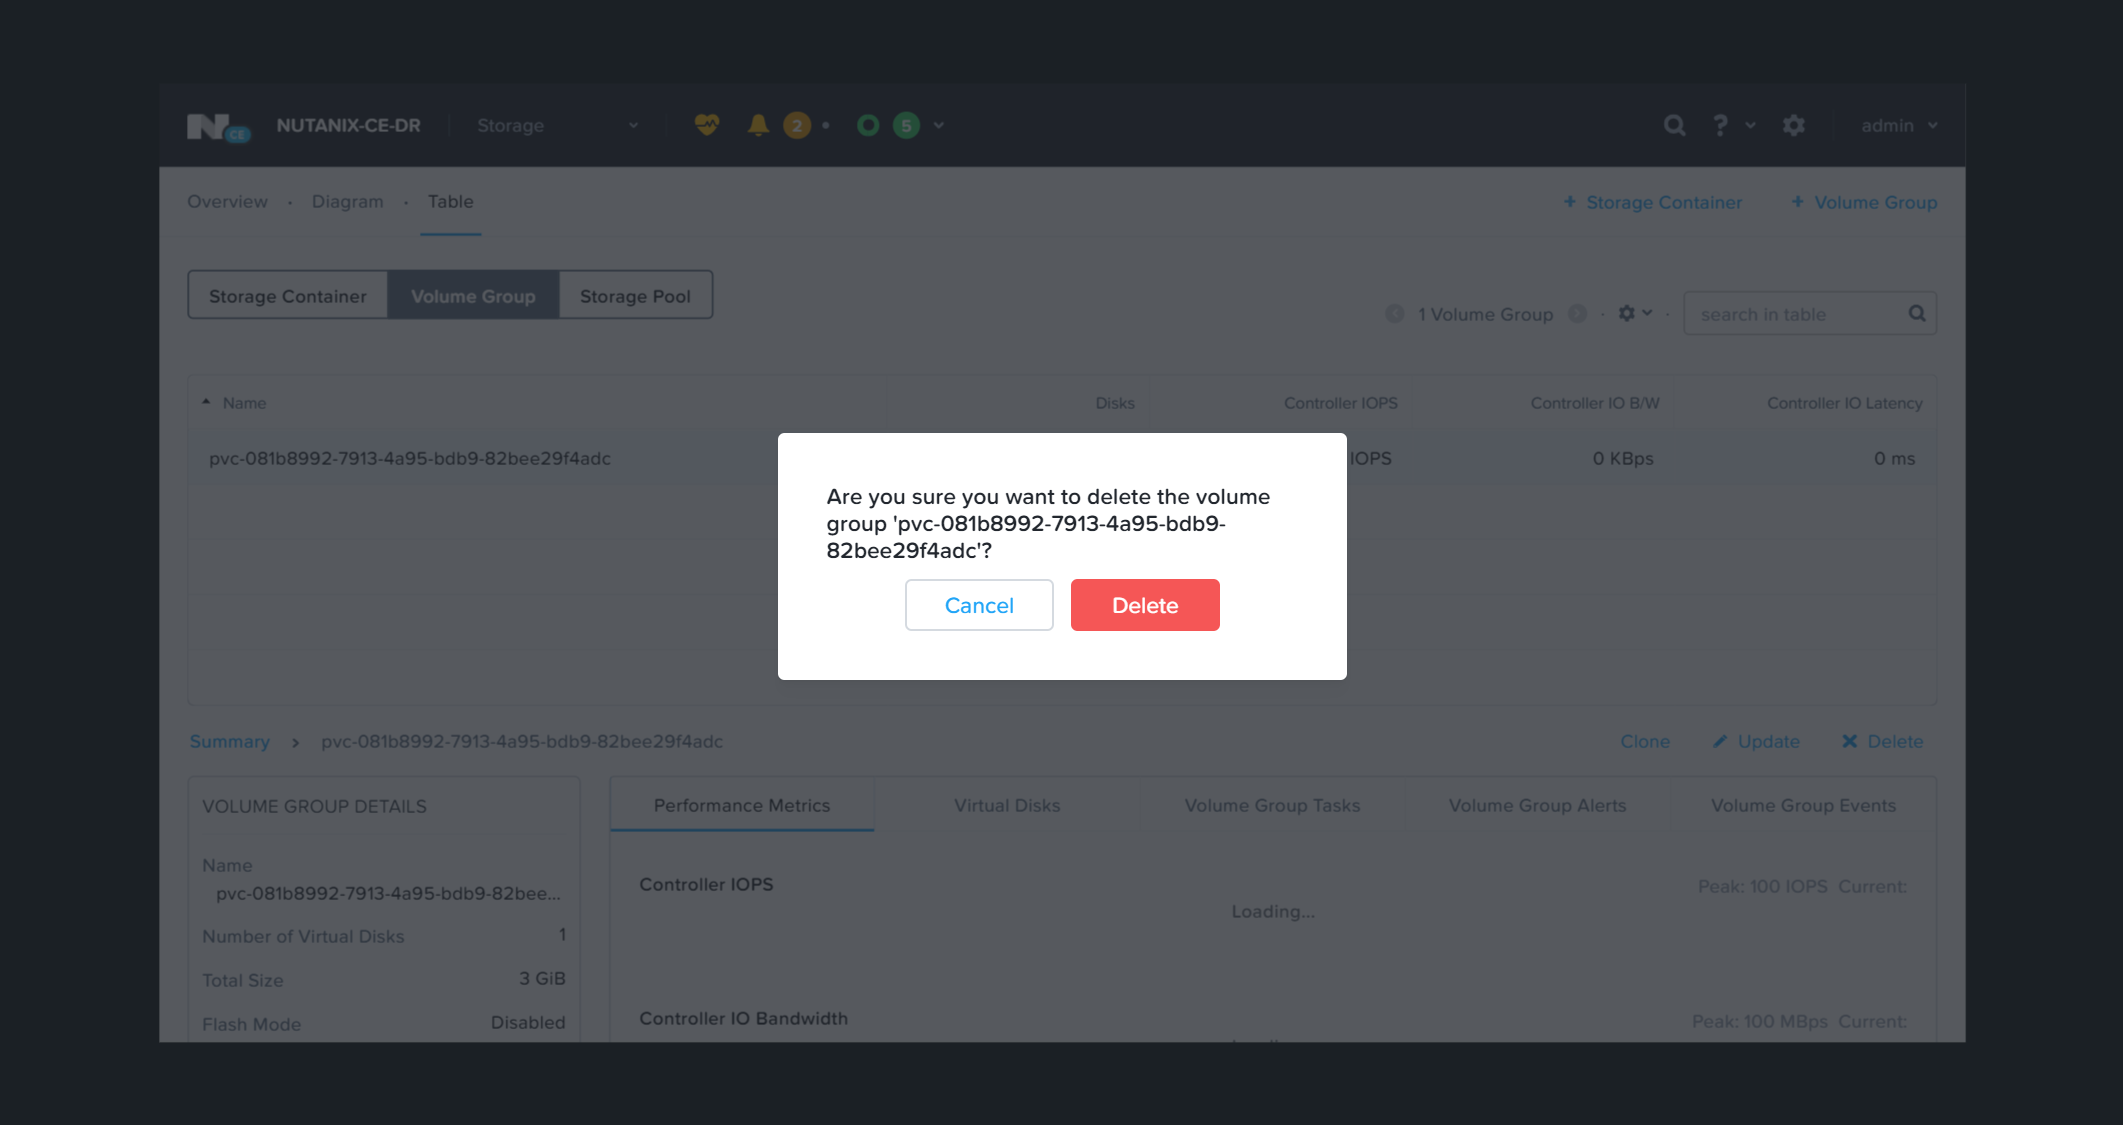
Prismから残ったままのVolume Groupを削除します。一覧から、対象のVolume Groupを選択して、リストの右下のにあるメニューから「Delete」を選択し削除します。
なお、reclaimPolicyがDeleteとなっている場合には、PersistentVolumesの動的なプロビジョニング要求を行うPersistentVolumesClaimを削除した時点で、reclaimPolicyに従ってKubernetes上に登録されたPersistentVolumesもreclaimPolicyがDeleteであることから、Nutanix CE側にあるVolume Groupも自動的に削除しても良いとの判断で自動で削除されます。
まとめ
今回は、敢えて2つのStorageClassを用意して動作を紹介したため、少し長々と解説を含めて書きましたが、CSI Volume Pluginの動作を試すだけであれば、実質的にこのNutanixのCSI Volume PluginはSecretsとStorageClassのManifestファイルをそれぞれ1、2箇所設定するだけで簡単に利用可能です。
- Secrets: NutanixのPrism IPとCredentialを指定
- StorageClass: Nutanix側のiSCSI Data Service IPとStorageContainer名の指定
今回はNutanix Community Edition環境で試しましたが、勿論、商用のNutanixのストレージ領域をCSI Volume Pluginを使って外部のKubernetesからでも利用することが可能です。今回のNutanix Community Edition環境では、残念ながらNutanixは、クラスターを構成する物理ストレージデバイスをPCIパススルーで掴んでいないためオーバーヘッドが出てしまいます2が、商用のNutanixの場合は、Nutanixのクラスターを構成する物理ストレージデバイスをPCIパススルーで掴んでいるため、非常に高速なBandwidthと高いIOPSが出ます。
オンプレミスのKubernetesでは逃げられないストレージの永続化を実現するための物理を含む低いレイヤーの管理が悩ましいケースにおいて、従来のインフラストラクチャーにおけるストレージ管理の複雑さや煩雑さを解消できるNutanixの効果がそのまま、このKubernetes環境の悩ましいストレージ問題も解消してくれます。
ひとまずは、誰でも触れる無償のNutanix Community EditionとCSI Volume Pluginで、KarbonではないオンプレミスのKubernetes環境のPersistentVolumesが手軽に実現できることを試してみて下さい。
明日(今日)は23日目、@yuichi110 さんの投稿になります。この記事の続きとして、なるべく時間を空けないうちに、NutanixのFilesのファイルストレージを利用したPersistent Volumesについても紹介したいと思います。
